UCS IPv6管理配置示例
目錄
簡介
本文檔介紹如何使用IPv6地址配置思科統一計算系統(UCS)管理終端。
必要條件
需求
思科建議您瞭解以下主題:
- Cisco UCS Manager(UCSM)
- 思科整合式管理控制器(CIMC)
- 熟悉IPv6
採用元件
本文中的資訊係根據以下軟體和硬體版本:
- Cisco UCS B系列
- Cisco UCSM版本2.2(3a)
- Cisco UCS M3系列刀鋒伺服器
本文中的資訊是根據特定實驗室環境內的裝置所建立。文中使用到的所有裝置皆從已清除(預設)的組態來啟動。如果您的網路正在作用,請確保您已瞭解任何指令可能造成的影響。
背景資訊
UCS上的IPv6管理支援是在UCS版本2.2中引入的。6100和6200系列交換矩陣互聯(FI)的IPv6地址除了其IPv4地址之外,都可以用作管理埠。除此之外,M3伺服器的CIMC地址可以具有IPv6地址。當您選擇帶內訪問方法時,此選項可用。
外部客戶端可以使用IPv6來訪問UCS服務,例如:
- HTTP/HTTPS
- 安全殼層 (SSH)
- Telnet
- 簡易網路管理通訊協定(SNMP)
- 思科互動管理員(CIM)
- Web服務管理(WS-Management)
- 快閃記憶體策略伺服器
使用UCS作為客戶端,可以使用IPv6來訪問各種型別的服務,例如:
- 網路服務 — 網域名稱系統(DNS)、SNMP和網路時間通訊協定(NTP)
- 驗證服務 — 輕量型目錄存取通訊協定(LDAP)、TACACS和RADIUS
- 檔案傳輸服務 — SSH、FTP、SSH檔案傳輸通訊協定(SFTP)和TFTP
- 其他服務 — Syslog、Callhome、網路檔案系統(NFS)客戶端和vCenter代理
設定
本節介紹如何使用IPv6地址配置Cisco UCSM終端
FI配置
在初始設定期間,您可以使用IPv4或IPv6地址配置管理介面。如果配置了IPv6地址,則必須在初始設定後通過UCSM CLI或GUI手動新增管理介面的IPv4地址。
此示例說明了在初始設定期間為管理埠配置IPv6地址所完成的步驟:
  Enter the configuration method. (console/gui) ? console
  Enter the setup mode; setup newly or restore from backup. (setup/restore) ? setup
  You have chosen to setup a new Fabric interconnect. Continue? (y/n): y
  Enforce strong password? (y/n) [y]: n
  Enter the password for "admin":
  Confirm the password for "admin":
  Is this Fabric interconnect part of a cluster(select 'no' for standalone)?
   (yes/no) [n]: n
  Fabric interconnect will be in stand alone mode
  Enter the system name:  ucs-ipv6
  Physical Switch Mgmt0 IP address : 2014::10:76:78:107
  Physical Switch Mgmt0 IPv6 prefix : 64
  IPv6 address of the default gateway : 2014::10:76:78:1
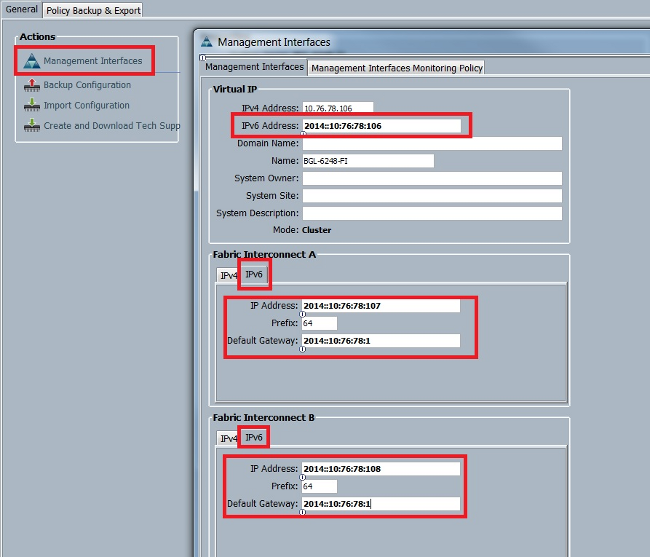
IPv6地址可以新增到僅具有IPv4地址的設定中,並且當前IPv6地址也可以更改。UCSM GUI和CLI均提供這些選項。
此示例顯示從UCSM GUI完成的步驟:

此示例顯示從UCSM CLI完成的步驟:
FI-A# scope fabric-interconnect a
FI-A /fabric-interconnect # scope ipv6-config
FI-A /fabric-interconnect/ipv6-config # set out-of-band ipv6 2014::10:76:78:107
FI-A /fabric-interconnect/ipv6-config* # set out-of-band ipv6-gw 2014::10:76:78:1
FI-A /fabric-interconnect/ipv6-config* # set out-of-band ipv6-prefix 64

FI-A* # scope fabric-interconnect b
FI-A /fabric-interconnect* # scope ipv6-config
FI-A /fabric-interconnect/ipv6-config* # set out-of-band ipv6 2014::10:76:78:108
FI-A /fabric-interconnect/ipv6-config* # set out-of-band ipv6-gw 2014::10:76:78:1
FI-A /fabric-interconnect/ipv6-config* # set out-of-band ipv6-prefix 64

FI-A* # scope system
FI-A /system* # set virtual-ip ipv6 2014::10:76:78:106

FI-A* # commit-buffer
通過IPv6訪問UCSM
您可以使用分配的IPv6地址訪問UCSM GUI和CLI:

使用IPv6的CIMC
本節介紹CIMC的帶內管理。
在UCS版本2.2之前,CIMC訪問通過UCS FI的帶外管理埠。在UCS 2.2版之前,CIMC可以有兩個不同的IP地址:
- 從Equipment(裝置)頁籤分配的IPv4地址 — 此地址會粘連到伺服器硬體本身,不會更改,無論服務配置檔案關聯如何。
- 從Servers頁籤分配的IPv4地址 — 此地址將貼上到服務配置檔案並隨服務配置檔案移動。
UCS版本2.2還啟用了M3伺服器的CIMC帶內訪問。IPv4和IPv6地址均可用於帶內訪問,因此CIMC與UCS版本2.2最多可以有六個不同的地址:
| 帶外 | 帶內 | |
| 裝置 | IPv4 | IPv4、IPv6 |
| 伺服器 | IPv4 | IPv4、IPv6 |
此示例說明通過UCSM GUI的Equipment頁籤為CIMC配置帶內IPv6地址所完成的步驟:
- 導覽至LAN > VLAN Groups,然後使用將用於帶內管理的VLAN清單建立VLAN組:

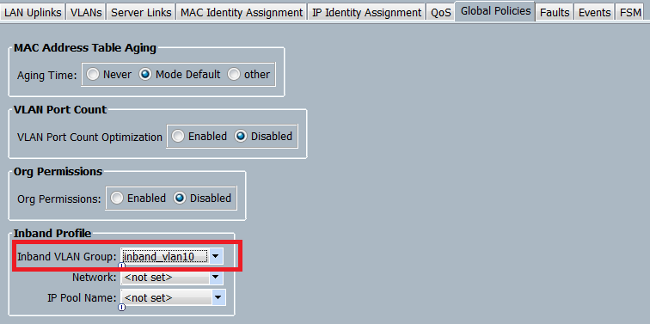
- 導覽至LAN > Global Policies > Inband Profile,然後選擇VLAN組以將其與Inband Profile關聯:

- 從Equipment頁籤導航到伺服器,按一下Inventory > CIMC > Change Inband Management IP,將組中的VLAN與CIMC相關聯,並分配IPv6地址:

- 從Network下拉選單中選擇VLAN,按一下Inband IPv6,然後分配IPv6地址。下一張圖顯示了靜態分配方法。

從Servers頁籤分配IPv6地址時,會使用相同的過程。下一個示例顯示了通過UCSM CLI從Equipment頁籤為CIMC配置帶內IPv6地址所完成的步驟:
FI-A# scope server 1/1
FI-A /chassis/server # scope cimc
FI-A /chassis/server/cimc # create mgmt-iface in-band
FI-A /chassis/server/cimc/mgmt-iface* # create mgmt-vlan
FI-A /chassis/server/cimc/mgmt-iface/mgmt-vlan* # set network-name VL10
FI-A /chassis/server/cimc/mgmt-iface/mgmt-vlan* # create ext-static-ip6
FI-A /chassis/server/cimc/mgmt-iface/mgmt-vlan/ext-static-ip6* # set addr
 2014::10:76:78:141
FI-A /chassis/server/cimc/mgmt-iface/mgmt-vlan/ext-static-ip6* # set prefix 64
FI-A /chassis/server/cimc/mgmt-iface/mgmt-vlan/ext-static-ip6* # set default-gw
 2014::10:76:78:1
FI-A /chassis/server/cimc/mgmt-iface/mgmt-vlan/ext-static-ip6* # commit-buffer
啟動KVM控制檯和其他服務
CIMC地址用於諸如鍵盤、影片和滑鼠(KVM)、vMedia、智慧平台管理介面(IPMI)和Serial over LAN(SoL)等服務。 這些服務可用於帶內和帶外地址。
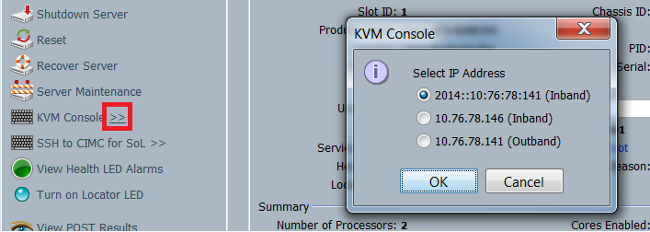
啟動KVM控制檯時,按一下KVM控制檯選項旁邊的>>符號以檢視可用於訪問KVM控制檯的各個地址:

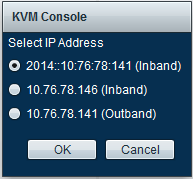
KVM啟動程式提供相同的選項:


分配給服務配置檔案的地址優先於通過「裝置」頁籤分配給伺服器硬體的地址。
IPv6地址是為KVM控制檯啟動選擇的預設地址,因此當您按一下KVM控制檯時,它使用此地址。如果該IPv6地址不可訪問,KVM啟動將失敗。如前所述,要選擇其他地址,請按一下KVM控制台選項旁邊的>>符號。
UCS版本2.2還引入了直接KVM訪問。但是,此功能僅適用於帶外管理。此處不能使用IPv6地址,因為帶外僅使用IPv4地址。
驗證
本節介紹如何驗證您的組態是否正常運作。
檢驗FI的IPv6地址分配
此示例說明如何從UCSM GUI驗證FI的IPv6地址分配:

此示例說明如何從UCSM CLI驗證FI的IPv6地址分配:
FI-A(local-mgmt)# show mgmt-ip-debug ifconfig

eth0      Link encap:Ethernet  HWaddr 54:7F:EE:65:81:A1
          inet addr:10.76.78.107  Bcast:10.76.78.255  Mask:255.255.255.0
          inet6 addr: 2014::10:76:78:106/64 Scope:Global
          inet6 addr: 2014::10:76:78:107/64 Scope:Global
          inet6 addr: fe80::567f:eeff:fe65:81a1/64 Scope:Link
          UP BROADCAST RUNNING MULTICAST  MTU:1500  Metric:1
          RX packets:24775380 errors:0 dropped:0 overruns:0 frame:0
          TX packets:14343153 errors:0 dropped:0 overruns:0 carrier:0
          collisions:0 txqueuelen:1000

FI-B(local-mgmt)# show mgmt-ip-debug ifconfig

eth0      Link encap:Ethernet  HWaddr 54:7F:EE:6F:71:81
          inet addr:10.76.78.108  Bcast:10.76.78.255  Mask:255.255.255.0
          inet6 addr: 2014::10:76:78:108/64 Scope:Global
          inet6 addr: fe80::567f:eeff:fe6f:7181/64 Scope:Link
          UP BROADCAST RUNNING MULTICAST  MTU:1500  Metric:1
          RX packets:18646548 errors:0 dropped:0 overruns:0 frame:0
          TX packets:238825 errors:0 dropped:0 overruns:0 carrier:0
          collisions:0 txqueuelen:1000
          RX bytes:3206162748 (2.9 GiB)  TX bytes:56366913 (53.7 MiB)
測試基本網路連線
此示例展示如何從UCSM CLI執行基本網路連線測試:
FI-A(local-mgmt)# ping6 2014::10:76:78:216
PING 2014::10:76:78:216(2014::10:76:78:216) from 2014::10:76:78:106 eth0:
 56 data bytes
64 bytes from 2014::10:76:78:216: icmp_seq=1 ttl=64 time=1.92 ms
64 bytes from 2014::10:76:78:216: icmp_seq=2 ttl=64 time=0.262 ms
64 bytes from 2014::10:76:78:216: icmp_seq=3 ttl=64 time=0.260 ms
64 bytes from 2014::10:76:78:216: icmp_seq=4 ttl=64 time=0.222 ms
64 bytes from 2014::10:76:78:216: icmp_seq=5 ttl=64 time=0.196 ms
64 bytes from 2014::10:76:78:216: icmp_seq=6 ttl=64 time=0.231 ms

FI-A(local-mgmt)# traceroute6 2014::10:76:78:216
traceroute to 2014::10:76:78:216 (2014::10:76:78:216) from
 2014::10:76:78:106, 30 hops max, 16 byte packets
 1  2014::10:76:78:216 (2014::10:76:78:216)  0.244 ms *  0.253 ms
檢驗CIMC的IPv6地址分配
此示例說明如何驗證從UCSM GUI分配給CIMC的IPv6地址:

此示例說明如何驗證從UCSM CLI分配給CIMC的IPv6地址:
FI-A# scope server 1/1
FI-A /chassis/server # scope cimc
FI-A /chassis/server/cimc # show mgmt-iface in-band detail expand

External Management Interface:
    Mode: In Band
    Ip V4 State: None
    Ip V6 State: Static
    Is Derived from Inband Profile: No

    External Management Virtual LAN:
        Network Name: VL10
        Id: 10

        External Management Static IPv6:
            IP Address: 2014::10:76:78:146
            Default Gateway: 2014::10:76:78:1
            Prefix: 64
            Primary DNS IP: ::
            Secondary DNS IP: ::
跟蹤刀鋒伺服器的CIMC帶內連線路徑
下一個示例顯示如何跟蹤刀鋒伺服器的CIMC帶內連線的路徑。CIMC帶內介面應對映到對應的IOM上的最後一個主機介面(HIF)埠。IO模組(IOM)是根據伺服器的管理例項選擇的。
在UCSM GUI中,導航至Equipment > Server > General > Connection Details:

您也可以通過UCSM CLI進行驗證:
FI-A# scope server 1/1
FI-A /chassis/server # show detail

Server:
    Slot: 1
    <snip>
    Conn Path: A,B
    Conn Status: A,B
    Managing Instance: A
如圖所示,Eth1/1/33被固定到上行鏈路埠Eth1/19,該埠用於帶內連線。
FI-A(nxos)# show fex 1 detail

  Fex Port        State  Fabric Port
         Eth1/1/1    Up     Eth1/17
         Eth1/1/2    Up     Eth1/17
         Eth1/1/3    Up     Eth1/17
         Eth1/1/4    Up     Eth1/17
         Eth1/1/5  Down        None
         Eth1/1/6  Down        None
         Eth1/1/7  Down        None
         Eth1/1/8  Down        None
         Eth1/1/9    Up     Eth1/19
        Eth1/1/10  Down        None
        Eth1/1/11  Down        None
        Eth1/1/12  Down        None
        Eth1/1/13    Up     Eth1/20
        Eth1/1/14  Down        None
        Eth1/1/15  Down        None
        Eth1/1/16  Down        None
        Eth1/1/17    Up     Eth1/17
        Eth1/1/18  Down        None
        Eth1/1/19  Down        None
        Eth1/1/20  Down        None
        Eth1/1/21    Up     Eth1/18
        Eth1/1/22    Up     Eth1/18
        Eth1/1/23    Up     Eth1/18
        Eth1/1/24    Up     Eth1/18
        Eth1/1/25  Down        None
        Eth1/1/26  Down        None
        Eth1/1/27  Down        None
        Eth1/1/28  Down        None
        Eth1/1/29  Down     Eth1/20
        Eth1/1/30  Down     Eth1/20
        Eth1/1/31  Down     Eth1/20
        Eth1/1/32  Down     Eth1/20
        Eth1/1/33    Up     Eth1/19
現在,運行配置會新增帶內VLAN,在本例中為VLAN 10。
FI-A(nxos)# show run int eth1/1/33

interface Ethernet1/1/33
  no pinning server sticky
  switchport mode trunk
  switchport trunk native vlan 4044
  switchport trunk allowed vlan 10,4044
  no shutdown

FI-A(nxos)# show mac address-table vlan 10
Legend:
        * - primary entry, G - Gateway MAC, (R) - Routed MAC, O - Overlay MAC
        age - seconds since last seen,+ - primary entry using vPC Peer-Link
   VLAN     MAC Address      Type      age     Secure NTFY   Ports/SWID.SSID.LID
---------+-----------------+--------+---------+------+----+------------------
* 10       e02f.6d9a.9e71    dynamic   0          F    F  Eth1/1/33
跟蹤機架式伺服器的CIMC帶內連線路徑
此示例說明如何跟蹤機架式伺服器的CIMC帶內連線路徑。CIMC介面應對映到韋瑟網路介面,該介面對映到伺服器所連線的交換矩陣擴展器(FEX)埠。如果伺服器在高可用性(HA)設定中連線到兩個不同的FEX模組,則必須檢查管理例項以確定路徑。
在UCSM GUI中,導航至Equipment > Rack-mounts > Server > General > Connection Details:

您也可以通過UCSM CLI進行驗證:
FI-A# scope server 1
FI-A /server # show detail

Server:
    Conn Path: A,B
    Conn Status: A,B
    Managing Instance: B
如圖所示,FEX上的Eth2/1/4連線到機架式伺服器。
FI-B(nxos)# show fex 2 detail
  Fex Port        State  Fabric Port
         Eth2/1/1  Down        None
         Eth2/1/2  Down        None
         Eth2/1/3  Down        None
         Eth2/1/4    Up      Po1154
         Eth2/1/5  Down        None
         Eth2/1/6  Down        None
         Eth2/1/7  Down        None
         Eth2/1/8  Down        None
         Eth2/1/9  Down        None
        Eth2/1/10  Down        None
        Eth2/1/11  Down        None
        Eth2/1/12  Down        None
        Eth2/1/13  Down        None
        Eth2/1/14  Down        None
        Eth2/1/15  Down        None
        Eth2/1/16  Down        None
        Eth2/1/17  Down        None
        Eth2/1/18  Down        None
        Eth2/1/19  Down        None
        Eth2/1/20  Down        None
        Eth2/1/21  Down        None
        Eth2/1/22  Down        None
        Eth2/1/23  Down        None
        Eth2/1/24  Down        None
        Eth2/1/25  Down        None
        Eth2/1/26  Down        None
        Eth2/1/27  Down        None
        Eth2/1/28  Down        None
        Eth2/1/29  Down        None
        Eth2/1/30  Down        None
        Eth2/1/31  Down        None
        Eth2/1/32  Down        None
這些Vethernet介面對映到Eth2/1/4:
FI-B(nxos)# show vifs interface ethernet 2/1/4

Interface      MAX-VIFS VIFS
-------------- -------- ------------------------------------
Eth2/1/4       60       Veth689, Veth32769,

FI-B(nxos)# show run int veth32769

interface Vethernet32769
  inherit port-profile ucsm_internal_rackserver_portprofile
  no pinning server sticky
  bind interface Ethernet2/1/4 channel 65535
如圖所示,Veth32769被固定至上行鏈路埠Eth1/17。
FI-B(nxos)# show pinning border-interfaces

--------------------+---------+-----------------------------
Border Interface     Status    SIFs
--------------------+---------+-----------------------------
Eth1/17              Active    sup-eth2 Veth32769
疑難排解
目前尚無適用於此組態的具體疑難排解資訊。
常見問題(FAQ)
本節介紹一些常見問題解答和解答。
是否可以將IPv6專用單播地址用於管理埠?
不支援。僅支援全域性單播地址。
UCS是否支援無狀態地址自動配置(SLAAC)?
否。FI管理埠僅支援靜態地址分配。
使用iSCSI引導時,是否可以將IPv6用於iSCSI啟動器?
否。目前網際網路小型電腦系統介面(iSCSI)啟動器不支援IPv6。
當UCS從UCS版本2.2或更高版本降級到UCS版本2.1或更低版本時,會發生什麼情況?
如果FI的管理埠或者CIMC具有IPv6地址或帶內配置,則降級失敗並出現錯誤消息。
當FI從UCS 2.2版或更高版本降級到UCS 2.1版或更低版本時,會發生什麼情況?
如果UCSM當前使用版本2.2或更高版本,則FI降級成功完成。FI上的IPv6配置應繼續工作。
當CIMC使用UCS 2.1版或更低版本時,會發生什麼情況?
如果UCSM使用版本2.2或更高版本,則允許對CIMC進行帶內或IPv6配置。但是,無法識別此問題,並且CIMC繼續使用帶外IPv4地址。
當CIMC從UCS 2.2版或更高版本降級到UCS 2.1版或更低版本時,會發生什麼情況?
如果CIMC具有帶內或IPv6配置,則降級失敗並出現錯誤消息。
是否有任何保留的字首不能用於IPv6地址?
會。保留的字首值為0和128。只能使用1到127。
是否存在無法用於帶內管理的保留VLAN?
會。VLAN 1、2和3不能與保留VLAN的常規清單一起使用(3968到4047)。
相關資訊
修訂記錄
| 修訂 | 發佈日期 | 意見 |
|---|---|---|
1.0 |
06-Mar-2015 |
初始版本 |
 意見
意見