2.2(2C)之前的專用VLAN和Cisco UCS配置
下載選項
無偏見用語
本產品的文件集力求使用無偏見用語。針對本文件集的目的,無偏見係定義為未根據年齡、身心障礙、性別、種族身分、民族身分、性別傾向、社會經濟地位及交織性表示歧視的用語。由於本產品軟體使用者介面中硬式編碼的語言、根據 RFP 文件使用的語言,或引用第三方產品的語言,因此本文件中可能會出現例外狀況。深入瞭解思科如何使用包容性用語。
關於此翻譯
思科已使用電腦和人工技術翻譯本文件,讓全世界的使用者能夠以自己的語言理解支援內容。請注意,即使是最佳機器翻譯,也不如專業譯者翻譯的內容準確。Cisco Systems, Inc. 對這些翻譯的準確度概不負責,並建議一律查看原始英文文件(提供連結)。
目錄
簡介
本檔案介紹思科整合運算系統(UCS)中的私人VLAN(PVLAN)支援,這是Cisco UCS Manager(UCSM)版本1.4中介紹的功能。 還詳細說明了在UCS環境中使用PVLAN時的功能、注意事項和配置。
本文檔用於UCSM版本2.2(2C)及更早版本。在版本2.2(2C)之後的版本中,對UCSM進行了更改,支援ESXi DVS。對於PVLAN NIC,標籤的工作方式也發生了變化。
必要條件
需求
思科建議您瞭解以下主題:
- UCS
- Cisco Nexus 1000 V(N1K)
- VMware
- 第2層(L2)交換
採用元件
本文件所述內容不限於特定軟體和硬體版本。
本文中的資訊是根據特定實驗室環境內的裝置所建立。文中使用到的所有裝置皆從已清除(預設)的組態來啟動。如果您的網路正在作用,請確保您已瞭解任何指令可能造成的影響。
背景資訊
理論
專用VLAN是配置為從同一個專用VLAN中的其他埠隔離第2層的VLAN。屬於PVLAN的連線埠與一組常見的支援VLAN關聯,用於建立PVLAN架構。
PVLAN埠有三種型別:
- 混雜埠與所有其他PVLAN埠通訊,並且是用來與PVLAN外部裝置通訊的埠。
- 隔離連線埠與相同PVLAN中的其他連線埠完全分離L2(包括廣播),但混雜連線埠除外。
- community port可與同一PVLAN中的其他埠以及混雜埠通訊。在L2中,團體埠與其他團體中的埠或隔離的PVLAN埠隔離。廣播只會傳播到團體中的其他連線埠和混雜連線埠。
請參閱RFC 5517,Cisco Systems的私人VLAN:在多客戶端環境中實現可擴展的安全性,以便瞭解PVLAN的理論、操作和概念。
UCS中的PVLAN實施
UCS非常類似於Nexus 5000/2000架構,其中Nexus 5000與UCS 6100類似,Nexus 2000與UCS 2104交換矩陣擴展器類似。
UCS中PVLAN功能的許多限制是由Nexus 5000/2000實施中的限制引起的。
需要記住的重要一點是:
- UCS僅支援隔離埠。如果結合了N1K,您可以使用社群VLAN,但混雜埠也必須在N1K上。
- 不支援混雜埠/中繼、社群埠/中繼或隔離中繼。
- 混雜埠需要位於UCS域之外,例如上游交換機/路由器或下游N1K。
目標
本文檔介紹適用於使用UCS的PVLAN的多種不同配置:
- 上游裝置上帶有混雜埠的隔離PVLAN。
- N1K上的隔離PVLAN,上游裝置上有混雜埠。
- N1K上的隔離PVLAN,N1K上行鏈路埠配置檔案上的混雜埠
- N1K上的社群PVLAN,N1K上行鏈路埠配置檔案上的混雜埠。
- VMware分散式虛擬交換機(DVS)混雜埠上的隔離PVLAN。
- VMware DVS上的社群PVLAN交換機上的DVS混雜埠
設定
網路圖
分散式交換機的所有示例的拓撲是:
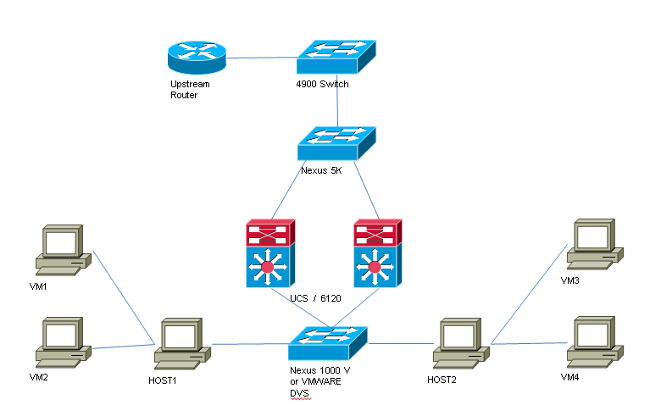
沒有分散式交換機的所有示例的拓撲是:
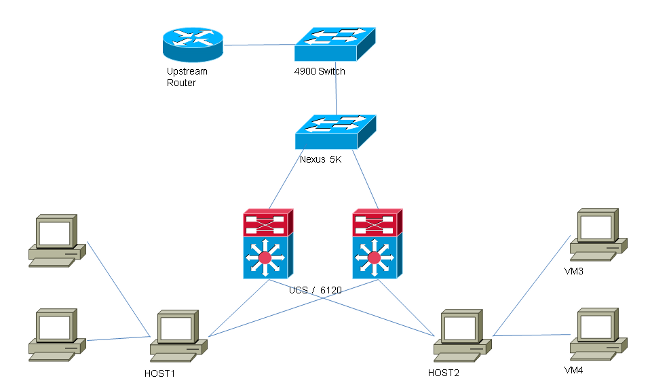
vSwitch:上的PVLAN上游裝置上帶有混雜埠的隔離PVLAN
在此配置中,您將PVLAN流量通過UCS傳遞到上游的混合埠。由於不能在同一個vNIC上同時傳送主VLAN和輔助VLAN,因此每個PVLAN的每個刀片需要一個vNIC,以便傳輸PVLAN流量。
UCS中的配置
以下過程介紹了如何建立主要和任何隔離VLAN。
附註:本示例使用266作為主用裝置,使用166作為隔離裝置;vlan ID由站點決定。
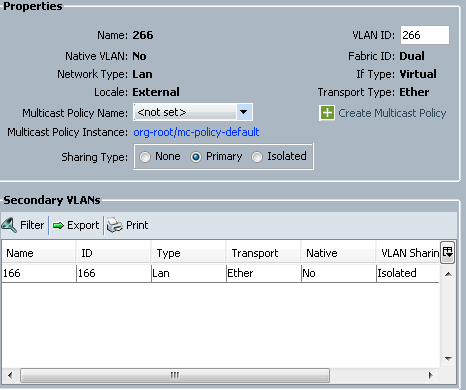
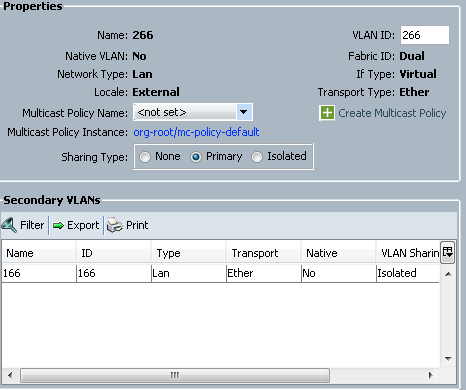
- 要建立主VLAN,請按一下Primary作為共用型別,並輸入VLAN ID266:
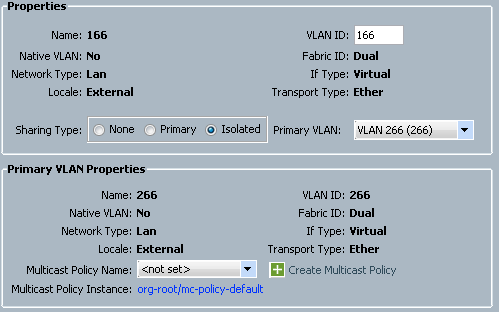
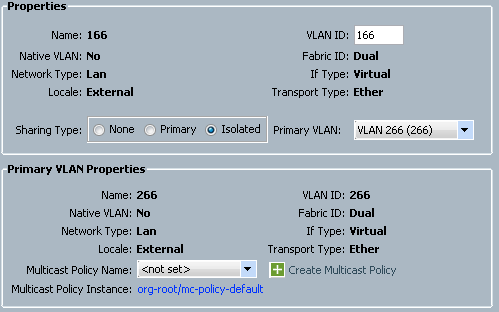
- 要建立隔離VLAN,請按一下Isolated作為共用型別,輸入VLAN ID 166,然後選擇VLAN 266(266)作為主要VLAN:
- 若要將VLAN新增到vNIC,請按一下VLAN 166的選擇覈取方塊,然後按一下關聯的本地VLAN單選按鈕。
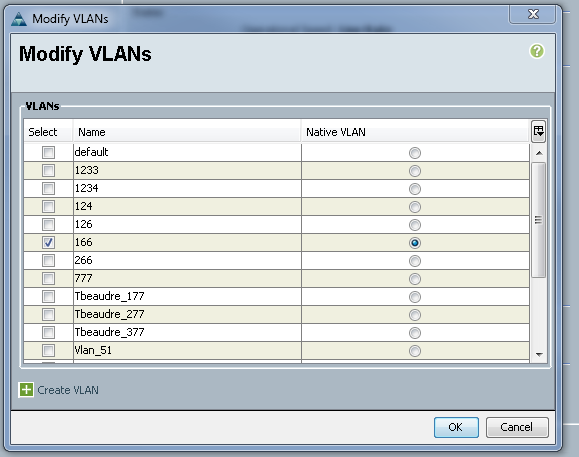
僅新增隔離VLAN,必須將其設定為主要VLAN,每個vNIC只能有一個。由於此處定義了本地VLAN,因此請勿在VMware埠組上配置VLAN標籤。
配置上游裝置
以下過程介紹了如何配置Nexus 5K以將PVLAN傳遞到混雜埠所在的上游4900交換機。雖然並非在所有環境中都必需此配置,但如果您必須將PVLAN通過另一台交換機,請使用此配置。
在Nexus 5K上,輸入以下命令,並檢查上行鏈路配置:
- 開啟PVLAN功能:
Nexus5000-5(config)# feature private-vlan
[an error occurred while processing this directive] - 將VLAN新增為主用和隔離:
Nexus5000-5(config)# vlan 166
[an error occurred while processing this directive]
Nexus5000-5(config-vlan)# private-vlan isolated
Nexus5000-5(config-vlan)# vlan 266
Nexus5000-5(config-vlan)# private-vlan primary - 將VLAN 266與隔離VLAN 166關聯:
Nexus5000-5(config-vlan)# private-vlan association 166
[an error occurred while processing this directive] - 確保所有上行鏈路都已配置以中繼VLAN:
- interface Ethernet1/1
- 描述與4900的連線
- switchport mode trunk
- 速度1000
- interface Ethernet1/3
- 描述與FIB埠5的連線
- switchport mode trunk
- 速度1000
- interface Ethernet1/4
- 描述與FIA埠5的連線
- switchport mode trunk
- 速度1000
在4900交換機上,執行這些步驟,並設定混雜埠。PVLAN在混雜埠結束。
- 如果需要,開啟PVLAN功能。
- 按照在Nexus 5K上的操作建立並關聯VLAN。
- 在4900交換器的輸出連線埠上建立混雜連線埠。從此以後,來自VLAN 166的資料包會在VLAN 266上看到(本例中)。
Switch(config-if)#switchport mode trunk
[an error occurred while processing this directive]
switchport private-vlan mapping 266 166
switchport mode private-vlan promiscuous
在上游路由器上,只為VLAN 266建立子介面。在此級別,要求取決於您使用的網路配置:
- interface GigabitEthernet0/1.1
- encapsulation dot1Q 266
- ip address 209.165.200.225 255.255.255.224
疑難排解
以下程式介紹如何測試組態。
- 在每台交換器上設定交換器虛擬介面(SVI),允許您從PVLAN:
(config)# interface vlan 266
[an error occurred while processing this directive]
(config-if)# ip address 209.165.200.225 255.255.255.224
(config-if)# private-vlan mapping 166
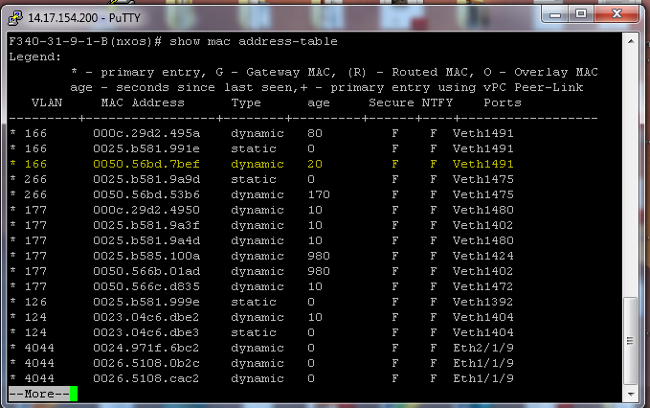
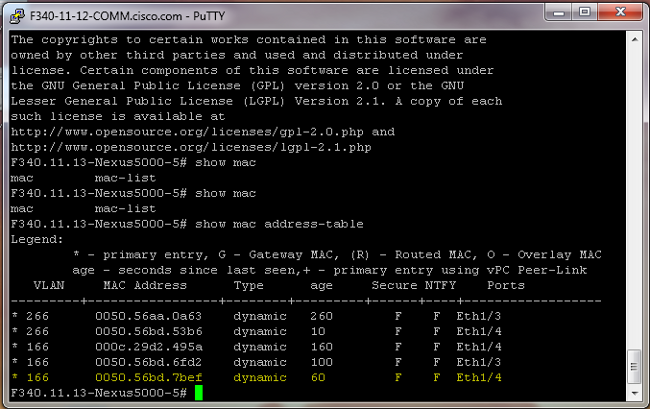
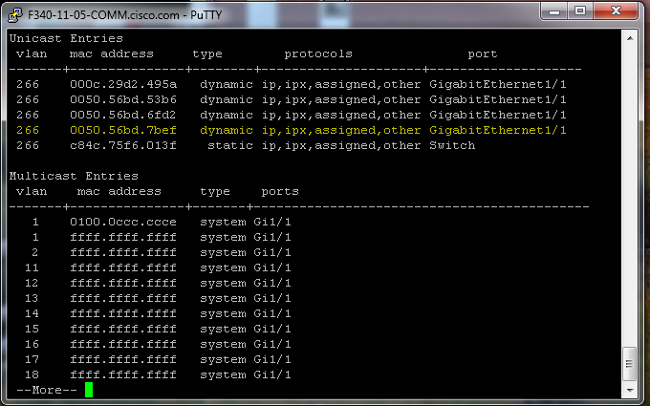
(config-if)# no shut - 檢查MAC地址表,檢視您的MAC被獲取的位置。在所有交換機上,MAC應該位於隔離VLAN中,但帶有混雜埠的交換機除外。在混雜交換器上,請注意MAC位於主要VLAN中。
- 在交換矩陣互聯上,在Veth1491上獲知MAC地址0050.56bd.7bef:
- 在Nexus 5K上,在Eth1/4上獲知MAC地址0050.56bd.7bef:
- 在4900交換器上,MAC位址0050.56bd.7bef是在GigabitEthernet1/1上得知的:
- 在交換矩陣互聯上,在Veth1491上獲知MAC地址0050.56bd.7bef:
在此配置中,此隔離VLAN中的系統無法相互通訊,但可以通過4900交換機上的混雜埠與其他系統通訊。一個問題是如何配置降壓裝置。在本例中,您正在使用VMware和兩個主機。
請記住,您必須為每個PVLAN使用一個vNIC。這些vNIC提供給VMware vSphere ESXi,然後您可以建立埠組並讓來賓訪問這些埠組。
如果將兩個系統新增到同一交換機上的同一埠組,則它們可以彼此通訊,因為它們的通訊在vSwitch上進行本地交換。在此系統中,有兩台刀鋒伺服器,每台伺服器有兩個主機。
在第一個系統上建立了兩個不同的埠組 — 一個稱為166,另一個稱為166A。每個介面都連線到單個NIC,該NIC在UCS上的隔離VLAN中配置。目前每個連線埠群組僅有一個訪客。在本例中,由於它們在ESXi上是分開的,所以它們不能相互通訊。
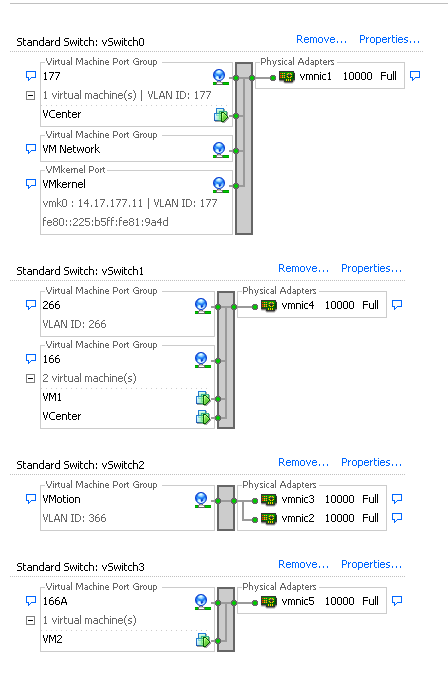
在第二個系統上,只有一個埠組稱為166。此埠組中有兩個訪客。在此配置中,VM3和VM4可以相互通訊,即使您不希望發生這種情況。為了糾正此問題,您需要為隔離VLAN中的每個虛擬機器(VM)配置單個NIC,然後建立連線到該vNIC的埠組。設定好此指令後,只需將一位訪客加入連線埠群組。裸機Windows安裝不存在此問題,因為您沒有這些基礎vSwitch。
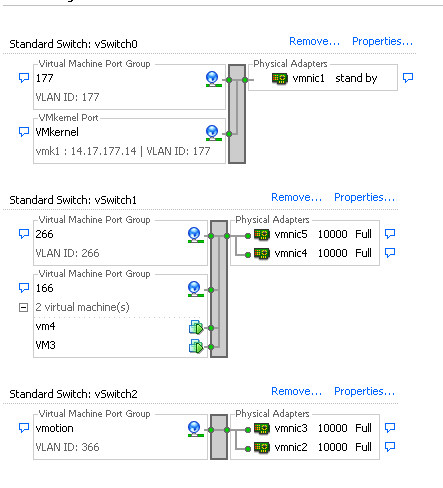
N1K上的隔離PVLAN,上游裝置上的混雜埠
在此配置中,您將PVLAN流量通過N1K,然後通過UCS傳遞到上游的混合埠。由於不能在同一個vNIC上同時傳送主VLAN和輔助VLAN,因此每個PVLAN上行鏈路需要一個vNIC來傳輸PVLAN流量。
UCS中的配置
以下過程介紹了如何建立主要和任何隔離VLAN。
附註:本示例使用266作為主用裝置,使用166作為隔離裝置;vlan ID由站點決定。
- 要建立主VLAN,請按一下Primary作為共用型別:
- 要建立隔離VLAN,請按一下Isolated作為共用型別:
- 要將VLAN新增到vNIC,請點選VLAN 166的選擇覈取方塊。VLAN 166沒有選擇本地VLAN。
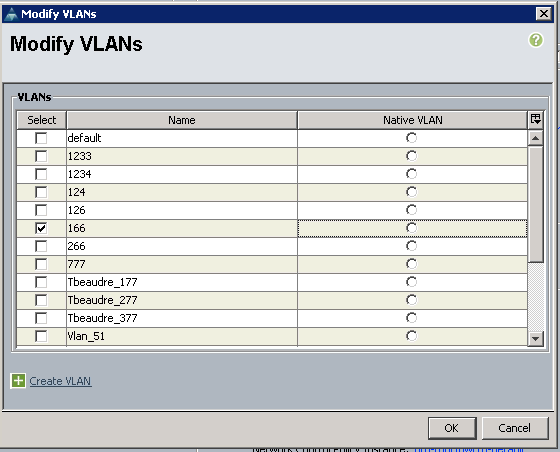
僅新增隔離VLAN,不得將其設定為本徵,並且每個vNIC只能有一個。由於未在此處定義本徵VLAN,因此請標籤N1K上的本徵VLAN。標籤本地VLAN的選項在VMware DVS中不可用,因此DVS不支援此選項。
配置上游裝置
以下步驟說明如何配置Nexus 5K,以便將PVLAN傳遞到混雜埠所在的上游4900交換機。雖然並非在所有環境中都必需此配置,但如果您必須將PVLAN通過另一台交換機,請使用此配置。
在Nexus 5K上,輸入以下命令,並檢查上行鏈路配置:
- 開啟PVLAN功能:
Nexus5000-5(config)# feature private-vlan
[an error occurred while processing this directive] - 將VLAN新增為主用和隔離:
Nexus5000-5(config)# vlan 166
[an error occurred while processing this directive]
Nexus5000-5(config-vlan)# private-vlan isolated
Nexus5000-5(config-vlan)# vlan 266
Nexus5000-5(config-vlan)# private-vlan primary - 將VLAN 266與隔離VLAN 166關聯:
Nexus5000-5(config-vlan)# private-vlan association 166
[an error occurred while processing this directive] - 確保所有上行鏈路都已配置以中繼VLAN:
- interface Ethernet1/1
- 描述與4900的連線
- switchport mode trunk
- 速度1000
- interface Ethernet1/3
- 描述與FIB埠5的連線
- switchport mode trunk
- 速度1000
- interface Ethernet1/4
- 描述與FIA埠5的連線
- switchport mode trunk
- 速度1000
在4900交換機上,執行這些步驟,並設定混雜埠。PVLAN在混雜埠結束。
- 如果需要,開啟PVLAN功能。
- 按照在Nexus 5K上的操作建立並關聯VLAN。
- 在4900交換器的輸出連線埠上建立混雜連線埠。從此以後,來自VLAN 166的資料包會在VLAN 266上看到(本例中)。
Switch(config-if)#switchport mode trunk
[an error occurred while processing this directive]
switchport private-vlan mapping 266 166
switchport mode private-vlan promiscuous
在上游路由器上,只為VLAN 266建立子介面。在此級別,要求取決於您使用的網路配置:
- interface GigabitEthernet0/1.1
- encapsulation dot1Q 266
- ip address 209.165.200.225 255.255.255.224
N1K的配置
以下過程介紹了如何將N1K配置為標準中繼,而不是PVLAN中繼。
- 按照在Nexus 5K上的操作建立並關聯VLAN。如需詳細資訊,請參閱上游裝置組態一節。
- 為PVLAN流量建立上行鏈路埠配置檔案:
Switch(config)#port-profile type ethernet pvlan_uplink
[an error occurred while processing this directive]
Switch(config-port-prof)# vmware port-group
Switch(config-port-prof)# switchport mode trunk
Switch(config-port-prof)# switchport trunk allowed vlan 166,266
Switch(config-port-prof)# switchport trunk native vlan 266 <-- This is necessary to handle
traffic coming back from the promiscuous port.
Switch(config-port-prof)# channel-group auto mode on mac-pinning
Switch(config-port-prof)# no shut
Switch(config-port-prof)# state enabled - 為隔離VLAN建立埠組;為主要和隔離VLAN建立與主機關聯的PVLAN主機埠:
Switch(config)# port-profile type vethernet pvlan_guest
[an error occurred while processing this directive]
Switch(config-port-prof)# vmware port-group
Switch(config-port-prof)# switchport mode private-vlan host
Switch(config-port-prof)# switchport private-vlan host-association 266 166
Switch(config-port-prof)# no shut
Switch(config-port-prof)# state enabled - 在vCenter中,將正確的vNIC新增到PVLAN上行鏈路。這是您在UCS設定中的「配置」下將隔離VLAN新增到的vNIC。

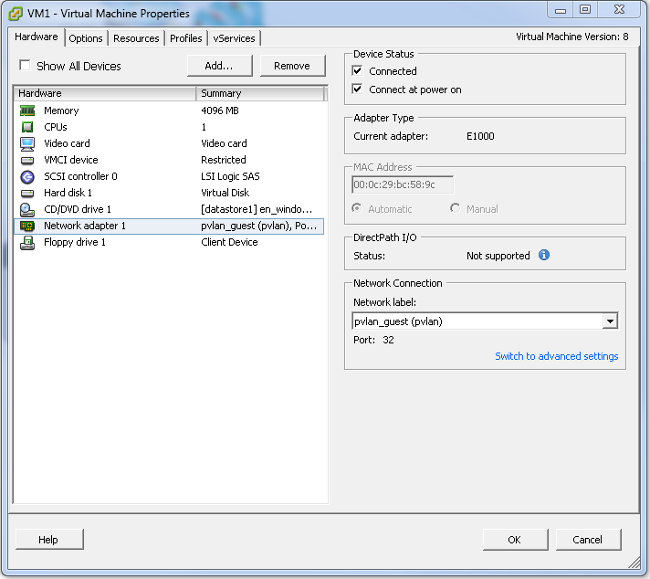
- 將VM新增到正確的埠組:
- 在Hardware(硬體)頁籤中,按一下Network adapter 1。
- 為Network Connection:(網路連線)下的Network(網路)標籤選擇pvlan_guest(pvlan):
疑難排解
以下程式介紹如何測試組態。
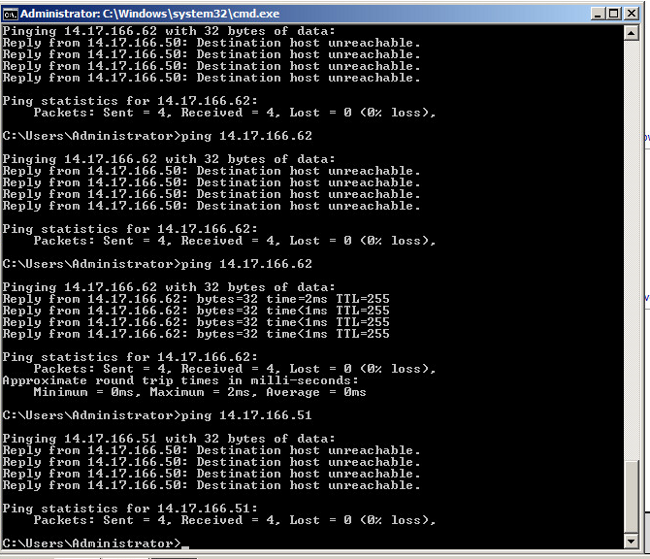
- 對埠組中配置的其他系統以及混雜埠上的路由器或其他裝置運行ping。通過混雜埠對裝置發出的ping命令應該能正常工作,而向隔離VLAN中的其他裝置發出的這些ping命令應該會失敗。
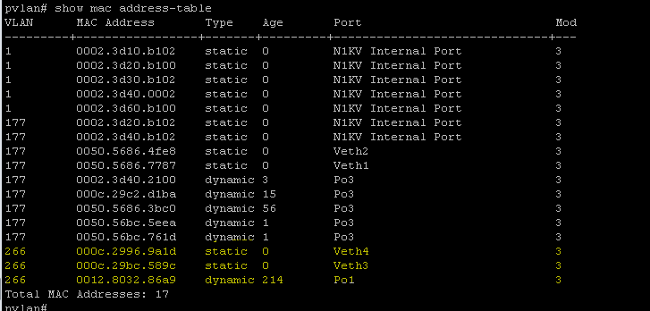
- 在N1K上,VM列在主VLAN上;之所以會出現這種情況,是因為您位於與PVLAN關聯的PVLAN主機埠中。由於VM的學習方式,請確保不要在UCS系統上將PVLAN設定為本徵。另請注意,您會從連線埠通道得知上游裝置,同時在主VLAN得知上游裝置。必須通過此方法學習這一點,因此您必須將主VLAN作為PVLAN上行鏈路上的本地VLAN。
在此螢幕抓圖中,Veth3和Veth 4上的兩台裝置是VM。Po1上的裝置是經過混雜埠的上游路由器。
- 在UCS系統上,您應該學習隔離VLAN中此通訊的所有MAC。您不應在此處看到上游:

- 在Nexus 5K上,兩個VM位於隔離VLAN上,而上游裝置位於主VLAN上:

- 在混合連線埠所在的4900交換器上,所有內容都位於主VLAN上:

N1K上的隔離PVLAN,N1K上行鏈路埠上的混雜埠 — 配置檔案
在此配置中,將包含通向N1K的PVLAN流量,並且僅使用上游的主要VLAN。
UCS中的配置
以下過程介紹了如何將主VLAN新增到vNIC。無需PVLAN配置,因為您只需要主要VLAN。
附註:本示例使用266作為主用裝置,使用166作為隔離裝置;vlan ID由站點決定。
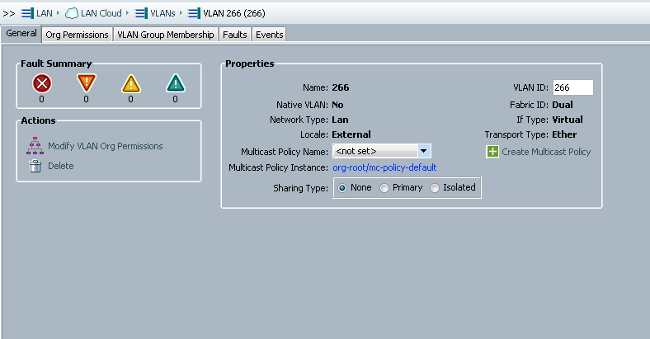
- 請注意,共用型別為None。
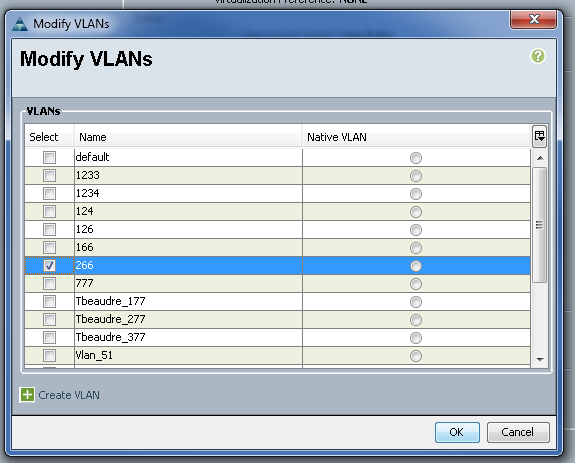
- 按一下VLAN 266的選擇覈取方塊以將主VLAN新增到vNIC。請勿將其設定為「本機」。
配置上游裝置
以下過程介紹了如何配置上游裝置。在這種情況下,上游交換機只需要中繼埠,並且只需要中繼VLAN 266,因為它是上游交換機看到的唯一VLAN。
在Nexus 5K上,輸入以下命令,並檢查上行鏈路配置:
- 將VLAN新增為主要:
Nexus5000-5(config-vlan)# vlan 266
[an error occurred while processing this directive] - 確保所有上行鏈路都已配置以中繼VLAN:
- interface Ethernet1/1
- 描述與4900的連線
- switchport mode trunk
- 速度1000
- interface Ethernet1/3
- 描述與FIB埠5的連線
- switchport mode trunk
- 速度1000
- interface Ethernet1/4
- 描述與FIA埠5的連線
- switchport mode trunk
- 速度1000
在4900交換器上,執行以下步驟:
- 在N1K上建立用作主鏈路的VLAN。
- 將所有介面與4900交換機進行中繼連線,以便通過VLAN。
在上游路由器上,只為VLAN 266建立子介面。在此級別,要求取決於您使用的網路配置。
- interface GigabitEthernet0/1.1
- encapsulation dot1Q 266
- ip address 209.165.200.225 255.255.255.224
N1K的配置
以下過程介紹了如何配置N1K。
- 建立並關聯VLAN:
Switch(config)# vlan 166
[an error occurred while processing this directive]
Switch(config-vlan)# private-vlan isolated
Switch(config-vlan)# vlan 266
Switch(config-vlan)# private-vlan primary
Switch(config-vlan)# private-vlan association 166 - 為PVLAN流量建立上行埠配置檔案,其中混雜埠已註明:
Switch(config)#port-profile type ethernet pvlan_uplink
[an error occurred while processing this directive]
Switch(config-port-prof)# vmware port-group
Switch(config-port-prof)# switchport mode private-vlan trunk promiscuous
Switch(config-port-prof)# switchport private-vlan trunk allowed vlan 266 <-- Only need to
allow the primary VLAN
Switch(config-port-prof)# switchport private-vlan mapping trunk 266 166 <-- The VLANS must
be mapped at this point
Switch(config-port-prof)# channel-group auto mode on mac-pinning
Switch(config-port-prof)# no shut
Switch(config-port-prof)# state enabled - 為隔離VLAN建立埠組;為主要和隔離VLAN建立與主機關聯的PVLAN主機埠:
Switch(config)# port-profile type vethernet pvlan_guest
[an error occurred while processing this directive]
Switch(config-port-prof)# vmware port-group
Switch(config-port-prof)# switchport mode private-vlan host
Switch(config-port-prof)# switchport private-vlan host-association 266 166
Switch(config-port-prof)# no shut
Switch(config-port-prof)# state enabled - 在vCenter中,將正確的vNIC新增到PVLAN上行鏈路。這是您在UCS設定中的「配置」下將隔離VLAN新增到的vNIC。

- 將VM新增到正確的埠組。
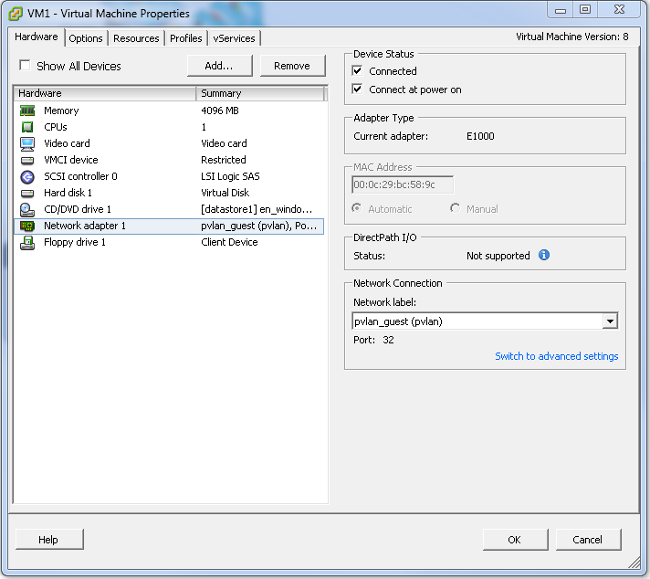
- 在Hardware(硬體)頁籤中,按一下Network adapter 1。
- 為Network Connection下的Network標籤選擇pvlan_guest(pvlan)。
疑難排解
以下程式介紹如何測試組態。
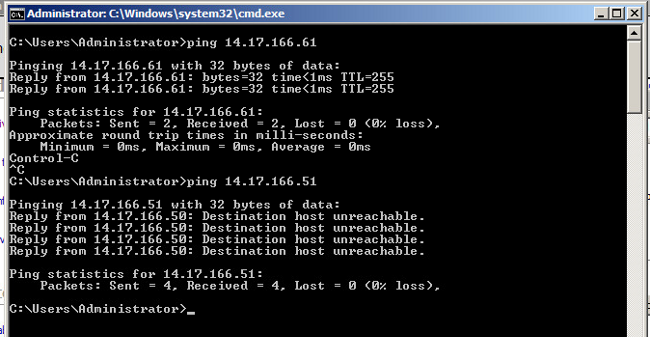
- 對埠組中配置的其他系統以及混雜埠上的路由器或其他裝置運行ping。通過混雜埠對裝置發出的ping命令應該能正常工作,而向隔離VLAN中的其他裝置發出的這些ping命令應該會失敗。
- 在N1K上,VM列在主VLAN上;之所以會出現這種情況,是因為您位於與PVLAN關聯的PVLAN主機埠中。另請注意,您會從連線埠通道得知上游裝置,同時在主VLAN得知上游裝置。
在此螢幕抓圖中,Veth3和Veth 4上的兩台裝置是VM。Po1上的裝置是經過混雜埠的上游裝置。
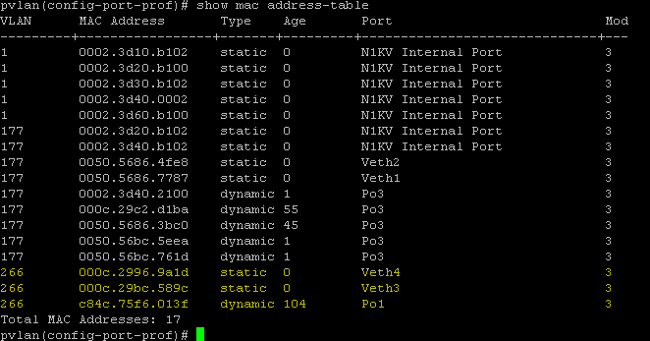
- 在UCS系統上,您應該學習在N1K上使用的主VLAN中用於此通訊的所有MAC。您不應在此學習上游:
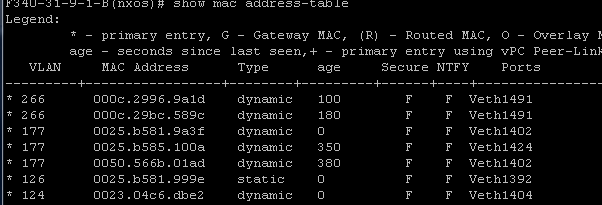
- 在Nexus 5K上,所有MAC都位於您選擇的主VLAN中:

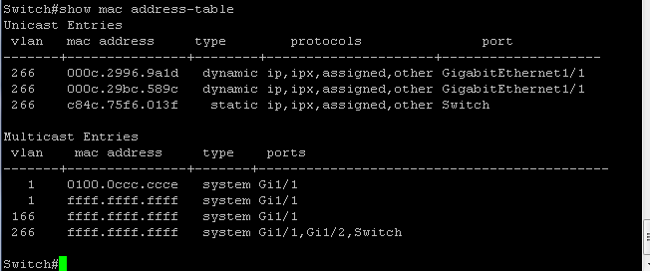
- 在4900交換器上,所有內容均位於您選取的主VLAN上:
N1K上的社群PVLAN,N1K上行鏈路埠上的混雜埠 — 配置檔案
這是使用UCS的社群VLAN唯一支援的配置。
此配置與在N1K上的隔離PVLAN中設定的配置相同,在N1K上行鏈路埠配置檔案部分設定了混雜埠。團體與隔離的唯一區別是PVLAN的配置。
要配置N1K,請像在Nexus 5K上那樣建立和關聯VLAN:
Switch(config)# vlan 166[an error occurred while processing this directive]
Switch(config-vlan)# private-vlan community
Switch(config-vlan)# vlan 266
Switch(config-vlan)# private-vlan primary
Switch(config-vlan)# private-vlan association 16
所有其他配置與N1K上的隔離PVLAN相同,N1K上行埠配置檔案上有混雜埠。
配置此配置後,您可以與連線到PVLAN使用的vEthernet埠配置檔案的所有VM通訊。
疑難排解
以下程式介紹如何測試組態。
- 對埠組中配置的其他系統以及混雜埠上的路由器或其他裝置運行ping。Ping經過混雜埠並到達社群中的其他系統應該能正常工作。
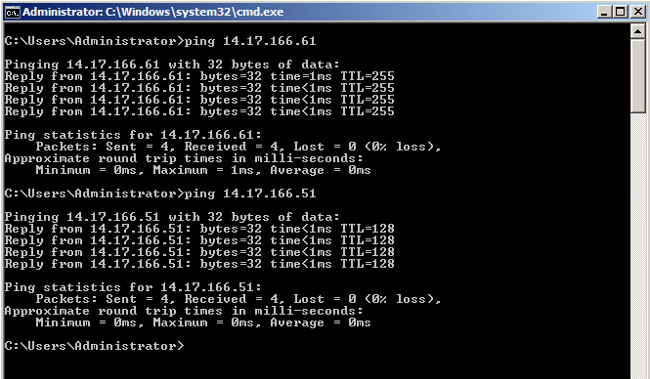
- 所有其他故障排除與隔離PVLAN相同。
VMware DVS上的隔離PVLAN和社群PVLAN DVS上的混合埠
由於DVS和UCS系統都存在配置問題,因此2.2(2c)版之前不支援帶有DVS和UCS的PVLAN。
驗證
目前沒有適用於這些配置的驗證程式。
疑難排解
前面部分提供的資訊可用於對配置進行故障排除。
輸出直譯器工具(僅供已註冊客戶使用)支援某些show命令。使用Output Interpreter工具檢視show指令輸出的分析。
修訂記錄
| 修訂 | 發佈日期 | 意見 |
|---|---|---|
1.0 |
17-Jun-2013 |
初始版本 |
由思科工程師貢獻
- Tommy Beard and Joseph RistainoCisco TAC Engineers.
 意見
意見