簡介
本文檔介紹在C8300平台上配置在自主模式下使用FQDN ACL模式匹配的ZBFW的過程。
必要條件
需求
思科建議您瞭解以下主題:
- 區域原則防火牆(ZBFW)
- 虛擬路由和轉送(VRF)
- 網路位址翻譯(NAT)
採用元件
本文中的資訊係根據以下軟體和硬體版本:
本文中的資訊是根據特定實驗室環境內的裝置所建立。文中使用到的所有裝置皆從已清除(預設)的組態來啟動。如果您的網路運作中,請確保您瞭解任何指令可能造成的影響。
背景資訊
區域原則防火牆(ZBFW)是Cisco IOS®和Cisco IOS XE裝置上的進階防火牆組態方法,可用於在網路中建立安全區域。
ZBFW允許管理員將介面分組到區域中,並對在這些區域之間移動的流量應用防火牆策略。
FQDN ACL(完全限定域名訪問控制清單)與思科路由器中的ZBFW一起使用,允許管理員建立基於域名而不是僅IP地址匹配流量的防火牆規則。
在處理託管在AWS或Azure等平台上的服務時,此功能特別有用,因為與服務相關聯的IP地址可能會頻繁更改。
它簡化了訪問控制策略的管理,提高了網路內安全配置的靈活性。
設定
網路圖表
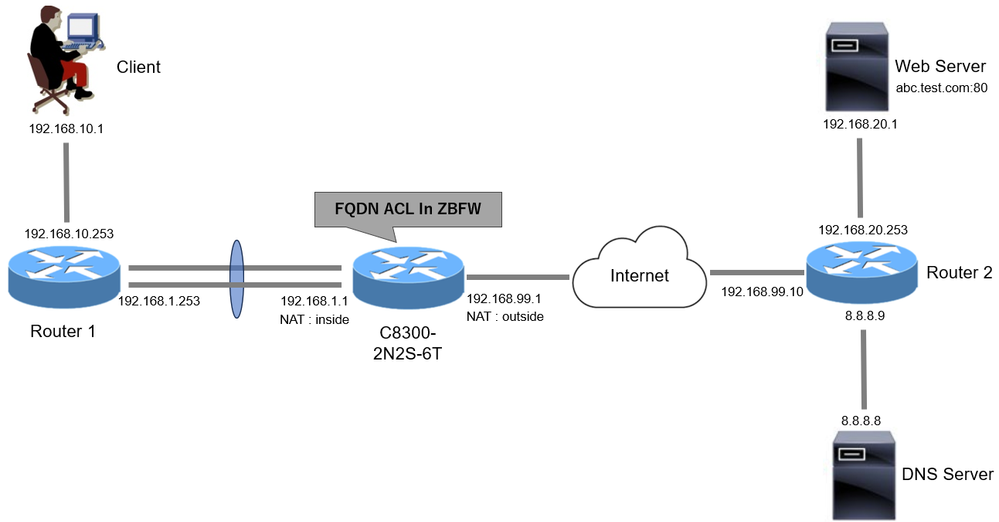
本文檔介紹基於此圖的ZBFW的配置和驗證。 這是使用BlackJumboDog作為DNS伺服器的模擬環境。
 網路圖表
網路圖表
組態
這是允許從客戶端與Web伺服器進行通訊的配置。
步驟1. (可選)配置VRF
VRF(虛擬路由和轉發)功能允許您在單個路由器中建立和管理多個獨立的路由表。在本示例中,我們建立了一個稱為WebVRF的VRF,並執行相關通訊的路由。
vrf definition WebVRF
rd 65010:10
!
address-family ipv4
route-target export 65010:10
route-target import 65010:10
exit-address-family
!
address-family ipv6
route-target export 65010:10
route-target import 65010:10
exit-address-family

ip route vrf WebVRF 8.8.8.8 255.255.255.255 GigabitEthernet0/0/3 192.168.99.10
ip route vrf WebVRF 192.168.10.0 255.255.255.0 Port-channel1.2001 192.168.1.253
ip route vrf WebVRF 192.168.20.0 255.255.255.0 GigabitEthernet0/0/3 192.168.99.10
步驟 2.配置介面
為內部和外部介面配置基本資訊,如區域成員、VRF、NAT和IP地址。
interface GigabitEthernet0/0/1
no ip address
negotiation auto
lacp rate fast
channel-group 1 mode active

interface GigabitEthernet0/0/2
no ip address
negotiation auto
lacp rate fast
channel-group 1 mode active

interface Port-channel1
no ip address
no negotiation auto

interface Port-channel1.2001
encapsulation dot1Q 2001
vrf forwarding WebVRF
ip address 192.168.1.1 255.255.255.0
ip broadcast-address 192.168.1.255
no ip redirects
no ip proxy-arp
ip nat inside
zone-member security zone_client

interface GigabitEthernet0/0/3
vrf forwarding WebVRF
ip address 192.168.99.1 255.255.255.0
ip nat outside
zone-member security zone_internet
speed 1000
no negotiation auto
步驟3. (可選)配置NAT
為內部和外部介面配置NAT。 在本例中,來自客戶端的源IP地址(192.168.10.1)被轉換為192.168.99.100。
ip access-list standard nat_source
10 permit 192.168.10.0 0.0.0.255

ip nat pool natpool 192.168.99.100 192.168.99.100 prefix-length 24
ip nat inside source list nat_source pool natpool vrf WebVRF overload
步驟 4.配置FQDN ACL
配置FQDN ACL以匹配目標流量。在本示例中,在FQDN對象組的模式匹配中使用萬用字元「*」來匹配目標FQDN。
object-group network src_net
192.168.10.0 255.255.255.0

object-group fqdn dst_test_fqdn
pattern .*\.test\.com

object-group network dst_dns
host 8.8.8.8

ip access-list extended Client-WebServer
1 permit ip object-group src_net object-group dst_dns
5 permit ip object-group src_net fqdn-group dst_test_fqdn
步驟 5.配置ZBFW
為ZBFW配置區域、類對映和策略對映。 在本示例中,透過使用parameter-map,日誌在ZBFW允許流量時生成。
zone security zone_client
zone security zone_internet

parameter-map type inspect inspect_log
audit-trail on

class-map type inspect match-any Client-WebServer-Class
match access-group name Client-WebServer

policy-map type inspect Client-WebServer-Policy
class type inspect Client-WebServer-Class
inspect inspect_log
class class-default
drop log

zone-pair security Client-WebServer-Pair source zone_client destination zone_internet
service-policy type inspect Client-WebServer-Policy
驗證
步驟 1.從客戶端啟動HTTP連線
驗證從客戶端到WEB伺服器的HTTP通訊是否成功。
 HTTP連線
步驟 2.確認IP快取
運行show platform hardware qfp active feature dns-snoop-agent datapath ip-cache all命令以確認目標FQDN的IP快取是在C8300-2N2S-6T中生成的。
02A7382#show platform hardware qfp active feature dns-snoop-agent datapath ip-cache all
IP Address Client(s) Expire RegexId Dirty VRF ID Match
------------------------------------------------------------------------------------------------------
192.168.20.1 0x1 117 0xdbccd400 0x00 0x0 .*\.test\.com
步驟 3.確認ZBFW日誌
確認IP地址(192.168.20.1)與FQDN (.*\.test\.com)匹配,並驗證ZBFW是否允許步驟1中的HTTP通訊。
*Mar 7 11:08:23.018: %IOSXE-6-PLATFORM: R0/0: cpp_cp: QFP:0.0 Thread:003 TS:00000551336606461468 %FW-6-SESS_AUDIT_TRAIL_START: (target:class)-(Client-WebServer-Pair:Client-WebServer-Class):Start http session: initiator (192.168.10.1:51468) -- responder (192.168.20.1(.*\.test\.com):80) from Port-channel1.2001

*Mar 7 11:08:24.566: %IOSXE-6-PLATFORM: R0/0: cpp_cp: QFP:0.0 Thread:002 TS:00000551338150591101 %FW-6-SESS_AUDIT_TRAIL: (target:class)-(Client-WebServer-Pair:Client-WebServer-Class):Stop http session: initiator (192.168.10.1:51468) sent 943 bytes -- responder (192.168.20.1:80) sent 101288 bytes, from Port-channel1.2001
步驟 4.確認資料包捕獲
確認目標FQDN的DNS解析以及客戶端與WEB伺服器之間的HTTP連線是否成功。
內部資料包捕獲:
 內部DNS資料包
 內部HTTP資料包
Onside中的資料包捕獲(192.168.10.1是NAT到192.168.19.100):
 外部DNS資料包
 外部的HTTP封包
疑難排解
對於使用FQDN ACL模式匹配排除與ZBFW相關的通訊問題,您可以在問題期間收集日誌並將它們提供給思科TAC。請注意,故障排除的日誌取決於問題的性質。
要收集的日誌示例:
!!!! before reproduction
!! Confirm the IP cache
show platform hardware qfp active feature dns-snoop-agent datapath ip-cache all

!! Enable packet-trace
debug platform packet-trace packet 8192 fia-trace
debug platform packet-trace copy packet both
debug platform condition ipv4 access-list Client-WebServer both
debug platform condition feature fw dataplane submode all level verbose

!! Enable debug-level system logs and ZBFW debug logs
debug platform packet-trace drop
debug acl cca event
debug acl cca error
debug ip domain detail
!! Start to debug
debug platform condition start

!! Enable packet capture on the target interface (both sides) and start the capture
monitor capture CAPIN interface Port-channel1.2001 both
monitor capture CAPIN match ipv4 any any
monitor capture CAPIN buffer size 32
monitor capture CAPIN start

monitor capture CAPOUT interface g0/0/3 both
monitor capture CAPOUT match ipv4 any any
monitor capture CAPOUT buffer size 32
monitor capture CAPOUT start

!! (Optional) Clear the DNS cache on the client
ipconfig/flushdns
ipconfig /displaydns

!! Run the show command before reproduction
show platform hardware qfp active feature firewall drop all
show policy-map type inspect zone-pair Client-WebServer-Pair sessions
show platform packet-trace statistics
show platform packet-trace summary
show logging process cpp_cp internal start last boot
show platform hardware qfp active feature dns-snoop-agent client hw-pattern-list
show platform hardware qfp active feature dns-snoop-agent client info
show platform hardware qfp active feature dns-snoop-agent datapath stats
show ip dns-snoop all
show platform hardware qfp active feature dns-snoop-agent datapath ip-cache all
show platform software access-list F0 summary

!!!! Reproduce the issue - start

!! During the reproductionof the issue, run show commands at every 10 seconds
!! Skip show ip dns-snoop all command if it is not supported on the specific router
show ip dns-snoop all
show platform hardware qfp active feature dns-snoop-agent datapath ip-cache all

!!!! After reproduction
!! Stop the debugging logs and packet capture
debug platform condition stop
monitor capture CAPIN stop
monitor capture CAPOUT stop

!! Run the show commands
show platform hardware qfp active feature firewall drop all
show policy-map type inspect zone-pair Client-WebServer-Pair sessions
show platform packet-trace statistics
show platform packet-trace summary
show logging process cpp_cp internal start last boot
show platform hardware qfp active feature dns-snoop-agent client hw-pattern-list
show platform hardware qfp active feature dns-snoop-agent client info
show platform hardware qfp active feature dns-snoop-agent datapath stats
show ip dns-snoop all
show platform hardware qfp active feature dns-snoop-agent datapath ip-cache all
show platform software access-list F0 summary

show platform packet-trace packet all decode
show running-config
常見問題
問:路由器上IP快取的超時值是如何確定的?
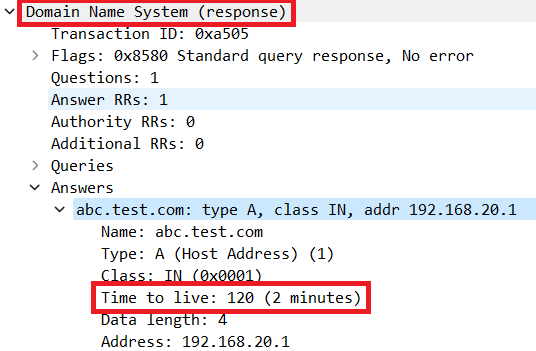
答:IP快取的超時值由從DNS伺服器返回的DNS資料包的TTL(生存時間)值確定。在本例中,它是120秒。當IP快取超時時,會自動將其從路由器中刪除。以下是資料包捕獲的詳細資訊。
 DNS解析的資料包詳細資訊
問:當DNS伺服器返回CNAME記錄而不是A記錄時,是否可以接受?
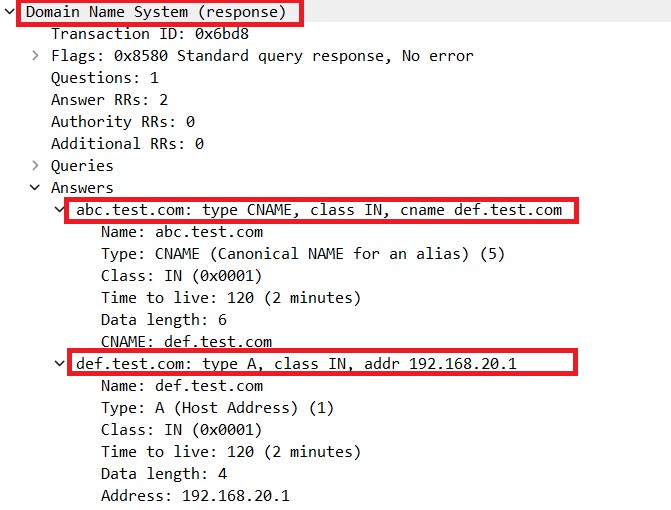
答:是的,這不是問題。當DNS伺服器返回CNAME記錄時,DNS解析和HTTP通訊不會有任何問題。以下是資料包捕獲的詳細資訊。
 內部DNS資料包
 DNS解析的資料包詳細資訊
 內部HTTP資料包
問:將收集在C8300路由器上的資料包捕獲傳輸到FTP伺服器的命令是什麼?
答:使用monitor capture <capture name> export bootflash:<capture name>.pcap和copy bootflash:<capture name>.pcap ftp://<user>:<password>@<FTP IP Address>命令將資料包捕獲傳輸到FTP伺服器。以下是將CAPIN傳輸到FTP伺服器的示例。
monitor capture CAPIN export bootflash:CAPIN.pcap
copy bootflash:CAPIN.pcap ftp://<user>:<password>@<FTP IP Address>
參考
瞭解基於區域的策略防火牆設計