ASA 7.1/7.2:允許在ASA上為SVC分割隧道配置示例
目錄
簡介
本文提供如何允許安全通訊端層(SSL)VPN使用者端(SVC)透過通道連線到思科調適型安全裝置(ASA)時存取網際網路的逐步指示。 此配置允許SVC通過SSL安全訪問公司資源,並通過使用分割隧道提供對Internet的不安全訪問。
在同一介面上傳輸安全流量和非安全流量的功能稱為分割隧道。分割隧道要求您準確指定哪些流量受到保護,以及該流量的目的地是什麼,以便只有指定的流量進入隧道,而其餘的流量則通過公共網路(Internet)以未加密的方式傳輸。
必要條件
需求
嘗試此組態之前,請確保符合以下要求:
-
所有遠端工作站上的本地管理許可權
-
遠端工作站上的Java和ActiveX控制元件
-
連線路徑中的任何位置都不會阻塞埠443(SSL)
採用元件
本文中的資訊係根據以下軟體和硬體版本:
-
執行軟體版本7.2(2)的Cisco 5500系列調適型安全裝置(ASA)
-
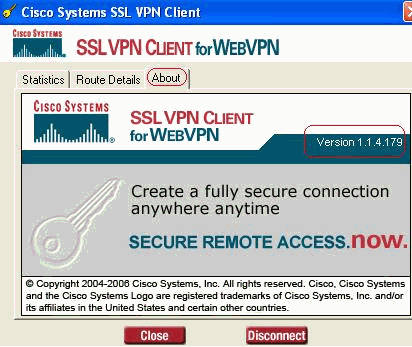
適用於Windows 1.1.4.179的Cisco SSL VPN客戶端版本
注意:從Cisco Software Download(僅限註冊客戶)下載SSL VPN客戶端包(sslclient-win*.pkg)。 將SVC複製到ASA的快閃記憶體,該快閃記憶體將下載到遠端使用者電腦,以便與ASA建立SSL VPN連線。有關詳細資訊,請參閱ASA配置指南的安裝SVC軟體部分。
-
運行Windows 2000 Professional SP4或Windows XP SP2的PC
-
思科調適型安全裝置管理員(ASDM)版本5.2(2)
本文中的資訊是根據特定實驗室環境內的裝置所建立。文中使用到的所有裝置皆從已清除(預設)的組態來啟動。如果您的網路正在作用,請確保您已瞭解任何指令可能造成的影響。
慣例
背景資訊
SSL VPN客戶端(SVC)是一種VPN隧道技術,使遠端使用者能夠享受IPsec VPN客戶端的好處,而無需網路管理員在遠端電腦上安裝和配置IPsec VPN客戶端。SVC使用遠端電腦上已經存在的SSL加密以及安全裝置的WebVPN登入和身份驗證。
為了建立SVC會話,遠端使用者在瀏覽器中輸入安全裝置的WebVPN介面的IP地址,瀏覽器連線到該介面並顯示WebVPN登入螢幕。如果滿足登入和身份驗證要求,且安全裝置將您識別為需要SVC,則安全裝置會將SVC下載到遠端電腦。如果安全裝置識別您具有使用SVC的選項,則安全裝置會將SVC下載到遠端電腦,同時它會在視窗中顯示一個連結以跳過SVC安裝。
下載後,SVC會自行安裝和配置,當連線終止時,SVC會自行保留或解除安裝遠端電腦,具體取決於配置。
設定
本節提供用於設定本文件中所述功能的資訊。
註:使用Command Lookup Tool(僅限註冊客戶)可獲取本節中使用的命令的詳細資訊。
網路圖表
本檔案會使用以下網路設定:
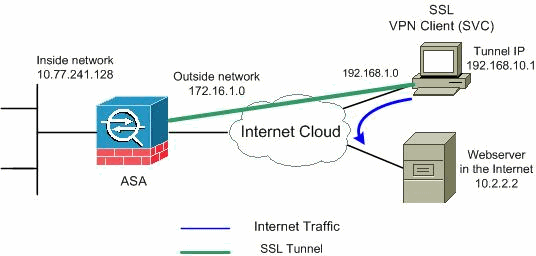
注意:此配置中使用的IP編址方案在Internet上不能合法路由。這些地址是RFC 1918 ![]() ,已在實驗室環境中使用。
,已在實驗室環境中使用。
使用ASDM 5.2(2)的ASA配置
完成以下步驟,以在具有分割隧道的ASA上配置SSL VPN,如下所示:
-
本檔案假設已建立基本組態(例如介面組態等)並正常運作。
註:請參閱允許ASDM進行HTTPS訪問,以便允許ASDM配置ASA。
注意:除非更改埠號,否則不能在同一個ASA介面上啟用WebVPN和ASDM。有關詳細資訊,請參閱在同一介面ASA上啟用ASDM和WebVPN。
-
選擇Configuration > VPN > IP Address Management > IP Pools以建立IP地址池:適用於VPN使用者端的VPN池。
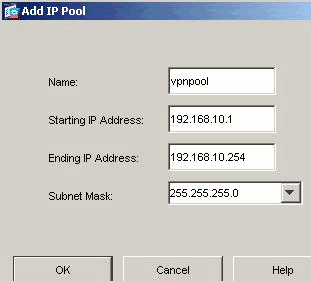
按一下「Apply」。
-
啟用WebVPN
-
選擇Configuration > VPN > WebVPN > WebVPN Access,然後使用滑鼠突出顯示外部介面,然後按一下Enable。選中Enable Tunnel Group Drop-down List on WebVPN Login Page覈取方塊,以啟用顯示在登入頁中的下拉選單,供使用者選擇其各自的組。
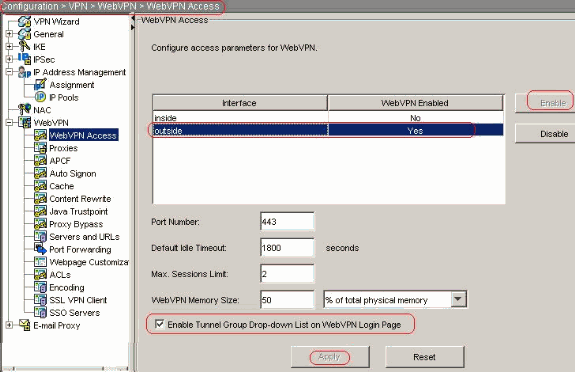
按一下「Apply」。
-
選擇Configuration > VPN > WebVPN > SSL VPN Client > Add,以便從ASA的快閃記憶體中新增SSL VPN客戶端映像,如下所示。
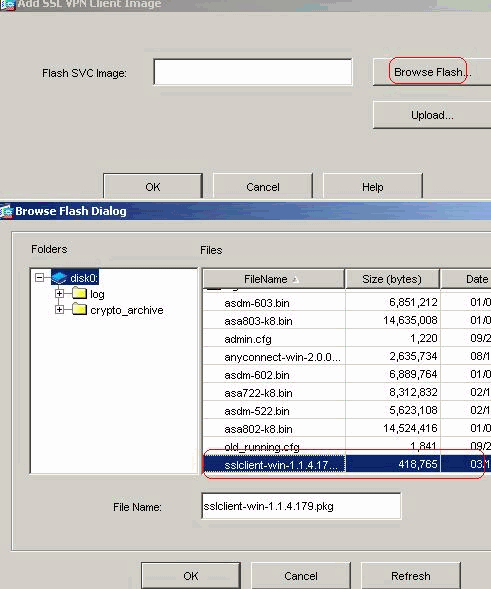
按一下「OK」(確定)。
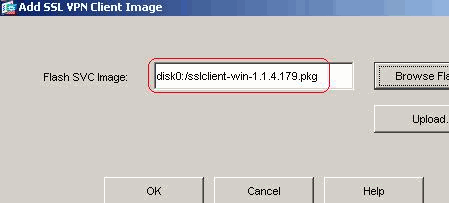
按一下「OK」(確定)。
按一下SSL VPN Client覈取方塊。
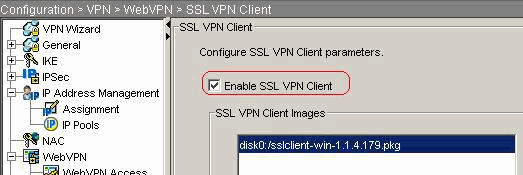
按一下「Apply」。
等效的CLI配置:
Cisco ASA 7.2(2) ciscoasa(config)#webvpn ciscoasa(config-webvpn)#enable outside ciscoasa(config-webvpn)#svc image disk0:/sslclient-win-1.1.4.179.pkg 1 ciscoasa(config-webvpn)#tunnel-group-list enable ciscoasa(config-webvpn)#svc enable
-
-
配置組策略
-
選擇Configuration > VPN > General > Group Policy > Add(Internal Group Policy)以建立內部組策略客戶端組。在General下,選擇WebVPN覈取方塊以啟用WebVPN作為隧道協定。
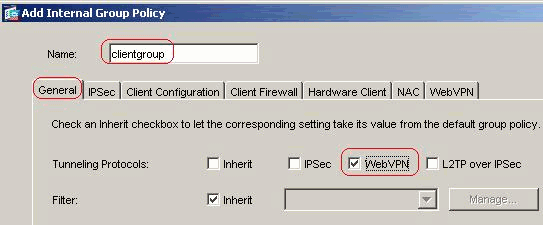
-
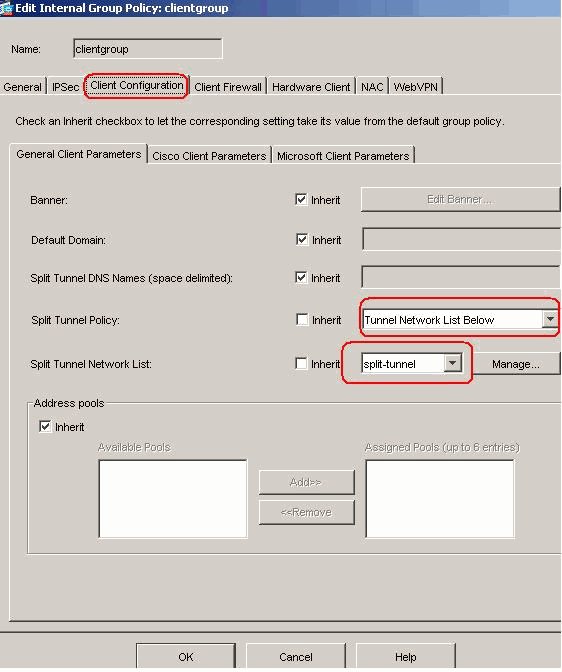
在Client Configuration > General Client Parameters頁籤中,取消選中Split Tunnel Policy的Inherit框,然後從下拉選單中選擇Tunnel Network List Below。
取消選中Split Tunnel Network List的Inherit框,然後按一下Manage以啟動ACL Manager。
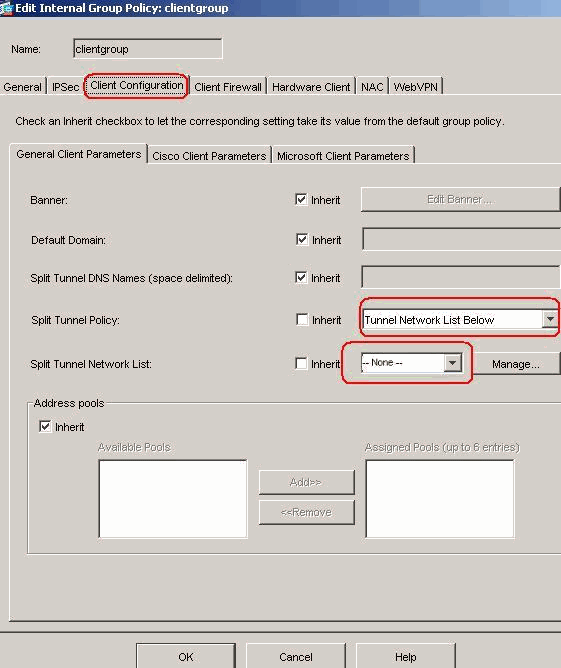
在ACL Manager中,選擇Add > Add ACL...以建立新的訪問清單。

提供ACL的名稱,然後按一下OK。

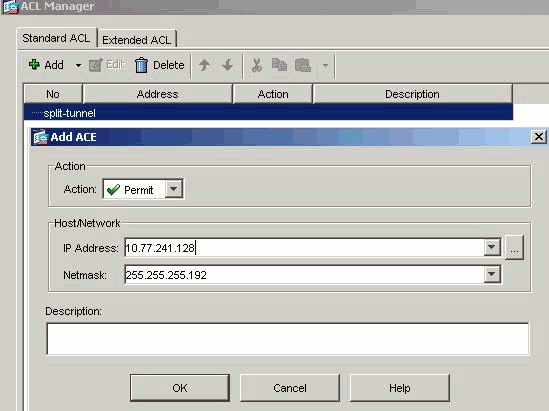
建立ACL名稱后,選擇Add > Add ACE以新增訪問控制條目(ACE)。
定義與ASA後面的LAN對應的ACE。在這種情況下,網路為10.77.241.128/26,然後選擇Permit。
按一下「OK」以退出ACL Manager。
請確保為分割隧道網路清單選擇了您剛剛建立的ACL。
按一下OK以返回組策略配置。
在首頁中,按一下Apply,然後按一下Send(如果需要),以便將命令傳送到ASA。
-
-
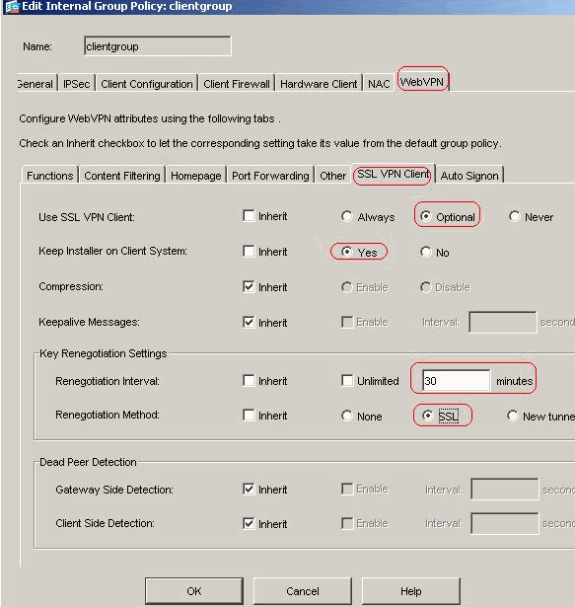
對於Use SSL VPN Client選項,取消選中Inherit覈取方塊,然後按一下Optional單選按鈕。
此選項允許遠端客戶端選擇是否按一下WebVPN > SSLVPN Client頁籤,然後選擇以下選項:
請勿下載SVC。Always選項可確保每個SSL VPN連線期間將SVC下載到遠端工作站。
-
對於Keep Installer on Client System選項,取消選中Inherit覈取方塊,然後按一下Yes單選按鈕。
此操作允許SVC軟體保留在客戶端電腦上;因此,每次建立連線時,都不需要ASA將SVC軟體下載到客戶端。對於經常訪問公司網路的遠端使用者來說,此選項是一個不錯的選擇。
-
對於Renegotiation Interval選項,取消選中Inherit框,取消選中Unlimited覈取方塊,並輸入重新生成金鑰之前的分鐘數。
當您設定金鑰的有效時間長度限制時,安全性會增強。
-
對於Renegotiation Method選項,取消選中Inherit覈取方塊,然後按一下SSL單選按鈕。重新交涉可以使用目前的SSL通道或專門為重新交涉建立的新通道。
SSL VPN客戶端屬性應如下圖所示:
-
-
按一下「OK」,然後「Apply」。

等效的CLI配置:
Cisco ASA 7.2(2) ciscoasa(config)#access-list split-tunnel standard permit 10.77.241.128 255.255.255.1922 ciscoasa(config)#group-policy clientgroup internal ciscoasa(config)#group-policyclientgroup attributes ciscoasa(config-group-policy)#vpn-tunnel-protocol webvpn ciscoasa(config-group-policy)#split-tunnel-policy tunnelspecified ciscoasa(config-group-policy)#split-tunnel-network-list value split-tunnel ciscoasa(config-group-policy)#webvpn ciscoasa(config-group-webvpn)#svc required ciscoasa(config-group-webvpn)#svc keep-installer installed ciscoasa(config-group-webvpn)#svc rekey time 30 ciscoasa(config-group-webvpn)#svc rekey method ssl
-
-
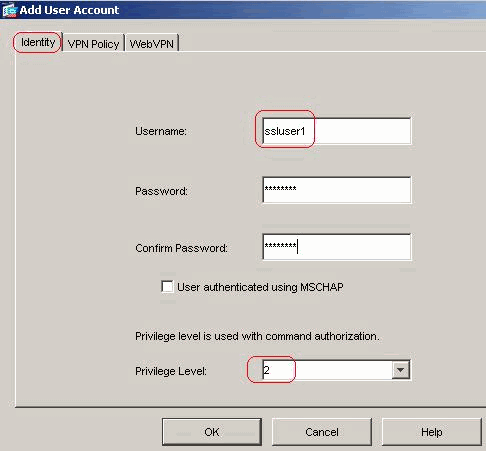
選擇Configuration > VPN > General > Users > Add以建立新的使用者帳戶ssluser1。按一下OK,然後按一下Apply。
等效的CLI配置:
Cisco ASA 7.2(2) ciscoasa(config)#username ssluser1 password asdmASA@
-
選擇Configuration > Properties > AAA Setup > AAA Servers Groups > Edit以修改預設伺服器組LOCAL,然後選擇Enable Local User Lockout覈取方塊,最大嘗試次數值為16。
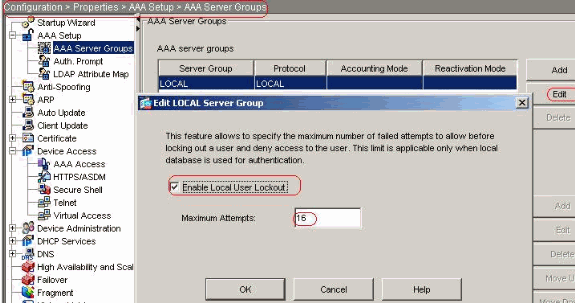
等效的CLI配置:
Cisco ASA 7.2(2) ciscoasa(config)#aaa local authentication attempts max-fail 16
-
配置隧道組
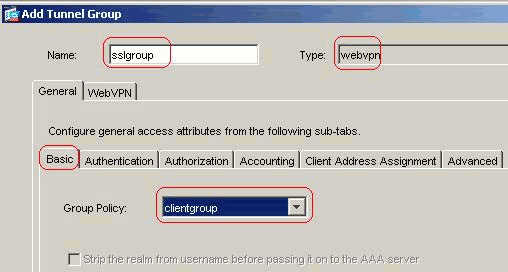
選擇Configuration > VPN > General > Tunnel Group > Add(WebVPN access)以建立新的隧道組sslgroup。
-
在General > Basic頁籤中,從下拉選單中選擇Group Policy as clientgroup。
-
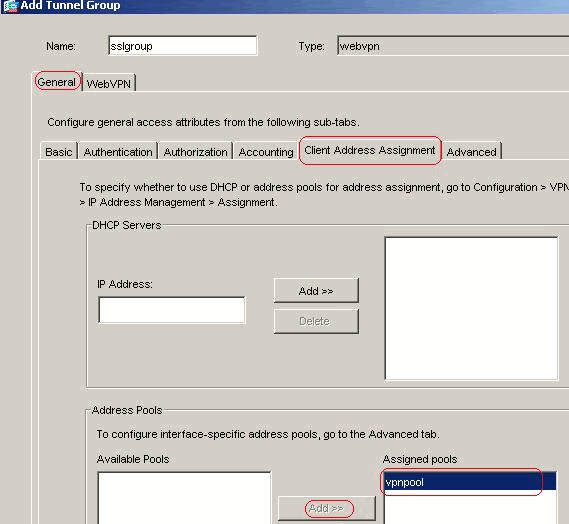
在General > Client Address Assignment頁籤的Address Pools下,按一下Add >>以分配可用地址池vpnpool。
-
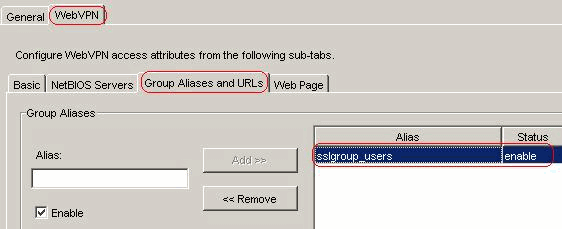
在WebVPN > Group Aliases and URLs頁籤中,在引數框中鍵入別名,然後按一下Add >>,使其顯示在登入頁的組名清單中。
按一下「OK」,然後「Apply」。
等效的CLI配置:
Cisco ASA 7.2(2) ciscoasa(config)#tunnel-group sslgroup type webvpn ciscoasa(config)#tunnel-group sslgroup general-attributes ciscoasa(config-tunnel-general)#address-pool vpnpool ciscoasa(config-tunnel-general)#default-group-policy clientgroup ciscoasa(config-tunnel-general)#exit ciscoasa(config)#tunnel-group sslgroup webvpn-attributes ciscoasa(config-tunnel-webvpn)#group-alias sslgroup_users enable
-
-
配置NAT
對於來自可使用外部IP地址172.16.1.5轉換的內部網路的流量,選擇Configuration > NAT > Add > Add Dynamic NAT Rule。
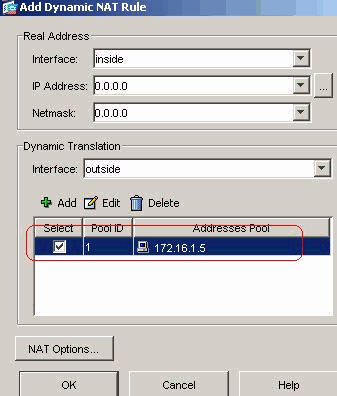
按一下「OK」,然後在首頁上按一下「Apply」。
等效的CLI配置:
Cisco ASA 7.2(2) ciscoasa(config)#global (outside) 1 172.16.1.5 ciscoasa(config)#nat (inside) 1 0.0.0.0 0.0.0.0
-
為從內部網路到VPN客戶端的返回流量配置nat免除。
ciscoasa(config)#access-list nonat permit ip 10.77.241.0 192.168.10.0
ciscoasa(config)#access-list nonat permit ip 192.168.10.0 10.77.241.0
ciscoasa(config)#nat (inside) 0 access-list nonat
使用CLI配置ASA 7.2(2)
| Cisco ASA 7.2(2) |
|---|
ciscoasa#show running-config : Saved : ASA Version 7.2(2) ! hostname ciscoasa enable password 8Ry2YjIyt7RRXU24 encrypted names ! interface Ethernet0/0 nameif inside security-level 100 ip address 10.77.241.142 255.255.255.192 ! interface Ethernet0/1 nameif outside security-level 0 ip address 172.16.1.1 255.255.255.0 ! interface Ethernet0/2 shutdown no nameif no security-level no ip address ! interface Ethernet0/3 shutdown no nameif no security-level no ip address ! interface Management0/0 shutdown no nameif no security-level no ip address ! passwd 2KFQnbNIdI.2KYOU encrypted ftp mode passive access-list split-tunnel standard permit 10.77.241.128 255.255.255.192 !--- ACL for Split Tunnel network list for encryption. access-list nonat permit ip 10.77.241.0 192.168.10.0 access-list nonat permit ip 192.168.10.0 10.77.241.0 !--- ACL to define the traffic to be exempted from NAT. pager lines 24 mtu inside 1500 mtu outside 1500 ip local pool vpnpool 192.168.10.1-192.168.10.254 !--- The address pool for the SSL VPN Clients no failover icmp unreachable rate-limit 1 burst-size 1 asdm image disk0:/asdm-522.bin no asdm history enable arp timeout 14400 global (outside) 1 172.16.1.5 !--- The global address for Internet access used by VPN Clients. !--- Note: Uses an RFC 1918 range for lab setup. !--- Apply an address from your public range provided by your ISP. nat (inside) 0 access-list nonat !--- The traffic permitted in "nonat" ACL is exempted from NAT. nat (inside) 1 0.0.0.0 0.0.0.0 access-group 100 in interface outside route outside 0.0.0.0 0.0.0.0 172.16.1.2 1 timeout xlate 3:00:00 timeout conn 1:00:00 half-closed 0:10:00 udp 0:02:00 icmp 0:00:02 timeout sunrpc 0:10:00 h323 0:05:00 h225 1:00:00 mgcp 0:05:00 mgcp-pat 0:05:0 timeout sip 0:30:00 sip_media 0:02:00 sip-invite 0:03:00 sip-disconnect 0:02: timeout uauth 0:05:00 absolute group-policy clientgroup internal !--- Create an internal group policy "clientgroup". group-policy clientgroup attributes vpn-tunnel-protocol webvpn !--- Enable webvpn as tunneling protocol. split-tunnel-policy tunnelspecified split-tunnel-network-list value split-tunnel !--- Encrypt the traffic specified in the split tunnel ACL only. webvpn svc required !--- Activate the SVC under webvpn mode. svc keep-installer installed !--- When the security appliance and the SVC perform a rekey, !--- they renegotiate the crypto keys and initialization vectors, !--- and increase the security of the connection. svc rekey time 30 !--- Command that specifies the number of minutes !--- from the start of the session until the rekey takes place, !--- from 1 to 10080 (1 week). svc rekey method ssl !--- Command that specifies that SSL renegotiation !--- takes place during SVC rekey. username ssluser1 password ZRhW85jZqEaVd5P. encrypted !--- Create an user account "ssluser1". aaa local authentication attempts max-fail 16 !--- Enable the AAA local authentication. http server enable http 0.0.0.0 0.0.0.0 inside no snmp-server location no snmp-server contact snmp-server enable traps snmp authentication linkup linkdown coldstart tunnel-group sslgroup type webvpn !--- Create a tunnel group "sslgroup" with type as WebVPN. tunnel-group sslgroup general-attributes address-pool vpnpool !--- Associate the address pool vpnpool created. default-group-policy clientgroup !--- Associate the group policy "clientgroup" created. tunnel-group sslgroup webvpn-attributes group-alias sslgroup_users enable !--- Configure the group alias as sslgroup-users. telnet timeout 5 ssh timeout 5 console timeout 0 ! class-map inspection_default match default-inspection-traffic ! ! policy-map type inspect dns preset_dns_map parameters message-length maximum 512 policy-map global_policy class inspection_default inspect dns preset_dns_map inspect ftp inspect h323 h225 inspect h323 ras inspect netbios inspect rsh inspect rtsp inspect skinny inspect esmtp inspect sqlnet inspect sunrpc inspect tftp inspect sip inspect xdmcp ! service-policy global_policy global webvpn enable outside !--- Enable WebVPN on the outside interface. svc image disk0:/sslclient-win-1.1.4.179.pkg 1 !--- Assign an order to the SVC image. svc enable !--- Enable the security appliance to download !--- SVC images to remote computers. tunnel-group-list enable !--- Enable the display of the tunnel-group list !--- on the WebVPN Login page. prompt hostname context Cryptochecksum:d41d8cd98f00b204e9800998ecf8427e : end ciscoasa# |
使用SVC建立SSL VPN連線
完成以下步驟,以便與ASA建立SSL VPN連線。
-
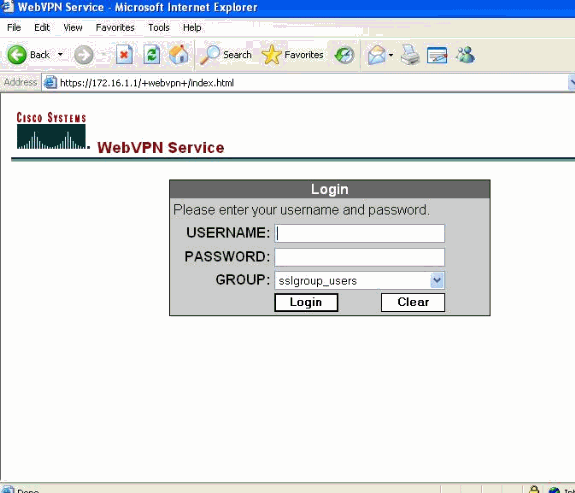
按照所示格式在Web瀏覽器中鍵入ASA WebVPN介面的URL或IP地址。
https://url
或
https://<IP address of the ASA WebVPN interface>
-
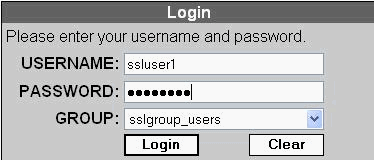
輸入您的使用者名稱和密碼,然後從下拉選單中選擇您各自的組,如下所示。
-
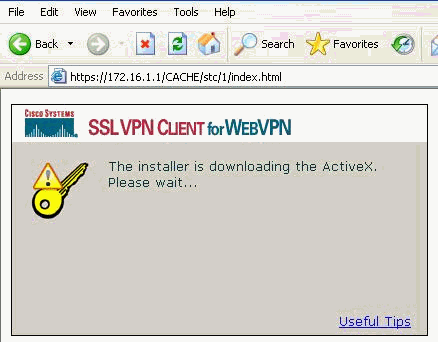
下載SVC之前,必須在電腦上安裝ActiveX軟體。
-
這些視窗在建立SSL VPN連線之前出現。

-
一旦建立連線,您就可以獲得這些視窗。

-
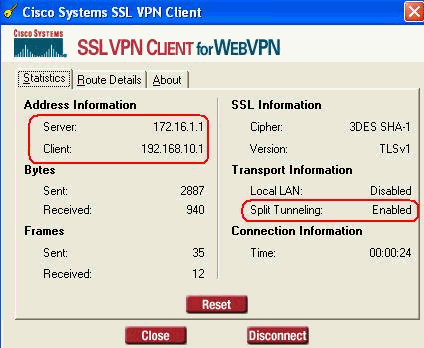
按一下出現在電腦工作列中的黃色鍵。將出現這些視窗,其中提供有關SSL連線的資訊。例如,為客戶端分配的IP是192.168.10.1,伺服器IP地址是172.16.1.1,已啟用分割隧道,依此類推。
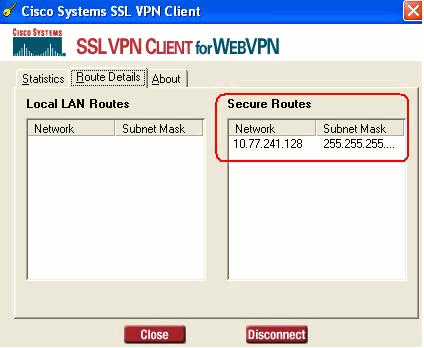
您還可以檢查要通過SSL加密的安全網路,網路清單從ASA中配置的拆分隧道訪問清單下載。
在此範例中,SSL VPN使用者端會保護對10.77.241.128/24的存取安全,而所有其他流量不會進行加密,也不會透過通道傳送。
驗證
使用本節內容,確認您的組態是否正常運作。
輸出直譯器工具(僅供已註冊客戶使用)(OIT)支援某些show命令。使用OIT檢視show命令輸出的分析。
-
show webvpn svc — 顯示儲存在ASA快閃記憶體中的SVC映像。
ciscoasa#show webvpn svc
1. disk0:/sslclient-win-1.1.4.179.pkg 1
  CISCO STC win2k+ 1.0.0
  1,1,4,179
  Fri 01/18/2008 15:19:49.43

1 SSL VPN Client(s) installed
-
show vpn-sessiondb svc — 顯示有關當前SSL連線的資訊。
ciscoasa#show vpn-sessiondb svc

Session Type: SVC

Username     : ssluser1
Index        : 1
Assigned IP  : 192.168.10.1           Public IP    : 192.168.1.1
Protocol     : SVC                    Encryption   : 3DES
Hashing      : SHA1
Bytes Tx     : 131813                 Bytes Rx     : 5082
Client Type  : Mozilla/4.0 (compatible; MSIE 6.0; Windows NT 5.1; SV1)
Client Ver   : Cisco Systems SSL VPN Client 1, 1, 4, 179
Group Policy : clientgroup
Tunnel Group : sslgroup
Login Time   : 12:38:47 UTC Mon Mar 17 2008
Duration     : 0h:00m:53s
Filter Name  :
-
show webvpn group-alias — 顯示各種組的已配置別名。
ciscoasa#show webvpn group-alias
Tunnel Group: sslgroup   Group Alias: sslgroup_users enabled
-
在ASDM中,選擇Monitoring > VPN > VPN Statistics > Sessions以瞭解當前ASA中的WebVPN會話。

疑難排解
本節提供的資訊可用於對組態進行疑難排解。
-
vpn-sessiondb logoff name <username> — 用於註銷特定使用者名稱的SSL VPN會話的命令。
ciscoasa#vpn-sessiondb logoff name ssluser1
Called vpn_remove_uauIth: success!
webvpn_svc_np_tear_down: no ACL
NFO: Number of sessions with name "ssluser1" logged off : 1
同樣,您可以使用vpn-sessiondb logoff svc命令終止所有SVC會話。
-
注意:如果PC進入待機或休眠模式,SSL VPN連線可以終止。
webvpn_rx_data_cstp
webvpn_rx_data_cstp: got message
SVC message: t/s=5/16: Client PC is going into suspend mode (Sleep, Hibernate, etc)
Called vpn_remove_uauth: success!
webvpn_svc_np_tear_down: no ACL
ciscoasa#show vpn-sessiondb svc
INFO: There are presently no active sessions
-
Debug webvpn svc <1-255> — 提供即時webvpn事件以建立會話。
Ciscoasa#debug webvpn svc 7

ATTR_CISCO_AV_PAIR: got SVC ACL: -1
webvpn_rx_data_tunnel_connect
CSTP state = HEADER_PROCESSING
http_parse_cstp_method()
...input: 'CONNECT /CSCOSSLC/tunnel HTTP/1.1'
webvpn_cstp_parse_request_field()
...input: 'Host: 172.16.1.1'
Processing CSTP header line: 'Host: 172.16.1.1'
webvpn_cstp_parse_request_field()
...input: 'User-Agent: Cisco Systems SSL VPN Client 1, 1, 4, 179'
Processing CSTP header line: 'User-Agent: Cisco Systems SSL VPN Client 1, 1, 4,
179'
Setting user-agent to: 'Cisco Systems SSL VPN Client 1, 1, 4, 179'
webvpn_cstp_parse_request_field()
...input: 'X-CSTP-Version: 1'
Processing CSTP header line: 'X-CSTP-Version: 1'
Setting version to '1'
webvpn_cstp_parse_request_field()
...input: 'X-CSTP-Hostname: tacweb'
Processing CSTP header line: 'X-CSTP-Hostname: tacweb'
Setting hostname to: 'tacweb'
webvpn_cstp_parse_request_field()
...input: 'X-CSTP-Accept-Encoding: deflate;q=1.0'
Processing CSTP header line: 'X-CSTP-Accept-Encoding: deflate;q=1.0'
webvpn_cstp_parse_request_field()
...input: 'Cookie: webvpn=16885952@10@1205757506@D4886D33FBF1CF236DB5E8BE70B1486
D5BC554D2'
Processing CSTP header line: 'Cookie: webvpn=16885952@10@1205757506@D4886D33FBF1
CF236DB5E8BE70B1486D5BC554D2'
Found WebVPN cookie: 'webvpn=16885952@10@1205757506@D4886D33FBF1CF236DB5E8BE70B1
486D5BC554D2'
WebVPN Cookie: 'webvpn=16885952@10@1205757506@D4886D33FBF1CF236DB5E8BE70B1486D5B
C554D2'
Validating address: 0.0.0.0
CSTP state = WAIT_FOR_ADDRESS
webvpn_cstp_accept_address: 192.168.10.1/0.0.0.0
CSTP state = HAVE_ADDRESS
No subnetmask... must calculate it
SVC: NP setup
webvpn_svc_np_setup
SVC ACL Name: NULL
SVC ACL ID: -1
SVC ACL ID: -1
vpn_put_uauth success!
SVC: adding to sessmgmt
SVC: Sending response
CSTP state = CONNECTED
-
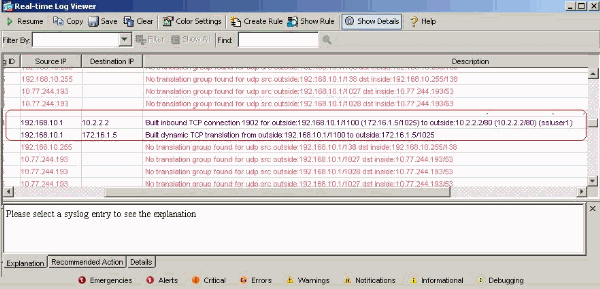
在ASDM中,選擇Monitoring > Logging > Real-time Log Viewer > View以檢視即時事件。以下示例顯示通過ASA 172.16.1.5在網際網路中的SVC 192.168.10.1和Web伺服器10.2.2.2之間的會話資訊。
相關資訊
修訂記錄
| 修訂 | 發佈日期 | 意見 |
|---|---|---|
1.0 |
02-Oct-2009 |
初始版本 |
 意見
意見