Cisco Secure Firewall ASA 和 Secure Firewall Threat Defense 重新映像指南

本指南介绍如何在 Cisco Secure Firewall ASACisco Secure Firewall Threat Defense(之前的 Firepower Threat Defense)之间重新映像,以及如何使用新映像版本为威胁防御执行重新映像;此方法不同于升级,并会将威胁防御设置为出厂默认状态。对于 ASA 重新映像,请参阅《 ASA 常规操作配置指南》,您可以在其中使用多种方法对 ASA 进行重新映像。

支持的型号

以下型号支持 ASA 软件或 威胁防御 软件。有关 ASA 和 威胁防御 版本支持,请参阅《ASA 兼容性指南》或Cisco Secure Firewall Threat Defense 兼容性指南

  • Firepower 1000

  • Firepower 2100

  • Cisco Secure Firewall 3100

  • Cisco Secure Firewall 4200

  • ISA 3000

  • ASA 5506-X、5506W-x 和 5506H-x-X (威胁防御 6.2.3 及早期版本;ASA 9.16 及更早版本)

  • ASA 5508-X(威胁防御 7.0 及早期版本;ASA 9.16 及早期版本)

  • ASA 5512-X (威胁防御 6.2.3 及早期版本;ASA 9.12 及早期版本)

  • ASA 5515-X (威胁防御 6.4 及早期版本;ASA 9.12 及早期版本)

  • ASA 5516-X(威胁防御 7.0 及早期版本;ASA 9.16 及早期版本)

  • ASA 5525-X(威胁防御 6.6 及早期版本;ASA 9.14 及早期版本)

  • ASA 5545-X(威胁防御 6.6 及早期版本;ASA 9.14 及早期版本)

  • ASA 5555-X(威胁防御 6.6 及早期版本;ASA 9.14 及早期版本)


Firepower 4100 和 9300 还支持 ASA 或 威胁防御,但它们将作为逻辑设备进行安装;有关详细信息,请参阅 FXOS 配置指南。


对于 ASA 5512-X 至 ASA 5555-X 上的 威胁防御,必须安装思科固态硬盘 (SSD)。有关详细信息,请参阅《ASA 5500-X 硬件指南》。对于 ASA,使用 ASA FirePOWER 模块也需要 SSD。(SSD 是 ASA 5506-X、5508-X 和 5516-X 的标准配置。)


重新映像 Firepower 或 Cisco Secure Firewall

下载软件

获取 威胁防御软件或 ASA 软件。


需要 Cisco.com 登录信息和思科服务合同。


表 1. 威胁防御 软件

威胁防御 型号

下载位置

软件包

Firepower 1000

请参阅:https://www.cisco.com/go/ftd-software

威胁防御 软件包

选择型号 > Firepower Threat Defense 软件 > 版本

软件包的文件名类似于 cisco-ftd-fp1k.7.4.1-172SPA

Firepower 2100

请参阅:https://www.cisco.com/go/ftd-software

威胁防御 软件包

选择型号 > Firepower Threat Defense 软件 > 版本

软件包的文件名类似于 cisco-ftd-fp2k.7.4.1-172SPA

Cisco Secure Firewall 3100

请参阅:https://www.cisco.com/go/ftd-software

威胁防御 软件包

选择型号 > Firepower Threat Defense 软件 > 版本

  • 7.3 及更高版本 - 软件包的文件名类似于 Cisco_FTD_SSP_FP3K_Upgrade-7.4.1-172.sh.REL.tar

  • 7.2 — 软件包的文件名类似于 cisco-ftd-fp3k.7.2.6-127。SPA

Cisco Secure Firewall 4200

请参阅:https://www.cisco.com/go/ftd-software

威胁防御 软件包

选择型号 > Firepower Threat Defense 软件 > 版本

软件包的文件名类似于 Cisco_Secure_FW_TD_4200-7.4.1-172.sh.REL.tar

表 2. ASA 软件

ASA 型号

下载位置

软件包

Firepower 1000

请参阅:https://www.cisco.com/go/asa-firepower-sw

ASA 软件包

选择您的型号 > Adaptive Security Appliance (ASA) Software > 版本

软件包的文件名类似于 cisco-asa-fp1k.9.20.2.2。SPA。此软件包包括 ASA 和 ASDM。

ASDM 软件(升级)

要使用当前的 ASDM 或 ASA CLI 升级到更高版本的 ASDM,请选择您的型号 > Adaptive Security Appliance (ASA) Device Manager > 版本

ASDM 软件文件都有一个文件名,例如: asdm-7202.bin

Firepower 2100

请参阅:https://www.cisco.com/go/asa-firepower-sw

ASA 软件包

选择您的型号 > Adaptive Security Appliance (ASA) Software > 版本

软件包的文件名类似于 cisco-asa-fp2k.9.20.2.2。SPA。此软件包含有 ASA、ASDM、FXOS 和 Cisco Secure Firewall 机箱管理器 (之前的 Firepower 机箱管理器)

ASDM 软件(升级)

要使用当前的 ASDM 或 ASA CLI 升级到更高版本的 ASDM,请选择您的型号 > Adaptive Security Appliance (ASA) Device Manager > 版本

ASDM 软件文件都有一个文件名,例如: asdm-7202.bin

Cisco Secure Firewall 3100

请参阅:https://cisco.com/go/asa-secure-firewall-sw

ASA 软件包

选择您的型号 > Adaptive Security Appliance (ASA) Software > 版本

软件包的文件名类似于 cisco-asa-fp3k.9.20.2.2。SPA。此软件包包括 ASA 和 ASDM。

ASDM 软件(升级)

要使用当前的 ASDM 或 ASA CLI 升级到更高版本的 ASDM,请选择您的型号 > Adaptive Security Appliance (ASA) Device Manager > 版本

ASDM 软件文件都有一个文件名,例如: asdm-7202.bin

Secure Firewall 4200 系列

请参阅:https://cisco.com/go/asa-secure-firewall-sw

ASA 软件包

选择您的型号 > Adaptive Security Appliance (ASA) Software > 版本

软件包的文件名类似于 cisco-asa-fp4200.9.20.2.2。SPA。此软件包包括 ASA 和 ASDM。

ASDM 软件(升级)

要使用当前的 ASDM 或 ASA CLI 升级到更高版本的 ASDM,请选择您的型号 > Adaptive Security Appliance (ASA) Device Manager > 版本

ASDM 软件文件都有一个文件名,例如: asdm-7202.bin

ASA→威胁防御:Firepower 或 Cisco Secure Firewall

通过此任务,您可以从 ASA 软件启动威胁防御映像,将 Firepower 或 Cisco Secure Firewall 设备从 ASA 重新映像到威胁防御

开始之前

  • 确保要上传的图像在 FTP、HTTP(S)、SCP、SMB 或 TFTP 服务器上,或在格式为 EXT2/3/4 或 VFAT/FAT32 的 USB 驱动器上。


    如果您的 ASA 没有强加密许可证(例如,您从未注册过),那么您就不能使用任何安全协议,如 SCP 或 HTTPS。


  • 确保您可以通过 ASA 接口来访问服务器。默认配置包括:

    • 以太网 1/2 - 192.168.1.1

    • 管理 1/1 - Firepower 1010:192.168.45.1;其他型号:DHCP 和默认路由

    • 以太网 1/1 - DHCP 和默认路由

    您还可以使用 configure factory-default 命令为管理 1/1(Firepower 1010)或以太网 1/2(其他型号)设置静态 IP 地址。要配置路由,请参阅 route 命令。

  • (Firepower 2100) 在 9.12 和更早版本中,仅平台模式可用。在 9.13 及更高版本中,设备模式为默认模式。如果将平台模式设备升级到 9.13 或更高版本,则 ASA 将保持平台模式。在 ASA CLI 中使用 show fxos mode 命令检查模式。其他型号仅支持设备模式。

    如果您的 ASA 处于平台模式,则必须使用 FXOS 重新映像。请参阅ASA→威胁防御:Firepower 2100 平台模式

  • (Cisco Secure Firewall 3100) 要在 Cisco Secure Firewall 3100 上从 ASA 重新映像到威胁防御 7.3+,必须先将 ASA 升级到 9.19+,以便更新 ROMMON 版本以支持 7.3 中引入的新映像类型。请参阅 ASA 升级指南

过程


步骤 1

连接到 ASA CLI。

步骤 2

无论是通过 ASA CLI/ASDM 还是通过智能软件许可服务器,都可以从智能软件许可服务器取消注册 ASA。

license smart deregister

示例:


ciscoasa# license smart deregister

步骤 3

威胁防御映像下载到闪存。此步骤展示了如何执行 FTP 复制。

copy ftp://[[user@]server[/path]/ftd_image_name diskn:/[path/]ftd_image_name

要使用 USB 驱动器,请指定 disk1:// ,但 Firepower 2100 除外,它使用 disk2://

示例:

Firepower 2100

ciscoasa# copy ftp://dwinchester@10.1.1.1/cisco-ftd-fp2k.7.4.1-172.SPA disk0:/cisco-ftd-fp2k.7.4.1-172.SPA

示例:

Cisco Secure Firewall 3100

ciscoasa# copy ftp://dwinchester@10.1.1.1/Cisco_FTD_SSP_FP3K_Upgrade-7.4.1-172.sh.REL.tar disk0:/Cisco_FTD_SSP_FP3K_Upgrade-7.4.1-172.sh.REL.tar

步骤 4

启动 威胁防御 映像(您刚上传的映像)。

  1. 访问全局配置模式。

    configure terminal

    示例:

    
    ciscoasa# configure terminal
    ciscoasa(config)#
    
    
  2. 显示当前配置的引导映像(如存在)。

    show running-config boot system

    请注意,您的配置中不能有 boot system 命令;例如,如果您从 ROMMON 安装了原 ASA 映像,有新设备,或者手动删除了该命令。

    示例:

    
    ciscoasa(config)# show running-config boot system
    boot system disk0:/cisco-asa-fp1k.9.20.2.2.SPA
    
    
  3. 如果boot system 已配置命令,请将其删除,以便您可以输入新的引导映像。

    no boot system diskn:/[path/]asa_image_name

    如果未配置 boot system 命令,请跳过此步骤。

    示例:

    
    ciscoasa(config)# no boot system disk0:/cisco-asa-fp1k.9.20.2.2.SPA
    
    
  4. 引导 威胁防御映像。

    boot system diskn:/[path/]ftd_image_name

    系统将提示重新加载。

    示例:

    Cisco Secure Firewall 3100
    
    ciscoasa(config)# boot system disk0:/Cisco_FTD_SSP_FP3K_Upgrade-7.4.1-172.sh.REL.tar
     
    fxos_set_boot_system_image(filename: Cisco_FTD_SSP_FP3K_Upgrade-7.4.1-172.sh.REL.tar)
    fxos_get_current_bundle_version(instance 41)
    The system is currently installed with security software package 9.20.2.2, which has:
       - The platform version:  2.14.1.131
       - The CSP (asa) version: 9.20.2.2
    Preparing new image for install...
    !!!!!!!!!!!!!!!!!!!!
    Image download complete (Successful unpack the image).
    Attention:
       If you proceed the system will be re-imaged and reboot automatically.
       All existing configuration will be lost and the default configuration applied.
    Do you want to proceed? [confirm]
    Finalizing image install process...
     
    Installation succeeded.


    示例:

    Firepower 2100
    
    ciscoasa(config)# boot system disk0:/cisco-ftd-fp2k.7.4.1-172.SPA
     
    fxos_set_boot_system_image(filename: cisco-ftd-fp2k.7.4.1-172.SPA)
    fxos_get_current_bundle_version(instance 41)
    The system is currently installed with security software package 9.20.2.2, which has:
       - The platform version:  2.14.1.131
       - The CSP (asa) version: 9.20.2.2
    Preparing new image for install...
    !!!!!!!!!!!!!!!!!!!!
    Image download complete (Successful unpack the image).
    Attention:
       If you proceed the system will be re-imaged and reboot automatically.
       All existing configuration will be lost and the default configuration applied.
    Do you want to proceed? [confirm]
    Finalizing image install process...
     
    Installation succeeded.


步骤 5

等待机箱完成重新启动。

FXOS 首先出现,但您仍需要等待 威胁防御 出现。

在应用启动并连接到应用后,系统会提示您接受 EULA 并在 CLI 中执行初始设置。您可以使用 Secure Firewall 设备管理器 (以前的 Firepower 设备管理器)Cisco Secure Firewall Management Center (以前的 Firepower 管理中心)来管理设备。请参阅与您的型号和管理器对应的《快速入门指南》,继续设置:http://www.cisco.com/go/ftd-asa-quick

示例:


[...]
************ Attention *********

   Initializing the configuration database.  Depending on available
   system resources (CPU, memory, and disk), this may take 30 minutes 
   or more to complete.

************ Attention *********
Executing S09database-init                                                  [  OK  ]
Executing S11database-populate

Cisco FPR Series Security Appliance
firepower login: admin
Password: 
Successful login attempts for user 'admin' : 1

Copyright 2004-2024, Cisco and/or its affiliates. All rights reserved. 
[...]

User enable_1 logged in to firepower
Logins over the last 1 days: 1.  
Failed logins since the last login: 0.  
Type help or '?' for a list of available commands.
firepower> 
firepower# connect ftd
You must accept the EULA to continue.
Please enter 'YES' or press <ENTER> to AGREE to the EULA:
[...]
 

ASA→威胁防御:Firepower 2100 平台模式

此任务允许您在平台模式下将 Firepower 2100 重新映像到 威胁防御


执行此程序后,FXOS 管理员密码将被重置为 Admin123


开始之前

  • 您必须使用 FXOS CLI 执行此程序。

  • 在 9.12 和更早版本中,仅平台模式可用。在 9.13 及更高版本中,设备模式为默认模式。如果将平台模式设备升级到 9.13 或更高版本,则 ASA 将保持平台模式。在 ASA CLI 中使用 show fxos mode 命令检查 9.13 或更高版本中的模式。

    如果您的 ASA 处于设备模式下,则无法访问这些 FXOS 命令;重新映像到 威胁防御会在 ASA 操作系统中发生。请参阅ASA→威胁防御:Firepower 或 Cisco Secure Firewall

过程


步骤 1

请确保您要上传的映像在连接到 FXOS 管理 1/1 接口的 FTP、SCP、SFTP 服务器上找到,或在格式为 EXT2/3/4 或 VFAT/FAT32 的 USB 驱动器上找到。

要验证或更改 FXOS 管理 1/1 IP 地址,请参阅《Firepower 2100 入门指南》。

步骤 2

无论是通过 ASA CLI/ASDM 还是通过智能软件许可服务器,都可以从智能软件许可服务器取消注册 ASA。

步骤 3

通过控制台端口(首选)或使用 SSH 连接到管理 1/1 接口,从而连接到 FXOS CLI。如果在控制台端口连接,则立即访问 FXOS CLI。输入 FXOS 登录凭证。默认用户名是 admin,默认密码是 Admin123

如果使用 SSH 连接到 ASA 管理 IP 地址,请输入 connect fxos 以访问 FXOS。您还可以通过 FXOS 管理 IP 地址直接进行 SSH 连接。

步骤 4

将软件包下载到机箱。

  1. 进入固件模式。

    scope firmware

    示例:

    
    firepower-2110# scope firmware
    firepower-2110 /firmware# 
    
    
  2. 下载软件包。

    download image url

    使用以下各项之一,为正在导入的文件指定 URL:

    • ftp://username@server/[path/]image_name

    • scp://username@server/[path/]image_name

    • sftp://username@server/[path/]image_name

    • tftp://server[:port]/[path/]image_name

    • usbA:/path/filename

    示例:

    
    firepower-2110 /firmware # download image scp://admin@10.88.29.181/cisco-ftd-fp2k.7.4.1-172.SPA
    Password:
    Please use the command 'show download-task' or 'show download-task detail' to check download progress.
    
    
  3. 监控下载过程。

    show download-task

    示例:

    
    firepower-2110 /firmware # show download
    
    Download task:
        File Name Protocol Server          Port       Userid          State
        --------- -------- --------------- ---------- --------------- -----
        cisco-ftd-fp2k.7.4.1-172.SPA
                  Scp      10.122.84.45             0 admin           Downloading
    firepower-2110 /firmware #        


步骤 5

当新软件包完成下载(已下载状态)时,启动软件包。

  1. 查看和复制新软件包的版本号。

    show package

    示例:

    
    firepower-2110 /firmware # show package
    Name                                          Package-Vers
    --------------------------------------------- ------------
    cisco-asa-fp2k.9.20.2.2.SPA                   9.20.2.2
    cisco-ftd-fp2k.7.4.1-172.SPA                  7.4.1-172
    firepower-2110 /firmware #                                
    
    
  2. 安装软件包。

    小心


    此步骤会擦除您的配置。

    scope auto-install

    install security-pack version version

    show package 输出中,复制与 security-pack version 号对应的 Package-Vers 值。机箱会安装映像并重新启动。此过程大约需要 5 分钟。


    如果出现以下错误,则您可能输入了软件包名称,而不是软件包版本

    
    Invalid software pack
    Please contact technical support for help


    示例:

    
    firepower 2110 /firmware # scope auto-install
    firepower-2110 /firmware/auto-install # install security-pack version 7.4.1-172
    
    The system is currently installed with security software package 9.20.2.2, which has:
       - The platform version: 2.14.1.131
       - The CSP (asa) version: 9.20.2.2
    If you proceed with the upgrade 7.4.1-172, it will do the following:
       - upgrade to the new platform version 2.14.1.131
       - reimage the system from CSP asa version 9.20.2.2 to the CSP ftd version 7.4.1-172
    
    Do you want to proceed ? (yes/no): yes   
    
    This operation upgrades firmware and software on Security Platform Components
    Here is the checklist of things that are recommended before starting Auto-Install
    (1) Review current critical/major faults
    (2) Initiate a configuration backup
    
    Attention:
       If you proceed the system will be re-imaged. All existing configuration will be lost,
       and the default configuration applied.
    Do you want to proceed? (yes/no): yes  
    
    Triggered the install of software package version 7.4.1-172
    Install started. This will take several minutes.
    For monitoring the upgrade progress, please enter 'show' or 'show detail' command.
    firepower-2110 /firmware/auto-install #                                               


步骤 6

等待机箱完成重新启动。

FXOS 会首先启动,但您仍需等待 威胁防御 启动。

在应用启动并连接到应用后,系统会提示您接受 EULA 并在 CLI 中执行初始设置。您可以使用 设备管理器管理中心 来管理设备。请参阅与您的型号和管理器对应的《快速入门指南》,继续设置:http://www.cisco.com/go/ftd-asa-quick

示例:


[...]
************ Attention *********

   Initializing the configuration database.  Depending on available
   system resources (CPU, memory, and disk), this may take 30 minutes 
   or more to complete.

************ Attention *********
Executing S09database-init                                                  [  OK  ]
Executing S11database-populate

Cisco FPR Series Security Appliance
firepower login: admin
Password: 
Successful login attempts for user 'admin' : 1

Copyright 2004-2024, Cisco and/or its affiliates. All rights reserved. 
[...]

User enable_1 logged in to firepower
Logins over the last 1 days: 1.  
Failed logins since the last login: 0.  
Type help or '?' for a list of available commands.
firepower> 
firepower# connect ftd
You must accept the EULA to continue.
Please enter 'YES' or press <ENTER> to AGREE to the EULA:
[...]
 

威胁防御→ASA:Firepower 或 Cisco Secure Firewall

通过此任务,您可以将 Firepower 或 Cisco Secure Firewall 设备从 威胁防御 重新映像到 ASA。对于 Firepower 2100,ASA 默认在设备模式下运行。重新映像后,您可以将其更改为平台模式。


执行此程序后,FXOS 管理员密码将被重置为 Admin123


过程


步骤 1

确保要上传的映像在连接到管理 1/1 接口的 FTP、HTTP(S)、SCP、SFTP 或 TFTP 服务器上可用,或对于 Cisco Secure Firewall 4200,在管理 1/1 或 1/2 上可用,或在格式为 EXT2/3/4 或 VFAT/FAT32 的 USB 驱动器上可用。

有关管理接口设置的详细信息,请参阅 Cisco Secure Firewall Threat Defense 命令参考 中的 威胁防御 show network configure network 命令。

步骤 2

取消许可 威胁防御

  • 如果通过 管理中心管理 威胁防御,请从 管理中心中删除该设备。

  • 如果您使用 设备管理器管理 威胁防御,无论是通过 设备管理器还是通过智能软件许可服务器,请确保从智能软件许可服务器取消注册该设备。

步骤 3

通过控制台端口(首选)或使用 SSH 连接到管理接口,从而连接到 FXOS CLI。如果在控制台端口连接,则立即访问 FXOS CLI。输入 FXOS 登录凭证。默认用户名是 admin,默认密码是 Admin123

如果使用 SSH 连接到 威胁防御 管理 IP 地址,请输入 connect fxos 以访问 FXOS。

步骤 4

将软件包下载到机箱。

  1. 进入固件模式。

    scope firmware

    示例:

    
    firepower-2110# scope firmware
    firepower-2110 /firmware# 
    
    
  2. 下载软件包。

    download image url

    使用以下各项之一,为正在导入的文件指定 URL:

    • ftp://username@server/[path/]image_name

    • http://username@server/[path/]image_name

    • https://username@server/[path/]image_name

    • scp://username@server/[path/]image_name

    • sftp://username@server/[path/]image_name

    • tftp://server[:port]/[path/]image_name

    • usbA:/path/filename

    示例:

    
    firepower-2110 /firmware # download image scp://admin@10.88.29.181/cisco-asa-fp2k.9.20.2.2.SPA
    Password:
    Please use the command 'show download-task' or 'show download-task detail' to check download progress.
    
    
  3. 监控下载过程。

    show download-task

    示例:

    
    firepower-2110 /firmware # show download
    
    Download task:
        File Name Protocol Server          Port       Userid          State
        --------- -------- --------------- ---------- --------------- -----
        cisco-asa-fp2k.9.20.2.2.SPA
                  Scp      10.122.84.45             0 admin           Downloading
    firepower-2110 /firmware #        


步骤 5

当新软件包完成下载(已下载状态)时,启动软件包。

  1. 查看和复制新软件包的版本号。

    show package

    示例:

    
    firepower-2110 /firmware # show package
    Name                                          Package-Vers
    --------------------------------------------- ------------
    cisco-asa-fp2k.9.20.2.2.SPA                   9.20.2.2
    cisco-ftd-fp2k.7.4.1-172.SPA                  7.4.1-172
    firepower-2110 /firmware #                                
    
    
  2. 安装软件包。

    小心


    此步骤会擦除您的配置。

    scope auto-install

    install security-pack version version

    show package 输出中,复制与 security-pack version 号对应的 Package-Vers 值。机箱会安装映像并重新启动。此过程(包括重新加载)可能需要大约 30 分钟。


    如果出现以下错误,则您可能输入了软件包名称,而不是软件包版本

    
    Invalid software pack
    Please contact technical support for help


    示例:

    
    firepower 2110 /firmware # scope auto-install
    firepower-2110 /firmware/auto-install # install security-pack version 9.20.2.2
    
    The system is currently installed with security software package 7.4.1-172, which has:
       - The platform version: 2.14.1.131
       - The CSP (ftd) version: 7.4.1-172
    If you proceed with the upgrade 9.20.2.2, it will do the following:
       - upgrade to the new platform version 2.14.1.131
       - reimage the system from CSP ftd version 7.4.1-172 to the CSP asa version 9.20.2.2
    
    Do you want to proceed ? (yes/no): yes   
    
    This operation upgrades firmware and software on Security Platform Components
    Here is the checklist of things that are recommended before starting Auto-Install
    (1) Review current critical/major faults
    (2) Initiate a configuration backup
    
    Attention:
       If you proceed the system will be re-imaged. All existing configuration will be lost,
       and the default configuration applied.
    Do you want to proceed? (yes/no): yes  
    
    Triggered the install of software package version 9.20.2.2
    Install started. This will take several minutes.
    For monitoring the upgrade progress, please enter 'show' or 'show detail' command.
    firepower-2110 /firmware/auto-install #                                               


步骤 6

等待机箱完成重新启动。

ASA 9.13 及更高版本(默认为设备模式)

ASA 将启动,您可以在 CLI 中访问用户 EXEC 模式。

示例:


 [...]
Attaching to ASA CLI ...
Type help or '?' for a list of available commands.
ciscoasa>

ASA 9.12 及早期版本(默认为平台模式)

FXOS 会首先启动,但您仍需等待 ASA 启动。

在应用启动并连接到应用后,您可以在 CLI 中访问用户 EXEC 模式。

示例:


 [...]
Cisco FPR Series Security Appliance
firepower-2110 login: admin
Password: 

Successful login attempts for user 'admin' : 1
Cisco Firepower Extensible Operating System (FX-OS) Software
TAC support: http://www.cisco.com/tac
Copyright (c) 2009-2024, Cisco Systems, Inc. All rights reserved.
[...]

User enable_1 logged in to ciscoasa
Logins over the last 1 days: 1.  
Failed logins since the last login: 0.
[press Enter to see the prompt below:]
 
firepower-2110# connect asa
Attaching to ASA CLI ... Press 'Ctrl+a then d' to detach.
Type help or '?' for a list of available commands.

ciscoasa> 


威胁防御→威胁防御:Firepower 或 Cisco Secure Firewall

仅对于 Cisco Secure Firewall 3100,重新映像方法取决于您当前的版本。

威胁防御→威胁防御:Firepower 或 Cisco Secure Firewall(3100 除外)

这些型号提供多个级别的重新映像,从仅擦除配置到替换映像,到将设备恢复为出厂默认状态。

过程

步骤 1

有关重新映像程序,请参阅《故障排除指南》。

步骤 2

如果要加载新版本,请使用“使用新软件版本重新映像系统”程序。

使用其他重新映像方法进行故障排除,例如无法启动或重置密码。


威胁防御→威胁防御:Cisco Secure Firewall 3100

Cisco Secure Firewall 3100 提供多个级别的重新映像,从仅擦除配置到替换映像,到将设备恢复为出厂默认状态。根据您的开始和结束版本,请参阅以下重新映像选项。

过程

步骤 1

重新映像到 7.2,或 7.3+ 到 7.3+: 有关重新映像程序,请参阅《故障排除指南》。

如果要加载新版本,请使用“使用新软件版本重新映像系统”程序。

使用其他重新映像方法进行故障排除,例如无法启动或重置密码。

步骤 2

从 7.1/7.2 重新映像到 7.3+: 如果要从 7.1/7.2 重新映像到 7.3+,必须先重新映像到 ASA 9.19+,然后再重新映像到 7.3+。

7.3+ 使用新类型的映像文件。在您可以使用此映像文件之前,您需要更新 ROMMON,这就是为什么您需要重新映像到 ASA 9.19+(旧 ROMMON 支持,但也会升级到新 ROMMON),然后才能重新映像到 7.3+ 。没有单独的 ROMMON 更新程序。


如果要从 7.1/7.2 升级 到 7.3+,可以照常升级。ROMMON 将在升级过程中进行更新。

  1. 从威胁防御重新映像到 ASA 9.19+。请参阅威胁防御→ASA:Firepower 或 Cisco Secure Firewall

  2. 从 ASA 重新映像到威胁防御 7.3+。请参阅ASA→威胁防御:Firepower 或 Cisco Secure Firewall


ASA→ASA:Firepower 和 Cisco Secure Firewall

可能需要重新映像 ASA 以排除启动问题并执行密码恢复。对于正常升级,无需执行重新映像。

过程


步骤 1

有关重新映像程序,请参阅《故障排除指南》。

步骤 2

要加载新的软件映像,请参阅《ASA 升级指南》,而不是重新映像。


重新映像 ASA 5500-X 或 ISA 3000

需要访问控制台端口

要执行重新映像,您必须将计算机连接到控制台端口。

对于 ASA 5512-X、5515-X、5525-X、5545-X 和 5555-X,您可能需要使用第三方串行-USB 转换电缆建立连接。其他型号配备一个 Mini USB B 型控制台端口,因此您可以使用任意一种 Mini USB 电缆。对于 Windows,您可能需要安装从 software.cisco.com 下载的 USB-串行驱动程序。有关控制台端口选项和驱动程序要求的详细信息,请参阅以下网址提供的硬件指南:http://www.cisco.com/go/asa5500x-install

对终端仿真程序使用以下设置:9600 波特、8 个数据位、无奇偶校验、1 个停止位和无流量控制。

下载软件

获取 威胁防御 软件或 ASA、ASDM 和 ASA FirePOWER 模块软件。本文档中的程序要求将软件放在 TFTP 服务器上,供初始下载使用。其他映像可以通过其他类型服务器(例如 HTTP 或 FTP)下载。有关确切的软件包和服务器类型,请参阅相关程序。


需要 Cisco.com 登录信息和思科服务合同。


注意


威胁防御 引导映像和系统软件包可特定于版本、特定于型号。验证您的平台是否具有正确的引导映像和系统软件包。引导映像与系统软件包之间的不匹配可能导致启动失败。不匹配可能是将较旧的引导映像和较新的系统软件包一起使用。


表 3. 威胁防御 软件

威胁防御 型号

下载位置

软件包

ASA 5506-X、ASA 5508-X 和 ASA 5516-X

请参阅:http://www.cisco.com/go/asa-firepower-sw


您还会看到后缀名为 .sh 的补丁文件;本文档不提供有关补丁升级流程的信息。

启动映像

选择您的型号 > Firepower Threat Defense 软件 > 版本

启动映像都有一个文件名,例如:ftd-boot-9.6.2.0.lfbff

系统软件安装包

选择您的型号 > Firepower Threat Defense 软件 > 版本

系统软件安装包都有一个文件名,例如:ftd-6.1.0-330.pkg

ASA 5512-X 至 ASA 5555-X

请参阅:http://www.cisco.com/go/asa-firepower-sw


您还会看到后缀名为 .sh 的补丁文件;本文档不提供有关补丁升级流程的信息。

启动映像

选择您的型号 > Firepower Threat Defense 软件 > 版本

启动映像都有一个文件名,例如:ftd-boot-9.6.2.0.cdisk

系统软件安装包

选择您的型号 > Firepower Threat Defense 软件 > 版本

系统软件安装包都有一个文件名,例如:ftd-6.1.0-330.pkg

ISA 3000

请参阅: http://www.cisco.com/go/isa3000-software


您还会看到后缀名为 .sh 的补丁文件;本文档不提供有关补丁升级流程的信息。

启动映像

选择您的型号 > Firepower Threat Defense 软件 > 版本

启动映像都有一个文件名,例如:ftd-boot-9.9.2.0.lfbff

系统软件安装包

选择您的型号 > Firepower Threat Defense 软件 > 版本

系统软件安装包都有一个文件名,例如:ftd-6.2.3-330.pkg

表 4. ASA 软件

ASA 型号

下载位置

软件包

ASA 5506-X、ASA 5508-X 和 ASA 5516-X

http://www.cisco.com/go/asa-firepower-sw

ASA 软件

选择您的型号 > Adaptive Security Appliance (ASA) Software > 版本

ASA 软件文件都有一个文件名,例如:asa962-lfbff-k8.SPA

ASDM 软件

选择您的型号 > Adaptive Security Appliance (ASA) Device Manager > 版本

ASDM 软件文件都有一个文件名,例如:asdm-762.bin

REST API 软件

选择您的型号 > Adaptive Security Appliance REST API Plugin > 版本

API 软件文件的文件名类似于 asa-restapi-132-lfbff-k8.SPA。要安装 REST API,请参阅 API 快速启动指南

ROMMON 软件

选择您的型号 > ASA Rommon Software > 版本

ROMMON 软件文件的文件名类似于 asa5500-firmware-1108.SPA

ASA 5512-X 至 ASA 5555-X

http://www.cisco.com/go/asa-software

ASA 软件

选择您的型号 > Software on Chassis > Adaptive Security Appliance (ASA) Software > 版本

ASA 软件文件都有一个文件名,例如:asa962-smp-k8.bin。ASA 软件文件的文件名类似于 asa962-smp-k8.bin。

ASDM 软件

选择您的型号 > Software on Chassis > Adaptive Security Appliance (ASA) Device Manager > 版本

ASDM 软件文件都有一个文件名,例如:asdm-762.bin

REST API 软件

选择您的型号 > Software on Chassis > Adaptive Security Appliance REST API Plugin > 版本

API 软件文件的文件名类似于 asa-restapi-132-lfbff-k8.SPA。要安装 REST API,请参阅 API 快速启动指南

适用于思科应用策略基础设施控制器 (APIC) 的 ASA 设备软件包

选择您的型号 > Software on Chassis > ASA for Application Centric Infrastructure (ACI) Device Packages > 版本

对于 APIC 1.2(7) 及更高版本,请选择 Policy Orchestration with Fabric Insertion 或 Fabric Insertion-only 软件包。设备软件包软件文件的文件名类似于 asa-device-pkg-1.2.7.10.zip。要安装 ASA 设备软件包,请参阅思科 APIC 第 4 层至第 7 层服务部署指南中的“导入设备软件包”一章。

ISA 3000

http://www.cisco.com/go/isa3000-software

ASA 软件

选择您的型号 > Adaptive Security Appliance (ASA) Software > 版本

ASA 软件文件都有一个文件名,例如:asa962-lfbff-k8.SPA

ASDM 软件

选择您的型号 > Adaptive Security Appliance (ASA) Device Manager > 版本

ASDM 软件文件都有一个文件名,例如:asdm-762.bin

REST API 软件

选择您的型号 > Adaptive Security Appliance REST API Plugin > 版本

API 软件文件的文件名类似于 asa-restapi-132-lfbff-k8.SPA。要安装 REST API,请参阅 API 快速启动指南

升级 ROMMON 映像(ASA 5506-X、5508-X 和 5516-X、ISA 3000)

按照以下步骤升级 ASA 5506-X 系列、ASA 5508-X、ASA 5516-X 和 ISA 3000 的 ROMMON 映像。对于 ASA 型号,系统上的 ROMMON 版本必须为 1.1.8 或更高版本。我们建议您将引擎升级到最新版本。

您只能升级到新版本;无法降级。


小心


适用于 1.1.15 的 ASA 5506-X、5508-X 和 5516-X ROMMON ASA 5506-X,5508-X 和 5516-X ROMMON 升级,以及适用于 1.0 的 ISA 3000 ROMMON 升级。并且,1.0.5 的 ISA 3000 ROMMON 升级时间为过去 ROMMON 版本的两倍,大约需要 15 分钟。升级流程中请勿重启设备 。如果升级未在 30 分钟内完成或升级失败,请联系思科技术支持; 请勿重启或重置设备。


开始之前

从 Cisco.com 获取新的 ROMMON 映像,并将其放在服务器上以复制到 ASA。ASA 支持 FTP、TFTP、SCP、HTTP(S) 和 SMB 服务器。请从以下网址下载映像:

过程


步骤 1

如果使用的是 威胁防御 软件,请进入诊断 CLI,然后进入启用模式。

system support diagnostic-cli

enable

当系统提示输入密码时,请按 Enter 键输入密码。

示例:


> system support diagnostic-cli
Attaching to Diagnostic CLI ... Press 'Ctrl+a then d' to detach.
Type help or '?' for a list of available commands.

ciscoasa> enable
Password:
ciscoasa#

步骤 2

将 ROMMON 映像复制到 ASA 闪存。此程序显示 FTP 副本;输入 copy ? ,使用其他服务器类型的语法。

copy ftp://[username:password@]server_ip/asa5500-firmware-xxxx.SPA disk0:asa5500-firmware-xxxx.SPA

如果使用的是 威胁防御 软件,请确保已配置数据接口;诊断 CLI 无法访问专用管理接口。同样由于 CSCvn57678copy 命令可能无法在适用于您的 威胁防御 版本的常规 威胁防御 CLI 中运行,因此您无法使用该方法访问专用管理接口。

步骤 3

要查看当前版本,请输入 show module 命令并在 MAC 地址范围表中查看 Mod 1 的输出中的固件版本:


ciscoasa# show module
[...]
Mod  MAC Address Range                 Hw Version   Fw Version   Sw Version     
---- --------------------------------- ------------ ------------ ---------------
   1 7426.aceb.ccea to 7426.aceb.ccf2  0.3          1.1.5        9.4(1)
 sfr 7426.aceb.cce9 to 7426.aceb.cce9  N/A          N/A          

步骤 4

升级 ROMMON 映像:

upgrade rommon disk0:asa5500-firmware-xxxx.SPA

示例:


ciscoasa# upgrade rommon disk0:asa5500-firmware-1108.SPA
Verifying file integrity of disk0:/asa5500-firmware-1108.SPA

Computed Hash   SHA2: d824bdeecee1308fc64427367fa559e9
                      eefe8f182491652ee4c05e6e751f7a4f
                      5cdea28540cf60acde3ab9b65ff55a9f
                      4e0cfb84b9e2317a856580576612f4af
                      
Embedded Hash   SHA2: d824bdeecee1308fc64427367fa559e9
                      eefe8f182491652ee4c05e6e751f7a4f
                      5cdea28540cf60acde3ab9b65ff55a9f
                      4e0cfb84b9e2317a856580576612f4af
                      

Digital signature successfully validated
File Name                     : disk0:/asa5500-firmware-1108.SPA
Image type                    : Release
    Signer Information
        Common Name           : abraxas
        Organization Unit     : NCS_Kenton_ASA
        Organization Name     : CiscoSystems
    Certificate Serial Number : 553156F4
    Hash Algorithm            : SHA2 512
    Signature Algorithm       : 2048-bit RSA
    Key Version               : A
Verification successful.
Proceed with reload? [confirm]

步骤 5

当出现提示时,确认重新加载 ASA。

ASA 将升级 ROMMON 映像,然后重新加载操作系统。


ASA→威胁防御:ASA 5500-X 或 ISA 3000

要从 ASA 重新映像到 威胁防御软件,您必须调出 ROMMON 提示符。在 ROMMON 中,您必须在管理接口上使用 TFTP 下载 威胁防御 启动映像;仅支持 TFTP。引导映像随后可以使用 HTTP 或 FTP 下载 威胁防御 系统软件安装包。TFTP 下载可能需要较长时间;请确保在 ASA 与 TFTP 服务器之间建立了稳定的连接,避免丢包情况。

开始之前

要简化重新映像回 ASA 的流程,请执行以下操作:

  1. 使用 backup 命令执行完整系统备份。

    有关详细信息和其他备份技术,请参阅《配置指南》。

  2. 复制并保存当前激活密钥,以便您可以使用 show activation-key 命令重新安装许可证。

  3. 对于 ISA 3000,在使用 管理中心 时禁用硬件旁路;此功能仅在版本 6.3 及更高版本中使用 设备管理器 时可用。

过程


步骤 1

威胁防御启动映像(请参阅下载软件)下载到 ASA 可通过管理接口访问的 TFTP 服务器。

对于 ASA 5506-X、5508-X 和 5516-X、ISA 3000,您必须使用管理端口 1/1 下载映像。对于其他型号,您可以使用任意接口。

步骤 2

威胁防御系统软件安装包(请参阅下载软件)下载到 ASA 可通过管理接口访问的 HTTP 或 FTP 服务器。

步骤 3

从控制台端口重新加载 ASA:

reload

示例:


ciscoasa# reload

步骤 4

当系统提示进入 ROMMON 提示符时,需要在启动期间按 Esc 键。

请密切注意显示器显示的内容。

示例:


[...]
Booting from ROMMON

Cisco Systems ROMMON Version (2.1(9)8) #1: Wed Oct 26 17:14:40 PDT 2011

Platform ASA 5555-X with SW, 8 GE Data, 1 GE Mgmt

Use BREAK or ESC to interrupt boot.
Use SPACE to begin boot immediately.
Boot in   7 seconds. 

此时按 Esc 键。

如果系统显示以下信息,则表明等待时间过长,必须在 ASA 完成启动后进行重新加载:


Launching BootLoader...
Boot configuration file contains 2 entries.
[...]

步骤 5

使用以下 ROMMON 命令设置网络设置并加载启动映像:

interface interface_id

address management_ip_address

netmask subnet_mask

server tftp_ip_address

gateway gateway_ip_address

filepath/filename

set

sync

tftpdnld

威胁防御 引导映像随即下载并启动,进入引导 CLI。

请参阅以下信息:

  • interface -(仅限于 ASA 5512-X、5515-X、5525-X、5545-X 和 5555-X)指定接口 ID。其他型号始终使用管理接口 1/1。

  • set - 显示网络设置。您还可以使用 ping 命令验证与服务器的连接。

  • sync - 保存网络设置。

  • tftpdnld - 加载启动映像。

示例:

适用于 ASA 5555-X 的示例:


rommon 0 > interface gigabitethernet0/0
rommon 1 > address 10.86.118.4
rommon 2 > netmask 255.255.255.0
rommon 3 > server 10.86.118.21
rommon 4 > gateway 10.86.118.1
rommon 5 > file ftd-boot-latest.cdisk
rommon 6 > set
ROMMON Variable Settings:
  ADDRESS=10.86.118.3
  NETMASK=255.255.255.0
  SERVER=10.86.118.21
  GATEWAY=10.86.118.21
  PORT=GigabitEthernet0/0
  VLAN=untagged
  IMAGE=ftd-boot-latest.cdisk
  CONFIG=
  LINKTIMEOUT=20
  PKTTIMEOUT=4
  RETRY=20

rommon 7 > sync

Updating NVRAM Parameters... 

rommon 8 > tftpdnld

适用于 ASA 5506-X 的示例:


rommon 0 > address 10.86.118.4
rommon 1 > netmask 255.255.255.0
rommon 2 > server 10.86.118.21
rommon 3 > gateway 10.86.118.21
rommon 4 > file ftd-boot-latest.lfbff
rommon 5 > set
ROMMON Variable Settings:
  ADDRESS=10.86.118.3
  NETMASK=255.255.255.0
  SERVER=10.86.118.21
  GATEWAY=10.86.118.21
  VLAN=untagged
  IMAGE=ftd-boot-latest.lfbff
  CONFIG=
  LINKTIMEOUT=20
  PKTTIMEOUT=4
  RETRY=20

rommon 6 > sync

Updating NVRAM Parameters... 

rommon 7 > tftpdnld

执行 Ping 操作以排除与服务器的连接故障:


rommon 1 > ping 10.123.123.2
Sending 10, 32-byte ICMP Echoes to 10.123.123.2 timeout is 4 seconds
!!!!!!!!!!
Success rate is 100 percent (10/10)
rommon 2 >

步骤 6

输入 setup ,并配置管理接口的网络设置,以建立与 HTTP 或 FTP 服务器的临时连接,从而使您可以下载并安装系统软件包。


如果您有 DHCP 服务器,则 威胁防御 会自动设置网络配置。使用 DHCP 时,请参阅以下示例启动消息:


Configuring network interface using DHCP
Bringing up network interface.
Depending on your network, this might take a couple of minutes when using DHCP...
ifup: interface lo already configured
Using IPv4 address: 10.123.123.123
Using IPv6 address: fe80::2a0:c9ff:fe00:0
Using DNS server: 64.102.6.247
Using DNS server: 173.36.131.10
Using default gateway: 10.123.123.1

示例:


                    Cisco FTD Boot 6.3.0
                 Type ? for list of commands
firepower-boot>
firepower-boot>setup


 Welcome to Cisco FTD Setup 
 [hit Ctrl-C to abort]
 Default values are inside []

Enter a hostname [firepower]: example.cisco.com
Do you want to configure IPv4 address on management interface?(y/n) [Y]: y
Do you want to enable DHCP for IPv4 address assignment on management interface?(y/n) [Y]: n
Enter an IPv4 address: 10.123.123.123
Enter the netmask: 255.255.255.0
Enter the gateway: 10.123.123.1
Do you want to configure static IPv6 address on management interface?(y/n) [N]: n
Stateless autoconfiguration will be enabled for IPv6 addresses. 
Enter the primary DNS server IP address [64.102.6.247]: 10.123.123.2
Do you want to configure Secondary DNS Server? (y/n) [y]: n
Any previously configured secondary DNS servers will be removed.
Do you want to configure Local Domain Name? (y/n) [n]: n
Do you want to configure Search domains? (y/n) [y]: n
Any previously configured search domains will be removed.
Do you want to enable the NTP service? [N]: n
Please review the final configuration:
Hostname: example.cisco.com
Management Interface Configuration

IPv4 Configuration: static
 IP Address: 10.123.123.123
 Netmask: 255.255.255.0
 Gateway: 10.123.123.1

IPv6 Configuration: Stateless autoconfiguration

DNS Configuration:
 DNS Server:
 10.123.123.2

NTP configuration: Disabled

CAUTION:
You have selected IPv6 stateless autoconfiguration, which assigns a global address
based on network prefix and a device identifier. Although this address is unlikely
to change, if it does change, the system will stop functioning correctly.
We suggest you use static addressing instead.

Apply the changes?(y,n) [Y]: y
Configuration saved successfully!
Applying...
Restarting network services...
Done.
Press ENTER to continue...
firepower-boot>

步骤 7

下载 威胁防御系统软件安装包。此步骤展示了如何执行 HTTP 安装。

system install [noconfirm] url

如果不想响应确认消息,请在命令中添加 noconfirm 选项。

示例:


> system install noconfirm http://10.86.118.21/ftd-6.0.1-949.pkg

系统会提示您清除内部闪存驱动器。输入 y


######################## WARNING ############################
# The content of disk0: will be erased during installation! #
#############################################################

Do you want to continue? [y/N] y

安装过程会清除闪存驱动器并下载系统映像。系统会提示您继续安装。输入 y


Erasing disk0 ...
Verifying 
Downloading 
Extracting 
Package Detail
 Description: Cisco ASA-NGFW 6.3.0 System Install
 Requires reboot: Yes 

Do you want to continue with upgrade? [y]: y

安装完成后,按 Enter 重启设备。


Warning: Please do not interrupt the process or turn off the system.
Doing so might leave system in unusable state.

Starting upgrade process ... 
Populating new system image 

Reboot is required to complete the upgrade. Press 'Enter' to reboot the system.

重新启动通常需要 30 分钟以上,但也可能需要更长时间。重新启动后,即可进入 威胁防御 CLI。

步骤 8

要排除网络连接故障,请参阅以下示例。

示例:

查看网络接口配置:


firepower-boot>show interface
eth0 Link encap:Ethernet HWaddr 00:a0:c9:00:00:00 
 inet addr:10.123.123.123 Bcast:10.123.123.255 Mask:255.255.255.0
 inet6 addr: fe80::2a0:c9ff:fe00:0/64 Scope:Link
 inet6 addr: 2001:420:270d:1310:2a0:c9ff:fe00:0/64 Scope:Global
 UP BROADCAST RUNNING MULTICAST MTU:1500 Metric:1
 RX packets:522369 errors:0 dropped:0 overruns:0 frame:0
 TX packets:2473 errors:0 dropped:0 overruns:0 carrier:0
 collisions:0 txqueuelen:1000 
 RX bytes:42120849 (40.1 MiB) TX bytes:170295 (166.3 KiB)
...

对服务器执行 Ping 操作:


firepower-boot>ping www.example.com
PING www.example.com (10.125.29.106) 56(84) bytes of data.
64 bytes from qg-in-f106.1e100.net (74.125.29.106): icmp_seq=1 ttl=42 time=28.8 ms
64 bytes from qg-in-f106.1e100.net (74.125.29.106): icmp_seq=2 ttl=42 time=28.1 ms
64 bytes from qg-in-f106.1e100.net (74.125.29.106): icmp_seq=3 ttl=42 time=28.1 ms
64 bytes from qg-in-f106.1e100.net (74.125.29.106): icmp_seq=4 ttl=42 time=29.0 ms
^C
--- www.example.com ping statistics ---
4 packets transmitted, 4 received, 0% packet loss, time 3003ms
rtt min/avg/max/mdev = 28.159/28.549/29.022/0.437 ms

firepower-boot>

跟踪路由以测试网络连接,请执行以下操作:


firepower-boot>traceroute -n 10.100.100.1 
traceroute to 10.100.100.1 (10.100.100.1), 30 hops max, 60 byte packets
 1 10.123.123.1 0.937 ms 1.078 ms 1.154 ms^C
firepower-boot>

步骤 9

要排除安装故障,请参阅以下示例。

示例:

“超时”错误

在下载阶段,如果无法访问文件服务器,该下载操作将因超时而失败。


   ...
Erasing disk0 ...
Verifying 

timed out
Upgrade aborted
firepower-boot> 

在这种情况下,请确保可以从 ASA 访问文件服务器。您可以通过对文件服务器执行 Ping 操作来进行验证。

“未找到软件包”错误

如果文件服务器可访问,但文件路径或名称错误,则安装会失败,并显示“未找到数据包”错误:

  ...
Erasing disk0 ...
Verifying 

Package not found. Please correct the URL, which should include the full path including package name.
Upgrade aborted.
firepower-boot>

在这种情况下,请确保 威胁防御 软件包文件路径和名称正确无误。

安装失败,出现未知错误

在下载系统软件后进行安装时,导致的原因通常显示为“安装失败,出现未知错误”。发生此错误时,您可以通过查看安装日志来进行故障排除:


firepower-boot>support view logs

===View Logs===

============================
Directory: /var/log
----------sub-dirs----------
cisco
sa
-----------files------------
2015-09-24 19:56:33.150011 | 102668 | install.log
2015-09-24 19:46:28.400002 | 292292 | lastlog
2015-09-24 19:45:15.510001 | 250 | ntp.log
2015-09-24 19:46:28.400002 | 5760 | wtmp

([b] to go back or [s] to select a file to view, [Ctrl+C] to exit)
Type a sub-dir name to list its contents: s

Type the name of the file to view ([b] to go back, [Ctrl+C] to exit)
> install.log
Thu Sep 24 19:53:44 UTC 2015: Begin installation ...
Found hard drive(s): /dev/sda
Erasing files from flash ...
...

您还可以在 /var/log/cisco 下使用与引导 CLI 相关问题相同的命令查看 upgrade.log、 pyos.log 和 commandd.log。

步骤 10

您可以使用 设备管理器管理中心 来管理设备。请参阅与您的型号和管理器对应的《快速入门指南》,继续设置:http://www.cisco.com/go/ftd-asa-quick


威胁防御→ASA:ASA 5500-X 或 ISA 3000

要从 威胁防御 重新映像到 ASA 软件,您必须调出 ROMMON 提示符。在 ROMMON 中,您必须移除磁盘,然后在管理接口上使用 TFTP 下载 ASA 映像;仅支持 TFTP。在重新加载 ASA 后,您可以配置基本设置,然后加载 FirePOWER 模块软件。

开始之前

  • 请确保在 ASA 与 TFTP 服务器之间建立了稳定的连接,避免丢包情况。

过程


步骤 1

如果通过 管理中心管理 威胁防御,请从 管理中心中删除该设备。

步骤 2

如果您使用 设备管理器管理 威胁防御,无论是通过 设备管理器还是通过智能软件许可服务器,请确保从智能软件许可服务器取消注册该设备。

步骤 3

将 ASA 启动映像(请参阅下载软件)下载到 威胁防御 可通过管理接口访问的 TFTP 服务器。

对于 ASA 5506-X、5508-X 和 5516-X、ISA 3000,您必须使用管理端口 1/1 下载映像。对于其他型号,您可以使用任意接口。

步骤 4

在控制台端口,重新启动 威胁防御 设备。

reboot

输入 yes 重新启动。

示例:


> reboot
This command will reboot the system.  Continue?
Please enter 'YES' or 'NO': yes

步骤 5

当系统提示进入 ROMMON 提示符时,需要在启动期间按 Esc 键。

请密切注意显示器显示的内容。

示例:


[...]
Booting from ROMMON

Cisco Systems ROMMON Version (2.1(9)8) #1: Wed Oct 26 17:14:40 PDT 2011

Platform ASA 5555-X with SW, 8 GE Data, 1 GE Mgmt

Use BREAK or ESC to interrupt boot.
Use SPACE to begin boot immediately.
Boot in   7 seconds. 

此时按 Esc 键。

如果系统显示以下信息,则表明等待时间过长,必须在 威胁防御 完成启动后进行重新引导:


Launching BootLoader...
Boot configuration file contains 2 entries.
[...]

步骤 6

请移除 威胁防御上的所有磁盘。内部闪存称为 disk0。如果有外部 USB 驱动器,则称为 disk1。

示例:


Example:
rommon #0> erase disk0:

About to erase the selected device, this will erase
all files including configuration, and images.
Continue with erase? y/n [n]: y

Erasing Disk0:
.......................
[...]

此步骤删除了 威胁防御文件,使 ASA 不会尝试加载可引发多种错误的不正确的配置文件。

步骤 7

使用以下 ROMMON 命令设置网络设置并加载 ASA 映像。

interface interface_id

address management_ip_address

netmask subnet_mask

server tftp_ip_address

gateway gateway_ip_address

filepath/filename

set

sync

tftpdnld

ASA 映像随即下载并启动,进入 CLI。

请参阅以下信息:

  • interface -(仅限于 ASA 5512-X、5515-X、5525-X、5545-X 和 5555-X)指定接口 ID。其他型号始终使用管理接口 1/1。

  • set - 显示网络设置。您还可以使用 ping 命令验证与服务器的连接。

  • sync - 保存网络设置。

  • tftpdnld - 加载启动映像。

示例:

适用于 ASA 5555-X 的示例:


rommon 2 > interface gigabitethernet0/0
rommon 3 > address 10.86.118.4
rommon 4 > netmask 255.255.255.0
rommon 5 > server 10.86.118.21
rommon 6 > gateway 10.86.118.1
rommon 7 > file asalatest-smp-k8.bin
rommon 8 > set
ROMMON Variable Settings:
  ADDRESS=10.86.118.3
  NETMASK=255.255.255.0
  SERVER=10.86.118.21
  GATEWAY=10.86.118.21
  PORT=GigabitEthernet0/0
  VLAN=untagged
  IMAGE=asalatest-smp-k8.bin
  CONFIG=
  LINKTIMEOUT=20
  PKTTIMEOUT=4
  RETRY=20

rommon 9 > sync

Updating NVRAM Parameters... 

rommon 10 > tftpdnld

适用于 ASA 5506-X 的示例:


rommon 2 > address 10.86.118.4
rommon 3 > netmask 255.255.255.0
rommon 4 > server 10.86.118.21
rommon 5 > gateway 10.86.118.21
rommon 6 > file asalatest-lfbff-k8.SPA
rommon 7 > set
ROMMON Variable Settings:
  ADDRESS=10.86.118.3
  NETMASK=255.255.255.0
  SERVER=10.86.118.21
  GATEWAY=10.86.118.21
  VLAN=untagged
  IMAGE=asalatest-lfbff-k8.SPA
  CONFIG=
  LINKTIMEOUT=20
  PKTTIMEOUT=4
  RETRY=20

rommon 8 > sync

Updating NVRAM Parameters... 

rommon 9 > tftpdnld

示例:

执行 Ping 操作以排除与服务器的连接故障:


rommon 1 > ping 10.123.123.2
Sending 10, 32-byte ICMP Echoes to 10.123.123.2 timeout is 4 seconds
!!!!!!!!!!
Success rate is 100 percent (10/10)
rommon 2 >

步骤 8

配置网络设置并准备磁盘。

当 ASA 首次启动时,它上面没有任何配置。您可以按照交互式提示配置用于 ASDM 访问的管理接口,也可以粘贴保存的配置;或者,如果您没有保存的配置,可使用建议配置(如下所示)。

如果您没有保存的配置,但计划使用 ASA FirePOWER 模块,最佳做法是粘贴建议配置。ASA FirePOWER 模块可在管理接口上进行管理,并需要访问互联网进行更新。建议的简单网络部署包括一台内部交换机,通过该交换机,您可以将管理接口(仅用于 FirePOWER 管理)、内部接口(用于 ASA 管理和内部流量)和管理 PC 连接到同一内部网络。有关网络部署的详细信息,请参阅以下网址提供的《快速入门指南》:

  1. 当出现 ASA 控制台提示符时,系统将提示您为管理接口提供某种配置。

    
    Pre-configure Firewall now through interactive prompts [yes]?


    如果要为简单网络部署粘贴配置或创建建议配置,请输入 no 并继续执行此程序。

    如果要配置管理接口,以便可以连接到 ASDM,请输入 yes,并按照提示操作即可。

  2. 当出现 ASA 控制台提示符时,进入特权 EXEC 模式。

    enable

    系统将显示以下提示:

    
    Password:
    
    
  3. Enter 键。默认情况下,密码为空。

  4. 访问全局配置模式。

    configure terminal

  5. 如果没有使用交互式提示,请在提示符后复制并粘贴您的配置。

    如果没有保存的配置,但想要使用本快速入门指南中介绍的简单配置,请在提示符处复制以下配置,根据需要更改 IP 地址和接口 ID。如果使用的是交互式提示,但想要转用此配置,请先使用 clear configure all 命令清除该配置。

    
    interface gigabitethernetn/n
       nameif outside
       ip address dhcp setroute
       no shutdown
    interface gigabitethernetn/n
       nameif inside
       ip address ip_address netmask
       security-level 100
       no shutdown
    interface managementn/n
       no shutdown
    object network obj_any
       subnet 0 0
       nat (any,outside) dynamic interface
    http server enable
    http inside_network netmask inside
    dhcpd address inside_ip_address_start-inside_ip_address_end inside
    dhcpd auto_config outside
    dhcpd enable inside
    logging asdm informational


    对于 ASA 5506W-X,为 WiFi 接口添加以下配置:

    
    same-security-traffic permit inter-interface
    interface GigabitEthernet 1/9
    security-level 100
    nameif wifi
    ip address ip_address netmask
    no shutdown
    http wifi_network netmask wifi
    dhcpd address wifi_ip_address_start-wifi_ip_address_end wifi
    dhcpd enable wifi
    
    
  6. 重新格式化磁盘:

    format disk0:

    format disk1:

    内部闪存称为 disk0。如果有外部 USB 驱动器,则称为 disk1。如果不重新格式化磁盘,则尝试复制 ASA 映像时,系统会显示以下错误:

    
    %Error copying ftp://10.86.89.125/asa971-smp-k8.bin (Not enough space on device)
    
    
  7. 保存新配置:

    write memory

步骤 9

安装 ASA 和 ASDM 映像。

从 ROMMON 模式启动 ASA 不会在重新加载时保留系统映像;您仍需将映像下载到闪存。您还需要将 ASDM 下载到闪存。

  1. 将 ASA 和 ASDM 映像(请参阅下载软件)下载到 ASA 可访问的服务器。ASA 支持多种服务器类型。有关 copy 的详细信息,请参阅命令: http://www.cisco.com/c/en/us/td/docs/security/asa/asa-command-reference/A-H/cmdref1/c4.html#pgfId-2171368

  2. 将 ASA 映像复制到 ASA 闪存。此步骤展示了如何执行 FTP 复制。

    copy ftp://user:password@server_ip/asa_file disk0:asa_file

    示例:

    
    ciscoasa# copy ftp://admin:test@10.86.118.21/asa961-smp-k8.bin disk0:asa961-smp-k8.bin
    
    
  3. 将 ASDM 映像复制到 ASA 闪存。此步骤展示了如何执行 FTP 复制。

    copy ftp://user:password@server_ip/asdm_file disk0:asdm_file

    示例:

    
    ciscoasa# copy ftp://admin:test@10.86.118.21/asdm-761.bin disk0:asdm-761.bin
    
    
  4. 重新加载 ASA:

    reload

    ASA 使用 disk0 中的映像进行重新加载。

步骤 10

(可选) 安装 ASA FirePOWER 模块软件。

您需要安装 ASA FirePOWER 启动映像,对 SSD 进行分区,并按照此程序安装系统软件。

  1. 将启动映像复制到 ASA。请勿传输系统软件;系统软件稍后会下载到 SSD。此步骤展示了如何执行 FTP 复制。

    copy ftp://user:password@server_ip/firepower_boot_file disk0:firepower_boot_file

    示例:

    
    ciscoasa# copy ftp://admin:test@10.86.118.21/asasfr-5500x-boot-6.0.1.img disk0:/asasfr-5500x-boot-6.0.1.img
    
    
  2. 从 Cisco.com 将 ASA FirePOWER 服务系统软件安装包下载到可通过管理接口访问的 HTTP、HTTPS 或 FTP 服务器。请勿将其下载到 ASA 上的 disk0。

  3. 设置 ASA FirePOWER 模块启动映像在 ASA disk0 中的位置:

    sw-module module sfr recover configure image disk0:file_path

    示例:

    
    ciscoasa# sw-module module sfr recover configure image disk0:asasfr-5500x-boot-6.0.1.img
    
    
  4. 加载 ASA FirePOWER 启动映像:

    sw-module module sfr recover boot

    示例:

    
    ciscoasa# sw-module module sfr recover boot
    
    Module sfr will be recovered. This may erase all configuration and all data
    on that device and attempt to download/install a new image for it. This may take
    several minutes.
    
    Recover module sfr? [confirm] y
    Recover issued for module sfr.
    
    
  5. 等待几分钟,以便 ASA FirePOWER 模块启动,然后向当前正在运行的 ASA FirePOWER 启动映像发起控制台会话。发起会话后,可能需要按 Enter 键显示登录提示符。默认用户名是 admin,默认密码是 Admin123

    示例:

    
    ciscoasa# session sfr console
    Opening console session with module sfr.
    Connected to module sfr. Escape character sequence is 'CTRL-^X'.
    
    asasfr login: admin
    Password: Admin123


    如果模块启动未完成,session 命令会失败,并显示一条消息说明无法通过 ttyS1 进行连接。请稍后重试。

  1. 配置系统,以便您可以安装系统软件安装包。

    setup

    系统将提示输入以下信息。请注意,管理地址和网关以及 DNS 信息是要配置的主要设置。

    • 主机名 - 最多可达 65 个字母数字字符,不能包含空格。允许使用连字符。

    • 网络地址 - 可设置静态 IPv4 或 IPv6 地址,或使用 DHCP(适用于 IPv4)或 IPv6 无状态自动配置。

    • DNS 信息 - 必须至少确定一个 DNS 服务器,还可设置域名和搜索域。

    • NTP 信息 - 可启用 NTP 并配置 NTP 服务器,以便设置系统时间。

    示例:

    
    asasfr-boot> setup
    
                     Welcome to Cisco FirePOWER Services Setup
                              [hit Ctrl-C to abort]
                            Default values are inside []
    
    
  1. 安装系统软件安装包:

    system install [noconfirm] url

    如果不想响应确认消息,请在命令中添加 noconfirm 选项。使用 HTTP、HTTPS 或 FTP URL;如果需要用户名和密码,系统将提示您提供这些信息。此文件较大,下载可能需要较长时间,具体取决于您的网络。

    安装完成后,系统将重新启动。安装应用组件所需的时间以及启动 ASA FirePOWER 服务所需的时间差别极为明显:高端平台可能需要 10 分钟或更长时间,但低端平台可能需要 60-80 分钟或更长时间。(show module sfr 输出应将所有进程状态显示为 Up。)

    示例:

    
    asasfr-boot> system install http://admin:pa$$wd@upgrades.example.com/packages/asasfr-sys-6.0.1-58.pkg
    Verifying
    Downloading
    Extracting
    Package Detail
            Description:                    Cisco ASA-FirePOWER 6.0.1-58 System Install
            Requires reboot:                Yes
    
    Do you want to continue with upgrade? [y]: y
    Warning: Please do not interrupt the process or turn off the system.
    Doing so might leave system in unusable state.
    
    Upgrading
    Starting upgrade process ...
    Populating new system image
    
    Reboot is required to complete the upgrade. Press 'Enter' to reboot the system. [type Enter]
    Broadcast message from root (ttyS1) (Mon Feb 17 19:28:38 2016):
    
    The system is going down for reboot NOW!
    Console session with module sfr terminated.
    
    
  1. 如果您需要安装补丁版本,可以稍后请求 ASDM 或 管理中心 的管理员执行此操作。

步骤 11

如需为未保存激活密钥的现有 ASA 获取强加密许可证和其他许可证,请参阅 http://www.cisco.com/go/license。在管理 (Manage) > 许可证 (Licenses) 部分,您可以重新下载许可证。

要使用 ASDM(和许多其他功能),您需要安装强加密 (3DES/AES) 许可证。如果您在早先重新映像至 威胁防御 设备之前保存了此 ASA 的许可激活密钥,则可以重新安装该激活密钥。如果您未保存激活密钥,但拥有此 ASA 的许可证,则可以重新下载该许可证。对于新的 ASA,您需要申请新的 ASA 许可证。

步骤 12

为新的 ASA 获取许可证。

  1. 通过输入以下命令获取 ASA 的序列号:

    show version | grep Serial

    此序列号与印制在硬件外部的机箱序列号不同。机箱序列号用于技术支持,但不用于许可。

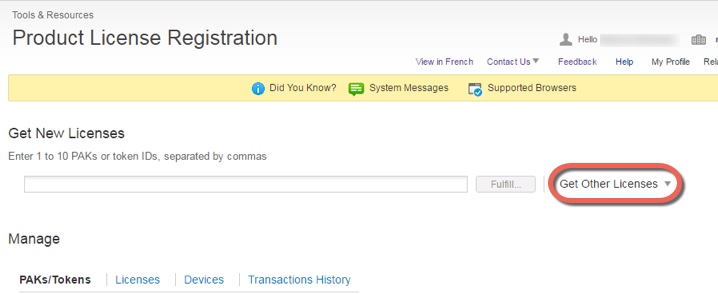
  2. 访问 http://www.cisco.com/go/license,然后点击获取其他许可证 (Get Other Licenses)

    图 1. 获取其他许可证
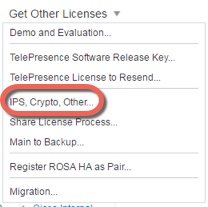
  3. 选择 IPS, Crypto, Other

    图 2. IPS、加密、其他
  4. Search by Keyword 字段中,输入 asa,并选择 Cisco ASA 3DES/AES License

    图 3. 思科 ASA 3DES/AES 许可证
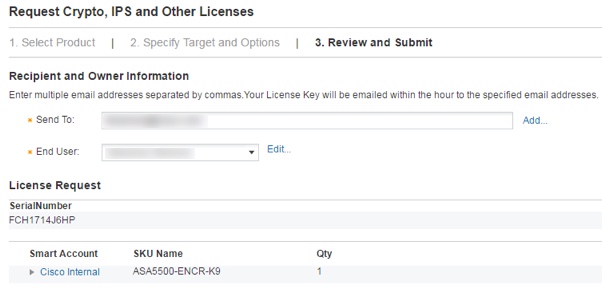
  5. 选择您的智能帐户 (Smart Account)虚拟帐户 (Virtual Account),输入 ASA 序列号 (Serial Number),然后点击下一步 (Next)

    图 4. 智能帐户、虚拟帐户和序列号
  6. 系统将自动填充您的 Send To 邮箱地址和 End User 名称;必要时输入其他邮箱地址。选中我同意 (I Agree) 复选框,然后点击提交 (Submit)

    图 5. 提交
  7. 之后,您将会收到一封包含激活密钥的邮件,但您也可以立即从管理 (Manage) > 许可证 (Licenses) 区域下载该密钥。

  8. 如需从基础许可证升级到 Security Plus 许可证或者购买 AnyConnect 许可证,请访问: http://www.cisco.com/go/ccw. 购买许可证后,您将收到一封邮件,其中包含您可以在 http://www.cisco.com/go/license 上输入的产品授权密钥 (PAK)。对于 AnyConnect 许可证,您将收到多用途 PAK,该 PAK 可应用于多个使用相同用户会话池的 ASA。此类激活密钥包含迄今为止为永久许可证(包括 3DES/AES 许可证)注册的所有功能。对于基于时间的许可证,每个许可证具有单独的激活密钥。

步骤 13

应用激活密钥。

activation-key 密钥

示例:


ciscoasa(config)# activation-key 7c1aff4f e4d7db95 d5e191a4 d5b43c08 0d29c996
Validating activation key. This may take a few minutes...
Failed to retrieve permanent activation key.
Both Running and Flash permanent activation key was updated with the requested key.

由于此 ASA 没有安装激活密钥,系统将显示“Failed to retrieve permanent activation key.”消息。您可以忽略此消息。

您只能安装一个永久密钥和多个基于时间的密钥。如果输入新的永久密钥,则它会覆盖已安装的永久密钥。如果您在安装 3DES/AES 许可证后订购了其他许可证,组合激活密钥将包含所有许可证以及该 3DES/AES 许可证,因此您可以将覆盖该独立 3DES/AES 密钥。

步骤 14

ASA FirePOWER 模块使用独立于 ASA 的许可机制。此模块没有预装任何许可证,但是根据您的订单,可能会在打印输出件上包含 PAK,从而使您可以获得以下许可证的许可证激活密钥:

  • 控制和保护。控制又称为“应用可视性与可控性 (AVC)”或“应用”。保护又称为“IPS”。除了这些许可证的激活密钥外,您还需要“使用权”订用以自动更新这些功能。

    控制 (AVC) 更新随思科支持合同提供。

    保护 (IPS) 更新需要您从 http://www.cisco.com/go/ccw 购买 IPS 订用。此订用包括规则、引擎、漏洞和地理位置更新的授权。注意:此使用权订用不会生成也不需要 ASA FirePOWER 模块的 PAK/许可证激活密钥;它仅提供对更新的使用权。

如果您未购买具备 ASA FirePOWER 服务的 ASA 5500-X,则您可以通过购买升级捆绑包获取必要的许可证。有关详细信息,请参阅《具备 FirePOWER 服务的思科 ASA 订购指南》。

您可以购买的其他许可证包括:

  • Cisco Secure Firewall Threat Defense 恶意软件防御许可证

  • Cisco Secure Firewall Threat Defense URL 过滤许可证

这些许可证确实会生成 ASA FirePOWER 模块的 PAK/许可证激活密钥。有关订购信息,请参阅《具备 FirePOWER 服务的思科 ASA 订购指南》。另请参阅Cisco Secure Firewall Management Center 功能许可证

要安装控制和保护许可证以及其他可选许可证,请参阅《ASA 快速入门指南》查找您的型号。


威胁防御威胁防御:ASA 5500-X 或 ISA 3000

此程序介绍如何使用 ROMMON 将现有 威胁防御版本重新映像到新版本的 威胁防御 软件。此过程会将设备恢复为出厂默认状态。如果要执行常规升级,请参阅升级指南。

在 ROMMON 中,您必须在管理接口上使用 TFTP 下载新 威胁防御 启动映像;仅支持 TFTP。引导映像随后可以使用 HTTP 或 FTP 下载 威胁防御 系统软件安装包。TFTP 下载可能需要较长时间;请确保在 威胁防御 与 TFTP 服务器之间建立了稳定的连接,避免丢包情况。

过程


步骤 1

如果使用 管理中心 管理 威胁防御,请从 管理中心 中删除该设备。

步骤 2

如果您使用 设备管理器管理 威胁防御,无论是通过 设备管理器 还是通过智能软件许可服务器,请确保从智能软件许可服务器取消注册该设备。

步骤 3

威胁防御启动映像(请参阅下载软件)下载到 威胁防御 可通过管理接口访问的 TFTP 服务器。

对于 ASA 5506-X、5508-X 和 5516-X、ISA 3000,您必须使用管理端口 1/1 下载映像。对于其他型号,您可以使用任意接口。

步骤 4

威胁防御系统软件安装包(请参阅下载软件)下载到 威胁防御 可通过管理接口访问的 HTTP 或 FTP 服务器。

步骤 5

在控制台端口,重新启动 威胁防御 设备。

reboot

示例:

输入 yes 重新启动。

示例:


> reboot
This command will reboot the system.  Continue?
Please enter 'YES' or 'NO': yes

步骤 6

当系统提示进入 ROMMON 提示符时,需要在启动期间按 Esc 键。

请密切注意显示器显示的内容。

示例:


[...]
Booting from ROMMON

Cisco Systems ROMMON Version (2.1(9)8) #1: Wed Oct 26 17:14:40 PDT 2011

Platform ASA 5555-X with SW, 8 GE Data, 1 GE Mgmt

Use BREAK or ESC to interrupt boot.
Use SPACE to begin boot immediately.
Boot in   7 seconds. 

此时按 Esc 键。

如果系统显示以下信息,则表明等待时间过长,必须在 威胁防御 完成启动后进行重新加载:


Launching BootLoader...
Boot configuration file contains 2 entries.
[...]

步骤 7

清除上的威胁防御所有磁盘。内部闪存称为 disk0。如果有外部 USB 驱动器,则称为 disk1。

示例:


Example:
rommon 1 > erase disk0:
erase: Erasing 7583 MBytes ..........................................

rommon 2 >

此步骤会清除旧威胁防御的启动和系统映像。如果不清除系统映像,则在下一步加载启动映像后,必须记住在启动过程中进行转义;如果您错过了转义窗口, 威胁防御 将继续加载旧 威胁防御系统映像,这可能需要很长时间,并且您必须重新启动该程序。

步骤 8

使用以下 ROMMON 命令设置网络设置并加载新启动映像:

interface interface_id

address management_ip_address

netmask subnet_mask

server tftp_ip_address

gateway gateway_ip_address

file path/filename

set

sync

tftpdnld

威胁防御 引导映像随即下载并启动,进入引导 CLI。


如果在上一步中未清除磁盘,则需要按 Esc 进入引导 CLI:


==============================================
Use ESC to interrupt boot and launch boot CLI.
Use SPACE to launch Cisco FTD immediately.
Cisco FTD launch in 24 seconds ... 
Launching boot CLI ...
...

请参阅以下信息:

  • interface -(仅限于 ASA 5512-X、5515-X、5525-X、5545-X 和 5555-X)指定接口 ID。其他型号始终使用管理接口 1/1。

  • set - 显示网络设置。您还可以使用 ping 命令验证与服务器的连接。

  • sync - 保存网络设置。

  • tftpdnld - 加载启动映像。

示例:

ASA 5508-X 的示例:


rommon 0 > address 10.86.118.4
rommon 1 > netmask 255.255.255.0
rommon 2 > server 10.86.118.1
rommon 3 > gateway 10.86.118.21
rommon 4 > file ftd-boot-latest.lfbff
rommon 5 > set
    ADDRESS=10.86.118.4
    NETMASK=255.255.255.0
    GATEWAY=10.86.118.1
    SERVER=10.86.118.21
    IMAGE=ftd-boot-latest.lfbff
    CONFIG=
    PS1="rommon ! > "


rommon 6 > sync
rommon 7 > tftpdnld
             ADDRESS: 10.86.118.4
             NETMASK: 255.255.255.0
             GATEWAY: 10.86.118.1
              SERVER: 10.86.118.21
               IMAGE: ftd-boot-latest.lfbff
             MACADDR: 84:b2:61:b1:92:e6
           VERBOSITY: Progress
               RETRY: 40
          PKTTIMEOUT: 7200
             BLKSIZE: 1460
            CHECKSUM: Yes
                PORT: GbE/1
             PHYMODE: Auto Detect

IP: Detected unsupported IP packet fragmentation.  Try reducing TFTP_BLKSIZE.
IP: Retrying with a TFTP block size of 512..
Receiving ftd-boot-99.15.1.178.lfbff from 10.19.41.228!!!!!!!!!!!!!!!!!!!!!!!!!!!!!!!!!!!!!  
  

适用于 ASA 5555-X 的示例:


rommon 0 > interface gigabitethernet0/0
rommon 1 > address 10.86.118.4
rommon 2 > netmask 255.255.255.0
rommon 3 > server 10.86.118.21
rommon 4 > gateway 10.86.118.1
rommon 5 > file ftd-boot-latest.cdisk
rommon 6 > set
ROMMON Variable Settings:
  ADDRESS=10.86.118.3
  NETMASK=255.255.255.0
  SERVER=10.86.118.21
  GATEWAY=10.86.118.21
  PORT=GigabitEthernet0/0
  VLAN=untagged
  IMAGE=ftd-boot-latest.cdisk
  CONFIG=
  LINKTIMEOUT=20
  PKTTIMEOUT=4
  RETRY=20

rommon 7 > sync

Updating NVRAM Parameters... 

rommon 8 > tftpdnld

执行 Ping 操作以排除与服务器的连接故障:


rommon 1 > ping 10.123.123.2
Sending 10, 32-byte ICMP Echoes to 10.123.123.2 timeout is 4 seconds
!!!!!!!!!!
Success rate is 100 percent (10/10)
rommon 2 >

步骤 9

输入 setup ,并配置管理接口的网络设置,以建立与 HTTP 或 FTP 服务器的临时连接,从而使您可以下载并安装系统软件包。


如果您有 DHCP 服务器,则 威胁防御 会自动设置网络配置。使用 DHCP 时,请参阅以下示例启动消息:


Configuring network interface using DHCP
Bringing up network interface.
Depending on your network, this might take a couple of minutes when using DHCP...
ifup: interface lo already configured
Using IPv4 address: 10.123.123.123
Using IPv6 address: fe80::2a0:c9ff:fe00:0
Using DNS server: 64.102.6.247
Using DNS server: 173.36.131.10
Using default gateway: 10.123.123.1

示例:


                    Cisco FTD Boot 6.3.0
                 Type ? for list of commands
firepower-boot>
firepower-boot>setup


 Welcome to Cisco FTD Setup 
 [hit Ctrl-C to abort]
 Default values are inside []

Enter a hostname [firepower]: example.cisco.com
Do you want to configure IPv4 address on management interface?(y/n) [Y]: y
Do you want to enable DHCP for IPv4 address assignment on management interface?(y/n) [Y]: n
Enter an IPv4 address: 10.123.123.123
Enter the netmask: 255.255.255.0
Enter the gateway: 10.123.123.1
Do you want to configure static IPv6 address on management interface?(y/n) [N]: n
Stateless autoconfiguration will be enabled for IPv6 addresses. 
Enter the primary DNS server IP address [64.102.6.247]: 10.123.123.2
Do you want to configure Secondary DNS Server? (y/n) [y]: n
Any previously configured secondary DNS servers will be removed.
Do you want to configure Local Domain Name? (y/n) [n]: n
Do you want to configure Search domains? (y/n) [y]: n
Any previously configured search domains will be removed.
Do you want to enable the NTP service? [N]: n
Please review the final configuration:
Hostname: example.cisco.com
Management Interface Configuration

IPv4 Configuration: static
 IP Address: 10.123.123.123
 Netmask: 255.255.255.0
 Gateway: 10.123.123.1

IPv6 Configuration: Stateless autoconfiguration

DNS Configuration:
 DNS Server:
 10.123.123.2

NTP configuration: Disabled

CAUTION:
You have selected IPv6 stateless autoconfiguration, which assigns a global address
based on network prefix and a device identifier. Although this address is unlikely
to change, if it does change, the system will stop functioning correctly.
We suggest you use static addressing instead.

Apply the changes?(y,n) [Y]: y
Configuration saved successfully!
Applying...
Restarting network services...
Done.
Press ENTER to continue...
firepower-boot>

步骤 10

下载 威胁防御系统软件安装包。此步骤展示了如何执行 HTTP 安装。

system install [noconfirm] url

如果不想响应确认消息,请在命令中添加 noconfirm 选项。

示例:


> system install noconfirm http://10.86.118.21/ftd-6.0.1-949.pkg

系统会提示您清除内部闪存驱动器。输入 y


######################## WARNING ############################
# The content of disk0: will be erased during installation! #
#############################################################

Do you want to continue? [y/N] y

安装过程会清除闪存驱动器并下载系统映像。系统会提示您继续安装。输入 y


Erasing disk0 ...
Verifying 
Downloading 
Extracting 
Package Detail
 Description: Cisco ASA-NGFW 6.3.0 System Install
 Requires reboot: Yes 

Do you want to continue with upgrade? [y]: y

安装完成后,按 Enter 重启设备。


Warning: Please do not interrupt the process or turn off the system.
Doing so might leave system in unusable state.

Starting upgrade process ... 
Populating new system image 

Reboot is required to complete the upgrade. Press 'Enter' to reboot the system.

重新启动通常需要 30 分钟以上,但也可能需要更长时间。重新启动后,即可进入 威胁防御 CLI。

步骤 11

要排除网络连接故障,请参阅以下示例。

示例:

查看网络接口配置:


firepower-boot>show interface
eth0 Link encap:Ethernet HWaddr 00:a0:c9:00:00:00 
 inet addr:10.123.123.123 Bcast:10.123.123.255 Mask:255.255.255.0
 inet6 addr: fe80::2a0:c9ff:fe00:0/64 Scope:Link
 inet6 addr: 2001:420:270d:1310:2a0:c9ff:fe00:0/64 Scope:Global
 UP BROADCAST RUNNING MULTICAST MTU:1500 Metric:1
 RX packets:522369 errors:0 dropped:0 overruns:0 frame:0
 TX packets:2473 errors:0 dropped:0 overruns:0 carrier:0
 collisions:0 txqueuelen:1000 
 RX bytes:42120849 (40.1 MiB) TX bytes:170295 (166.3 KiB)
...

对服务器执行 Ping 操作:


firepower-boot>ping www.example.com
PING www.example.com (10.125.29.106) 56(84) bytes of data.
64 bytes from qg-in-f106.1e100.net (74.125.29.106): icmp_seq=1 ttl=42 time=28.8 ms
64 bytes from qg-in-f106.1e100.net (74.125.29.106): icmp_seq=2 ttl=42 time=28.1 ms
64 bytes from qg-in-f106.1e100.net (74.125.29.106): icmp_seq=3 ttl=42 time=28.1 ms
64 bytes from qg-in-f106.1e100.net (74.125.29.106): icmp_seq=4 ttl=42 time=29.0 ms
^C
--- www.example.com ping statistics ---
4 packets transmitted, 4 received, 0% packet loss, time 3003ms
rtt min/avg/max/mdev = 28.159/28.549/29.022/0.437 ms

firepower-boot>

跟踪路由以测试网络连接,请执行以下操作:


firepower-boot>traceroute -n 10.100.100.1 
traceroute to 10.100.100.1 (10.100.100.1), 30 hops max, 60 byte packets
 1 10.123.123.1 0.937 ms 1.078 ms 1.154 ms^C
firepower-boot>

步骤 12

要排除安装故障,请参阅以下示例。

示例:

“超时”错误

在下载阶段,如果无法访问文件服务器,该下载操作将因超时而失败。


   ...
Erasing disk0 ...
Verifying 

timed out
Upgrade aborted
firepower-boot> 

在这种情况下,请确保可以从 ASA 访问文件服务器。您可以通过对文件服务器执行 Ping 操作来进行验证。

“未找到软件包”错误

如果文件服务器可访问,但文件路径或名称错误,则安装会失败,并显示“未找到数据包”错误:

  ...
Erasing disk0 ...
Verifying 

Package not found. Please correct the URL, which should include the full path including package name.
Upgrade aborted.
firepower-boot>

在这种情况下,请确保 威胁防御 软件包文件路径和名称正确无误。

安装失败,出现未知错误

在下载系统软件后进行安装时,导致的原因通常显示为“安装失败,出现未知错误”。发生此错误时,您可以通过查看安装日志来进行故障排除:


firepower-boot>support view logs

===View Logs===

============================
Directory: /var/log
----------sub-dirs----------
cisco
sa
-----------files------------
2015-09-24 19:56:33.150011 | 102668 | install.log
2015-09-24 19:46:28.400002 | 292292 | lastlog
2015-09-24 19:45:15.510001 | 250 | ntp.log
2015-09-24 19:46:28.400002 | 5760 | wtmp

([b] to go back or [s] to select a file to view, [Ctrl+C] to exit)
Type a sub-dir name to list its contents: s

Type the name of the file to view ([b] to go back, [Ctrl+C] to exit)
> install.log
Thu Sep 24 19:53:44 UTC 2015: Begin installation ...
Found hard drive(s): /dev/sda
Erasing files from flash ...
...

您还可以在 /var/log/cisco 下使用与引导 CLI 相关问题相同的命令查看 upgrade.log、 pyos.log 和 commandd.log。

步骤 13

您可以使用 设备管理器管理中心 来管理设备。请参阅与您的型号和管理器对应的《快速入门指南》,继续设置:http://www.cisco.com/go/ftd-asa-quick


ASA→ASA:ASA 5500-X 或 ISA 3000

如果无法启动,可以使用 ROMMON 启动映像。然后,您可以将新的映像文件从 ASA 操作系统下载到闪存。

过程


步骤 1

关闭 ASA,然后重新启动。

步骤 2

在启动过程中,当系统提示您进入 ROMMON 模式时,请按 Escape 键。

步骤 3

在 ROMMOM 模式下,定义 ASA 的接口设置,包括 IP 地址、TFTP 服务器地址、网关地址、软件映像文件和端口,如下所示:


rommon #1> interface gigabitethernet0/0
rommon #2> address 10.86.118.4
rommon #3> server 10.86.118.21
rommon #4> gateway 10.86.118.21
rommon #5> file asa961-smp-k8.bin


请确保已存在网络连接。

interface 命令在 ASA 5506-X、ASA 5508-X、ASA 5516-X 和 ISA 3000 平台上将被忽略,您必须从管理 1/1 接口对这些平台执行 TFTP 恢复。

步骤 4

验证您的设置:


rommon #6> set
ROMMON Variable Settings:
  ADDRESS=10.86.118.3
  SERVER=10.86.118.21
  GATEWAY=10.86.118.21
  PORT=GigabitEthernet0/0
  VLAN=untagged
  IMAGE=asa961-smp-k8.bin
  CONFIG=
  LINKTIMEOUT=20
  PKTTIMEOUT=4
  RETRY=20

步骤 5

对 TFTP 服务器执行 ping 操作:


rommon #7> ping server
Sending 20, 100-byte ICMP Echoes to server 10.86.118.21, timeout is 4 seconds:

Success rate is 100 percent (20/20)

步骤 6

保存网络设置,以备将来使用:


rommon #8> sync
Updating NVRAM Parameters... 

步骤 7

加载软件映像:


rommon #9> tftpdnld
ROMMON Variable Settings:
  ADDRESS=10.86.118.3
  SERVER=10.86.118.21
  GATEWAY=10.86.118.21
  PORT=GigabitEthernet0/0
  VLAN=untagged
  IMAGE=asa961-smp-k8.bin
  CONFIG=
  LINKTIMEOUT=20
  PKTTIMEOUT=4
  RETRY=20

tftp asa961-smp-k8.bin@10.86.118.21 via 10.86.118.21

Received 14450688 bytes

Launching TFTP Image...
Cisco ASA Security Appliance admin loader (3.0) #0: Mon Mar 5 16:00:07 MST 2016

Loading...

成功加载软件映像后,ASA 会自动退出 ROMMON 模式。

步骤 8

从 ROMMON 模式启动 ASA 不会在重新加载时保留系统映像;您仍需将映像下载到闪存。有关完整的升级过程,请参阅《思科 ASA 升级指南 》


下一步工作