UCS IPv6 관리 컨피그레이션 예
목차
소개
이 문서에서는 IPv6 주소로 Cisco UCS(Unified Computing System) 관리 엔드포인트를 구성하는 방법에 대해 설명합니다.
사전 요구 사항
요구 사항
다음 주제에 대한 지식을 보유하고 있으면 유용합니다.
- Cisco UCS Manager(UCSM)
- Cisco CIMC(Integrated Management Controller)
- IPv6에 익숙함
사용되는 구성 요소
이 문서의 정보는 다음 소프트웨어 및 하드웨어 버전을 기반으로 합니다.
- Cisco UCS B Series
- Cisco UCSM 버전 2.2(3a)
- Cisco UCS M3 Series 블레이드 서버
이 문서의 정보는 특정 랩 환경의 디바이스를 토대로 작성되었습니다.이 문서에 사용된 모든 디바이스는 초기화된(기본) 컨피그레이션으로 시작되었습니다.현재 네트워크가 작동 중인 경우, 모든 명령어의 잠재적인 영향을 미리 숙지하시기 바랍니다.
배경 정보
UCS에 대한 IPv6 관리 지원은 UCS 버전 2.2에서 도입되었습니다. 6100 및 6200 Series FI(Fabric Interconnect)는 IPv4 주소와 별도로 관리 포트에 대한 IPv6 주소를 가질 수 있습니다.또한 M3 서버의 CIMC 주소에는 IPv6 주소가 있을 수 있습니다.인밴드 액세스 방법을 선택할 때 사용할 수 있습니다.
IPv6는 외부 클라이언트에서 다음과 같은 UCS 서비스에 액세스하기 위해 사용할 수 있습니다.
- HTTP/HTTPS
- SSH(Secure Shell)
- Telnet
- SNMP(Simple Network Management Protocol)
- CIM(Cisco Interaction Manager)
- 웹 서비스 관리(WS-Management)
- 플래시 정책 서버
UCS를 클라이언트로 사용하면 다음과 같은 다양한 서비스 카테고리에 액세스하기 위해 IPv6를 사용할 수 있습니다.
- 네트워크 서비스 - DNS(Domain Name System), SNMP 및 NTP(Network Time Protocol)
- 인증 서비스 - LDAP(Lightweight Directory Access Protocol), TACACS 및 RADIUS
- 파일 전송 서비스 - SSH, FTP, SSH SFTP(File Transfer Protocol) 및 TFTP
- 기타 서비스 - Syslog, Callhome, NFS(Network File System) 클라이언트 및 vCenter 에이전트
구성
이 섹션에서는 IPv6 주소로 Cisco UCSM 엔드포인트를 구성하는 방법에 대해 설명합니다
FI 컨피그레이션
초기 설정 중에 IPv4 또는 IPv6 주소로 관리 인터페이스를 구성할 수 있습니다.IPv6 주소로 구성된 경우 UCSM CLI 또는 GUI를 통해 초기 설정 후 관리 인터페이스에 대한 IPv4 주소를 수동으로 추가해야 합니다.
다음 예에서는 초기 설정 중에 관리 포트에 대한 IPv6 주소를 구성하기 위해 완료된 단계를 보여줍니다.
  Enter the configuration method. (console/gui) ? console
  Enter the setup mode; setup newly or restore from backup. (setup/restore) ? setup
  You have chosen to setup a new Fabric interconnect. Continue? (y/n): y
  Enforce strong password? (y/n) [y]: n
  Enter the password for "admin":
  Confirm the password for "admin":
  Is this Fabric interconnect part of a cluster(select 'no' for standalone)?
   (yes/no) [n]: n
  Fabric interconnect will be in stand alone mode
  Enter the system name:  ucs-ipv6
  Physical Switch Mgmt0 IP address : 2014::10:76:78:107
  Physical Switch Mgmt0 IPv6 prefix : 64
  IPv6 address of the default gateway : 2014::10:76:78:1
IPv4 주소만 있는 설정에 IPv6 주소를 추가할 수 있으며 현재 IPv6 주소도 변경할 수 있습니다.이러한 옵션은 UCSM GUI 및 CLI에서 모두 사용할 수 있습니다.
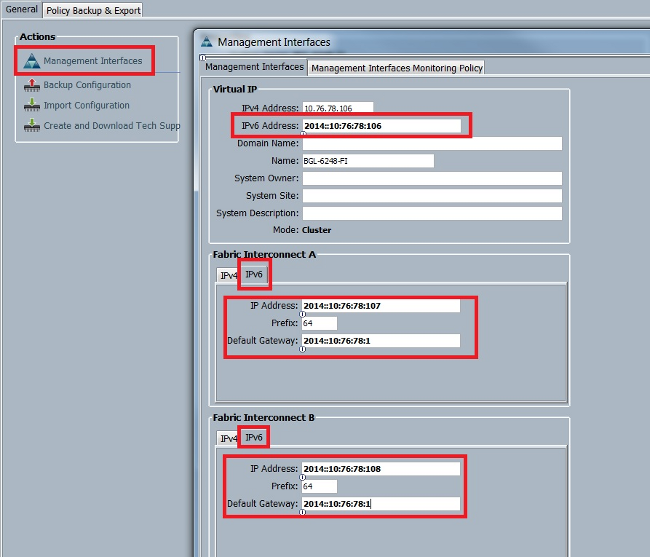
다음 예에서는 UCSM GUI에서 완료된 단계를 보여줍니다.

다음 예에서는 UCSM CLI에서 완료된 단계를 보여줍니다.
FI-A# scope fabric-interconnect a
FI-A /fabric-interconnect # scope ipv6-config
FI-A /fabric-interconnect/ipv6-config # set out-of-band ipv6 2014::10:76:78:107
FI-A /fabric-interconnect/ipv6-config* # set out-of-band ipv6-gw 2014::10:76:78:1
FI-A /fabric-interconnect/ipv6-config* # set out-of-band ipv6-prefix 64

FI-A* # scope fabric-interconnect b
FI-A /fabric-interconnect* # scope ipv6-config
FI-A /fabric-interconnect/ipv6-config* # set out-of-band ipv6 2014::10:76:78:108
FI-A /fabric-interconnect/ipv6-config* # set out-of-band ipv6-gw 2014::10:76:78:1
FI-A /fabric-interconnect/ipv6-config* # set out-of-band ipv6-prefix 64

FI-A* # scope system
FI-A /system* # set virtual-ip ipv6 2014::10:76:78:106

FI-A* # commit-buffer
IPv6를 통해 UCSM 액세스
할당된 IPv6 주소를 사용하여 UCSM GUI 및 CLI에 액세스할 수 있습니다.

IPv6를 통한 CIMC
이 섹션에서는 CIMC의 대역 내 관리에 대해 설명합니다.
UCS 버전 2.2 이전에는 CIMC 액세스가 UCS FI의 대역 외 관리 포트를 통해 이루어졌습니다.CIMC는 UCS 버전 2.2까지 두 개의 서로 다른 IP 주소를 가질 수 있습니다.
- Equipment(장비) 탭에서 할당된 IPv4 주소 - 이 주소는 서비스 프로필 연결에 관계없이 서버 하드웨어 자체에 고정되며 변경되지 않습니다.
- Servers(서버) 탭에서 할당된 IPv4 주소 - 이 주소는 서비스 프로필에 따라 달라지며 서비스 프로필과 함께 이동합니다.
UCS 버전 2.2는 M3 서버용 CIMC의 인밴드 액세스도 활성화했습니다.IPv4 및 IPv6 주소를 모두 인밴드 액세스에 사용할 수 있으므로 CIMC는 UCS 버전 2.2와 최대 6개의 서로 다른 주소를 가질 수 있습니다.
| 대역 외 | 인밴드 | |
| 장비 | IPv4 | IPv4, IPv6 |
| 서버 | IPv4 | IPv4, IPv6 |
다음 예에서는 UCSM GUI의 Equipment(장비) 탭을 통해 CIMC에 대한 인밴드 IPv6 주소를 구성하기 위해 완료된 단계를 설명합니다.
- LAN > VLAN Groups(LAN 그룹)로 이동하고 인밴드 관리에 사용할 VLAN 목록을 사용하여 VLAN 그룹을 생성합니다.

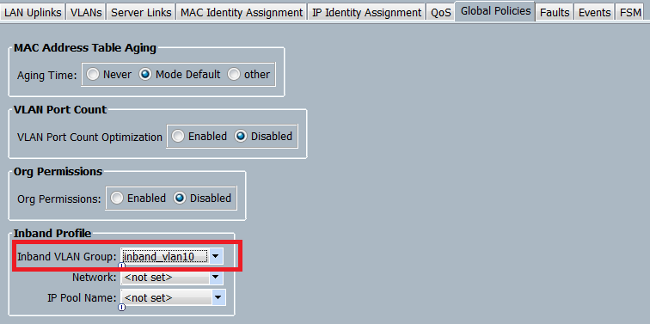
- LAN > Global Policies(전역 정책) > Inband Profile(인밴드 프로파일)로 이동하여 VLAN 그룹을 선택하여 인밴드 프로파일에 연결합니다.

- Equipment(장비) 탭에서 서버로 이동하고 Inventory(인벤토리) > CIMC > Change Inband Management IP(인밴드 관리 IP 변경)를 클릭하고 그룹의 VLAN을 CIMC에 연결하고 IPv6 주소를 할당합니다.

- Network(네트워크) 드롭다운 목록에서 VLAN을 선택하고 Inband IPv6(인밴드 IPv6)을 클릭하고 IPv6 주소를 할당합니다.다음 그림에서는 정적 할당 방법을 보여 줍니다.

Servers(서버) 탭에서 IPv6 주소를 할당할 때도 동일한 절차가 사용됩니다.다음 예는 UCSM CLI를 통해 Equipment(장비) 탭에서 CIMC에 대한 인밴드 IPv6 주소를 구성하기 위해 완료된 단계를 보여줍니다.
FI-A# scope server 1/1
FI-A /chassis/server # scope cimc
FI-A /chassis/server/cimc # create mgmt-iface in-band
FI-A /chassis/server/cimc/mgmt-iface* # create mgmt-vlan
FI-A /chassis/server/cimc/mgmt-iface/mgmt-vlan* # set network-name VL10
FI-A /chassis/server/cimc/mgmt-iface/mgmt-vlan* # create ext-static-ip6
FI-A /chassis/server/cimc/mgmt-iface/mgmt-vlan/ext-static-ip6* # set addr
 2014::10:76:78:141
FI-A /chassis/server/cimc/mgmt-iface/mgmt-vlan/ext-static-ip6* # set prefix 64
FI-A /chassis/server/cimc/mgmt-iface/mgmt-vlan/ext-static-ip6* # set default-gw
 2014::10:76:78:1
FI-A /chassis/server/cimc/mgmt-iface/mgmt-vlan/ext-static-ip6* # commit-buffer
KVM 콘솔 및 기타 서비스 실행
CIMC 주소는 KVM(Keyboard, Video, and Mouse), vMedia, IPMI(Intelligent Platform Management Interface), SoL(Serial over LAN) 등의 서비스에 사용됩니다. 이러한 서비스는 인밴드 주소와 대역 외 주소 모두에 사용할 수 있습니다.
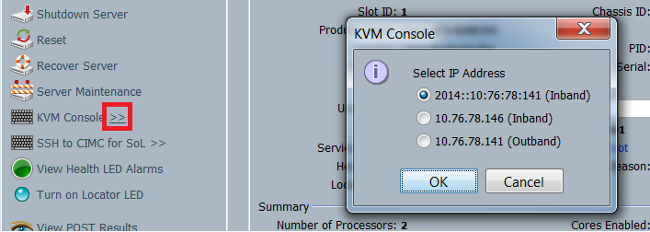
KVM 콘솔을 시작할 때 KVM 콘솔 옵션 옆에 있는 >> 기호를 클릭하여 KVM 콘솔에 액세스할 수 있는 다양한 주소를 확인합니다.

KVM 시작 관리자에서 동일한 옵션을 사용할 수 있습니다.


서비스 프로필에 할당된 주소가 Equipment(장비) 탭을 통해 서버 하드웨어에 할당된 주소보다 우선합니다.
IPv6 주소는 KVM 콘솔을 시작하기 위해 선택된 기본 주소이므로 KVM 콘솔을 클릭하면 이 주소가 사용됩니다.이 IPv6 주소에 연결할 수 없는 경우 KVM 실행이 실패합니다.다른 주소를 선택하려면 위에서 설명한 대로 KVM Console 옵션 옆에 있는 >> 기호를 클릭합니다.
UCS 버전 2.2는 직접 KVM 액세스도 도입했습니다.그러나 이 기능은 대역 외 관리에만 사용할 수 있습니다.OOB는 IPv4 주소만 사용하므로 IPv6 주소는 여기에서 사용할 수 없습니다.
다음을 확인합니다.
이 섹션에서는 컨피그레이션이 제대로 작동하는지 확인하는 방법에 대해 설명합니다.
FI에 대한 IPv6 주소 할당 확인
다음 예에서는 UCSM GUI에서 FI에 대한 IPv6 주소 할당을 확인하는 방법을 보여줍니다.

다음 예에서는 UCSM CLI에서 FI에 대한 IPv6 주소 할당을 확인하는 방법을 보여 줍니다.
FI-A(local-mgmt)# show mgmt-ip-debug ifconfig

eth0      Link encap:Ethernet  HWaddr 54:7F:EE:65:81:A1
          inet addr:10.76.78.107  Bcast:10.76.78.255  Mask:255.255.255.0
          inet6 addr: 2014::10:76:78:106/64 Scope:Global
          inet6 addr: 2014::10:76:78:107/64 Scope:Global
          inet6 addr: fe80::567f:eeff:fe65:81a1/64 Scope:Link
          UP BROADCAST RUNNING MULTICAST  MTU:1500  Metric:1
          RX packets:24775380 errors:0 dropped:0 overruns:0 frame:0
          TX packets:14343153 errors:0 dropped:0 overruns:0 carrier:0
          collisions:0 txqueuelen:1000

FI-B(local-mgmt)# show mgmt-ip-debug ifconfig

eth0      Link encap:Ethernet  HWaddr 54:7F:EE:6F:71:81
          inet addr:10.76.78.108  Bcast:10.76.78.255  Mask:255.255.255.0
          inet6 addr: 2014::10:76:78:108/64 Scope:Global
          inet6 addr: fe80::567f:eeff:fe6f:7181/64 Scope:Link
          UP BROADCAST RUNNING MULTICAST  MTU:1500  Metric:1
          RX packets:18646548 errors:0 dropped:0 overruns:0 frame:0
          TX packets:238825 errors:0 dropped:0 overruns:0 carrier:0
          collisions:0 txqueuelen:1000
          RX bytes:3206162748 (2.9 GiB)  TX bytes:56366913 (53.7 MiB)
기본 네트워크 연결 테스트
다음 예에서는 UCSM CLI에서 기본 네트워크 연결 테스트를 수행하는 방법을 보여 줍니다.
FI-A(local-mgmt)# ping6 2014::10:76:78:216
PING 2014::10:76:78:216(2014::10:76:78:216) from 2014::10:76:78:106 eth0:
 56 data bytes
64 bytes from 2014::10:76:78:216: icmp_seq=1 ttl=64 time=1.92 ms
64 bytes from 2014::10:76:78:216: icmp_seq=2 ttl=64 time=0.262 ms
64 bytes from 2014::10:76:78:216: icmp_seq=3 ttl=64 time=0.260 ms
64 bytes from 2014::10:76:78:216: icmp_seq=4 ttl=64 time=0.222 ms
64 bytes from 2014::10:76:78:216: icmp_seq=5 ttl=64 time=0.196 ms
64 bytes from 2014::10:76:78:216: icmp_seq=6 ttl=64 time=0.231 ms

FI-A(local-mgmt)# traceroute6 2014::10:76:78:216
traceroute to 2014::10:76:78:216 (2014::10:76:78:216) from
 2014::10:76:78:106, 30 hops max, 16 byte packets
 1  2014::10:76:78:216 (2014::10:76:78:216)  0.244 ms *  0.253 ms
CIMC에 대한 IPv6 주소 할당 확인
다음 예에서는 UCSM GUI에서 CIMC에 할당된 IPv6 주소를 확인하는 방법을 보여줍니다.

다음 예에서는 UCSM CLI에서 CIMC에 할당된 IPv6 주소를 확인하는 방법을 보여줍니다.
FI-A# scope server 1/1
FI-A /chassis/server # scope cimc
FI-A /chassis/server/cimc # show mgmt-iface in-band detail expand

External Management Interface:
    Mode: In Band
    Ip V4 State: None
    Ip V6 State: Static
    Is Derived from Inband Profile: No

    External Management Virtual LAN:
        Network Name: VL10
        Id: 10

        External Management Static IPv6:
            IP Address: 2014::10:76:78:146
            Default Gateway: 2014::10:76:78:1
            Prefix: 64
            Primary DNS IP: ::
            Secondary DNS IP: ::
블레이드 서버의 CIMC 인밴드 연결 경로 추적
다음 예는 블레이드 서버에 대한 CIMC 인밴드 연결의 경로를 추적하는 방법을 보여줍니다.CIMC 인밴드 인터페이스는 해당 IOM의 마지막 HIF(Host Interfaces) 포트에 매핑해야 합니다.IOM(Io Module)은 서버의 관리 인스턴스를 기반으로 선택됩니다.
UCSM GUI에서 Equipment(장비) > Server(서버) > General(일반) > Connection Details(연결 세부사항)로 이동합니다.

또한 UCSM CLI를 통해 확인할 수도 있습니다.
FI-A# scope server 1/1
FI-A /chassis/server # show detail

Server:
    Slot: 1
    <snip>
    Conn Path: A,B
    Conn Status: A,B
    Managing Instance: A
표시된 대로 Eth1/1/33은 인밴드 연결에 사용되는 업링크 포트 Eth1/19에 고정됩니다.
FI-A(nxos)# show fex 1 detail

  Fex Port        State  Fabric Port
         Eth1/1/1    Up     Eth1/17
         Eth1/1/2    Up     Eth1/17
         Eth1/1/3    Up     Eth1/17
         Eth1/1/4    Up     Eth1/17
         Eth1/1/5  Down        None
         Eth1/1/6  Down        None
         Eth1/1/7  Down        None
         Eth1/1/8  Down        None
         Eth1/1/9    Up     Eth1/19
        Eth1/1/10  Down        None
        Eth1/1/11  Down        None
        Eth1/1/12  Down        None
        Eth1/1/13    Up     Eth1/20
        Eth1/1/14  Down        None
        Eth1/1/15  Down        None
        Eth1/1/16  Down        None
        Eth1/1/17    Up     Eth1/17
        Eth1/1/18  Down        None
        Eth1/1/19  Down        None
        Eth1/1/20  Down        None
        Eth1/1/21    Up     Eth1/18
        Eth1/1/22    Up     Eth1/18
        Eth1/1/23    Up     Eth1/18
        Eth1/1/24    Up     Eth1/18
        Eth1/1/25  Down        None
        Eth1/1/26  Down        None
        Eth1/1/27  Down        None
        Eth1/1/28  Down        None
        Eth1/1/29  Down     Eth1/20
        Eth1/1/30  Down     Eth1/20
        Eth1/1/31  Down     Eth1/20
        Eth1/1/32  Down     Eth1/20
        Eth1/1/33    Up     Eth1/19
이제 실행 중인 컨피그레이션이 이 예에서 VLAN 10인 인밴드 VLAN을 추가합니다.
FI-A(nxos)# show run int eth1/1/33

interface Ethernet1/1/33
  no pinning server sticky
  switchport mode trunk
  switchport trunk native vlan 4044
  switchport trunk allowed vlan 10,4044
  no shutdown

FI-A(nxos)# show mac address-table vlan 10
Legend:
        * - primary entry, G - Gateway MAC, (R) - Routed MAC, O - Overlay MAC
        age - seconds since last seen,+ - primary entry using vPC Peer-Link
   VLAN     MAC Address      Type      age     Secure NTFY   Ports/SWID.SSID.LID
---------+-----------------+--------+---------+------+----+------------------
* 10       e02f.6d9a.9e71    dynamic   0          F    F  Eth1/1/33
랙 서버의 CIMC 인밴드 연결 경로 추적
이 예에서는 랙 서버의 CIMC 인밴드 연결 경로를 추적하는 방법을 보여줍니다.CIMC 인터페이스는 서버가 연결된 FEX(Fabric Extender) 포트에 매핑된 Vethernet 인터페이스에 매핑되어야 합니다.서버가 HA(High Availability) 설정에서 서로 다른 두 FEX 모듈에 연결되는 경우 경로를 확인하려면 관리 인스턴스를 확인해야 합니다.
UCSM GUI에서 Equipment(장비) > Rack-mounts(랙 마운트) > Server(서버) > General(일반) > Connection Details(연결 세부사항)로 이동합니다.

또한 UCSM CLI를 통해 확인할 수도 있습니다.
FI-A# scope server 1
FI-A /server # show detail

Server:
    Conn Path: A,B
    Conn Status: A,B
    Managing Instance: B
표시된 대로 FEX의 Eth2/1/4가 랙 서버에 연결됩니다.
FI-B(nxos)# show fex 2 detail
  Fex Port        State  Fabric Port
         Eth2/1/1  Down        None
         Eth2/1/2  Down        None
         Eth2/1/3  Down        None
         Eth2/1/4    Up      Po1154
         Eth2/1/5  Down        None
         Eth2/1/6  Down        None
         Eth2/1/7  Down        None
         Eth2/1/8  Down        None
         Eth2/1/9  Down        None
        Eth2/1/10  Down        None
        Eth2/1/11  Down        None
        Eth2/1/12  Down        None
        Eth2/1/13  Down        None
        Eth2/1/14  Down        None
        Eth2/1/15  Down        None
        Eth2/1/16  Down        None
        Eth2/1/17  Down        None
        Eth2/1/18  Down        None
        Eth2/1/19  Down        None
        Eth2/1/20  Down        None
        Eth2/1/21  Down        None
        Eth2/1/22  Down        None
        Eth2/1/23  Down        None
        Eth2/1/24  Down        None
        Eth2/1/25  Down        None
        Eth2/1/26  Down        None
        Eth2/1/27  Down        None
        Eth2/1/28  Down        None
        Eth2/1/29  Down        None
        Eth2/1/30  Down        None
        Eth2/1/31  Down        None
        Eth2/1/32  Down        None
이러한 이더넷 인터페이스는 Eth2/1/4에 매핑됩니다.
FI-B(nxos)# show vifs interface ethernet 2/1/4

Interface      MAX-VIFS VIFS
-------------- -------- ------------------------------------
Eth2/1/4       60       Veth689, Veth32769,

FI-B(nxos)# show run int veth32769

interface Vethernet32769
  inherit port-profile ucsm_internal_rackserver_portprofile
  no pinning server sticky
  bind interface Ethernet2/1/4 channel 65535
표시된 대로 Veth32769는 업링크 포트 Eth1/17에 고정됩니다.
FI-B(nxos)# show pinning border-interfaces

--------------------+---------+-----------------------------
Border Interface     Status    SIFs
--------------------+---------+-----------------------------
Eth1/17              Active    sup-eth2 Veth32769
문제 해결
현재 이 컨피그레이션에 사용할 수 있는 특정 문제 해결 정보가 없습니다.
FAQ(자주 묻는 질문)
이 섹션에서는 일부 FAQ와 답변을 설명합니다.
관리 포트에 IPv6 프라이빗 유니캐스트 주소를 사용할 수 있습니까?
아니요. 전역 유니캐스트 주소만 지원됩니다.
UCS는 SLAAC(Stateless Address Autoconfiguration)를 지원합니까?
아니요. FI 관리 포트에는 고정 주소 할당만 지원됩니다.
iSCSI 부팅을 사용할 때 iSCSI 이니시에이터에 IPv6를 사용할 수 있습니까?
아니요. 현재 iSCSI(Internet Small Computer System Interface) 이니시에이터에는 IPv6가 지원되지 않습니다.
UCSM이 UCS 버전 2.2 이상에서 UCS 버전 2.1 이하로 다운그레이드되면 어떻게 됩니까?
FI의 관리 포트 또는 CIMC에 IPv6 주소 또는 인밴드 컨피그레이션이 있는 경우 다운그레이드가 실패하고 오류 메시지가 표시됩니다.
FI가 UCS 버전 2.2 이상에서 UCS 버전 2.1 이하로 다운그레이드되면 어떻게 됩니까?
UCSM에서 현재 버전 2.2 이상을 사용하는 경우 FI 다운그레이드가 성공적으로 완료됩니다.FI의 IPv6 컨피그레이션이 계속 작동해야 합니다.
CIMC에서 UCS 버전 2.1 또는 이전 버전을 사용하는 경우 어떻게 됩니까?
UCSM에서 버전 2.2 이상을 사용하는 경우 CIMC에 대한 인밴드 또는 IPv6 컨피그레이션이 허용됩니다.그러나 이는 인식되지 않으며 CIMC는 Out of Band IPv4 주소를 계속 사용합니다.
CIMC가 UCS 버전 2.2 이상에서 UCS 버전 2.1 이하로 다운그레이드되면 어떻게 됩니까?
CIMC에 인밴드 또는 IPv6 컨피그레이션이 있는 경우 다운그레이드가 실패하고 오류 메시지가 표시됩니다.
IPv6 주소에 사용할 수 없는 예약된 접두사가 있습니까?
예.예약된 접두사 값은 0 및 128입니다. 1에서 127만 사용할 수 있습니다.
인밴드 관리에 사용할 수 없는 예약된 VLAN이 있습니까?
예.VLAN 1, 2, 3은 예약된 VLAN의 일반 목록(3968~4047)과 함께 사용할 수 없습니다.
 피드백
피드백