소개
이 문서에서는 Cisco Secure Endpoint Private Cloud Appliance에서 지원 스냅샷을 수집하고 라이브 지원 세션을 활성화하는 단계에 대해 설명합니다.
배경 정보
TAC와 협업할 때 지원 스냅샷을 수집하거나 TAC에서 보안 엔드포인트(이전의 Advanced Malware Protection)에 대한 지원 터널을 설정하도록 허용해야 하는 경우가 있습니다. 이를 통해 정밀한 조사 또는 원격으로 픽스를 적용할 수 있습니다.
이러한 접근 방식은 시간을 절약하고 TAC 엔지니어에게 문제를 효과적으로 해결하는 데 필요한 포괄적인 정보를 제공합니다.
스냅샷 지원
관리 포털에서 지원 스냅샷 생성
관리 포털에서 지원 스냅샷을 수집하려면 다음 단계를 수행하십시오.
1단계: 관리 포털에 로그인합니다.
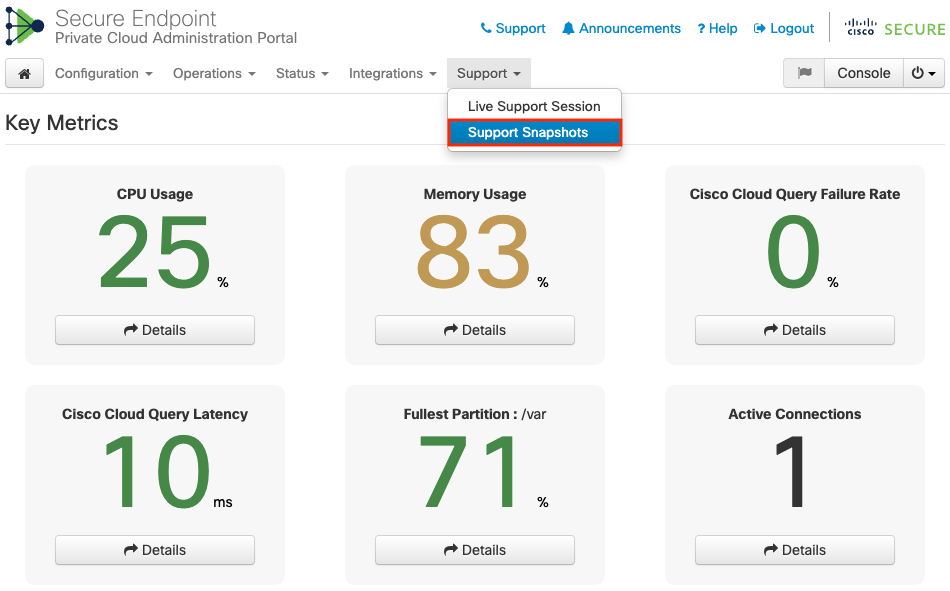
2단계: 그림과 같이 Support(지원)를 선택한 다음 Support Snapshots(스냅샷 지원)를 선택합니다.
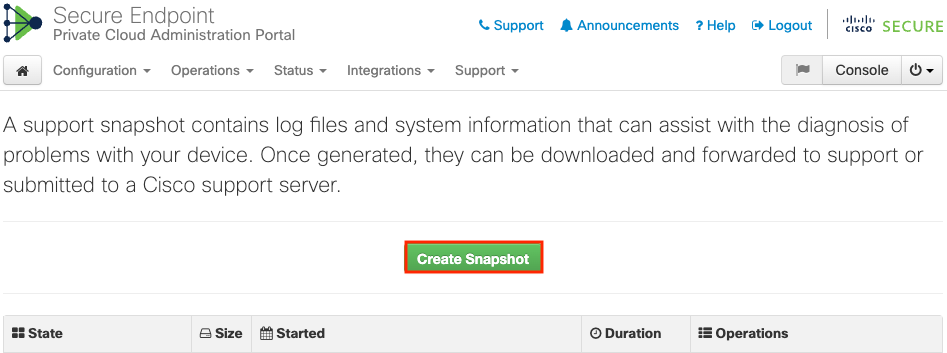
3단계: Create Snapshot(스냅샷 생성)을 클릭합니다.
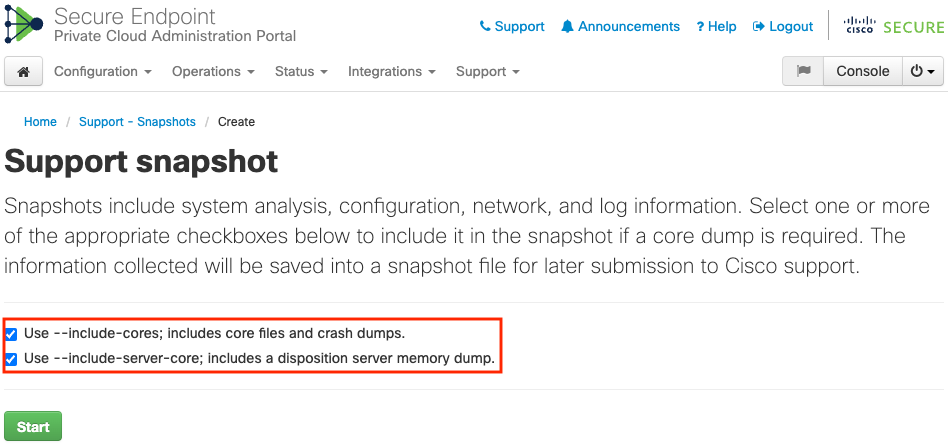
4단계: 이미지에 표시된 대로 Include the Core Files and other Memory Dumps(코어 파일 및 기타 메모리 덤프 포함)와 기본적으로 선택되지 않은 스냅샷을 선택할 수 있습니다.
5단계: 스냅샷이 시작되었으며 시간이 걸릴 수 있습니다. 진행 상황을 모니터링하려면 이미지에 표시된 대로 Details(세부사항)를 클릭합니다.
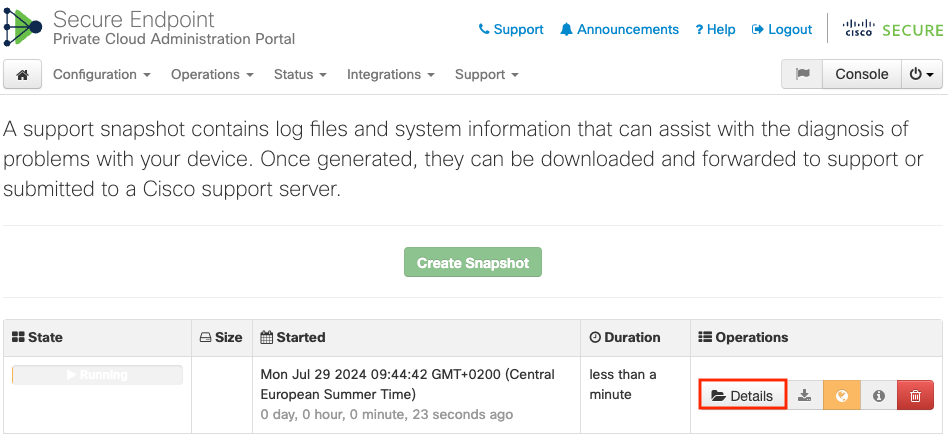
6단계: 스냅샷 생성이 완료되면 포털에 액세스하는 로컬 시스템에서 스냅샷을 다운로드할  아이콘을 선택할 수 있어야 합니다.
관리 포털 SSH에서 지원 스냅샷 생성
관리 포털 SSH에서 지원 스냅샷을 생성하려면 다음 단계를 수행하십시오.
1단계: 관리 포털에 SSH를 적용합니다.
2단계: 스냅샷을 생성하는 데 사용할 수 있는 CLI입니다.
[root@fireamp ~]# amp-support snapshot -A <Path where to store the Snapshot>

usage: /opt/opadmin/embedded/bin/amp-support snapshot [options] <snapshot_file>

Create a snapshot of the current system; this includes log files, system
status, run processes, crash dumps, and other information that can be
used by a support engineer to diagnose problems with your system.
If no explicit options are provided the default ones are assumed.  The
default options are: include-configs, include-logs, include-network,
include-cores, and include-status

    -A, --all                        Include everything.
    -a, --include-analysis           Include system analysis. (SLOW!)
    -C, --include-configs            Include configuration files.
    -c, --include-cores              Include core files.
    -F, --include-firehose-cassandra Include firehose-cassandra status.
    -i, --include-inodes             Include filesystem inode usage.
    -I, --include-integrations       Include appliance integration information.
    -k, --include_kafka              Include Kafka status.
    -L, --include-flink              Include Flink status.
    -l, --include-logs               Include log files.
    -m, --include-mongo              Include MongoDB status.
    -N, --include-cassandra          Include Cassandra status.
    -n, --include-network            Include network analysis.
    -r, --include-redis              Include Redis status.
    -S, --include-server-core        Include a disposition server memory dump.
    -s, --include-status             Include system status.
    -d, --include-docker             Include docker status.
    -z, --include_zookeeper          Include Zookeeper status.
    -f, --fs-check FILE              Include filesystem check results from file.
    -v, --verbose                    Increase output verbosity.
어플라이언스 콘솔에서 지원 스냅샷 생성
프라이빗 클라우드 어플라이언스 콘솔에서 지원 스냅샷을 생성하려면 다음 단계를 수행하십시오.
1단계: Private Cloud Appliance Console에 로그인합니다.
2단계: SUPPORT_SNAPSHOT을 선택합니다.
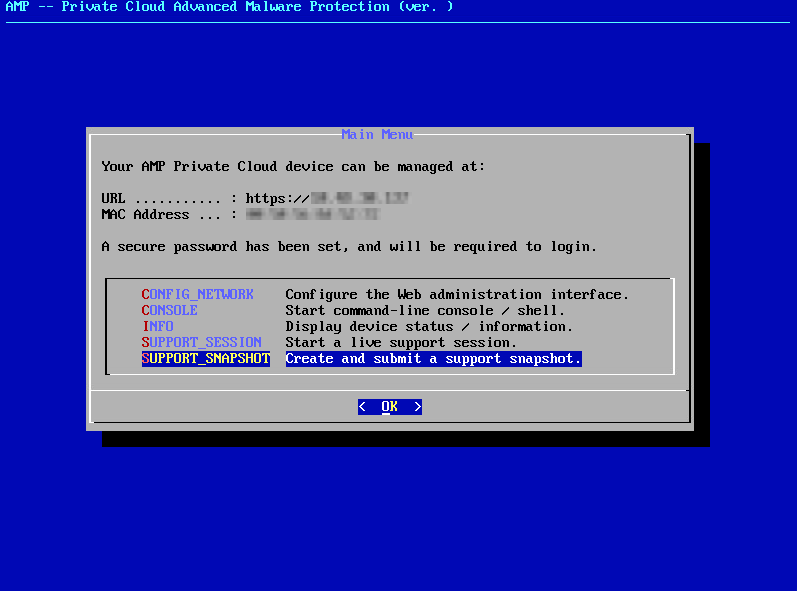
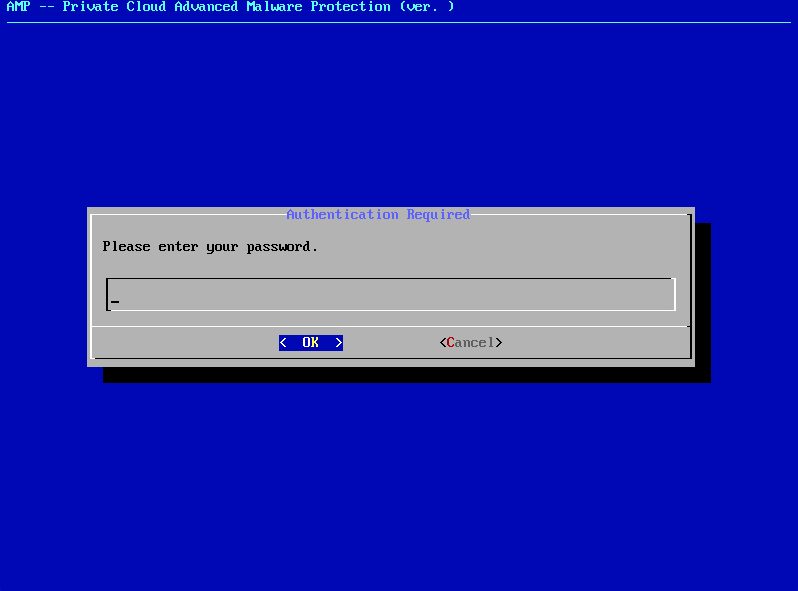
3단계: 이미지에 표시된 대로 관리 포털 비밀번호를 입력합니다.
4단계: 이미지에 표시된 대로 Include the Core Files and other Memory Dumps(코어 파일 및 기타 메모리 덤프 포함)와 기본적으로 선택되지 않은 스냅샷을 선택할 수 있습니다.
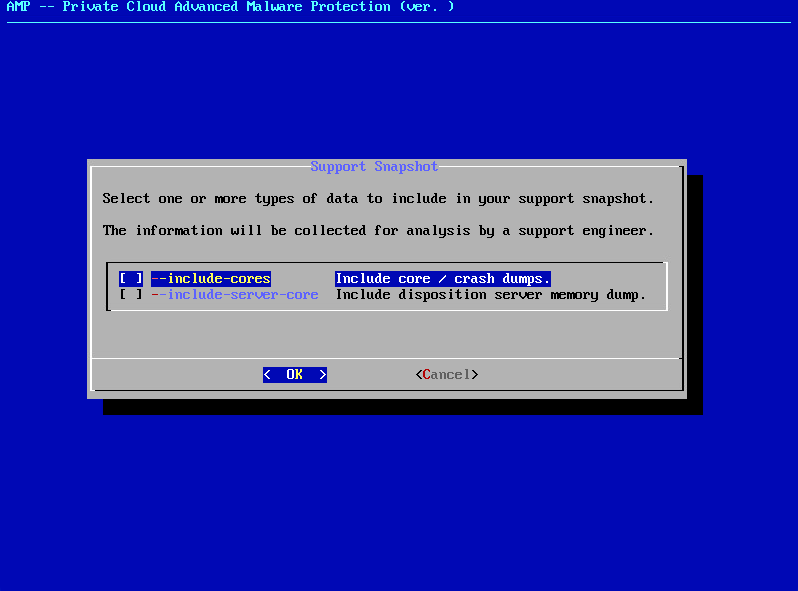
5단계: 그런 다음 OK(확인)를 선택하면 스냅샷이 시작됩니다.
라이브 지원 세션
관리 포털에서 라이브 지원 세션 활성화
관리 포털에서 라이브 지원 세션 활성화를 생성하려면 다음 단계를 수행합니다.
1단계: 관리 포털에 로그인합니다.
2단계: Support(지원)를 클릭하거나 선택하고 Live Support Session(라이브 지원 세션)을 선택합니다.
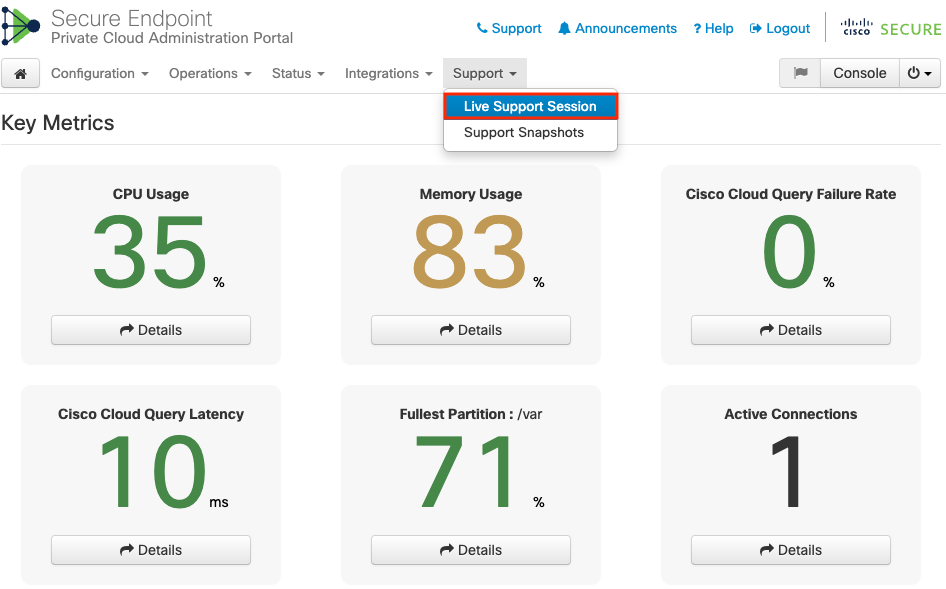
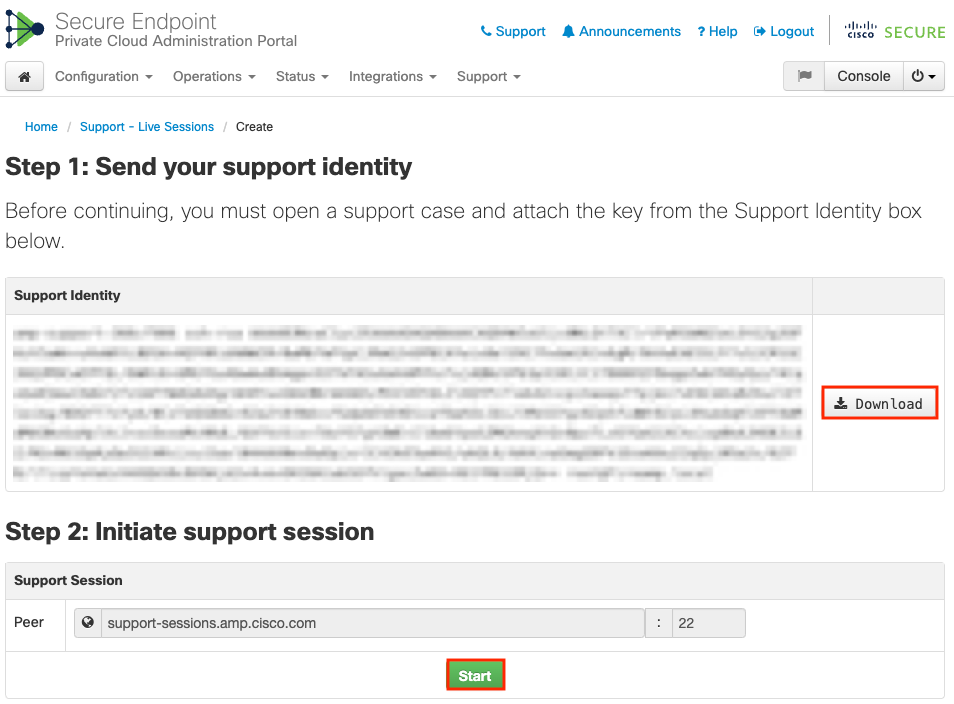
3단계: Start Support Session(지원 세션 시작) 다음 Download(다운로드)를 클릭하거나 선택하여 TAC에서 어플라이언스에 원격으로 연결하는 데 필요한 SSH ID를 가져옵니다. 그런 다음 를 클릭하거나 Start(시작)를 선택하여 이미지에 표시된 대로 Live Support Session(라이브 지원 세션)을 시작합니다.
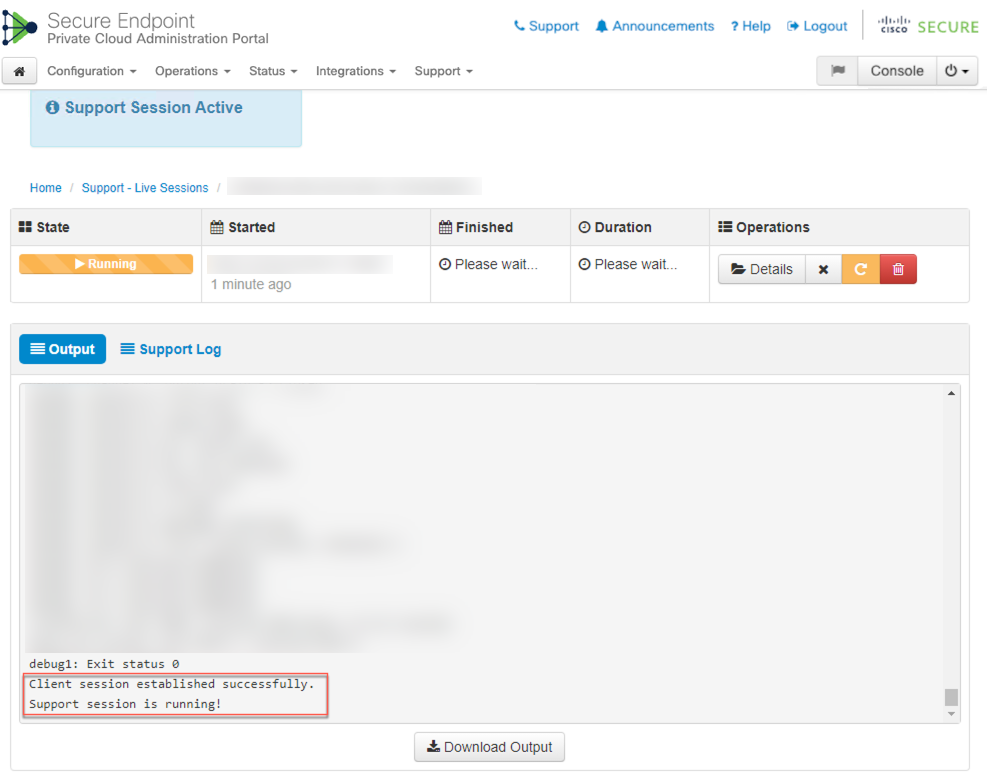
4단계: 그림과 같이 Live Support Session에 대해 어플라이언스가 성공적으로 연결된 후 그림에 표시된 것과 같은 로그가 표시됩니다.
관리 포털 SSH에서 라이브 지원 세션 활성화
관리 포털 SSH에서 Live Support 세션 활성화를 생성하려면 다음 단계를 수행합니다.
1단계: 관리 포털 SSH에 로그인합니다.
2단계: SSH에서 Live Support Session을 활성화할 수 있는 CLI입니다.
[root@fireamp ~]# amp-support session -l support.log -s support-sessions.amp.cisco.com -p 22 <UUID>
usage: /opt/opadmin/embedded/bin/amp-support session [options] <uuid>

Manage a support session with a remote server; this facilitates a secure method of
provide unrestricted shell access to your machine to an engineer on a remote
system. Note that when restart a session, the same parameters as the previous
session are used unless new parameters are supplied. The UUID is expected to be
version 4.

Note that the `--log` option provides an optional log file for the support
engineer to log their shell activity to. A script is provided to the remote
user to collect this log data, but it is not and cannot be enforced by the
support script.

OPTIONS

    -b, --batch                      Use batch (non-interactive) mode.
    -d, --delete                     Delete a support session and all files.
    -l, --log FILE                   Log remote shell commands to file.
    -p, --port PORT                  Connect to an alternative port.
    -s, --support-server SERVER      Set the server of a session.
    -t, --terminate                  Terminate an active session.
    -v, --verbose                    Increase output verbosity.

NOTE: UUID can be any random string as long as it has the format: xxxxxxxx-xxxx-xxxx-xxxx-xxxxxxxxxxxx. Also, you can keep the Port as default to 22

EXAMPLES

    /opt/opadmin/embedded/bin/amp-support session -l support.log -s support.example.com -p 2222 xxxxxxxx-xxxx-xxxx-xxxx-xxxxxxxxxxxx
    /opt/opadmin/embedded/bin/amp-support session xxxxxxxx-xxxx-xxxx-xxxx-xxxxxxxxxxxx
    /opt/opadmin/embedded/bin/amp-support session -t -d xxxxxxxx-xxxx-xxxx-xxxx-xxxxxxxxxxxx
어플라이언스 콘솔에서 라이브 지원 세션 활성화
Private Cloud Appliance Console에서 Live Support Session 활성화를 생성하려면 다음 단계를 수행합니다.
1단계: Private Cloud Appliance Console에 로그인합니다.
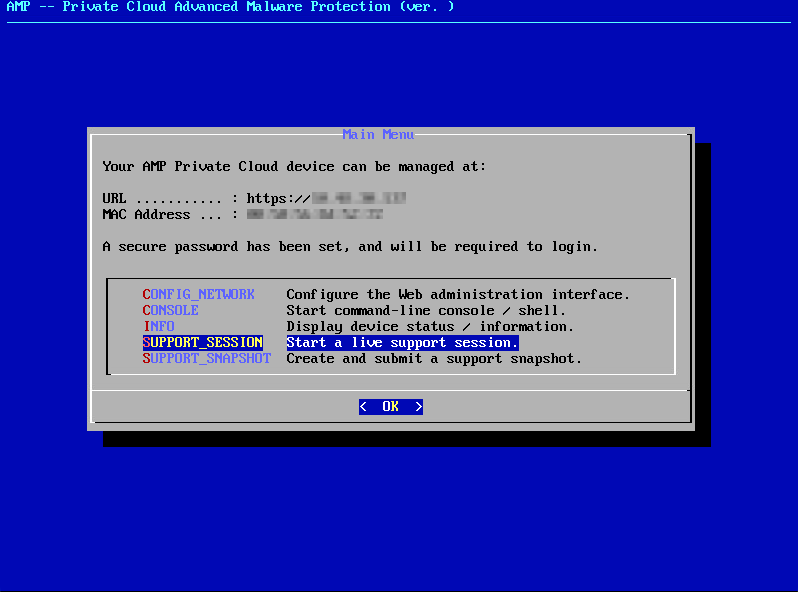
2단계: SUPPORT_SESSION을 선택하여 그림과 같이 Live Support Session을 활성화합니다.
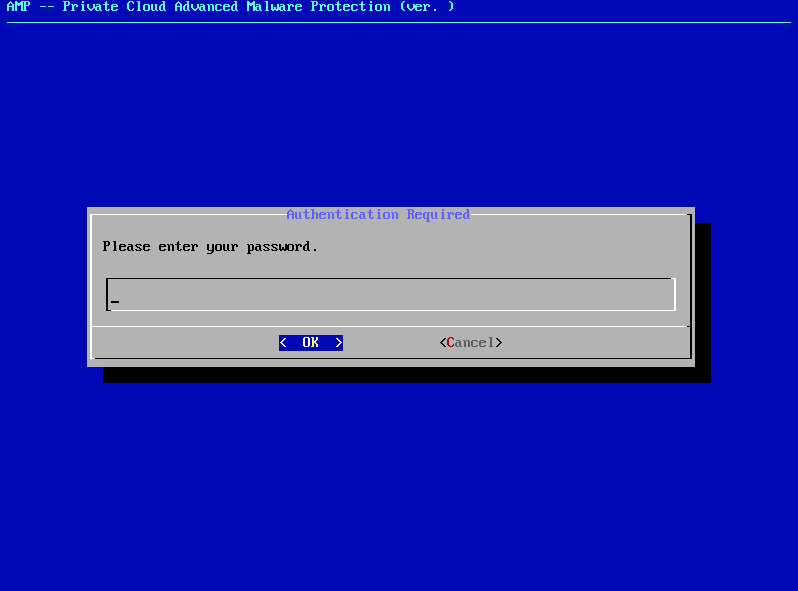
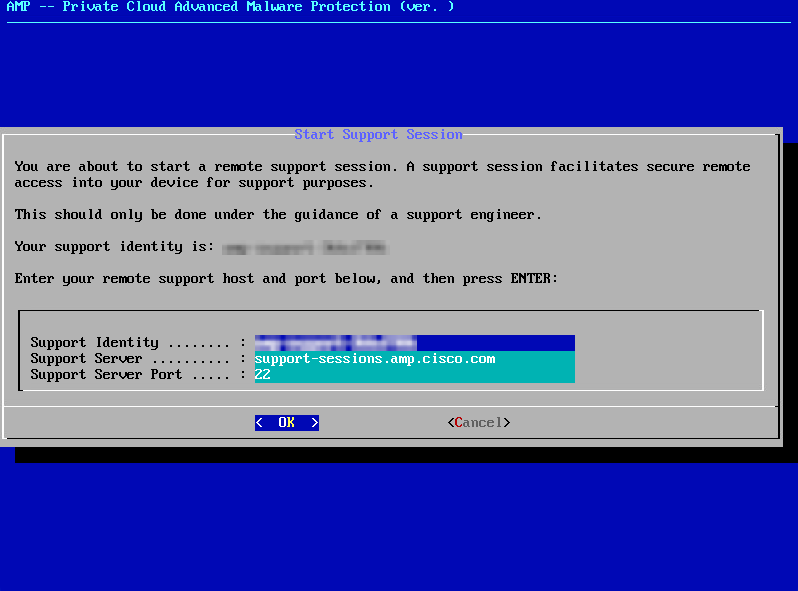
3단계: 이미지에 표시된 대로 관리 포털 비밀번호를 입력합니다.
4단계: 모든 기본 설정을 변경하지 않고 그대로 둘 수 있습니다. 이미지에 표시된 대로 OK(확인)를 선택하여 Live Support Session을 활성화합니다.


 아이콘을
아이콘을


 피드백
피드백