신청자 액세스에 대한 시스템 2단계 인증 구성
다운로드 옵션
편견 없는 언어
본 제품에 대한 문서 세트는 편견 없는 언어를 사용하기 위해 노력합니다. 본 설명서 세트의 목적상, 편견 없는 언어는 나이, 장애, 성별, 인종 정체성, 민족 정체성, 성적 지향성, 사회 경제적 지위 및 교차성에 기초한 차별을 의미하지 않는 언어로 정의됩니다. 제품 소프트웨어의 사용자 인터페이스에서 하드코딩된 언어, RFP 설명서에 기초한 언어 또는 참조된 서드파티 제품에서 사용하는 언어로 인해 설명서에 예외가 있을 수 있습니다. 시스코에서 어떤 방식으로 포용적인 언어를 사용하고 있는지 자세히 알아보세요.
이 번역에 관하여
Cisco는 전 세계 사용자에게 다양한 언어로 지원 콘텐츠를 제공하기 위해 기계 번역 기술과 수작업 번역을 병행하여 이 문서를 번역했습니다. 아무리 품질이 높은 기계 번역이라도 전문 번역가의 번역 결과물만큼 정확하지는 않습니다. Cisco Systems, Inc.는 이 같은 번역에 대해 어떠한 책임도 지지 않으며 항상 원본 영문 문서(링크 제공됨)를 참조할 것을 권장합니다.
목차
소개
이 문서에서는 머신 및 dot1x 인증을 사용하여 2단계 인증을 구성하는 데 필요한 단계를 설명합니다.
사전 요구 사항
요구 사항
다음 주제에 대한 지식을 보유하고 있으면 유용합니다.
- Cisco Identity Services Engine 구성
- Cisco Catalyst 구성
- IEEE802.1X
사용되는 구성 요소
- Identity Services Engine Virtual 3.3 패치 1
- C1000-48FP-4G-L 15.2(7)E9
- Windows Server 2019
이 문서의 정보는 특정 랩 환경의 디바이스를 토대로 작성되었습니다. 이 문서에 사용된 모든 디바이스는 초기화된(기본) 컨피그레이션으로 시작되었습니다. 현재 네트워크가 작동 중인 경우 모든 명령의 잠재적인 영향을 미리 숙지하시기 바랍니다.
네트워크 다이어그램
이 그림에서는 이 문서의 예에 사용된 토폴로지를 보여줍니다.
Windows Server 2019에 구성된 도메인 이름은 ad.rem-xxx.com이며 이 문서의 예제로 사용됩니다.
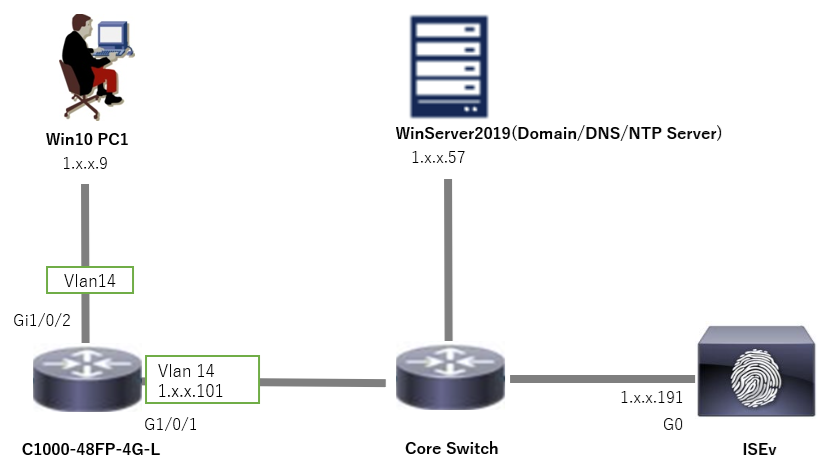 네트워크 다이어그램
배경 정보
머신 인증은 네트워크 또는 시스템에 액세스하려는 디바이스의 ID를 확인하는 보안 프로세스입니다. 사용자 이름 및 비밀번호와 같은 자격 증명을 기반으로 사람의 ID를 확인하는 사용자 인증과 달리 머신 인증은 디바이스 자체의 유효성을 검사하는 데 중점을 둡니다. 이는 종종 디바이스에 고유한 디지털 인증서 또는 보안 키를 사용하여 수행됩니다.
조직은 머신 및 사용자 인증을 함께 사용하여 승인된 디바이스와 사용자만 네트워크에 액세스할 수 있도록 함으로써 보다 안전한 환경을 제공할 수 있습니다. 이 2단계 인증 방식은 민감한 정보를 보호하고 엄격한 규제 표준을 준수하는 데 특히 유용합니다.
설정
C1000의 컨피그레이션
이는 C1000 CLI의 최소 컨피그레이션입니다.
aaa new-model

radius server ISE33
address ipv4 1.x.x.191
key cisco123

aaa group server radius AAASERVER
server name ISE33

aaa authentication dot1x default group AAASERVER
aaa authorization network default group AAASERVER
aaa accounting dot1x default start-stop group AAASERVER
dot1x system-auth-control

interface Vlan14
ip address 1.x.x.101 255.0.0.0

interface GigabitEthernet1/0/1
switchport access vlan 14
switchport mode access

interface GigabitEthernet1/0/2
switchport access vlan 14
switchport mode access
authentication host-mode multi-auth
authentication port-control auto
dot1x pae authenticator
spanning-tree portfast edge
Windows PC의 구성
1단계. AD 도메인에 PC 추가
Control Panel(제어판) > System and Security(시스템 및 보안)로 이동하고 System(시스템)을 클릭한 다음 Advanced system settings(고급 시스템 설정)를 클릭합니다. System Properties(시스템 속성) 창에서 Change(변경)를 클릭하고 Domain(도메인)을 선택한 다음 도메인 이름을 입력합니다.
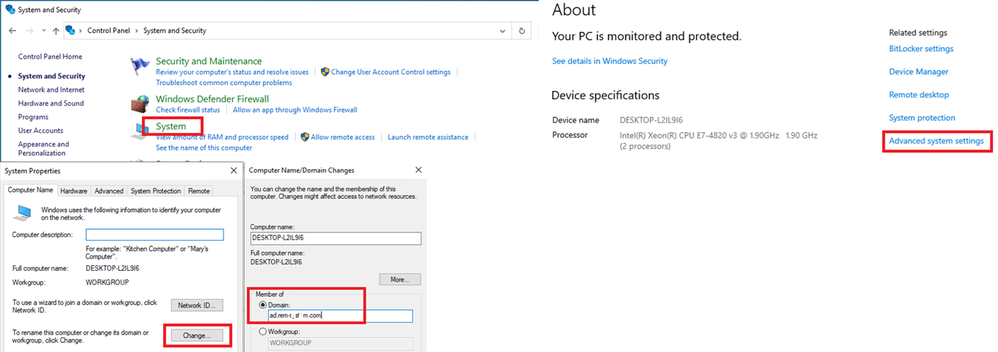 AD 도메인에 PC 추가
Windows 보안 창에서 도메인 서버의 사용자 이름과 암호를 입력합니다.
 사용자 이름 및 비밀번호 입력
2단계. 사용자 인증 구성
Authentication(인증)으로 이동하고 Enable IEEE 802.1X authentication(IEEE 802.1X 인증 활성화)을 선택합니다. Protected EAP Properties(보호된 EAP 속성) 창에서 Settings(설정)를 클릭하고 Verify the server's identity by validating the certificate(인증서를 검증하여 서버 ID 확인)의 선택을 취소한 다음 Configure(구성)를 클릭합니다. EAP MSCHAPv2 Properties(EAP MSCHAPv2 속성) 창에서 Automatically use my Windows logon name and password (and if any if any)(내 Windows 로그온 이름 및 암호(있는 경우 도메인)를 선택하여 사용자 인증을 위해 Windows 머신 로그인 중에 입력한 사용자 이름을 사용합니다.
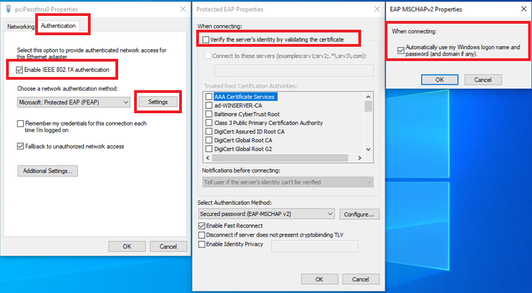 사용자 인증 활성화
Authentication(인증)으로 이동하고 Additional Settings(추가 설정)를 선택합니다. 드롭다운 목록에서 사용자 또는 컴퓨터 인증을 선택합니다.
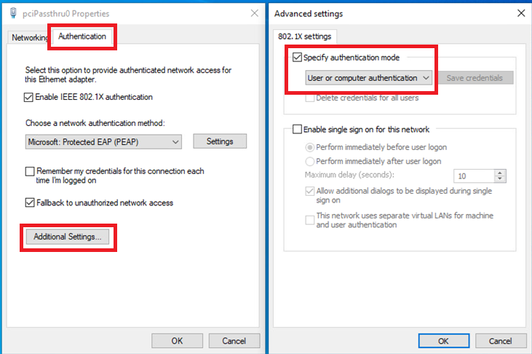 인증 모드 지정
Windows Server의 구성
1단계. 도메인 컴퓨터 확인
Active Directory Users and Computers(Active Directory 사용자 및 컴퓨터)로 이동하고 Computers(컴퓨터)를 클릭합니다. Win10 PC1이 도메인에 나열되는지 확인합니다.
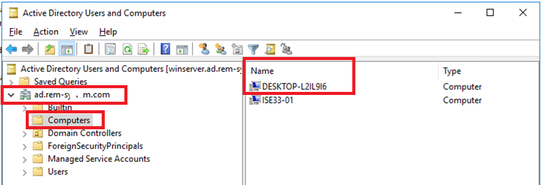 도메인 컴퓨터 확인
2단계. 도메인 사용자 추가
Active Directory Users and Computers(Active Directory 사용자 및 컴퓨터)로 이동하고 Users(사용자)를 클릭합니다. testuser를 도메인 사용자로 추가합니다.
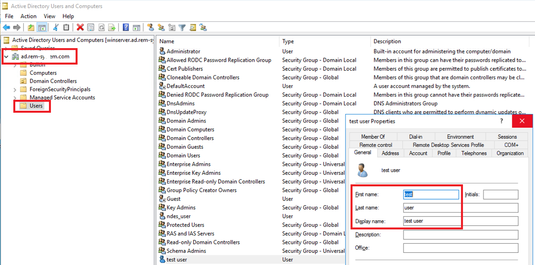 도메인 사용자 추가
도메인 사용자를 Domain Admins 및 Domain Users의 구성원에 추가합니다.
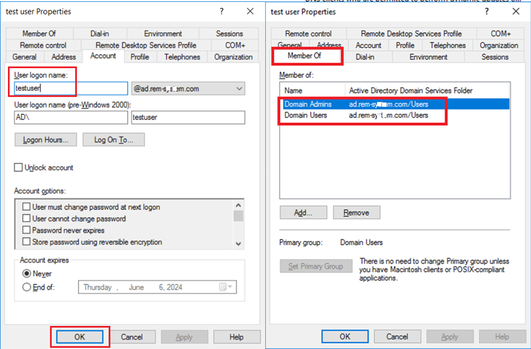 도메인 관리자 및 도메인 사용자
ISE의 컨피그레이션
1단계. 장치 추가
Administration(관리) > Network Devices(네트워크 디바이스)로 이동하고 Add(추가) 버튼을 클릭하여 C1000 디바이스를 추가합니다.
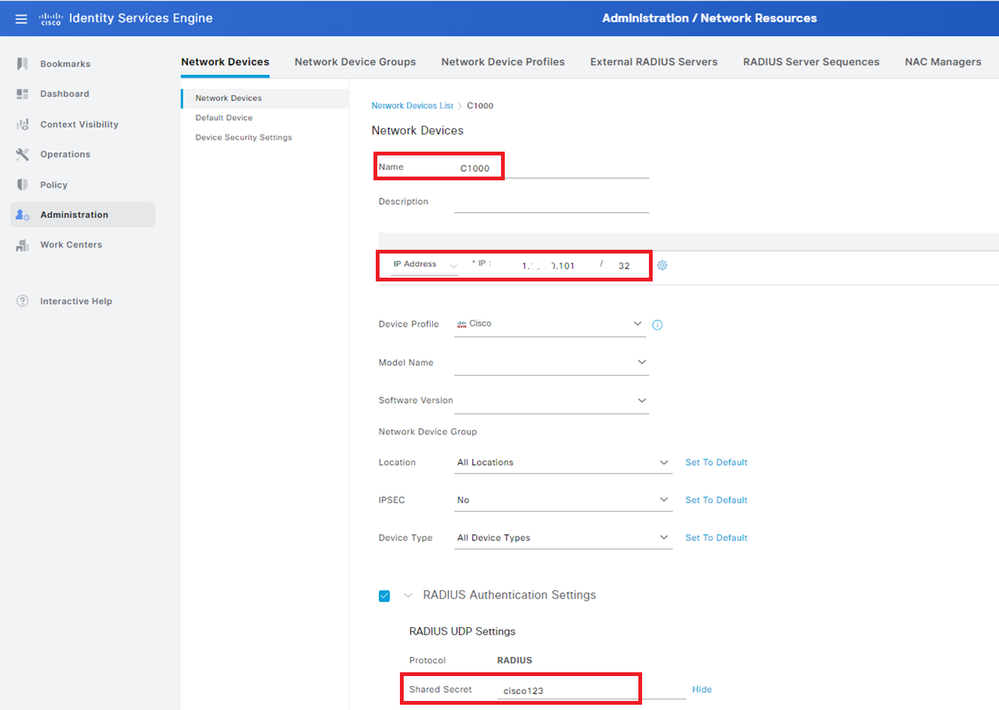 장치 추가
장치 추가
2단계. Active Directory 추가
Administration(관리) > External Identity Sources(외부 ID 소스) > Active Directory로 이동하여 Connection(연결) 탭을 클릭하고 Active Directory를 ISE에 추가합니다.
- 조인 지점 이름: AD_Join_Point
- Active Directory 도메인: ad.rem-xxx.com
 Active Directory 추가
Groups(그룹) 탭으로 이동하고 드롭다운 목록에서 Select Groups From Directory(디렉토리에서 그룹 선택)를 선택합니다.
 디렉터리에서 그룹 선택
Retrieve Groups from 드롭다운 목록을 클릭합니다. ad.rem-xxx.com/Users/Domain Computers and ad.rem-xxx.com/Users/Domain Users를 선택하고 OK를 클릭합니다.
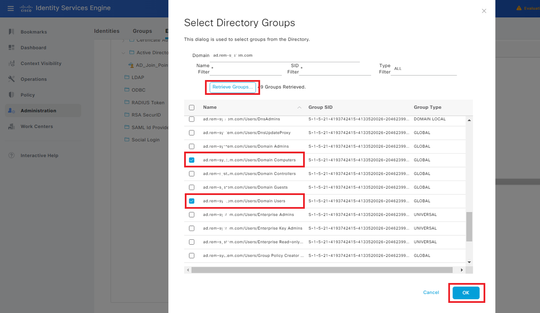 도메인 컴퓨터 및 사용자 추가
3단계. 머신 인증 설정 확인
Advanced Settings(고급 설정) 탭으로 이동하여 머신 인증 설정을 확인합니다.
- Enable Machine Authentication(머신 인증 활성화): 머신 인증을 활성화하려면
- Enable Machine Access Restriction(머신 액세스 제한 활성화): 권한 부여 전에 사용자 인증과 머신 인증을 결합합니다.

참고: 유효한 에이징 시간 범위는 1~8760입니다.
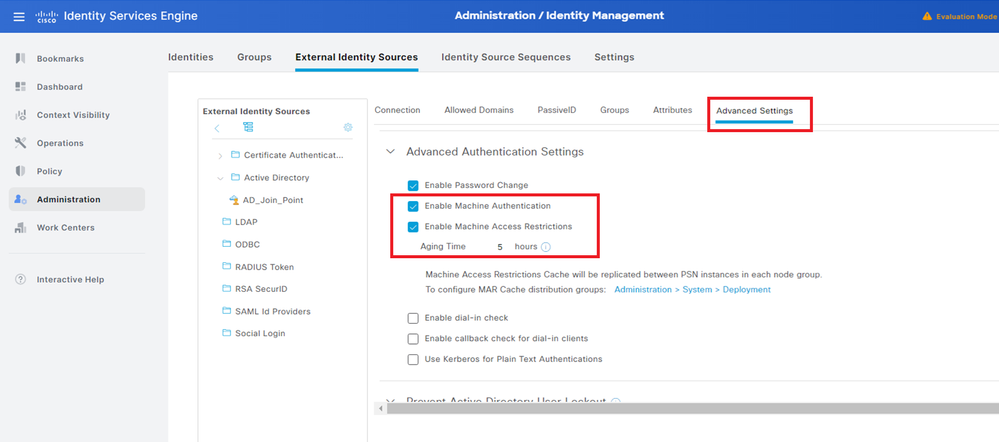 머신 인증 설정
4단계. ID 소스 시퀀스 추가
Administration(관리) > Identity Source Sequences(ID 소스 시퀀스)로 이동하여 ID 소스 시퀀스를 추가합니다.
- 이름: Identity_AD
- 인증 검색 목록: AD_Join_Point
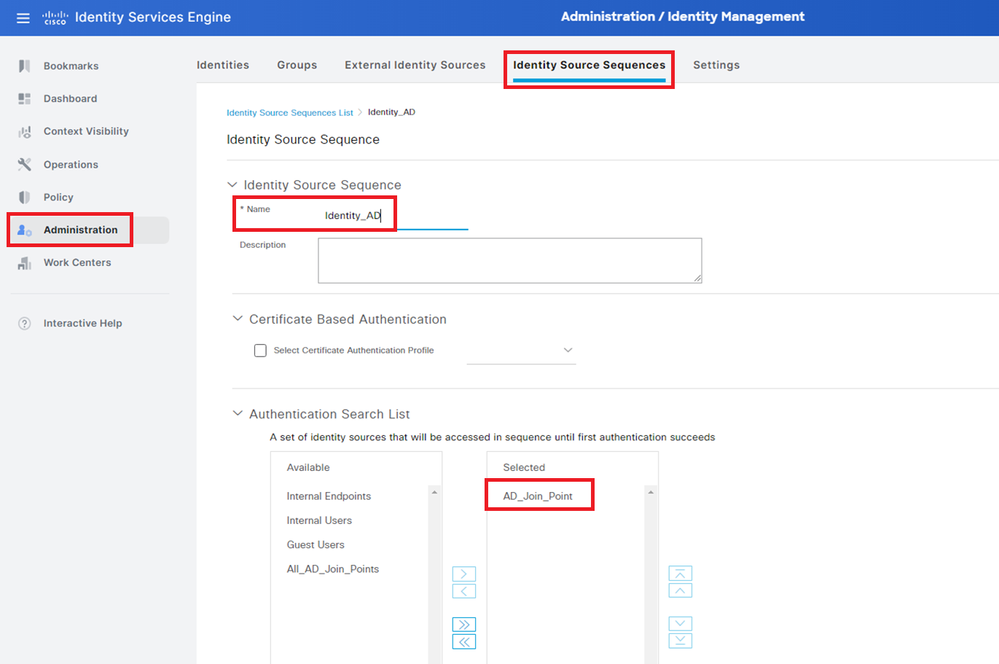 ID 소스 시퀀스 추가
5단계. DACL 및 권한 부여 프로파일 추가
Policy(정책) > Results(결과) > Authorization(권한 부여) > Downloadable ACLs(다운로드 가능한 ACL)로 이동하여 DACL을 추가합니다.
- 이름: MAR_Passed
- DACL 콘텐츠: 허용 ip any host 1.x.x.101 및 허용 ip any host 1.x.x.105
 DACL 추가
Policy(정책) > Results(결과) > Authorization(권한 부여) > Authorization Profiles(권한 부여 프로파일)로 이동하여 권한 부여 프로파일을 추가합니다.
- 이름: MAR_Passed
- DACL 이름: MAR_Passed
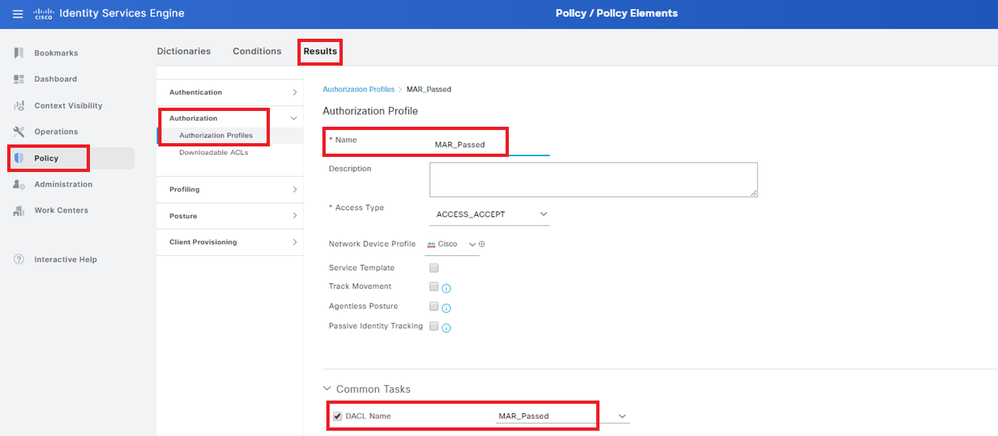 권한 부여 프로파일 추가
6단계. 정책 집합 추가
Policy(정책) > Policy Sets(정책 세트)로 이동하고 +를 클릭하여 정책 세트를 추가합니다.
- 정책 집합 이름: MAR_Test
- 조건: Wired_802.1X
- 허용되는 프로토콜/서버 시퀀스: 기본 네트워크 액세스
 정책 집합 추가
7단계. 인증 정책 추가
인증 정책을 추가하려면 Policy Sets(정책 집합)로 이동하고 MAR_Test(MAR_테스트)를 클릭합니다.
- 규칙 이름: MAR_dot1x
- 조건: Wired_802.1X
- 사용: Identity_AD
 인증 정책 추가
8단계. 권한 부여 정책 추가
Policy Sets(정책 집합)로 이동하고 MAR_Test를 클릭하여 권한 부여 정책을 추가합니다.
- 규칙 이름: MAR_Passed
- 조건: AD_Join_Point·ExternalGroups EQUALS ad.rem-xxx.com/Users/Domain Computers AND Network_Access_Authentication_Passed
- 결과: MAR_Pass
- 규칙 이름: User_MAR_Passed
- 조건: 네트워크 액세스·WasMachineAuthenticated EQUALS True AND AD_Join_Point·ExternalGroups EQUALS ad.rem-xxx.com/Users/Domain Users
- 결과: Permit Access
 권한 부여 정책 추가
다음을 확인합니다.
패턴 1. 머신 인증 및 사용자 인증
1단계. Windows PC 로그아웃
Win10 PC1에서 로그아웃 단추를 클릭하여 머신 인증을 트리거합니다.
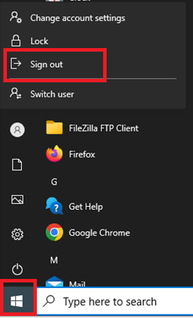 Windows PC 로그아웃
2단계. 인증 세션 확인
C1000에서 머신 인증 세션을 확인하려면 명령을show authentication sessions interface GigabitEthernet1/0/2 details 실행합니다.
Switch#show authentication sessions interface GigabitEthernet1/0/2 details
Interface: GigabitEthernet1/0/2
MAC Address: b496.9115.84cb
IPv6 Address: Unknown
IPv4 Address: 1.x.x.9
User-Name: host/DESKTOP-L2IL9I6.ad.rem-xxx.com
Status: Authorized
Domain: DATA
Oper host mode: multi-auth
Oper control dir: both
Session timeout: N/A
Restart timeout: N/A
Periodic Acct timeout: N/A
Session Uptime: 5s
Common Session ID: 01C2006500000049AA780D80
Acct Session ID: 0x0000003C
Handle: 0x66000016
Current Policy: POLICY_Gi1/0/2

Local Policies:
Service Template: DEFAULT_LINKSEC_POLICY_SHOULD_SECURE (priority 150)

Server Policies:
ACS ACL: xACSACLx-IP-MAR_Passed-6639ba20

Method status list:
Method State

dot1x Authc Success
3단계. Windows PC 로그인
Win10 PC1에 로그인하여 사용자 인증을 트리거하려면 사용자 이름 및 비밀번호를 입력합니다.
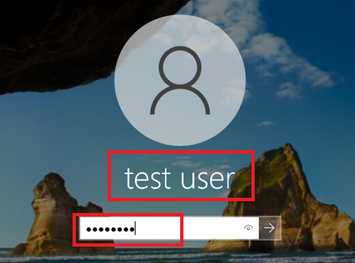 Windows PC 로그인
4단계. 인증 세션 확인
C1000에서 사용자 인증 세션을 확인하려면 명령을 실행하십시오show authentication sessions interface GigabitEthernet1/0/2 details.
Switch#show authentication sessions interface GigabitEthernet1/0/2 details
Interface: GigabitEthernet1/0/2
MAC Address: b496.9115.84cb
IPv6 Address: Unknown
IPv4 Address: 1.x.x.9
User-Name: AD\testuser
Status: Authorized
Domain: DATA
Oper host mode: multi-auth
Oper control dir: both
Session timeout: N/A
Restart timeout: N/A
Periodic Acct timeout: N/A
Session Uptime: 85s
Common Session ID: 01C2006500000049AA780D80
Acct Session ID: 0x0000003D
Handle: 0x66000016
Current Policy: POLICY_Gi1/0/2

Local Policies:
Service Template: DEFAULT_LINKSEC_POLICY_SHOULD_SECURE (priority 150)

Server Policies:


Method status list:
Method State

dot1x Authc Success
5단계. Radius 라이브 로그 확인
5단계. Radius 라이브 로그 확인ISE GUI에서 Operations(운영) > RADIUS > Live Logs(라이브 로그)로 이동하여 머신 인증 및 사용자 인증을 위한 라이브 로그를 확인합니다.
 Radius 라이브 로그
시스템 인증의 자세한 라이브 로그를 확인합니다.
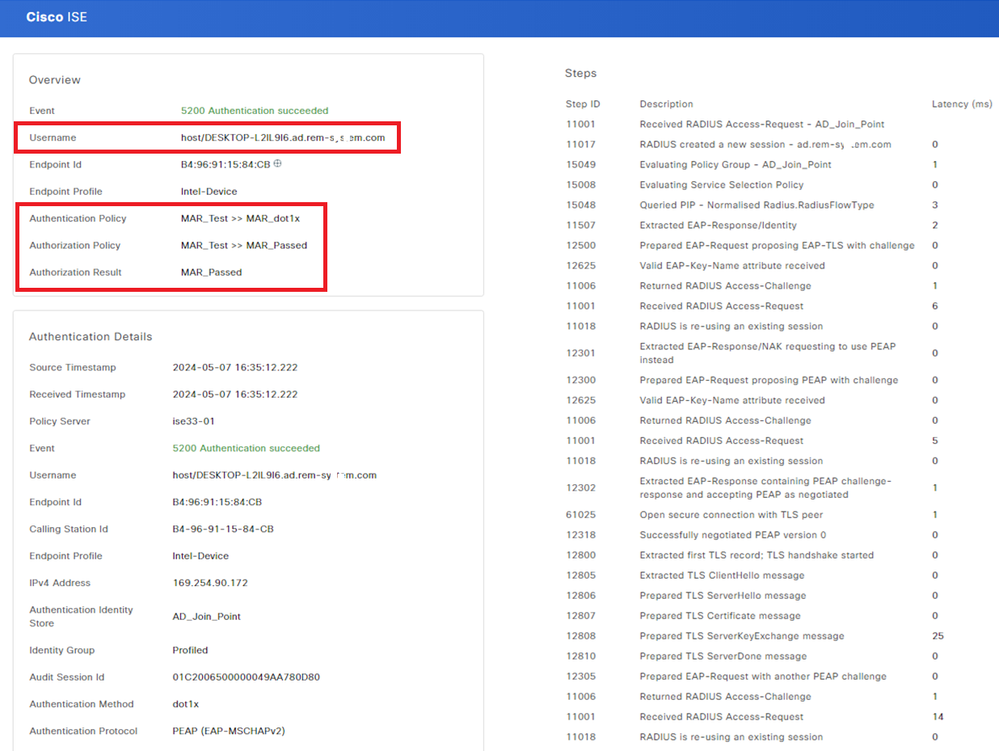 머신 인증 세부 정보
사용자 인증의 자세한 라이브 로그를 확인합니다.
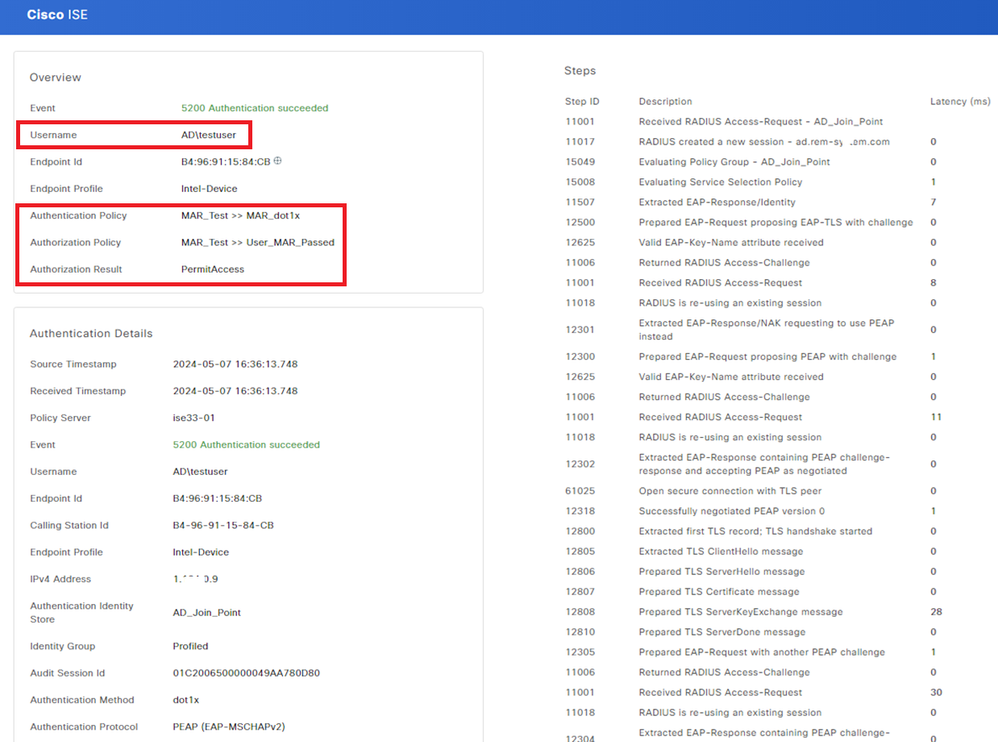 사용자 인증 세부 정보
패턴 2. 사용자 인증만
패턴 2. 사용자 인증만1단계. Windows PC의 NIC 비활성화 및 활성화
1단계. Windows PC의 NIC 비활성화 및 활성화사용자 인증을 트리거하려면 Win10 PC1의 NIC를 비활성화하고 활성화합니다.
2단계. 인증 세션 확인
2단계. 인증 세션 확인C1000에서 사용자 인증 세션을 확인하려면 명령을 실행하십시오show authentication sessions interface GigabitEthernet1/0/2 details.
Switch#show authentication sessions interface GigabitEthernet1/0/2 details
Interface: GigabitEthernet1/0/2
MAC Address: b496.9115.84cb
IPv6 Address: Unknown
IPv4 Address: 1.x.x.9
User-Name: AD\testuser
Status: Authorized
Domain: DATA
Oper host mode: multi-auth
Oper control dir: both
Session timeout: N/A
Restart timeout: N/A
Periodic Acct timeout: N/A
Session Uptime: 419s
Common Session ID: 01C2006500000049AA780D80
Acct Session ID: 0x0000003D
Handle: 0x66000016
Current Policy: POLICY_Gi1/0/2

Local Policies:
Service Template: DEFAULT_LINKSEC_POLICY_SHOULD_SECURE (priority 150)

Server Policies:


Method status list:
Method State

dot1x Authc Success
3단계. Radius 라이브 로그 확인
3단계. Radius 라이브 로그 확인ISE GUI에서 Operations(운영) > RADIUS > Live Logs(라이브 로그)로 이동하여 사용자 인증을 위한 라이브 로그를 확인합니다.

참고: MAR 캐시는 ISE에 저장되므로 사용자 인증만 필요합니다.
 Radius 라이브 로그
사용자 인증의 자세한 라이브 로그를 확인합니다.
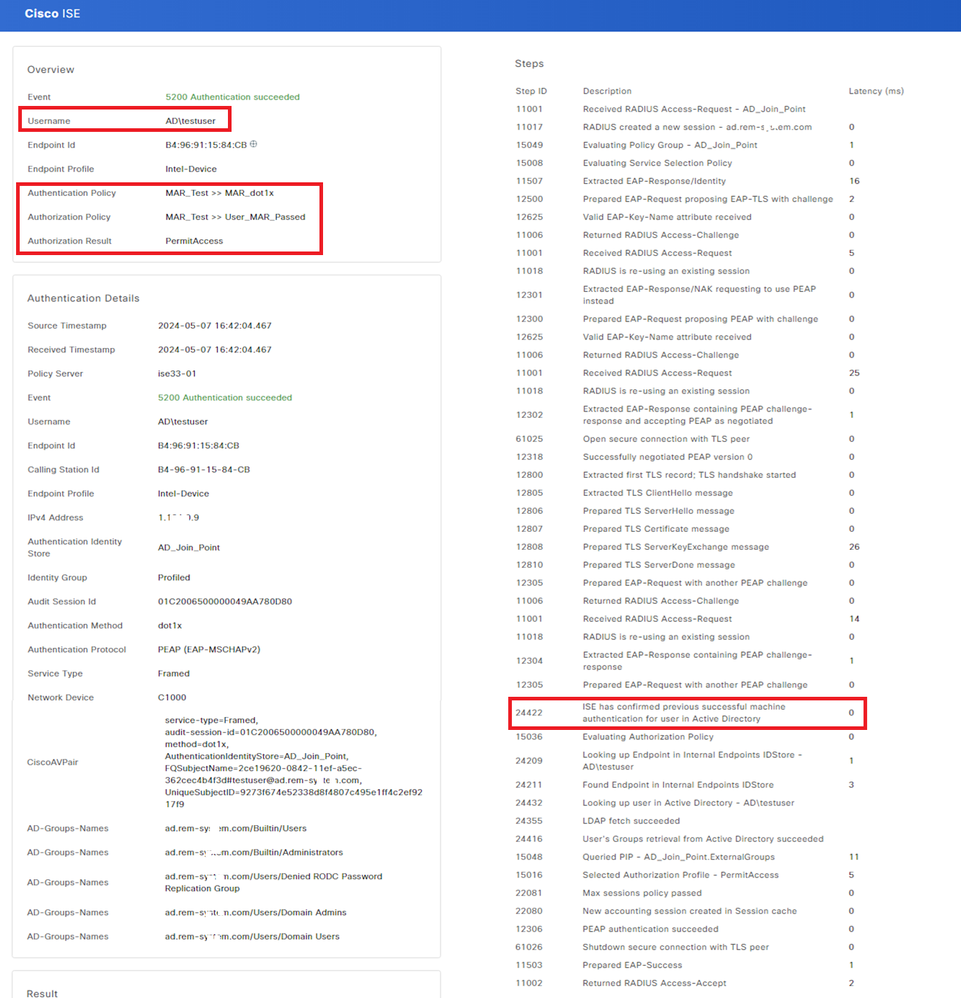 사용자 인증 세부 정보
문제 해결
문제 해결이러한 디버그 로그(prrt-server.log)는 ISE에서 인증의 자세한 동작을 확인하는 데 도움이 됩니다.
- 런타임 구성
- 런타임 로깅
- 런타임 AAA
패턴 1의 디버그 로그 예입니다. 이 문서의 시스템 인증 및 사용자 인증
// machine authentication
MAR,2024-05-08 16:54:50,582,DEBUG,0x7fb2fd3db700,cntx=0000034313,sesn=ise33-01/504417979/41,CPMSessionID=01C2006500000049AA780D80,user=host/DESKTOP-L2IL9I6.ad.rem-xxx.com,CallingStationID=B4-96-91-15-84-CB,FramedIPAddress=1.x.x.9,MARCache::checkInsertConditions: subject=machine, calling-station-id=B4-96-91-15-84-CB, HostName=DESKTOP-L2IL9I6$@ad.rem-xxx.com,MARCache.cpp:105
// insert MAR cache
MAR,2024-05-08 16:54:50,582,DEBUG,0x7fb2fd3db700,cntx=0000034313,sesn=ise33-01/504417979/41,CPMSessionID=01C2006500000049AA780D80,user=host/DESKTOP-L2IL9I6.ad.rem-xxx.com,CallingStationID=B4-96-91-15-84-CB,FramedIPAddress=1.x.x.9,Inserting new entry to cache CallingStationId=B4-96-91-15-84-CB, HostName=DESKTOP-L2IL9I6$@ad.rem-xxx.com, IDStore=AD_Join_Point and TTL=18000,CallingStationIdCacheHandler.cpp:55
MAR,2024-05-08 16:54:50,582,DEBUG,0x7fb2fd3db700,cntx=0000034313,sesn=ise33-01/504417979/41,CPMSessionID=01C2006500000049AA780D80,user=host/DESKTOP-L2IL9I6.ad.rem-xxx.com,CallingStationID=B4-96-91-15-84-CB,FramedIPAddress=1.x.x.9,MARCache::onInsertRequest: event not locally,MARCache.cpp:134
// user authentication
MAR,2024-05-08 16:55:11,120,DEBUG,0x7fb2fdde0700,cntx=0000034409,sesn=ise33-01/504417979/45,CPMSessionID=01C2006500000049AA780D80,user=AD\testuser,CallingStationID=B4-96-91-15-84-CB,FramedIPAddress=1.x.x.9,MARCache::onQueryRequest: machine authentication confirmed locally,MARCache.cpp:222
MAR,2024-05-08 16:55:11,130,DEBUG,0x7fb2fe5e4700,cntx=0000034409,sesn=ise33-01/504417979/45,CPMSessionID=01C2006500000049AA780D80,user=AD\testuser,CallingStationID=B4-96-91-15-84-CB,FramedIPAddress=1.x.x.9,MARCache::onMachineQueryResponse: machine DESKTOP-L2IL9I6$@ad.rem-xxx.com valid in AD,MARCache.cpp:316
관련 정보
개정 이력
| 개정 | 게시 날짜 | 의견 |
|---|---|---|
1.0 |
25-Jul-2024 |
최초 릴리스 |
 피드백
피드백