AES を使って、PIX に Cisco VPN Client を設定する方法
概要
この設定例では、暗号化に Advanced Encryption Standard(AES)を使用して、シスコの VPN Client から PIX ファイアウォールへのリモート アクセス VPN 接続の設定する方法について説明します。この例では、セキュア チャネルを設定するために Cisco Easy VPN を使用し、PIX Firewall は Easy VPN サーバとして設定されます。
Cisco Secure PIX Firewall ソフトウェア リリース 6.3 以降、サイト間およびリモート アクセス VPN 接続のセキュリティ保護のために、新しい国際暗号化標準である AES がサポートされています。これは、Data Encryption Standard(DES; データ暗号規格)および 3DES 暗号化アルゴリズムに追加されたものです。PIX ファイアウォールでは、128、192、および 256 ビットの AES キー サイズをサポートしています。
VPN Clientは、Cisco VPN Clientリリース3.6.1以降の暗号化アルゴリズムとしてAESをサポートします。VPN Clientは、128ビットおよび256ビットのキーサイズのみをサポートします。
前提条件
要件
この設定例では、PIX が完全に動作し、組織のセキュリティ ポリシーに従ってトラフィックを処理するために必要なコマンドで PIX が設定されていると想定しています。
使用するコンポーネント
このドキュメントの情報は、次のソフトウェアとハードウェアのバージョンに基づいています。
-
PIX ソフトウェア リリース 6.3(1)
注:この設定は、PIXソフトウェアリリース6.3(1)でテストされており、それ以降のすべてのリリースで動作することが予想されます。
-
Cisco VPN Client バージョン 4.0.3(A)
注:この設定は、VPN Clientバージョン4.0.3(A)でテストされましたが、3.6.1以前のリリースから現在のリリースまで動作します。
このドキュメントの情報は、特定のラボ環境にあるデバイスに基づいて作成されました。このドキュメントで使用するすべてのデバイスは、初期(デフォルト)設定の状態から起動しています。対象のネットワークが実稼働中である場合には、どのようなコマンドについても、その潜在的な影響について確実に理解しておく必要があります。
表記法
ドキュメント表記の詳細については、『シスコ テクニカル ティップスの表記法』を参照してください。
背景説明
リモート アクセス VPN は、モバイル ユーザからの要求を処理し、組織のネットワークに安全に接続できるようにします。モバイル ユーザは、自身の PC にインストールした VPN Client ソフトウェアを使用して、安全な接続を確立できます。VPN Client は、これらの要求を受け入れるよう設定されている中央サイトのデバイスへの接続を開始します。この例では、中央サイトのデバイスは、Easy VPN サーバとして設定された PIX ファイアウォールであり、ここではダイナミック暗号マップを使用します。
Cisco Easy VPN では、VPN の設定や管理を簡易にすることによって、VPN の展開を容易なものにしています。これは、Cisco Easy VPN Server と Cisco Easy VPN Remote で構成されています。Easy VPN Remote で必要なのは、最小構成です。Easy VPN Remote によって接続が開始します。認証が成功すると、Easy VPN Server が VPN 設定を送信します。PIX ファイアウォールを Easy VPN Server として設定する方法の詳細は、「VPN リモート アクセスの管理」を参照してください。
VPN の設定に必要なパラメータが事前に決定されていない場合には、ダイナミックに割り当てられる IP アドレスを受け取るモバイル ユーザと同様に、IPSec の設定にダイナミック暗号化マップが使用されます。ダイナミック暗号マップはテンプレートとして振る舞い、欠落しているパラメータは、IPSec のネゴシエーションの際に決定されます。ダイナミック暗号マップの詳細については、「ダイナミック暗号マップ」を参照してください。
設定
このセクションでは、このドキュメントで説明する機能を設定するために必要な情報を提供しています。
注:このセクションで使用されているコマンドの詳細を調べるには、Command Lookup Tool(登録ユーザ専用)を参照してください。一部ツールについては、ゲスト登録のお客様にはアクセスできない場合がありますことをご了承ください。
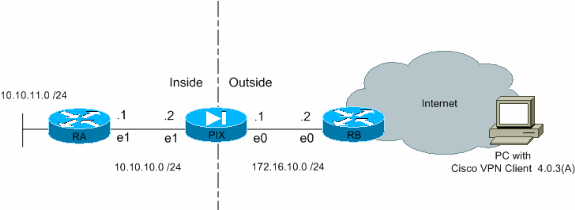
ネットワーク図
このドキュメントでは、次のネットワーク セットアップを使用します。

PIX の設定
PIX ファイアウォールに必要な設定は、次の出力のとおりです。この設定は VPN 用だけです。
| PIX |
|---|
PIX Version 6.3(1) interface ethernet0 auto interface ethernet1 auto interface ethernet2 auto shutdown nameif ethernet0 outside security0 nameif ethernet1 inside security100 nameif ethernet2 intf2 security4 enable password 8Ry2YjIyt7RRXU24 encrypted passwd 2KFQnbNIdI.2KYOU encrypted hostname Pixfirewall fixup protocol ftp 21 fixup protocol h323 h225 1720 fixup protocol h323 ras 1718-1719 fixup protocol http 80 fixup protocol ils 389 fixup protocol rsh 514 fixup protocol rtsp 554 fixup protocol sip 5060 fixup protocol sip udp 5060 fixup protocol skinny 2000 fixup protocol smtp 25 fixup protocol sqlnet 1521 names !--- Define the access list to enable split tunneling. access-list 101 permit ip 10.10.10.0 255.255.255.0 10.10.8.0 255.255.255.0 access-list 101 permit ip 10.10.11.0 255.255.255.0 10.10.8.0 255.255.255.0 !--- Define the access list to avoid network address !--- translation (NAT) on IPsec packets. access-list 102 permit ip 10.10.10.0 255.255.255.0 10.10.8.0 255.255.255.0 access-list 102 permit ip 10.10.11.0 255.255.255.0 10.10.8.0 255.255.255.0 pager lines 24 mtu outside 1500 mtu inside 1500 mtu intf2 1500 !--- Configure the IP address on the interfaces. ip address outside 172.16.10.1 255.255.255.0 ip address inside 10.10.10.2 255.255.255.0 no ip address intf2 ip audit info action alarm ip audit attack action alarm !--- Create a pool of addresses from which IP addresses are assigned !--- dynamically to the remote VPN Clients. ip local pool vpnpool1 10.10.8.1-10.10.8.254 pdm history enable arp timeout 14400 !--- Disable NAT for IPsec packets. nat (inside) 0 access-list 102 route outside 0.0.0.0 0.0.0.0 172.16.10.2 1 route inside 10.10.11.0 255.255.255.0 10.10.10.1 1 timeout xlate 3:00:00 timeout conn 1:00:00 half-closed 0:10:00 udp 0:02:00 rpc 0:10:00 h225 1:00:00 timeout h323 0:05:00 mgcp 0:05:00 sip 0:30:00 sip_media 0:02:00 timeout uauth 0:05:00 absolute aaa-server TACACS+ protocol tacacs+ aaa-server RADIUS protocol radius aaa-server LOCAL protocol local no snmp-server location no snmp-server contact snmp-server community public no snmp-server enable traps floodguard enable !--- Permit packet that came from an IPsec tunnel to pass through without !--- checking them against the configured conduits/access lists. sysopt connection permit-ipsec !--- Define the transform set to be used during IPsec !--- security association (SA) negotiation. Specify AES as the encryption algorithm. crypto ipsec transform-set trmset1 esp-aes-256 esp-sha-hmac !--- Create a dynamic crypto map entry !--- and add it to a static crypto map. crypto dynamic-map map2 10 set transform-set trmset1 crypto map map1 10 ipsec-isakmp dynamic map2 !--- Bind the crypto map to the outside interface. crypto map map1 interface outside !--- Enable Internet Security Association and Key Management !--- Protocol (ISAKMP) negotiation on the interface on which the IPsec !--- peer communicates with the PIX Firewall. isakmp enable outside isakmp identity address !--- Define an ISAKMP policy to be used while !--- negotiating the ISAKMP SA. Specify !--- AES as the encryption algorithm. The configurable AES !--- options are aes, aes-192 and aes-256. !--- Note: AES 192 is not supported by the VPN Client. isakmp policy 10 authentication pre-share isakmp policy 10 encryption aes-256 isakmp policy 10 hash sha isakmp policy 10 group 2 isakmp policy 10 lifetime 86400 !--- Create a VPN group and configure the policy attributes which are !--- downloaded to the Easy VPN Clients. vpngroup groupmarketing address-pool vpnpool1 vpngroup groupmarketing dns-server 10.10.11.5 vpngroup groupmarketing wins-server 10.10.11.5 vpngroup groupmarketing default-domain org1.com vpngroup groupmarketing split-tunnel 101 vpngroup groupmarketing idle-time 1800 vpngroup groupmarketing password ******** telnet timeout 5 ssh timeout 5 console timeout 0 terminal width 80 Cryptochecksum:c064abce81996b132025e83e421ee1c3 : end |
注:この設定では、トランスフォームセットまたはISAKMPポリシーを設定する際にaes-192を指定しないことをお勧めします。VPN Client では暗号化の場合に aes-192 をサポートしていません。
注:以前のバージョンでは、IKEモード設定コマンドisakmp client configuration address-poolとcrypto map client-configuration addressが必要でした。しかし、新しいバージョン(3.x 以降)では、これらのコマンドは不要になりました。現在では、vpngroup address-pool コマンドを使用して複数のアドレス プールを指定できます。
注:VPNグループ名では大文字と小文字が区別されます。つまり、PIX で指定されたグループ名と VPN クライアントのグループ名の大文字と小文字が異なっている場合、ユーザ認証は失敗します。
注:例えば、あるデバイスでグループ名をGroupMarketingと入力し、別のデバイスでグループmarketingと入力すると、デバイスは動作しません。
VPN クライアントの設定
VPN Client を PC にインストールした後、次の手順に従って、新しい接続を作成します。
-
VPN Client アプリケーションを起動し、[New] をクリックして新しい接続エントリを作成します。

-
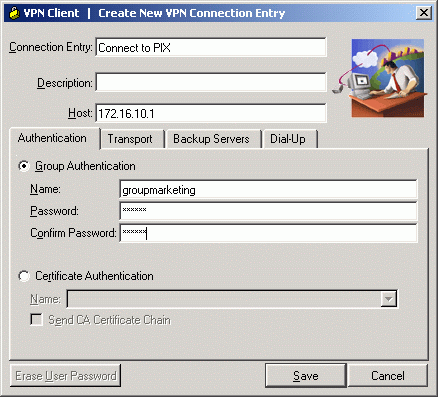
[VPN Client | Create New VPN Connection Entryが表示されます。新しい接続に関する設定情報を入力します。
-
[Connection Entry] フィールドで、作成する新しいエントリに名前を付けます。
-
Host フィールドで、PIX のパブリック インターフェイスの IP アドレスを入力します。
-
Authentication タブを選択し、グループ名とパスワード(確認用に 2 回)を入力します。 これは PIX 上で vpngroup password コマンドを使用して入力した情報と一致している必要があります。
-
[Save] をクリックして、入力した情報を保存します。新しい接続が作成されます。

-
-
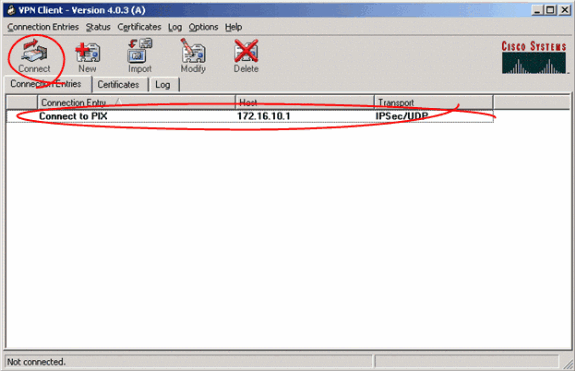
この新しい接続エントリを使用してゲートウェイに接続するには、接続エントリを 1 回クリックして選択し、[Connect] アイコンをクリックします。接続エントリをダブルクリックしても同じです。

確認
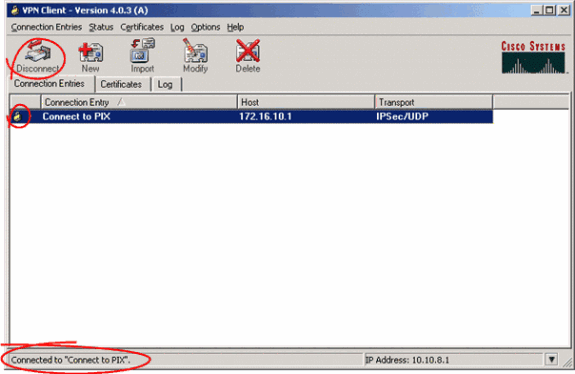
VPN クライアントでは、リモート ゲートウェイへの接続が正しく確立されたことは、次のように表示されます。
-
アクティブな接続エントリに対しては、黄色の閉じた鍵の形のアイコンが表示されます。
-
ツールバー上の [Connect] アイコン([Connection Entries] タブの横)は、[Disconnect] に変わります。
-
ウィンドウの一番下にあるステータス行には、[Connected to] というステータスの後に接続エントリ名が表示されます。

注:既定では、接続が確立されると、Windowsタスクバーの右下隅にあるシステムトレイの閉じたロックアイコンがVPN Clientの最小化されます。閉じた鍵の形のアイコンをダブル クリックすると、再度 [VPN Client] ウィンドウが表示されます。
PIX ファイアウォールで、次の show コマンドを使用すると、確立されている接続のステータスを確認することができます。
注:特定のshowコマンドは、Output Interpreter Tool(登録ユーザ専用)でサポートされています。このツールを使用すると、showコマンド出力の分析を表示できます。
-
show crypto ipsec sa:PIX 上の現在の IPSec SA をすべて表示します。さらに、この出力では、リモート ピアの実際の IP アドレス、割り当てられている IP アドレス、ローカルの IP アドレスとインターフェイス、および使用されている暗号マップも表示されます。
Pixfirewall#show crypto ipsec sa interface: outside Crypto map tag: map1, local addr. 172.16.10.1 local ident (addr/mask/prot/port): (0.0.0.0/0.0.0.0/0/0) remote ident (addr/mask/prot/port): (10.10.8.1/255.255.255.255/0/0) current_peer: 172.16.12.3:500 dynamic allocated peer ip: 10.10.8.1 PERMIT, flags={} #pkts encaps: 0, #pkts encrypt: 0, #pkts digest 0 #pkts decaps: 25, #pkts decrypt: 25, #pkts verify 25 #pkts compressed: 0, #pkts decompressed: 0 #pkts not compressed: 0, #pkts compr. failed: 0, #pkts decompress failed: 0 #send errors 0, #recv errors 0 local crypto endpt.: 172.16.10.1, remote crypto endpt.: 172.16.12.3 path mtu 1500, ipsec overhead 64, media mtu 1500 current outbound spi: cbabd0ce inbound esp sas: spi: 0x4d8a971d(1300928285) transform: esp-aes-256 esp-sha-hmac , in use settings ={Tunnel, } slot: 0, conn id: 2, crypto map: map1 sa timing: remaining key lifetime (k/sec): (4607996/28685) IV size: 16 bytes replay detection support: Y inbound ah sas: inbound pcp sas: outbound esp sas: spi: 0xcbabd0ce(3417034958) transform: esp-aes-256 esp-sha-hmac , in use settings ={Tunnel, } slot: 0, conn id: 1, crypto map: map1 sa timing: remaining key lifetime (k/sec): (4608000/28676) IV size: 16 bytes replay detection support: Y outbound ah sas: outbound pcp sas: -
show crypto isakmp sa:ピア間で構築されている ISAKMP SA のステータスを表示します。
Pixfirewall#show crypto isakmp sa
Total     : 1
Embryonic : 0
        dst               src        state     pending     created
     172.16.10.1      172.16.12.3    QM_IDLE         0           1
トラブルシュート
ここでは、設定のトラブルシューティングに使用できる情報を示します。
この debug コマンドは、VPN 設定の問題のトラブルシューティングに役立ちます。
注:debugコマンドを発行する前に、『debugコマンドの重要な情報』を参照してください。
-
debug crypto isakmp:構築された ISAKMP SA とネゴシエートされる IPsec 属性を表示します。ISAKMP SA ネゴシエーションの際には、PIX によって、あるプロポーザルが受け入れられる前に、いくつかが [not acceptable] として廃棄される場合があります。ISAKMP SA について合意がなされると、IPSec 属性がネゴシエートされます。次の debug 出力で示すように、再度、あるプロポーザルが受け入れられる前に、いくつかが拒否される場合があります。
crypto_isakmp_process_block:src:172.16.12.3, dest:172.16.10.1 spt:500 dpt:500
OAK_AG exchange
ISAKMP (0): processing SA payload. message ID = 0

ISAKMP (0): Checking ISAKMP transform 1 against priority 10 policy
ISAKMP:      encryption AES-CBC
ISAKMP:      hash SHA
ISAKMP:      default group 2
ISAKMP:      extended auth pre-share (init)
ISAKMP:      life type in seconds
ISAKMP:      life duration (VPI) of  0x0 0x20 0xc4 0x9b
ISAKMP:      keylength of 256

!--- Proposal is rejected since extended auth is not configured.

ISAKMP (0): atts are not acceptable. Next payload is 3
ISAKMP (0): Checking ISAKMP transform 2 against priority 10 policy
ISAKMP:      encryption AES-CBC
ISAKMP:      hash MD5
ISAKMP:      default group 2
ISAKMP:      extended auth pre-share (init)
ISAKMP:      life type in seconds
ISAKMP:      life duration (VPI) of  0x0 0x20 0xc4 0x9b
ISAKMP:      keylength of 256

!--- Proposal is rejected since MD5 is not specified as the hash algorithm.

ISAKMP (0): atts are not acceptable. Next payload is 3
ISAKMP (0): Checking ISAKMP transform 3 against priority 10 policy
ISAKMP:      encryption AES-CBC
ISAKMP:      hash SHA
ISAKMP:      default group 2
ISAKMP:      auth pre-share
ISAKMP:      life type in seconds
ISAKMP:      life duration (VPI) of  0x0 0x20 0xc4 0x9b
ISAKMP:      keylength of 256

!--- This proposal is accepted since it matches ISAKMP policy 10.

ISAKMP (0): atts are acceptable. Next payload is 3
ISAKMP (0): processing KE payload. message ID = 0

!--- Output is suppressed.

OAK_QM exchange
oakley_process_quick_mode:
OAK_QM_IDLE
ISAKMP (0): processing SA payload. message ID = 3348522173

ISAKMP : Checking IPSec proposal 1

ISAKMP: transform 1, ESP_AES
ISAKMP:   attributes in transform:
ISAKMP:      authenticator is HMAC-MD5
ISAKMP:      key length is 256
ISAKMP:      encaps is 1
ISAKMP:      SA life type in seconds
ISAKMP:      SA life duration (VPI) of  0x0 0x20 0xc4 0x9b

 !--- This proposal is not accepted since transform-set !--- trmset1 does not use MD5.

ISAKMP (0): atts not acceptable. Next payload is 0
ISAKMP (0): skipping next ANDed proposal (1)
ISAKMP : Checking IPSec proposal 2

ISAKMP: transform 1, ESP_AES
ISAKMP:   attributes in transform:
ISAKMP:      authenticator is HMAC-SHA
ISAKMP:      key length is 256
ISAKMP:      encaps is 1
ISAKMP:      SA life type in seconds
ISAKMP:      SA life duration (VPI) of  0x0 0x20 0xc4 0x9b

!--- This proposal is accepted since it matches !--- transform-set trmset1.

ISAKMP (0): atts are acceptable.
ISAKMP (0): bad SPI size of 2 octets!
ISAKMP : Checking IPSec proposal 3

!--- Output is suppressed.
-
debug crypto ipsec:IPSec SA ネゴシエーションに関する情報を表示します。
IPSEC(key_engine_delete_sas): rec'd delete notify from ISAKMP
IPSEC(key_engine_delete_sas): delete all SAs shared with     172.16.12.3
IPSEC(validate_proposal): transform proposal (prot 3, trans 12, hmac_alg 1) not
supported
IPSEC(validate_proposal): transform proposal (prot 3, trans 12, hmac_alg 1) not
supported
IPSEC(validate_proposal): transform proposal (prot 3, trans 12, hmac_alg 2) not
supported
IPSEC(validate_proposal): transform proposal (prot 3, trans 12, hmac_alg 1) not
supported
IPSEC(validate_proposal_request): proposal part #1,
  (key eng. msg.) dest= 172.16.10.1, src= 172.16.12.3,
    dest_proxy= 0.0.0.0/0.0.0.0/0/0 (type=4),
    src_proxy= 10.10.8.1/255.255.255.255/0/0 (type=1),
    protocol= ESP, transform= esp-aes-256 esp-sha-hmac ,
    lifedur= 0s and 0kb,
    spi= 0x0(0), conn_id= 0, keysize= 256, flags= 0x4
IPSEC(key_engine): got a queue event...
IPSEC(spi_response): getting spi 0xfb0cb69(263244649) for SA
        from     172.16.12.3 to     172.16.10.1 for prot 3
IPSEC(key_engine): got a queue event...
IPSEC(initialize_sas): ,
  (key eng. msg.) dest= 172.16.10.1, src= 172.16.12.3,
    dest_proxy= 0.0.0.0/0.0.0.0/0/0 (type=4),
    src_proxy= 10.10.8.1/0.0.0.0/0/0 (type=1),
    protocol= ESP, transform= esp-aes-256 esp-sha-hmac ,
    lifedur= 2147483s and 0kb,
    spi= 0xfb0cb69(263244649), conn_id= 2, keysize= 256, flags= 0x4
IPSEC(initialize_sas): ,
  (key eng. msg.) src= 172.16.10.1, dest= 172.16.12.3,
    src_proxy= 0.0.0.0/0.0.0.0/0/0 (type=4),
    dest_proxy= 10.10.8.1/0.0.0.0/0/0 (type=1),
    protocol= ESP, transform= esp-aes-256 esp-sha-hmac ,
    lifedur= 2147483s and 0kb,
    spi= 0xda6c054a(3664512330), conn_id= 1, keysize= 256, flags= 0x4
このドキュメントの設定を使用すると、VPN クライアントが AES を使用して中央サイトの PIX に正しく接続できます。VPN トンネルが正しく設定されているにもかかわらず、ユーザがネットワーク リソースへの ping や、ドメインへのログオン、ネットワーク ネイバーフッドの参照などの一般的なタスクを実行できない場合がときどきあります。このような問題のトラブルシューティングに関する情報については、「Cisco VPN Client を使用して VPN トンネルを確立した後の Microsoft ネットワーク ネイバーフッドのトラブルシューティング」を参照してください。
関連情報
更新履歴
| 改定 | 発行日 | コメント |
|---|---|---|
1.0 |
26-Sep-2008 |
初版 |
 フィードバック