TMS のエンドポイント設定テンプレートのカスタム コマンド
内容
概要
このドキュメントでは、Cisco TelePresence Management Suite(TMS)から、カスタム コマンド テンプレートまたはカスタム設定テンプレートを設定する方法について説明します。
前提条件
要件
次の項目に関する知識があることが推奨されます。
- Cisco TelePresence Management Suite
- Cisco TelePresence TC ソフトウェア
次のアクセスと権限が必要です。
- [Systems] > [Configuration Templates] > [Configuration Templates] にアクセスするための十分な権限を持つ、TMS への Web アクセス
- [Configuration] > [API] > [/command.xml] または [/configuration.xml] にアクセスするための十分な権限を持つ、Cisco TelePresence TC ソフトウェアを実行するエンドポイントへの Web アクセス
- 管理者レベルの権限を持つエンドポイントへのセキュア シェル(SSH)または Telnet アクセス
使用するコンポーネント
このドキュメントの情報は、次のソフトウェアとハードウェアのバージョンに基づいています。
- Cisco TelePresence Management Suite バージョン 14.2.2
- Cisco TelePresence TC ソフトウェア バージョン TC6.2.1 を備えた Cisco TelePresence Codec C40(C40)
このドキュメントの情報は、特定のラボ環境にあるデバイスに基づいて作成されました。このドキュメントで使用するすべてのデバイスは、初期(デフォルト)設定の状態から起動しています。対象のネットワークが実稼働中である場合には、どのようなコマンドについても、その潜在的な影響について確実に理解しておく必要があります。
関連製品
このドキュメントは、次のバージョンのハードウェアとソフトウェアにも使用できます。
- Cisco TelePresence Management Suite バージョン 13.x - 14.x
- Cisco TelePresence TC ソフトウェア バージョン TC6.0 - TC6.2.1
設定
簡単なコマンド文字列の作成
TMS には、TC ソフトウェアを実行するエンドポイント用に事前定義されたテンプレートがないため、管理者パスワードを設定するためにカスタム テンプレート コマンドが一般的に使用されます。この例では、/command.xml ファイルを使用しています。
この設定の xCommand 文字列は次のとおりです。
Xcommand SystemUnit AdminPassword Set Password: NewPassword
[Configuration] > [API]> [/command.xm] を選択し、エンドポイントの Web インターフェイスにある /command.xml ファイルを確認します。
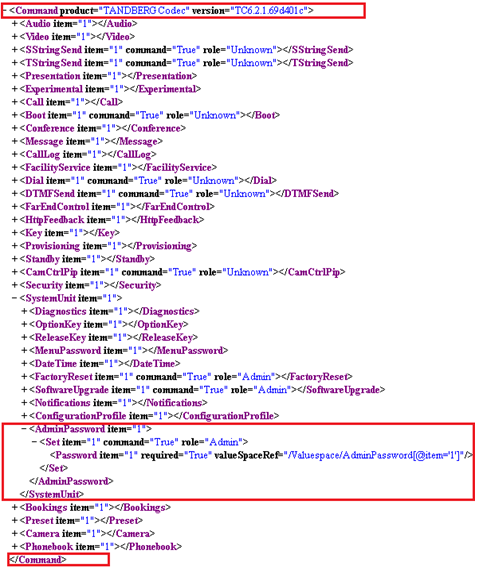
XML に必要な終了タグを除き、形式は xCommand 文字列と同じであることがわかります。これにより、管理者パスワードを変更する XML 文字列が得られます。
<Command>
 <SystemUnit>
  <AdminPassword>
   <Set>
    <Password>NewPassword</Password>
   </Set>
  </AdminPassword>
 </SystemUnit>
</Command>
NewPassword に希望するパスワードを指定します。
マルチパート コマンド文字列の作成
エンドポイントが TMS に報告するイベントを判断するため、フィードバック式の一般的な使用など、マルチパート コマンド文字列にカスタム コマンド テンプレートを使用できます。
Telnet/SSH コマンド文字列の例は次のとおりです。
xcommand HttpFeedback Register FeedbackSlot: 1 ServerUrl:
http://172.30.10.7/tms/public/feedback/code.aspx
Expression: /History/CallLogs/Call Expression: /Status/Call[Status='Connected']
Expression: /Status/H323/Gatekeeper Expression: /Status/SIP/Registration
Expression: /Status/Network/Ethernet/Speed Expression: /Event/CallSuccessful
Expression: /Event/Message/Prompt/Response Expression: /Configuration
Expression: /Event/CallDisconnect Expression: /Status/Call
/command.xml ファイルを確認します。
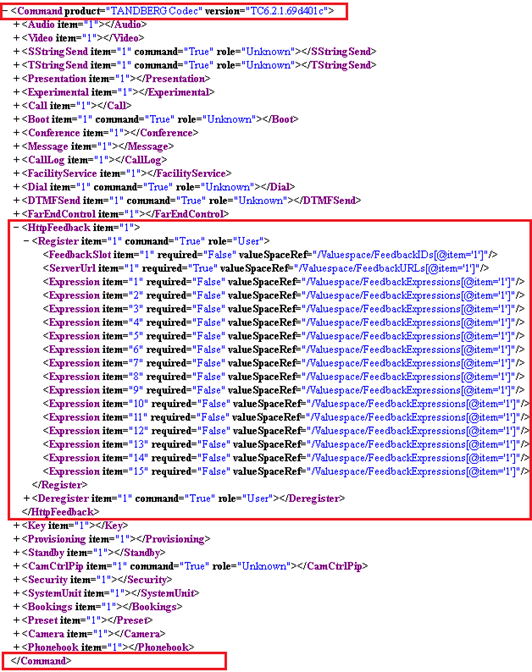
コマンド文字列を /command.xml ファイルと比較します。これにより、同様の XML 文字列が得られます。
<Command>
 <HttpFeedback>
  <Register>
   <FeedbackSlot>1</FeedbackSlot>
   <ServerUrl>http://172.30.10.7/tms/public/feedback/code.aspx</ServerUrl>
   <Expression item="1">/History/CallLogs/Call</Expression>
   <Expression item="2">/Status/Call[Status='Connected']</Expression>
   <Expression item="3">/Status/H323/Gatekeeper</Expression>
   <Expression item="4">/Status/SIP/Registration</Expression>
   <Expression item="5">/Status/Network/Ethernet/Speed</Expression>
   <Expression item="6">/Event/CallSuccessful</Expression>
   <Expression item="7">/Event/Message/Prompt/Response</Expression>
   <Expression item="8">/Configuration</Expression>
   <Expression item="9">/Event/CallDisconnect</Expression>
   <Expression item="10">/Status/Call</Expression>
  </Register>
 </HttpFeedback>
</Command>
マルチタスク コマンド文字列の作成
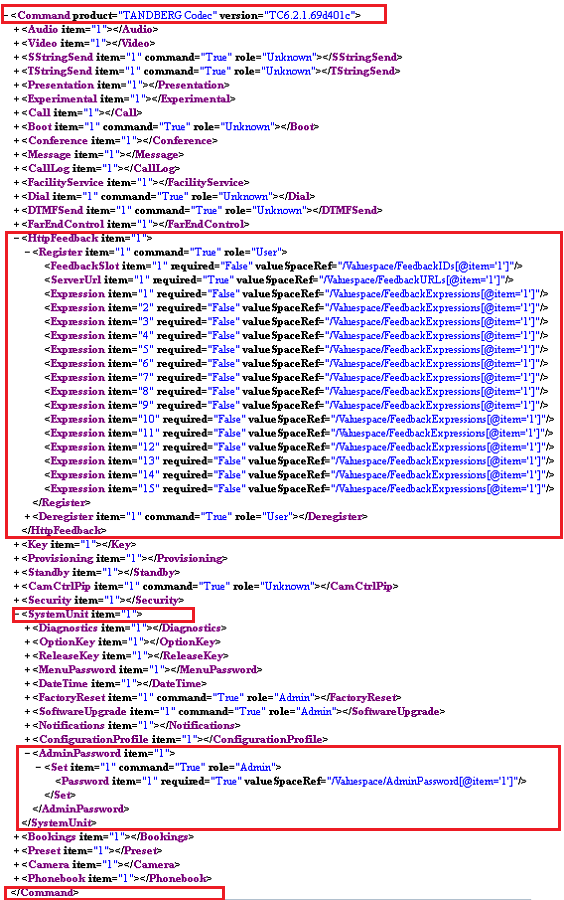
SSH コマンドとは異なり、マルチタスク コマンドを作成するためにカスタム コマンド テンプレートを使用できます。この例では、前述の 2 つの例を組み合わせて、HttpFeedback および AdminPassword の両方を 1 つのカスタム コマンド文字列で設定します。
<Command>
 <HttpFeedback>
  <Register>
   <FeedbackSlot>1</FeedbackSlot>
   <ServerUrl>http://172.30.10.7/tms/public/feedback/code.aspx</ServerUrl>
   <Expression item="1">/History/CallLogs/Call</Expression>
   <Expression item="2">/Status/Call[Status='Connected']</Expression>
   <Expression item="3">/Status/H323/Gatekeeper</Expression>
   <Expression item="4">/Status/SIP/Registration</Expression>
   <Expression item="5">/Status/Network/Ethernet/Speed</Expression>
   <Expression item="6">/Event/CallSuccessful</Expression>
   <Expression item="7">/Event/Message/Prompt/Response</Expression>
   <Expression item="8">/Configuration</Expression>
   <Expression item="9">/Event/CallDisconnect</Expression>
   <Expression item="10">/Status/Call</Expression>
  </Register>
 </HttpFeedback>
 <SystemUnit>
  <AdminPassword>
   <Set>
    <Password>NewPassword</Password>
   </Set>
  </AdminPassword>
 </SystemUnit>
</Command>
/command.xml ファイルを確認し、カスタム マルチタスク コマンド文字列にどのようにマッピングされるかを確認します。
簡単な設定文字列の作成
次の例では、DefaultCallプロトコルをH323に設定しています。これはSSH/Telnetコマンドです。
Xconfiguration Conference DefaultCall protocol: H323
/configuration.xml ファイルを確認します。
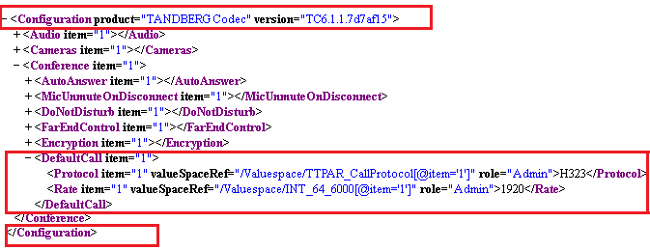
コマンド文字列を /command.xml ファイルと比較します。これにより、同様の XML 文字列が得られます。
<Configuration>
 <Conference>
  <DefaultCall>
   <Protocol>H323</Protocol>
  </DefaultCall>
 </Conference>
</Configuration>
マルチパート設定文字列の作成
複数のコンポーネントを設定するためにコマンドを実行させる Xcommand 文字列とは異なり、xConfiguration 文字列は文字列ごとに 1 つの設定変更のみをサポートします。したがって、このセクションは適用されません。
マルチタスク設定文字列の作成
カスタム コマンド文字列と同様、複数の設定文字列を 1 つのカスタム設定 XML 文字列に統合できます。この例では、ベースとしてこれらの xConfiguration 文字列を使用しています。
xConfiguration H323 Profile 1 H323Alias ID: c40-1.lab.h323@tac.lab
xConfiguration H323 Profile 1 H323Alias E164: 180004
xConfiguration H323 Profile 1 CallSetup Mode: Gatekeeper
xConfiguration H323 Profile 1 Gatekeeper Address: taccluster.tac.lab
xConfiguration H323 Profile 1 Gatekeeper Discovery: Manual
xConfiguration SIP Profile 1 URI: c40-1.lab.sip@tac.lab
xConfiguration SIP Profile 1 DefaultTransport: Auto
xConfiguration SIP Profile 1 Proxy 1 Discovery: Manual
xConfiguration SIP Profile 1 Proxy 1 Address: "taccluster.tac.lab"
/configuration.xml ファイルの次のセクションを確認します。
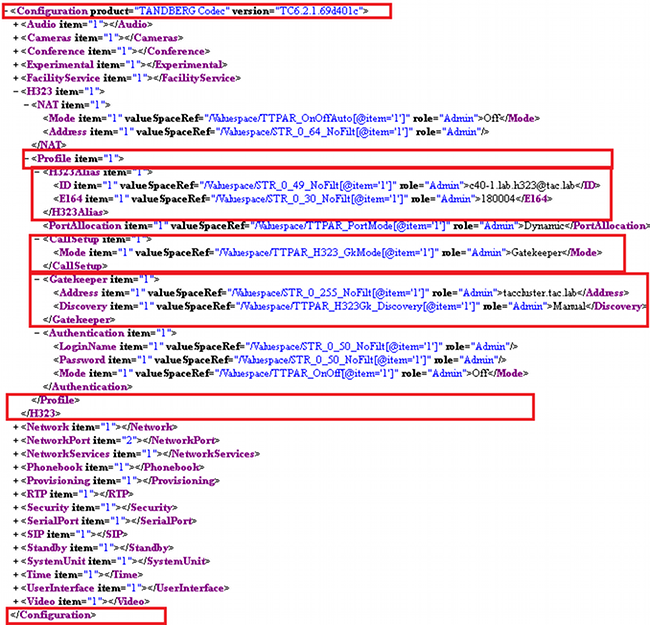
と
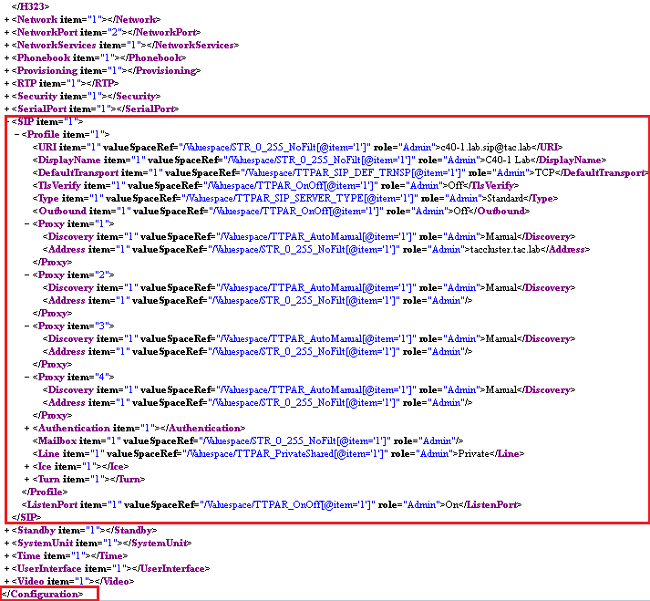
コマンド文字列を /command.xml ファイルと比較します。これにより、同様の XML 文字列が得られます。
<Configuration>
 <H323>
  <Profile>
   <H323Alias>
    <ID>c40-1.lab.h323@tac.lab</ID>
    <E164>180004</E164>
   </H323Alias>
  <CallSetup>
   <Mode>Gatekeeper</Mode>
  </CallSetup>
  <Gatekeeper>
   <Address>taccluster.tac.lab</Address>
   <Discovery>Manual</Discovery>
  </Gatekeeper>
  </Profile>
 </H323>
 <Sip>
  <Profile>
   <URI>c40-1.lab.sip@tac.lab</URI>
   <DefaultTransport>Auto</DefaultTransport>
   <Proxy item="1">
    <Discovery>Manual</Discovery>
    <Address>taccluster.tac.lab</Address>
   </Proxy>
  </Profile>
 </Sip>
</Configuration>
作成した XML 文字列の TMS カスタム テンプレートへの追加
XML 文字列を特定したら、その文字列をカスタム コマンドまたは設定テンプレートに追加します。次の手順はその方法を示します。
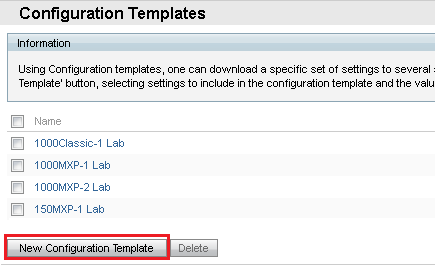
- TMS Web インターフェイスで、[Systems] > [Configuration Templates] > [Configuration Templates] を選択し、[New Configuration Template] を選択します。
- [Select Advanced Settings] タブをクリックし、custom という文字を [Cisco TelePresence Group Systems] の [Filter] テキスト フィールドに入力します。
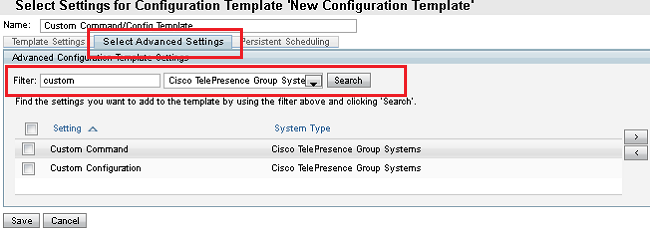
- 適切な設定([Custom Command] および(または)[Custom Configuration])の隣のチェックボックスをオンにし、右矢印(>)をクリックして移動します。
- [Template Settings] タブをクリックします。
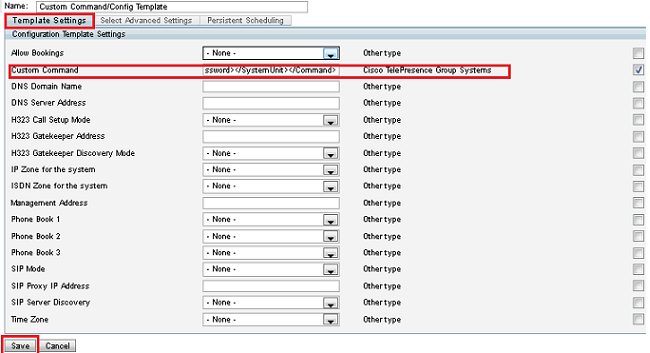
- XML 文字列を、適切な [Custom Command] および(または)[Custom Configuration] テキスト フィールドに入力します。
- [Save] を選択します。
確認
現在、この設定に使用できる確認手順はありません。
トラブルシュート
現在、この設定に関する特定のトラブルシューティング情報はありません。
更新履歴
| 改定 | 発行日 | コメント |
|---|---|---|
1.0 |
19-Feb-2014 |
初版 |
 フィードバック