Introduction
Ce document décrit comment créer des applications IOx à l'aide de Vagrant et Virtualbox et les déployer dans l'interface utilisateur graphique du gestionnaire local IOx.
Conditions préalables
Windows/ MAC Intel/ Linux
- Git
- Vagabond
- Boîte virtuelle
Basé sur MAC ARM - M1/M2/M3
- Git
- Vagabond
- VMWare Fusion
- vagrant-vmware-desktop plugin
Pour télécharger :
Procédure de configuration de l'environnement de build avec Vagrant
Résumé des actions
- La configuration vagrantfile configure un environnement de VM basé sur son architecture de machine hôte.
- Il configure la machine virtuelle pour qu'elle utilise VMware Fusion ou VirtualBox, selon l'architecture
- Elle fournit à la machine virtuelle les logiciels et outils nécessaires, notamment QEMU (Quick EMUlator) , Docker et ioxclient.
- La configuration crée automatiquement un exemple d'application iperf pour les périphériques de la plate-forme Cisco cible amd64.
Étape 1. Clonez le référentiel Github dans votre système local :
git clone https://github.com/suryasundarraj/cisco-iox-app-build.git
Vous pouvez également copier et coller le contenu du boîtier de configuration dans « Vagrantfile ». Ceci crée un fichier avec le nom "Vagrantfile" dans le système local :
# -*- mode: ruby -*-
# vi: set ft=ruby :

# All Vagrant configuration is done below. The "2" in Vagrant.configure
# configures the configuration version (we support older styles for
# backwards compatibility). Please don't change it unless you know what
# you're doing.
Vagrant.configure('2') do |config|
  arch = `arch`.strip()
  if arch == 'arm64'
    puts "This appears to be an ARM64 machine! ..."
    config.vm.box = 'gyptazy/ubuntu22.04-arm64'
    config.vm.boot_timeout = 600
    config.vm.provider "vmware_fusion" do |vf|
      #vf.gui = true
      vf.memory = "8192"
      vf.cpus = "4"
    end
    config.vm.define :ioxappbuild
  else
    puts "Assuming this to be an Intel x86 machine! ..."
    config.vm.box = "bento/ubuntu-22.04"
    config.vm.network "public_network", bridge: "ens192"
    config.vm.boot_timeout = 600
    config.vm.provider "virtualbox" do |vb|
      #vb.gui = true
      vb.memory = "8192"
      vb.cpus = "4"
    end
    config.vm.define :ioxappbuild
  end

  config.vm.provision "shell", inline: <<-SHELL
    #!/bin/bash
    # apt-cache madison docker-ce
    export VER="5:24.0.9-1~ubuntu.22.04~jammy"
    echo "!!! installing dependencies and packages !!!"
    apt-get update
    apt-get install -y ca-certificates curl unzip git pcregrep
    install -m 0755 -d /etc/apt/keyrings
    curl -fsSL https://download.docker.com/linux/ubuntu/gpg -o /etc/apt/keyrings/docker.asc
    chmod a+r /etc/apt/keyrings/docker.asc
    echo "deb [arch=$(dpkg --print-architecture) signed-by=/etc/apt/keyrings/docker.asc] https://download.docker.com/linux/ubuntu $(. /etc/os-release && echo "$VERSION_CODENAME") stable" |  tee /etc/apt/sources.list.d/docker.list > /dev/null
    apt-get update
    apt-get install -y qemu binfmt-support qemu-user-static
    apt-get install -y docker-ce=$VER docker-ce-cli=$VER docker-ce-rootless-extras=$VER containerd.io docker-buildx-plugin docker-compose-plugin
    # apt-get install -y docker.io docker-compose docker-buildx
    usermod -aG docker vagrant
    echo "!!! generating .ioxclientcfg.yaml file !!!"
    echo 'global:' > /home/vagrant/.ioxclientcfg.yaml
    echo '  version: "1.0"' >> /home/vagrant/.ioxclientcfg.yaml
    echo '  active: default' >> /home/vagrant/.ioxclientcfg.yaml
    echo '  debug: false' >> /home/vagrant/.ioxclientcfg.yaml
    echo '  fogportalprofile:' >> /home/vagrant/.ioxclientcfg.yaml
    echo '    fogpip: ""' >> /home/vagrant/.ioxclientcfg.yaml
    echo '    fogpport: ""' >> /home/vagrant/.ioxclientcfg.yaml
    echo '    fogpapiprefix: ""' >> /home/vagrant/.ioxclientcfg.yaml
    echo '    fogpurlscheme: ""' >> /home/vagrant/.ioxclientcfg.yaml
    echo '  dockerconfig:' >> /home/vagrant/.ioxclientcfg.yaml
    echo '    server_uri: unix:///var/run/docker.sock' >> /home/vagrant/.ioxclientcfg.yaml
    echo '    api_version: "1.22"' >> /home/vagrant/.ioxclientcfg.yaml
    echo 'author:' >> /home/vagrant/.ioxclientcfg.yaml
    echo '  name: |' >> /home/vagrant/.ioxclientcfg.yaml
    echo '    Home' >> /home/vagrant/.ioxclientcfg.yaml
    echo '  link: localhost' >> /home/vagrant/.ioxclientcfg.yaml
    echo 'profiles: {default: {host_ip: 127.0.0.1, host_port: 8443, auth_keys: cm9vdDpyb290,' >> /home/vagrant/.ioxclientcfg.yaml
    echo '    auth_token: "", local_repo: /software/downloads, api_prefix: /iox/api/v2/hosting/,' >> /home/vagrant/.ioxclientcfg.yaml
    echo '    url_scheme: https, ssh_port: 2222, rsa_key: "", certificate: "", cpu_architecture: "",' >> /home/vagrant/.ioxclientcfg.yaml
    echo '    middleware: {mw_ip: "", mw_port: "", mw_baseuri: "", mw_urlscheme: "", mw_access_token: ""},' >> /home/vagrant/.ioxclientcfg.yaml
    echo '    conn_timeout: 1000, client_auth: "no", client_cert: "", client_key: ""}}' >> /home/vagrant/.ioxclientcfg.yaml
    cp /home/vagrant/.ioxclientcfg.yaml /root/.ioxclientcfg.yaml
    chown vagrant:vagrant /home/vagrant/.ioxclientcfg.yaml
    arch=$(uname -m)
    if [[ $arch == x86_64 ]]; then
      # download page https://developer.cisco.com/docs/iox/iox-resource-downloads/
      echo "!!! downloading and extracting ioxclient for x86_64 architecture !!!"
      curl -O https://pubhub.devnetcloud.com/media/iox/docs/artifacts/ioxclient/ioxclient-v1.17.0.0/ioxclient_1.17.0.0_linux_amd64.tar.gz
      tar -xvf /home/vagrant/ioxclient_1.17.0.0_linux_amd64.tar.gz
      cp /home/vagrant/ioxclient_1.17.0.0_linux_amd64/ioxclient /usr/local/bin/ioxclient
      rm -rv /home/vagrant/ioxclient_1.17.0.0_linux_amd64
    elif  [[ $arch = aarch64 ]]; then
      # download page https://developer.cisco.com/docs/iox/iox-resource-downloads/
      echo "!!! downloading and extracting ioxclient for arm64 architecture !!!"
      curl -O https://pubhub.devnetcloud.com/media/iox/docs/artifacts/ioxclient/ioxclient-v1.17.0.0/ioxclient_1.17.0.0_linux_arm64.tar.gz
      tar -xvf /home/vagrant/ioxclient_1.17.0.0_linux_arm64.tar.gz
      cp /home/vagrant/ioxclient_1.17.0.0_linux_arm64/ioxclient /usr/local/bin/ioxclient
      rm -rv /home/vagrant/ioxclient_1.17.0.0_linux_arm64
    fi
    chown vagrant:vagrant /usr/local/bin/ioxclient
    echo "!!! pulling and packaging the app for x86_64 architecture !!!"
    docker pull --platform=linux/amd64 mlabbe/iperf3
    ioxclient docker package mlabbe/iperf3 .
    cp package.tar /vagrant/iperf3_amd64-$(echo $VER | pcregrep -o1 ':([0-9.-]+)~').tar
  SHELL
end
Étape 2. Assurez-vous que la ligne "export VER="5:24.0.9-1~ubuntu.22.04~jammy" est sans commentaire et que toutes les autres instructions d'exportation sont commentées. Cela correspond à la version du Docker Engine que vous souhaitez installer dans cet environnement Vagrant :
cisco@cisco-virtual-machine:~/Desktop/ioxappbuild$ cat Vagrantfile | grep 'export' | grep -v '#'
export VER="5:24.0.9-1~ubuntu.22.04~jammy"
Étape 3. Démarrez l'environnement Vagrant avec la commande vagrant up dans le répertoire où réside le fichier Vagrant et observez une génération réussie de l'application iperf IOx pour le fichier tar amd64 :
vagrant up

Procédure de création d'une application IOx personnalisée
Cette section décrit comment créer une application IOx personnalisée à l'aide de l'environnement vagrant.

Remarque : le répertoire "/vagrant" de la machine virtuelle et le répertoire qui contient le fichier "Vagrant" dans le système hôte sont synchronisés.
Comme l'illustre l'image, le fichier new.js est créé à l'intérieur de la machine virtuelle et est également accessible sur le système hôte :

Étape 1. Clonez un exemple d'application dans le même dossier que le fichier "Vagrantfile". Dans cet exemple, l'application "iox-multiarch-nginx-nyancat-sample" est utilisée :
git clone https://github.com/etychon/iox-multiarch-nginx-nyancat-sample.git
Étape 2. SSH dans la machine vagabonde :
vagrant ssh
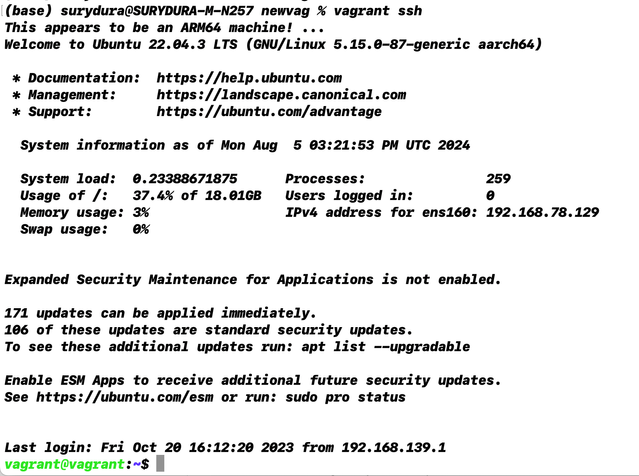
Étape 3. Créez l'application :
cd /vagrant/iox-multiarch-nginx-nyancat-sample/
chmod +x build
sh ./build
Une fois le processus de génération terminé, vous disposez désormais de deux applications IOx prêtes à être déployées ("iox-amd64-nginx-nyancat-sample.tar.gz" pour amd64 et "iox-arm64-nginx-nyancat-sample.tar.gz" pour les plates-formes cibles) :

Déployer l'application IOx
Étape 1. Accédez au routeur IR1101 à l'aide de l'interface Web :
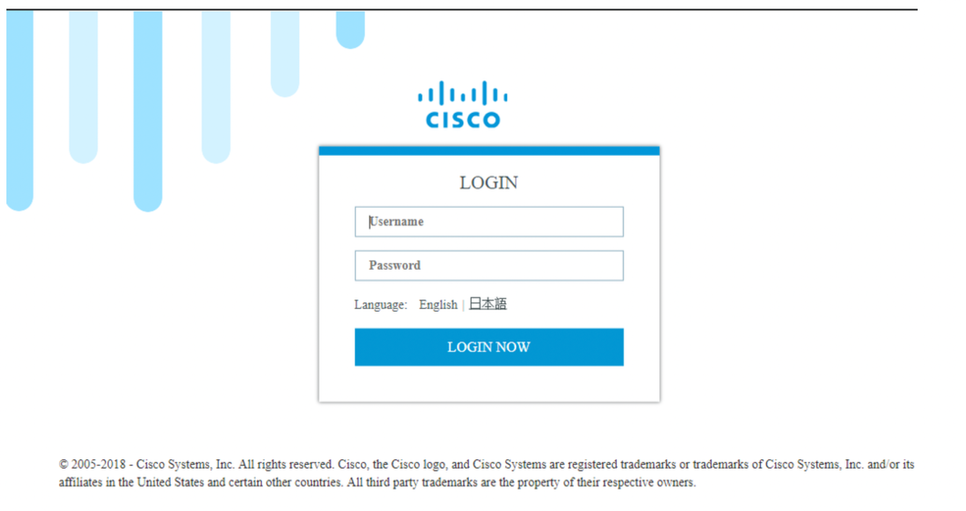
Étape 2. Utilisez le compte de privilège 15 :
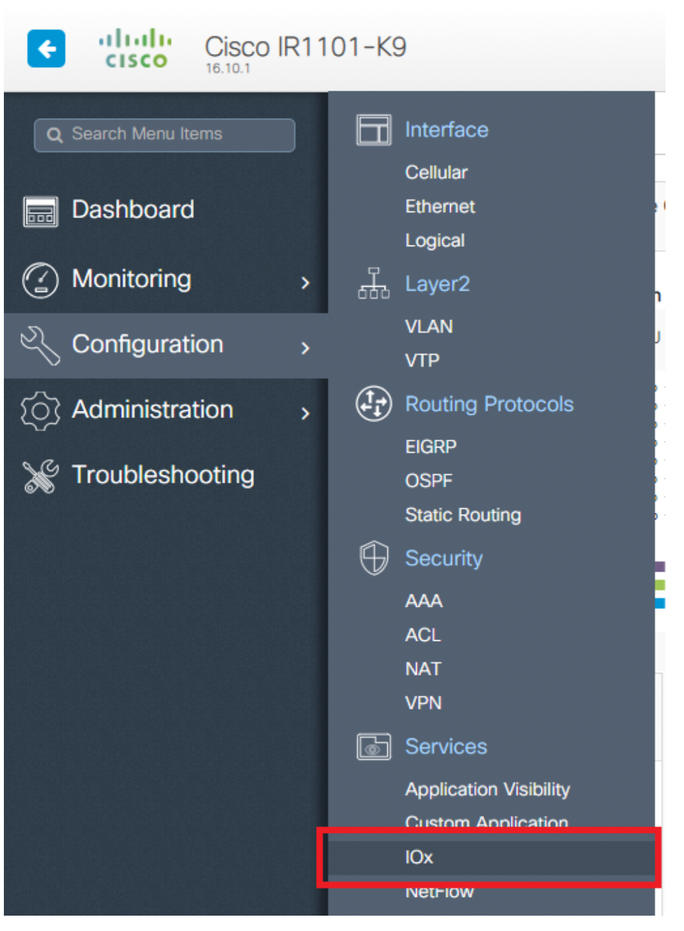
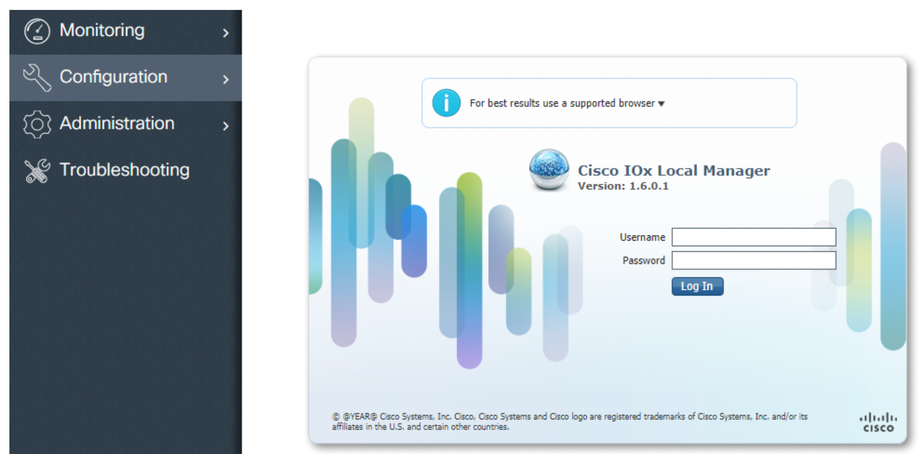
Étape 3. Dans l'ouverture de session IOx Local Manager, utilisez le même compte pour continuer comme indiqué dans l'image :
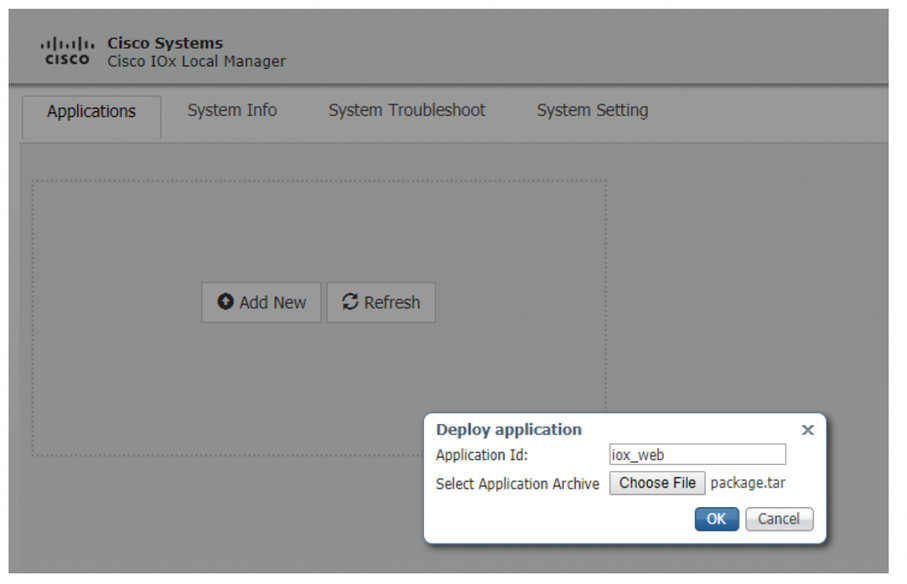
Étape 4. Cliquez sur Add New, sélectionnez un nom pour l'application IOx, et choisissez le package.tar qui a été construit à l'étape 3 de la section Procedure to Set Up Build Environment Using Vagrant, comme illustré dans l'image :
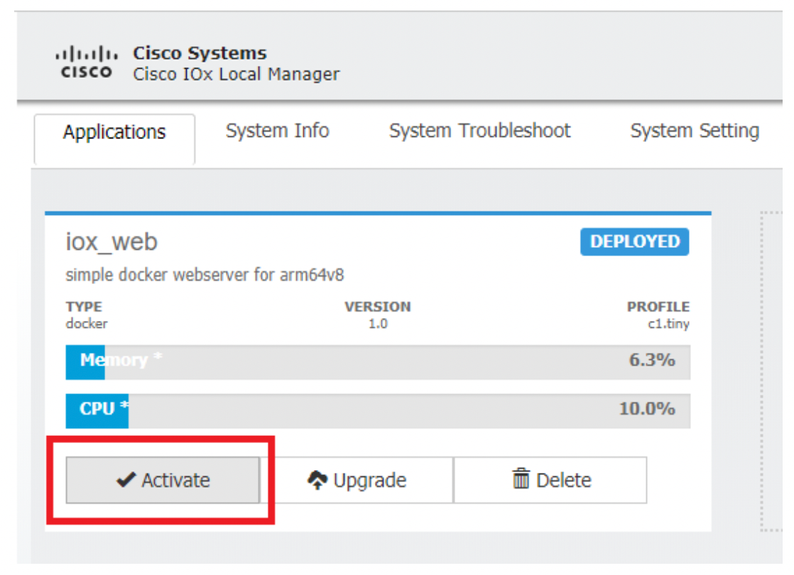
Étape 5. Une fois le package téléchargé, activez-le comme indiqué dans l'image :
Étape 6. Dans l'onglet Resources, ouvrez le paramètre d'interface afin de spécifier l'IP fixe que vous voulez attribuer à l'application comme montré dans l'image :
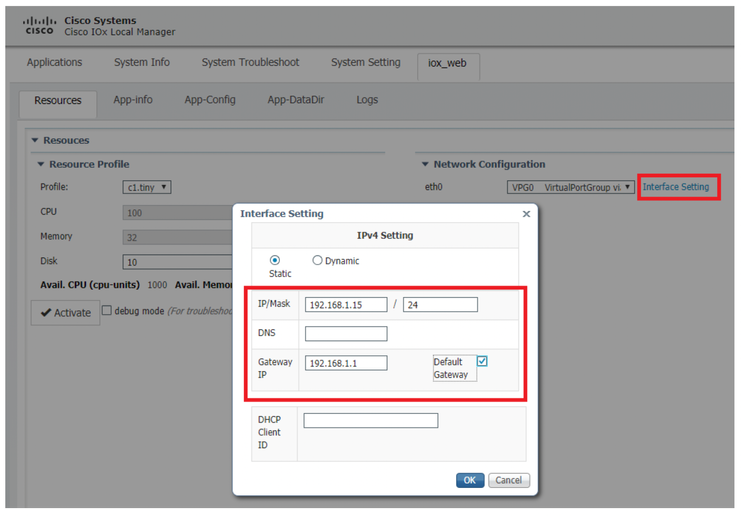
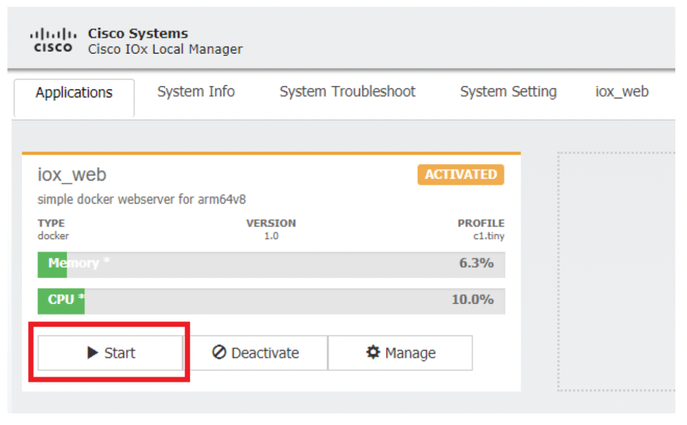
Étape 7. Cliquez sur OK, puis sur Activate. Une fois l'action terminée, revenez à la page Gestionnaire local principale (bouton Applications dans le menu supérieur), puis démarrez l'application comme indiqué dans l'image :
Une fois ces étapes effectuées, votre application est prête à être exécutée.
Dépannage
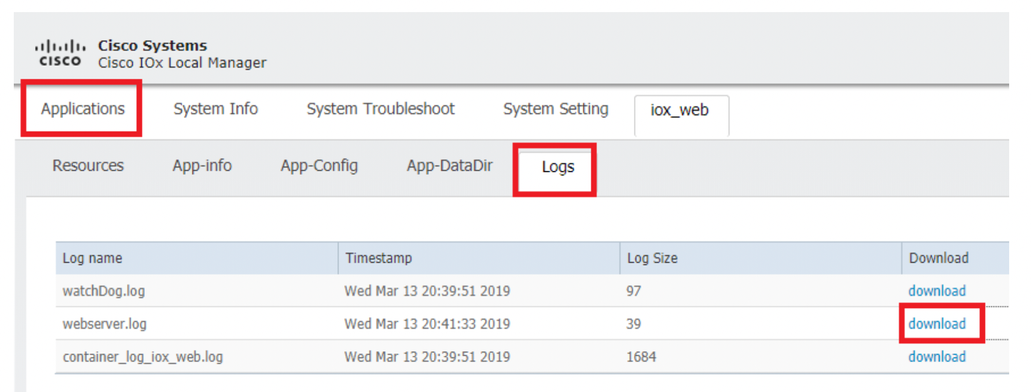
Afin de dépanner votre configuration, vérifiez le fichier journal que vous créez dans le script Python en utilisant un gestionnaire local. Accédez à Applications, cliquez sur Manage dans l'application iox_web, puis sélectionnez l'onglet Logs comme illustré dans l'image :


 Commentaires