Introduction
This document describes multiple use cases and configurations on Wireless Local-Area Network (LAN) Controllers (WLCs) which help to mitigate the wireless speed issues.
Prerequisites
Cisco recommends that you have good knowledge of WLCs along with basic knowledge of Routing and Switching.
Speed Issues in Wireless Network
Wireless Local-Area Network (WLAN) speed issues can be caused by a variety of factors, both on the wireless network and on the client devices. Troubleshooting these issues requires examining both the network and the devices.
When dealing with WLCs, there are several configuration checks you need to perform to ensure that your wireless network is optimized for speed and performance. Here are some checks that can be done on both the WLC and the client side:
Checks on Client Devices
The most important thing to check on the client machine is signal strength:
1. Signal strength: Check the Wi-Fi signal strength on the client device. If the signal is weak, the device can have trouble connecting or must experience slow speeds. Move closer to the wireless access point (AP) or Wi-Fi router to see if the signal improves.
1.1. Signal strength and SSID check on Windows Machine:
Start by checking the client devices that are experiencing slow network performance. Verify that the clients are connected to the correct wireless network and that they have a strong signal.
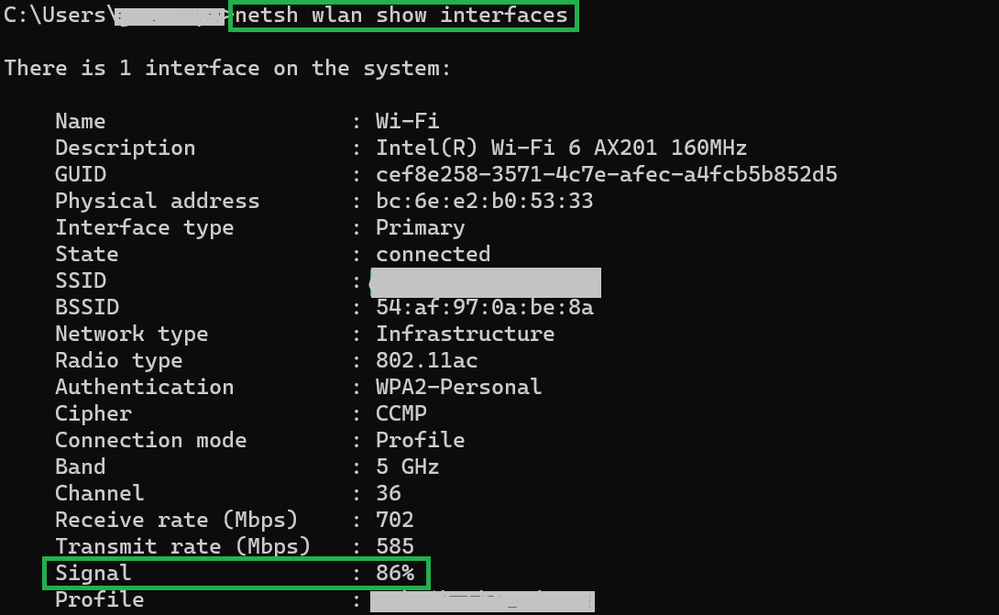 Command to verify the signal strength on a windows PC
1.2. Signal strength and SSID check on MacBook:
On a Mac, checking the Wi-Fi signal strength is a one-click operation. Press and hold the option key while clicking on the Wi-Fi icon in the menu bar at the top. You can now see the Wi-Fi signal strength (RSSI value in dBm) alongside a host of other network-related info in a drop-down menu.
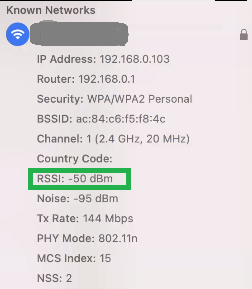 Signal strength for MAC
Configuration Checks on WLC
Here are a few use cases related to slowness issues due to configuration issues on WLCs:
Use Case 1. Data Rates
Data rates refer to the transmission speeds at which wireless devices can communicate with the network. These data rates are typically measured in megabits per second (Mbps) and vary based on the wireless standards and technologies supported by the WLC. One of the major reasons for slowness is because of lower data rates status set to Mandatory and supported state.
Cisco recommends disabling low data rates on wireless networks to improve performance and efficiency. This is because client devices can connect at higher data rates, which results in faster speeds and better performance.

Note: It is crucial to thoroughly assess the impact and compatibility of this change with your client devices.
1. Default data rate configuration:
By default, lower data rates are set to mandatory and supported states.
To see the parameters set for a particular radio on a wireless controller, navigate to the GUI of the controller, select the WIRELESS tab, and then select the desired radio.
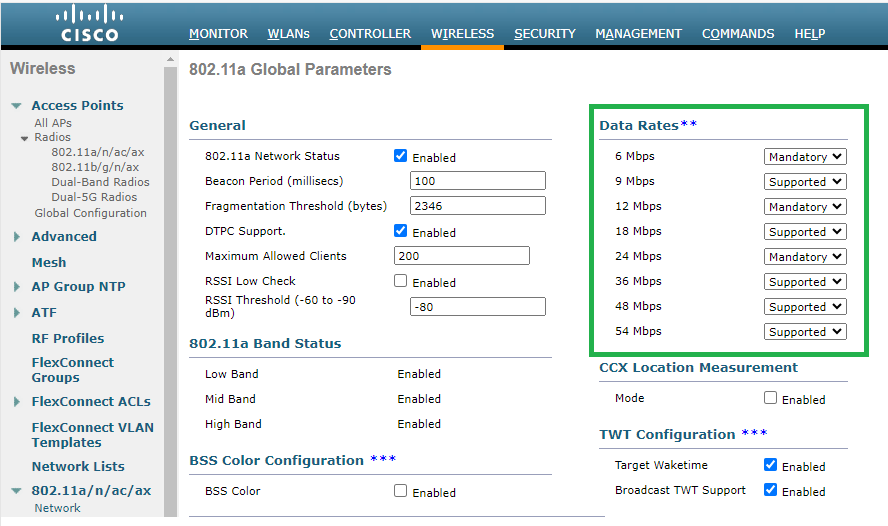 Default Data rates in 5 Ghz Radio
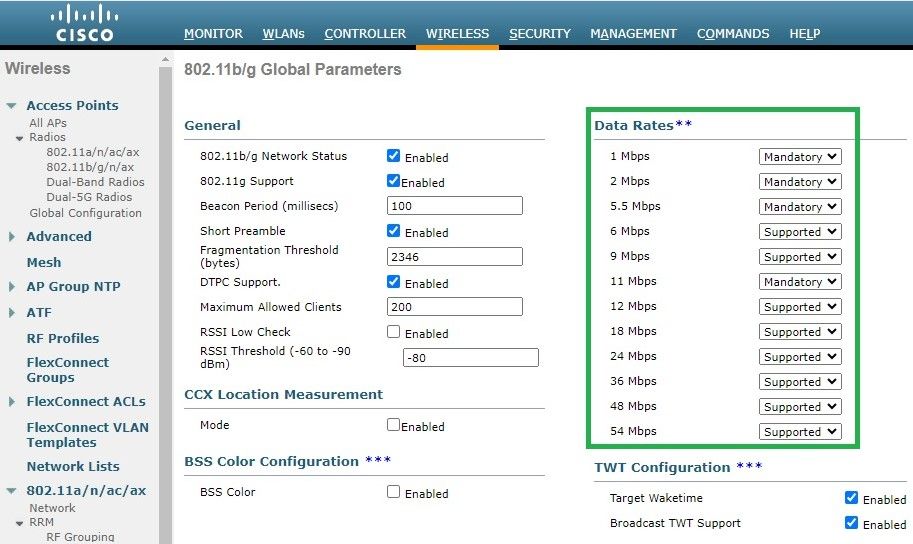 Default data rates in 2.4 Ghz Radio
Fix:
You can disable and enable the required data rates either by using CLI or GUI:
1. Steps to perform through CLI for radio 802.11b:
config 802.11b disable network

config 802.11b 11gSupport enable

config 802.11b 11nSupport enable

config 802.11b rate disabled 1

config 802.11b rate disabled 2

config 802.11b rate disabled 5.5

config 802.11b rate disabled 11

config 802.11b rate disabled 6

config 802.11b rate disabled 9

config 802.11b rate mandatory 12

config 802.11b rate supported 18

config 802.11b rate supported 24

config 802.11b rate supported 36

config 802.11b rate supported 48

config 802.11b rate supported 54

config 802.11b enable network
To change the data rates for a wireless network on a wireless controller, navigate to the GUI of the controller, select the Wireless tab, then select 802.11b/g/n/ax, then select the Network tab, and finally select the desired option for Data rates (Disabled, Supported, or Mandatory).
3. Steps to do through CLI for radio 802.11a.
config 802.11a disable network

config 802.11a 11nSupport enable

config 802.11a 11acSupport enable

config 802.11a rate disabled 6

config 802.11a rate disabled 9

config 802.11a rate disabled 12

config 802.11a rate disabled 18

config 802.11a rate mandatory 24

config 802.11a rate supported 36

config 802.11a rate supported 48

config 802.11a rate supported 54

config 802.11a enable network
4. Disable/Enable through GUI:
To change the data rates for a wireless network on a wireless controller, navigate to the GUI of the controller, select the Wireless tab, then select 802.11a/n/ac/ax, then select the Network tab, and finally select the desired option for Data rates (Disabled, Supported, or Mandatory).
5. Post verification check:
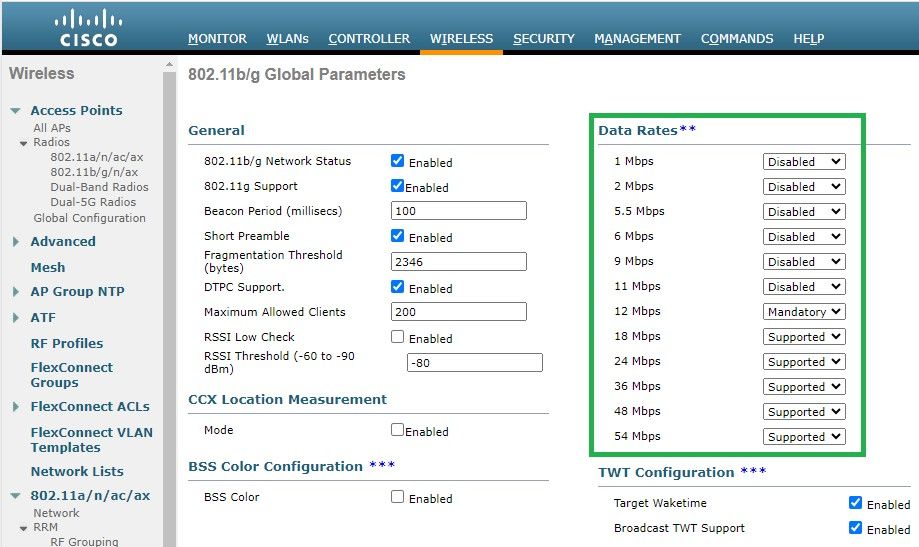 Recommended data rates on radio 802.11 b
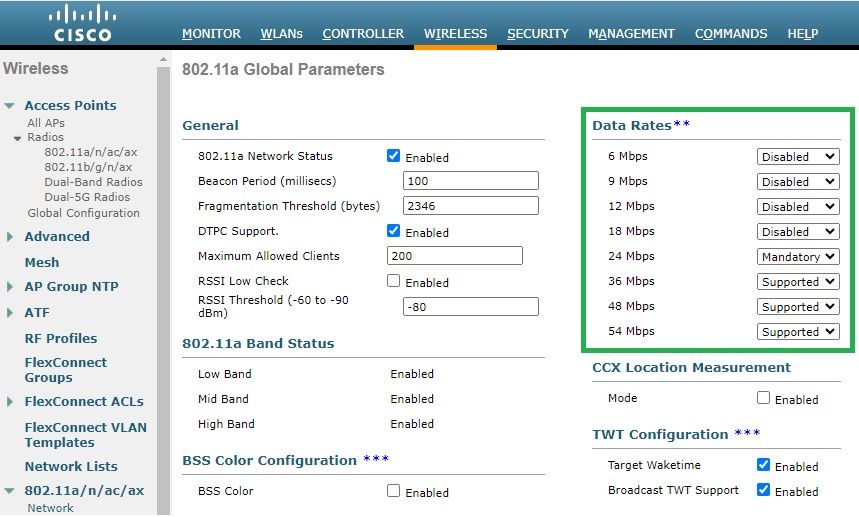 Recommended data rates on radio 802.11 a
Use Case 2. Regulatory Domain
Each country has its own regulatory body that governs the usage of wireless spectrum to avoid interference and ensure efficient wireless communications.
However, there are countries with the same regulatory domain that often share similar rules and regulations related to wireless communication, including frequency bands, power levels, and other parameters. This harmonization allows devices that are compliant with the regulations of one country to operate seamlessly in another country within the same regulatory domain.
When a regulatory domain is not supported, it means that a specific wireless device or technology is not compliant with the rules and regulations set by the regulatory authority of a particular country or region.
In this scenario, it is essential to ensure that the controller is correctly configured to handle access points in different regulatory domains. When access points from China are incorrectly mapped with the country code for India, it can lead to non-compliance issues and radio slot 1 going down with a "not supported" regulatory domain status.
You can detect this type of issue when you observe users at the site solely connected to 802.11b (2.4 GHz), and the operational status of Radio 1 (802.11a) is inoperative.
Here are the steps for identifying and resolving issues caused by incorrect country code mapping:
1. Verify the status of radio slots:
Access the Status section and navigate to this path: Wireless > AP > <desired AP> > Interfaces . Check for "Regulatory Domain: Not Supported".
 802.11a radio down due to Regulatory domain support issue in the Access Point operating country
2. Ensure the Admins status is in the enable state
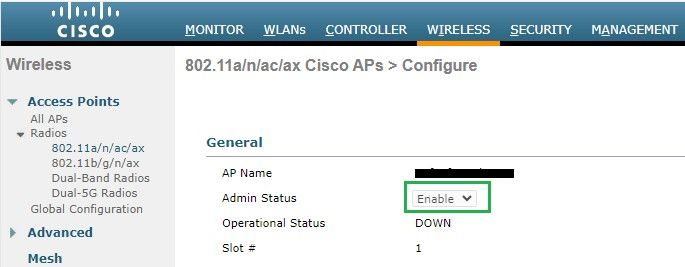 Admin status of the Access point on Radio 802.11a
3. Ensure the Country code of the Access points resided location is enabled under Wireless > Country as shown in the image.
 List of country codes enabled on the controller
Fix:
1. Map the desired country code on the access points to bring the radio 1 (802.11 a) up as shown in the image.
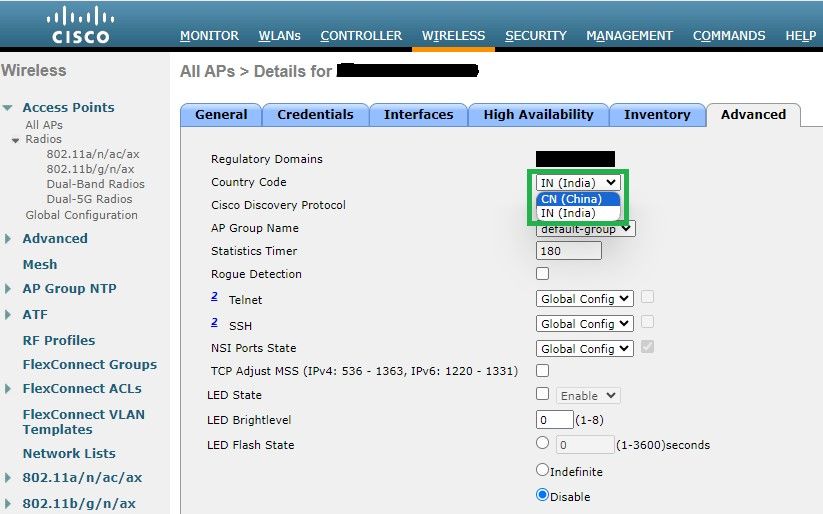 Select the Country that Access point is operated
2. Ensure both the are up and users are connected to 5 GHz as shown in the image.
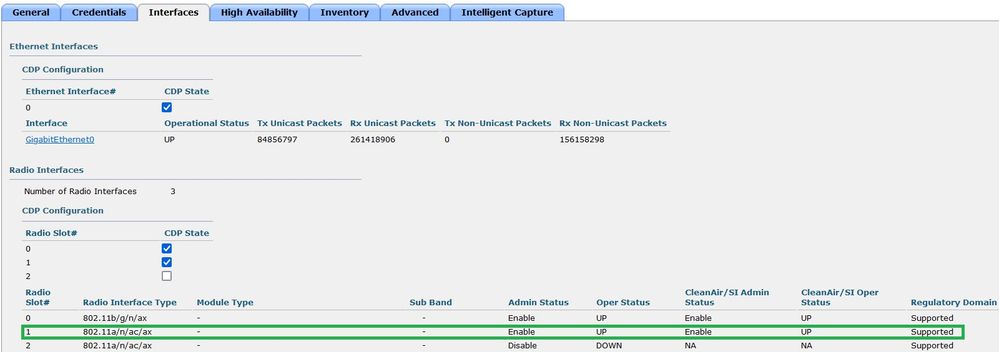 Ensure the AP Admin state is up and Regulatory domain is Supported
Use Case 3. Band Select
Band direction enables clients that are capable of dual-band (2.4 and 5 GHz) operation to move to a less congested 5 GHz access point. It makes 5 GHz channels more attractive to clients by delaying probe responses on the 2.4-GHz channels and therefore, clients choose to connect on 5 GHz.
Recommendation: Although this feature is designed to help 802.11n capable dual-band clients select the 5GHz band, it has to be used with caution on voice-enabled WLANs (with time-sensitive voice clients) as it can cause roaming delays or dropped calls.

Note: Please make sure you test it thoroughly in your environment with the dual-band clients before enabling it.
Steps to enable band selection on WLAN:
GUI: Navigate to WLAN > Advanced > Client Band Select and enable Band Select > Apply as shown in the image.
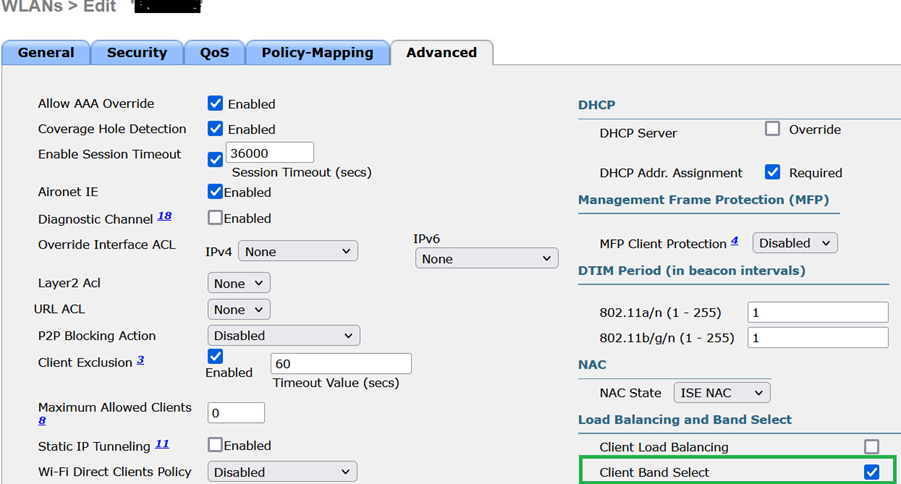 Band select option under WLAN
CLI:
(WLC) >config wlan band-select allow enable
Use Case 4. 802.11K
802.11k: 802.11k or Neighbor list feature provides a list of all neighbor APs to the client. Thus, the client can check all the options available to it with their RSSI value and can make an informed decision to roam. The client gets better signals on the AP selected via neighbor list and therefore better wireless performance and speed. This option works for clients that are 802.11k capable.
Steps to enable Neighbor List:
GUI: Navigate to WLAN > Advanced > Neighbor List and enable Apply as shown in the image.
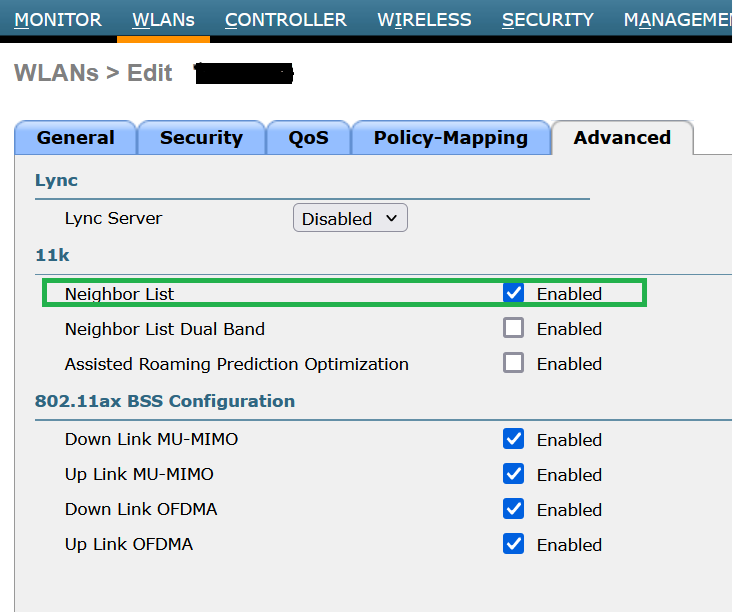 Enabled Neighborlist
CLI:
config wlan assisted-roaming neighbor-list {enable | disable} wlan-idUse Case 5. Channel Width
Channel width is a feature by which you can club two, four or more channels in one to increase the throughput. For example: If you merge two channels in one that allows the client to pass more data and gives a better speed.
This feature is designed for the 5 GHz band as there are more non-overlapping channels in 5 GHz which can be combined to provide better speed on wireless.
By default, the channel width is 20 MHz and you can increase it to 40 MHz, 80 MHz, or 160 MHz. If you merge two channels, the overall non-overlapping channels decrease. Therefore, you need to be cautious while using this feature if there are a large number of APs on the floor.
Steps to enable channel width to 40 MHz:
GUI:
Navigate to Wireless > 802.11a/n/ac/ax > DCA > Channel Width > 40 MHz > Accept Prompt > Apply as shown in the image.
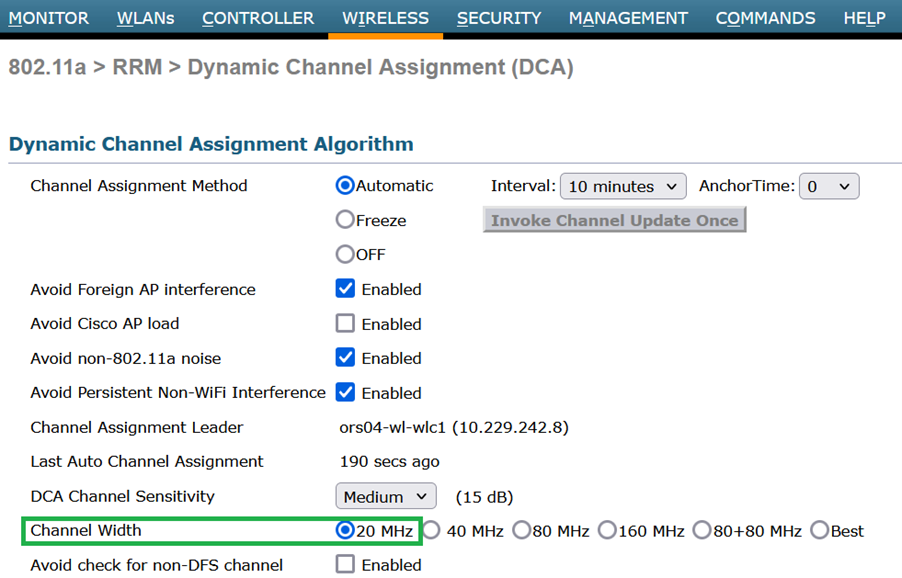 Default channel width set to 20 Mhz
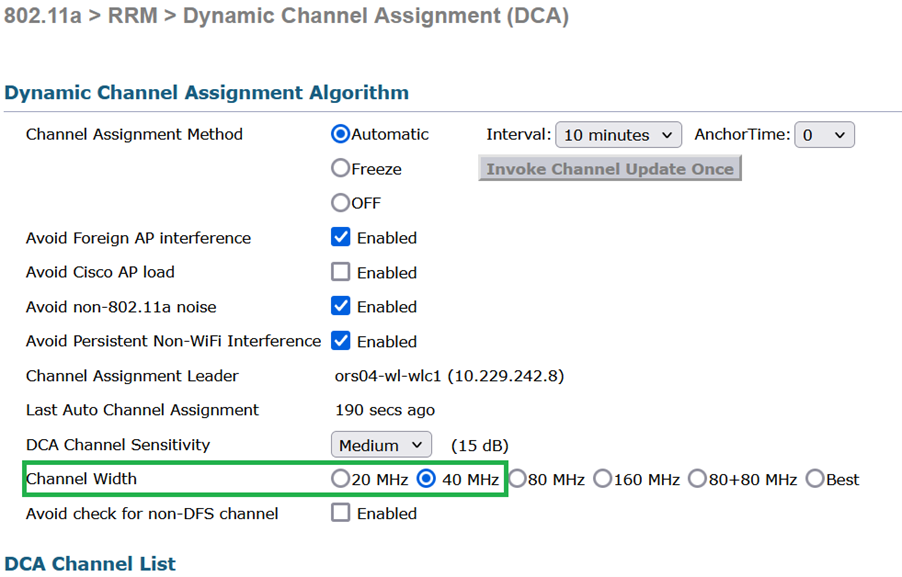 Channel_width set to 40Mhz
CLI:
(WLC) >config 802.11a disable network
y
(WLC) >config advanced 802.11a channel dca chan-width-11n 40
(WLC) >config 802.11a enable network
Use Case 6. QoS
QoS or Quality of Service can be used to prioritise traffic as per the WLAN requirement. You can configure the voice traffic WLAN to use Platinum QoS, assign the low-bandwidth WLAN to use Bronze QoS and assign all other traffic between the remaining QoS levels.
Steps to configure Platinum Qos on WLAN:
GUI: Navigate to WLANs, select WLAN ID > QoS and set Quality of Service (QoS) to Platinum (voice)as shown in the image.
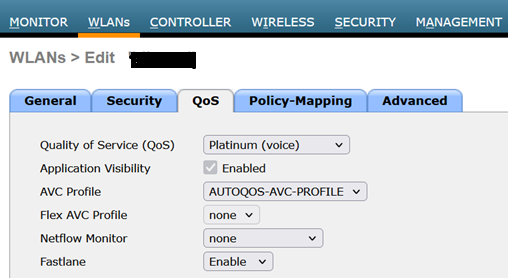 QOS value set to Platinum
CLI:
(WLC)> config wlan qos wlan_id platinum


 Feedback