CMX Connected Experiences- Social, SMS and Custom Portal Registration Configuration Example
Available Languages
Download Options
Bias-Free Language
The documentation set for this product strives to use bias-free language. For the purposes of this documentation set, bias-free is defined as language that does not imply discrimination based on age, disability, gender, racial identity, ethnic identity, sexual orientation, socioeconomic status, and intersectionality. Exceptions may be present in the documentation due to language that is hardcoded in the user interfaces of the product software, language used based on RFP documentation, or language that is used by a referenced third-party product. Learn more about how Cisco is using Inclusive Language.
Contents
Introduction
This purpose of this document is to guide network administrators through client registration via guest portals configuration on Connected Mobile eXperience (CMX).
CMX enables users to register and authenticate into the network using Social Registration Login, SMS and Custom Portal. In this document, an overview of the configuration steps on the Wireless LAN Controller (WLC) and CMX can be found.
Prerequisites
Requirements
CMX should be properly configured with the base configuration.
Having exported maps from Prime Infrastructure is optional.
Components Used
The information in this document is based on these software and hardware versions:
- Cisco Wireless Controller version 8.2.166.0, 8.5.110.0 and 8.5.135.0.
- Cisco Connected Mobile Experiences version 10.3.0-62, 10.3.1-35. 10.4.1-22.
Configure
Network Diagram
In this document two different ways of authenticating users/clients into the wireless network, using CMX, will be described.
First, setting up authentication using Social Network Accounts will be described, then authentication using SMS.
On both scenarios, the client will try to register on the SSID using authentication via CMX.
The WLC redirects the HTTP traffic to CMX where the user is prompted to authenticate. The CMX contains the setup of the portal to be used for the client to register, both trough social accounts and SMS.
Below, the flow of the registration process is described:
- The client tries to join the SSID and opens the browser.
- Instead of having access to the requested site, is redirected to the guest portal by the WLC.
- The client provides his credentials and tries to authenticate.
- CMX deals with the authentication process.
- If successful, now full internet access is provided to the client.
- The client is redirected to the initial requested site.
The topology used is:

Configurations
Authentication via SMS
Cisco CMX allows client authentication through SMS. This method requires setting up an HTML page so the user can provide their credentials to the system.Default Templates are natively provided by CMX, and can be later edited or replaced by a custom one.
The text messages service is done via integrating CMX with Twilio, a cloud communications platform that allows sending and receiving text messages. Twilio allows having a phone number per portal, meaning that if more than one portal is used, one phone number per portal is required.
A. WLC Configuration
In the WLC side, both an SSID and ACL will be configured. The AP should be joined to the controller and on RUN state.
- ACL
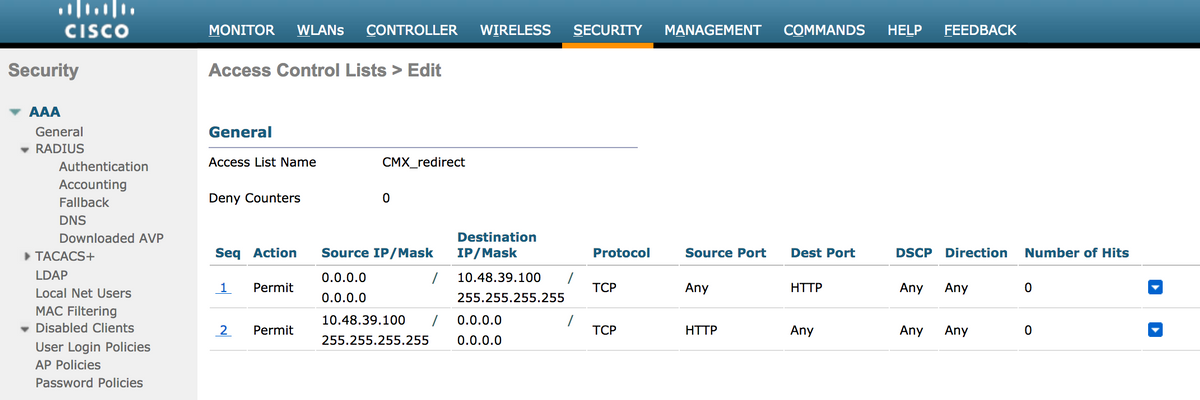
An ACL allowing HTTP traffic, configured on the WLC, is required. To configure an ACL, go to Security->Access Control Lists->Add New Rule.
The IP that is used is the one configured for the CMX. This allows HTTP traffic between the WLC and the CMX. The figure belows shows the created ACL where "10.48.39.100" refers to the CMX ip address.
2. WLAN
So the integration with the portal is done, Security policies changes on the WLAN must be made.
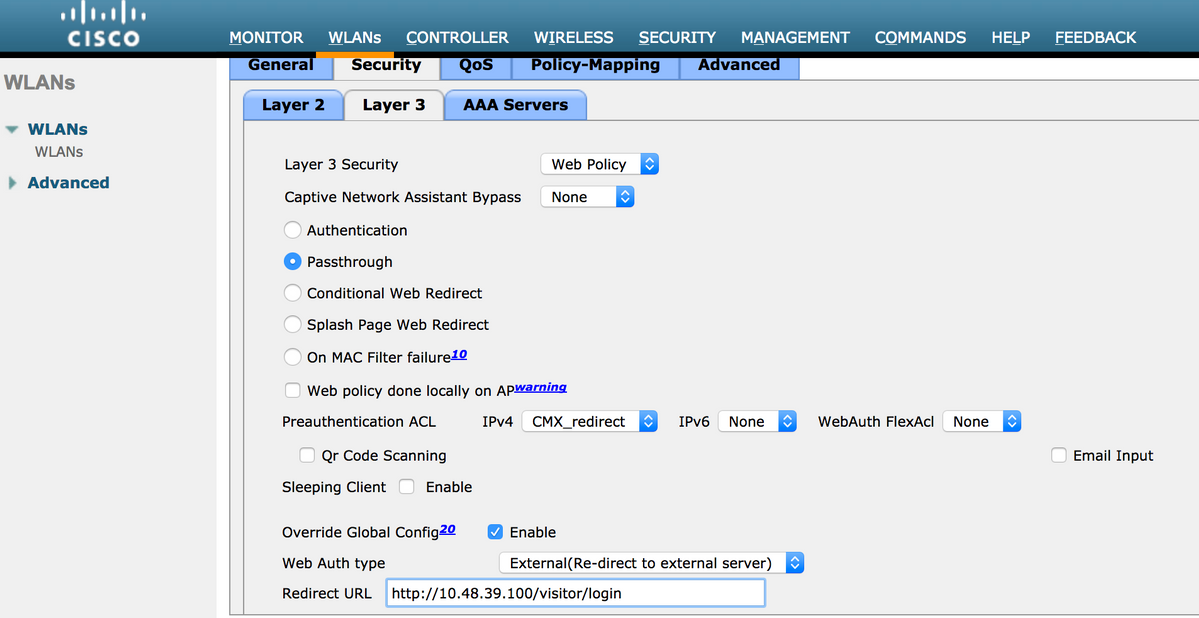
First, got to WLANs->Edit->Layer 2->Layer 2 Security, and in the dropdown choose None, so Layer 2 Security is disabled. Then, in the same Security tab, change to Layer 3. In the Layer 3 Security dropdown menu, select Web Policy, and then Passthrough. In Preauthentication ACL, select the IPv4 ACL configured previously, to bind it to the respective WLAN where SMS authentication must be provided. The option Over-ride Global Config must be enabled and the Web Auth type must be External (Re-direct to external server), so clients can be redirected to the CMX service. The URL must be the same as the CMX SMS authentication portal, format being http://<CMX-IP>/visitor/login .

B. Twilio
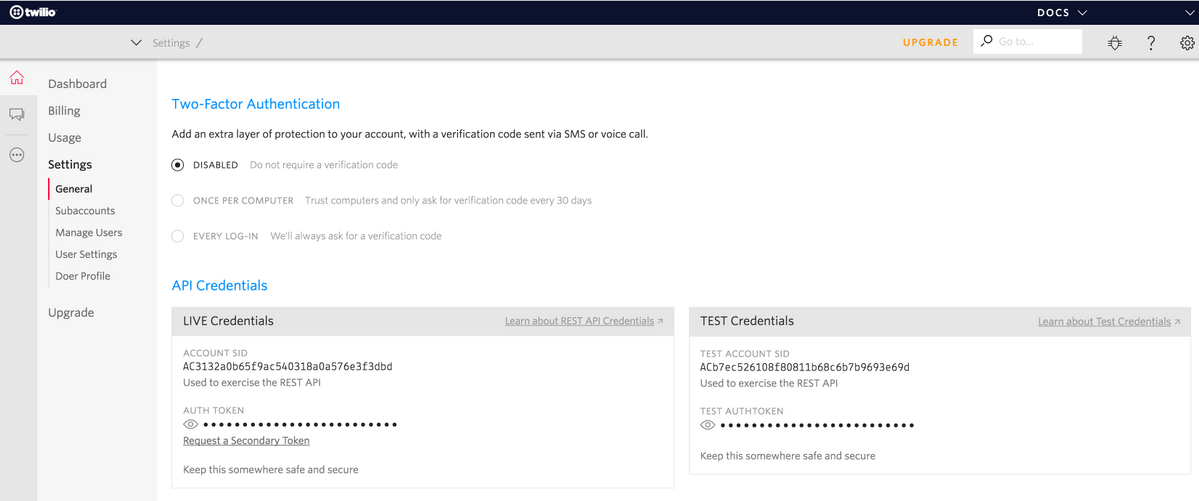
CMX provides Twilio integration for text message services. Credentials are provided after the account on Twilio is correctly configured. Both ACCOUNT SID and AUTH TOKEN are needed.
Twilio has its own configuration requirements, documented through the process of setting up the service. Before integrating with CMX, Twilio service can be tested meanning problems related with Twilio setup can be detected before using it with CMX.
C. CMX Configuration
It is required to have the controller properly added to the CMX, and the maps exported from Prime Infrastructure.
- SMS Registration Page
There is a default template for the registration portal. Portals can be found selecting CONNECT&ENGAGE->Library. If you want a template, choose Templates in the dropdown menu.
To integrate Twilio with the portal, go to Twilio Configuration and provide the Account ID and the Auth Token. If the integration is successful, the number used in Twilio account will popup.

Authentication via Social Network Accounts
Authenticating the client using Social Network Accounts requires the network administrator to add a valid Facebook APP identifier on the CMX.
A. WLC Configuration
In the WLC side, both an SSID and ACL will be configured. The AP should be join to the controller and on RUN state.
1. ACL
As here we are using HTTPS as authentication method, an ACL allowing HTTPS traffic must be configured on the WLC. To configure an ACL, go to Security->Access Control Lists->Add New Rule.
The CMX IP has to be used to allow HTTPS traffic between the WLC and the CMX. (in this example, the CMX ip is 10.48.39.100)

It is also necessary to have a DNS ACL with Facebook URLs. To do so, in Secuity ->Access Controll Lists find the entry of the previously configured ACL (in this case CMX_Auth) and move the mouse to the blue arrow at the end of the entry and select Add-Remove URL. After that type Facebook's URLs on the URL String Name and Add.

2. WLAN
The Security policies changes for the Registration to work, require specific configuration on the WLAN to be made.
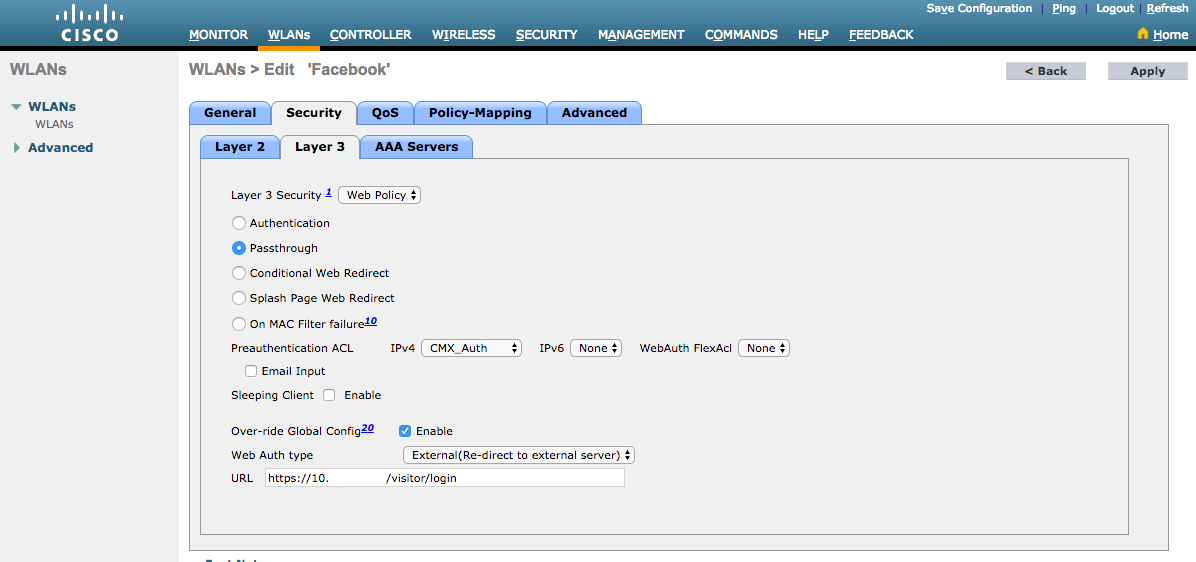
As done previously for the SMS Registration, first, got to WLANs->Edit->Layer 2->Layer 2 Security, and in the dropdown choose None, so Layer 2 Security is disabled. The, in the same Security tab, change to Layer 3. In the Layer 3 Security dropdown menu, select Web Policy, and then Passthrough. In Preauthentication ACL, select the IPv4 ACL configured previously, to bind it to the respective WLAN where authentication through Facebook must be provided. The option Over-ride Global Config must be enabled and the Web Auth type must be External (Re-direct to external server), so clients can be redirected to the CMX service. Note that this time, the URL, must be on the following format https://<CMX-IP>/visitor/login.

B. Facebook for Developers
For the Facebook and CMX integration, a Facebook App is required in order to have the proper tokens exchanged between the two parts.
Go to Facebook for Developers to create the App. There are some App configuration requirements in order to integrate the services.
In the App Settings make sure Client OAuth Login and Web OAuth Login are enabled. Also, verify that the Valid OAuth redirect URIs, you have the CMX URL in the https://<CMX-IP>/visitor/login format.

In order to have the App published and ready to integrate with CMX, it is required to make it public. To do that, go to App Review->Make <App-Name> public? and change the state to Yes.

C. CMX Configuration
It is required to have the controller properly added to the CMX, and the maps exported from Prime Infrastructure.
- Registration Page
To create a Registration Page on CMX, the same steps as done previously to create the page for SMS Registration Page should be done. Selecting CONNECT&ENGAGE->Library, template portals ready to be eddited can be found by choosing Templates in the dropdown menu.
Registering via Facebook credentials require the portal to have Social Accounts connection. To do it from scratch, when creating a custom portal, got to CONTENT->Common Elements->Social Auth, and select Facebook. Then insert the App Name and App ID (Key) obtained from Facebook.

Authentication via Custom Portal
Authenticating the client using Custom Portal is similar to configure external Web Authentication. The redirection will be done to the customised portal hosted on CMX.
A. WLC Configuration
In the WLC side, both an SSID and ACL will be configured. The AP should be join to the controller and on RUN state.
1. ACL
As here we are using HTTPS as authentication method, an ACL allowing HTTPS traffic must be configured on the WLC. To configure an ACL, go to Security->Access Control Lists->Add New Rule.
The CMX IP has to be used to allow HTTPS traffic between the WLC and the CMX. (in this example, the CMX IP is 10.48.71.122).
Note: Make sure to enable ssl on the CMX by issuing the command "cmxctl node sslmode enable" on the CMX CLI.

2. WLAN
The Security policies changes for the Registration to work, require specific configuration on the WLAN to be made.
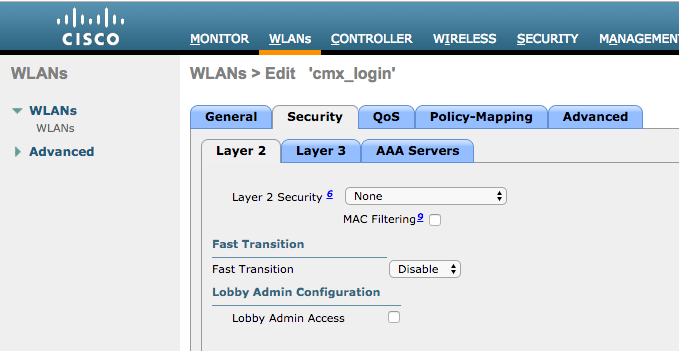
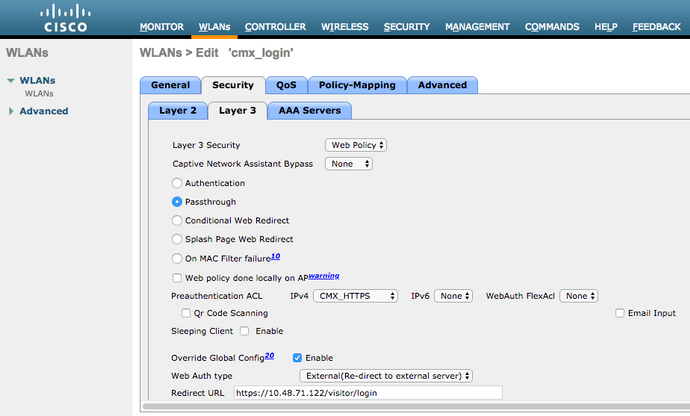
As done previously for the SMS and Social Network Registration, first, got to WLANs->Edit->Layer 2->Layer 2 Security, and in the dropdown choose None, so Layer 2 Security is disabled. The, in the same Security tab, change to Layer 3. In the Layer 3 Security dropdown menu, select Web Policy, and then Passthrough. In Preauthentication ACL, select the IPv4 ACL configured previously, (named CMX_HTTPS on this example) and bind it to the respective WLAN. The option Over-ride Global Config must be enabled and the Web Auth type must be External (Re-direct to external server), so clients can be redirected to the CMX service. Note that this time, the URL, must be on the following format https://<CMX-IP>/visitor/login.
C. CMX Configuration
It is required to have the controller properly added to the CMX, and the maps exported from Prime Infrastructure.
- Registration Page
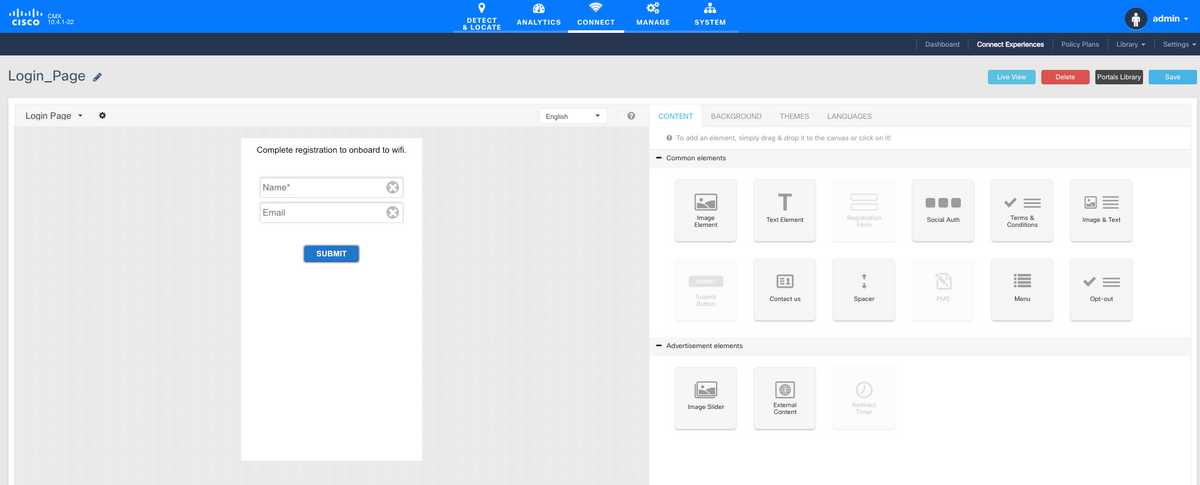
To create a Registration Page on CMX, the same steps as done previously to create the page for other authentication methods. Selecting CONNECT&ENGAGE->Library, template portals ready to be edited can be found by choosing Templates in the dropdown menu.
The portal for normal registration can be done from scratch (select “Custom”) or adapted from the “Registration Form” template available on the CMX library.
Verify
WLC
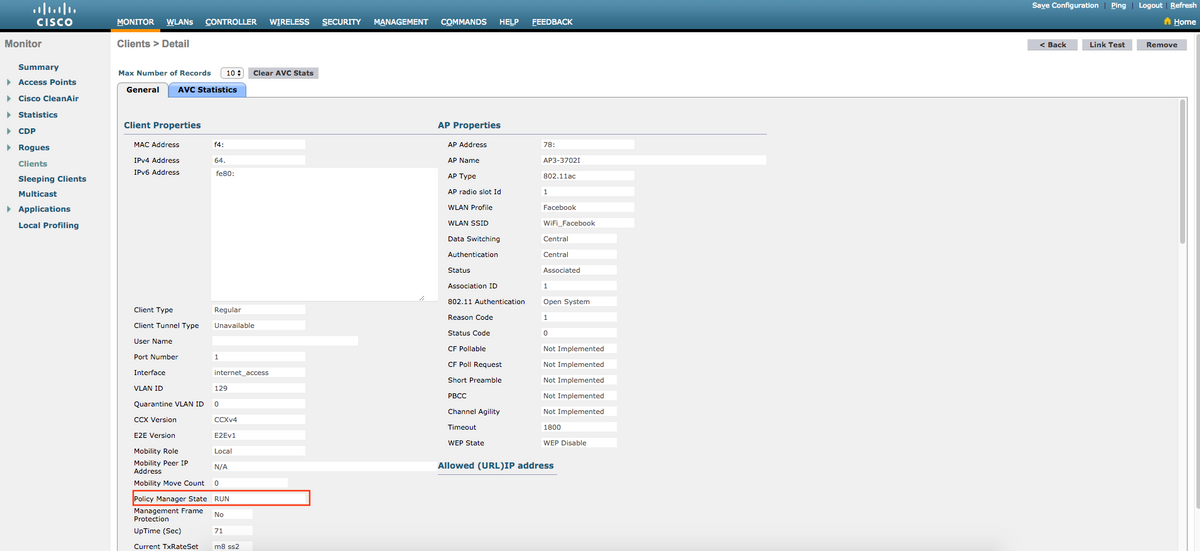
To verify if the user was successefully authenticated on the system, at the WLC GUI, go to MONITOR->Clients and search for the client's MAC address on the list:

Click on the client's MAC address and in the details, confirm that the client Policy Manager State is on RUN state:
CMX
It is possible to verify how many users are authenticated on CMX, by opening the CONNECT&ENGAGE tab:

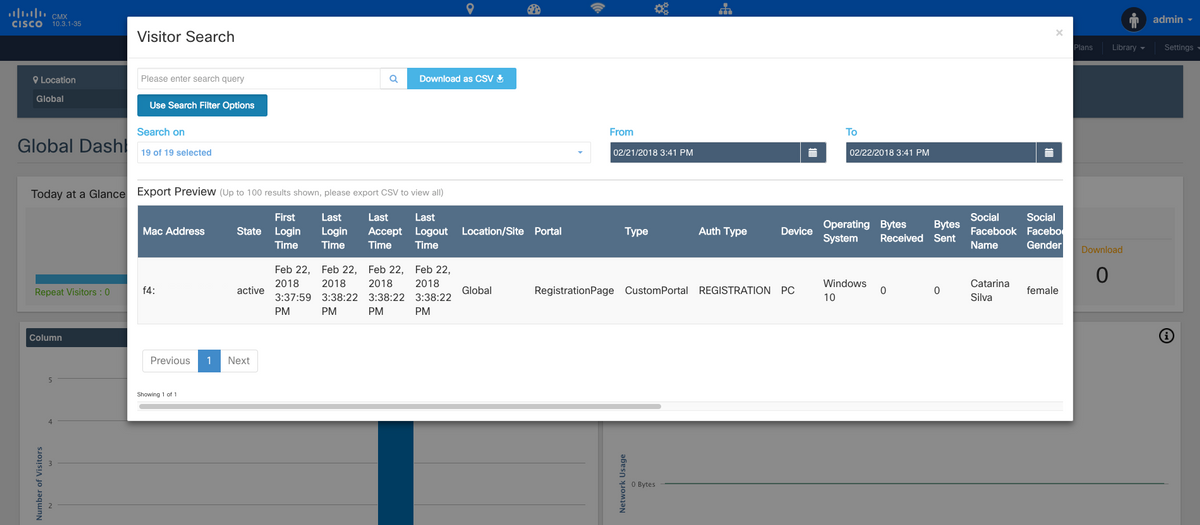
To check the user details, in the same tab, top right, click on Visitor Search:
Troubleshoot
In order to check the flow of the interactions between the elements, there are some debugs that can be done it the WLC:
>debug client<MAC addr1> <MAC addr2> (Enter the MAC address of one or more clients)
>debug web-auth redirect enable mac <MAC addr> (Enter the MAC address of the web-auth client)
>debug web-auth webportal-server enable
>debug aaa all enable
This debugs will allow troubleshooting, and if needed, some packet captures can be used to complement.
Contributed by Cisco Engineers
- Catarina Pires Da SilvaCisco TAC
Contact Cisco
- Open a Support Case

- (Requires a Cisco Service Contract)
 Feedback