Introduction
This document describes the overall process to generate, download and install certificates on the Catalyst 9800
Prerequisites
Requirements
Cisco recommends that you have knowledge of these topics:
- How to configure the 9800 WLC, the Access Point (AP) for basic operation
- How to use the OpenSSL application
- Public Key Infrastructure (PKI) and digital certificates
Components Used
The information in this document is based on these software and hardware versions:
- 9800-CL, Cisco IOS® XE version 17.9.4
- OpenSSL application (version 3.1.3)
The information in this document was created from the devices in a specific lab environment. All of the devices used in this document started with a cleared (default) configuration. If your network is live, ensure that you understand the potential impact of any command.
Configure
On 16.10.X, 9800s do not support a different certificate for web authentication and web administration. The web log in portal always uses the default certificate.
On 16.11.X, you can configure a dedicated certificate for web authentication, define the trustpoint inside the global parameter-map.
There are two options to get a certificate for a 9800 WLC.
- Generate Certificate Signing Request (CSR) with OpenSSL or any other SSL application. Generate (using OpenSSL) or get a PKCS12 certificate signed by your Certificate Authority (CA) and load it directly to the 9800 WLC. This means the private key is bundled with that certificate.
- Use the 9800 WLC to generate a CSR, get it signed by a CA and then load each certificate in the chain manually to the 9800 WLC.
Use the one that fits your needs best.
Option 1 - Load a Pre-Existent PKCS12 Signed Certificate on the WLC
Step 1 : Create a Certificate Signing Request
If you do not have the certificate yet, you need to generate a certificate signing request (CSR) to submit to your CA.
Create a text file called "openssl.conf" from your current directory (on a laptop that has OpenSSL installed), copy and paste these lines to include the Subject Alternate Names (SAN) field in newly created CSRs.
[ req ]
default_bits       = 4096
distinguished_name = req_distinguished_name
req_extensions     = req_ext
prompt             = no
[ req_distinguished_name ]
countryName                 = <Country Name (2 letter code)>
stateOrProvinceName         = <State or Province Name (full name)>
localityName               = <Locality Name (eg, city)>
organizationName           = <Organization Name (eg, company)>
commonName                 = <Common Name (e.g. server FQDN or YOUR name)>
[ req_ext ]
subjectAltName = @alt_names
[alt_names]
DNS.1   = testdomain.com
DNS.2   = example.com
DNS.3   = webadmin.com
IP.1    = <WLC_IP_ADDRESS> (note : this is optionnal, but can be added in case you want to access your WLC using the IP address instead of FQDN)
Replace the DNS.X names with your SAN (Subject Alternative Name). Replace the main fields with the certificate detail you need. Ensure that you repeat the Common Name inside the SAN fields (DNS.x). Google Chrome requires the name present in the URL to be in the SAN fields in order to trust the certificate.
In case of web admin, you also need to populate SAN fields with variations of the URL (just hostname, or full Fully Qualified Domain Name (FQDN) for example) so that the certificate matches no matter what the admin types in the URL in the browser address bar.
Generate the CSR from OpenSSL with this command:
openssl req -out myCSR.csr -newkey rsa:4096 -nodes -keyout private.key -config openssl.conf
The CSR generates as myCSR.csr and its key as private.key in the directory where OpenSSL is run from, unless the full path is provided to the command.

Caution: Ensure to keep the private.key file secure as it is used to encrypt communications
Step 2 : Verify the content of your CSR
You can copy paste the content of your CSR into an online tool (type "CSR decoder" on Google for example) to check its content. Make sure the SAN (Subject Alternative Name) is included in the CSR as it is required by some browser.
You can also verify the content of the CSR with OpenSSL using this command :
openssl req -noout -text -in myCSR.csr
Step 3 : Submit the CSR to your CA
You can then provide this CSR to your CA to have it signed and receive a certificate back. Ensure that the full chain is downloaded from the CA and that the certificate is in Base64 format in case it needs further manipulation. You would typically receive multiple files from your CA : the signed device certificate, the Root CA certificate and one or more intermediate CA certificate(s).
Step 4 : Create and/or import the pkcs12 file on the WLC
If you generated the CSR on your computer using OpenSSL, there is a chance that your CA only provides you the signed certificate along with its own certificate and the eventual intermediate certificates. In that case, you need to generate the PKCS12 file yourself using OpenSSL. If the CA also had access to your private key, it can provide you direclty the PKCS12 file (PFX file) and in that case, you would simply need to import it on the controller. Refer to the section "Import the PKCS12 file" to do this.
Create the PKCS12 file
It is possible to end up in a situation where you have a private key file and certificate in PEM or CRT format and want to combine them in a PKCS12 (.pfx) format to upload to the 9800 WLC. You can also have one or multiple CA certificate that need to also be inclueded in this pfx file before importing in the 9800 WLC.
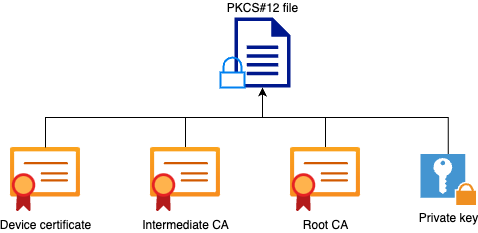
The first thing that you would need to do is to combine all intermediate CAs and the Root CA file into a single file. Copy and paste the contents together (save the file in .pem format) :
----- BEGIN Certificate --------
<intermediate CA cert>
------END Certificate --------
-----BEGIN Certificate -----
<root CA cert>
-----END Certificate--------
Then, you can create your .pfx file using this command :
For versions older than 17.12.1 :
openssl pkcs12 -export -macalg sha1 -legacy -descert -out chaincert.pfx -inkey <device private key> -in <device certificate> -certfile <combined CA file>

For version 17.12.1 or above :
openssl pkcs12 -export -out chaincert.pfx -inkey <device private key> -in <device certificate> -certfile <combined CA file>

Tip: While configuring a password for the .pfx file, do not use the ASCII characters: *, ^, (), [], , ", and +. Using these ASCII characters results in error with bad configuration and does not import the certificate to the controller.

Note: The "-macalg sha1" flag is needed on versions older than 17.12.1 due to Cisco bug ID CSCvz41428. The "-legacy -descert" is also needed as OpenSSL version 3 usually restrict the usage of legacy algorithms by default. However, the newer algorithms are supported in version 17.12.1 and later so these flags are not needed if you intend to import the pfx file on such versions.
Verify the PKCS12 file created
You can check the content of the PKCS12 file using this command :
openssl pkcs12 -info -in <chaincert.pfx>
You see in this output the full certificate chain as well as the private key. This file is protected with the password you configured earlier.
Import the PKCS12 file
You can now import the .pfx file on the 9800 WLC, either using the GUI or the CLI.
Using the GUI :
Open your 9800 WLC GUI and navigate to Configuration > Security > PKI Management, click the Add Certificate tab. Expand the Import PKCS12 Certificate menu. If the .pfx file is stored on your computer, choose the Desktop (HTTPS) option in the Transport Type drop-down list, which allows HTTP upload through the browser. Certificate Password refers to the password that was used when the PKCS12 certificate was generated.
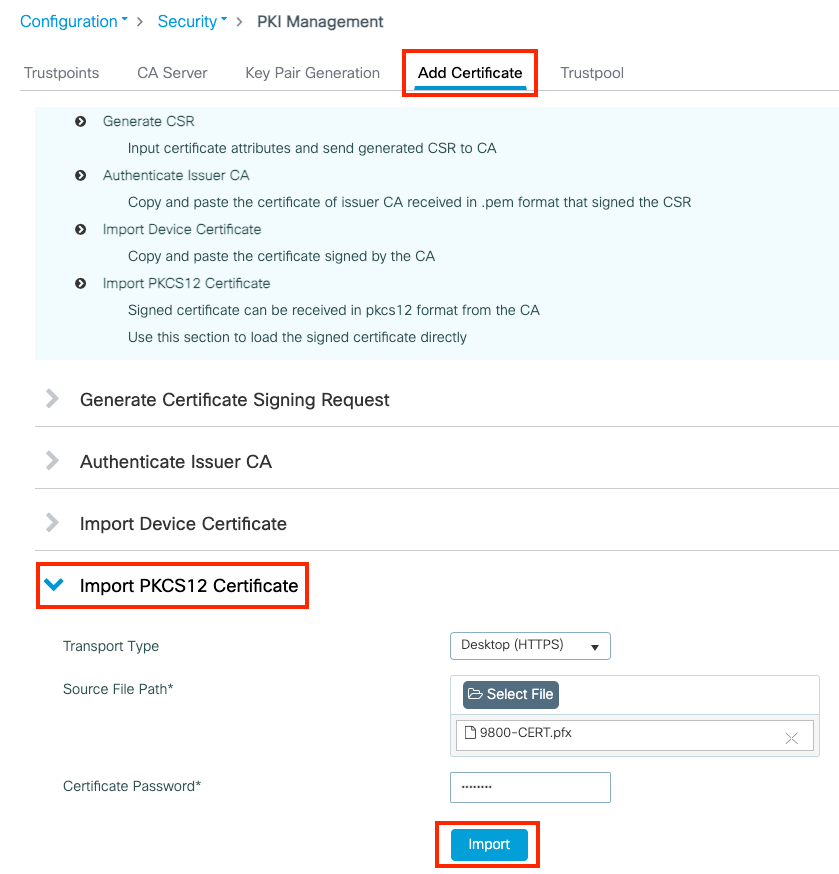
Verify that information is correct and click Import. After that you see the new certificate key pair for this new trustpoint installed in the Key Pair Generation tab. Upon successful importing, the 9800 WLC also creates an additional trustpoint for multi-level CAs.

Caution: The following error is seen when specific ASCII characters are included in the password of the .pfx file: Error in Configuring Reading file from bootflash pfx CRYPTO PKI Import PKCS12 operation failed bad HMAC Possible causes bad password or corrupted PKCS12 Including the following characters in the password causes the error: *, ^, (), [], \ When including the characters (" and +) the following error appears: "Error in Configuration". The certificate does not get imported to the WLC.


Note: Note: Currently, the 9800 WLC does not present the full certificate chain whenever a specific trustpoint is used for webauth or webadmin, rather it presents the device certificate and its immediate issuer. This is tracked with Cisco bug ID CSCwa23606, fixed in Cisco IOS® XE 17.8.
Using the CLI:
9800# configure terminal
9800(config)#crypto pki import <trustpoint-name> pkcs12 [tftp://<TFTP-IP>/<cert-filename> | ftp://<FTP-IP>/<cert-filename> | http://<server-IP>/<cert-filename> | bootflash:<cert-filename>] password <cert-password>
Note: It is important that both the certificate filename and trustpoint name match exactly for the 9800 WLC to create any additional trustpoints for multi-level CAs.
Option 2 - Define a key and Certificate Signing Request (CSR) on the 9800 WLC
Step 1 : Generate a general-purpose RSA key pair
Navigate to Configuration > Security > PKI Management, choose Key Pair Generation tab and then click + Add. Enter the details, ensure that the Key Exportable check box is checked, and then click Generate.
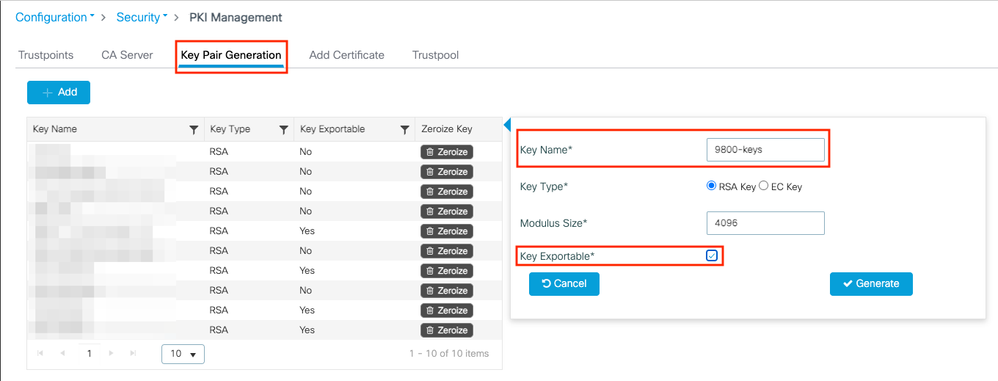
CLI configuration:
9800(config)#crypto key generate rsa general-keys label 9800-keys exportable
The name for the keys will be: 9800-keys
Choose the size of the key modulus in the range of 512 to 4096 for your
General Purpose Keys. Choosing a key modulus greater than 512 may take
a few minutes.

How many bits in the modulus [1024]: 4096
% Generating 4096 bit RSA keys, keys will be exportable...
[OK] (elapsed time was 9 seconds)
Step 2 : Generate a CSR on your 9800 WLC
Navigate to the Add Certificate tab and expand Generate Certificate Signing Request, fill in the details and choose the previously created key pair from the drop-down list. It is important that Domain Name matches the URL that is defined for client access on the 9800 WLC (web admin page, web authentication page, and so on), Certificate Name is the trustpoint name so you can name based on its use.
Note: The 9800 WLCs support certificates with wildcard parameters within their Common Name.
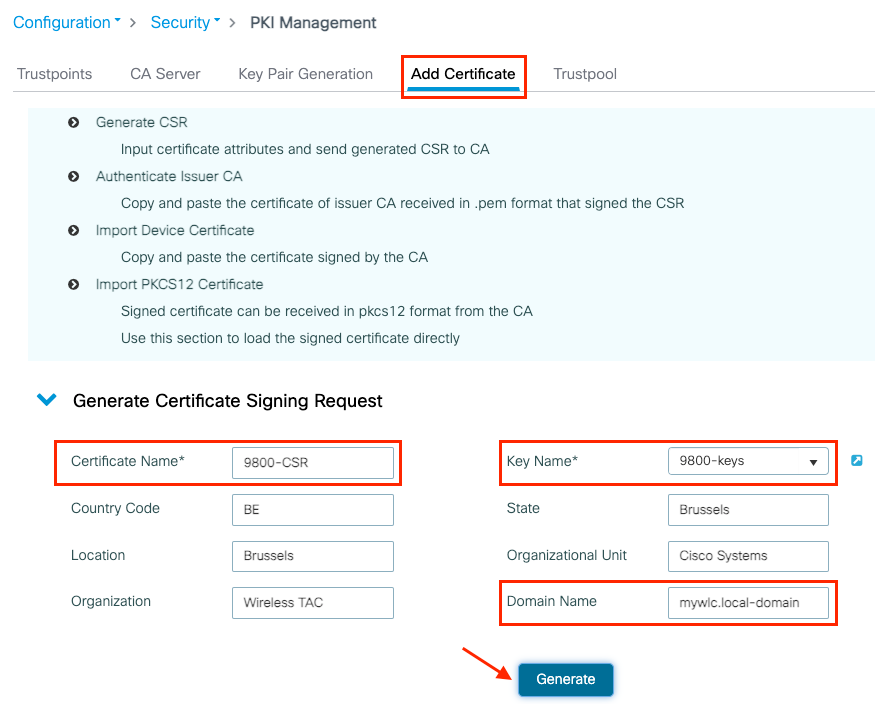
Ensure that information is correct and then click Generate. This displays the CSR in a textbox next to the original form

Copy saves a copy to clipboard so that you can paste it into a text editor and save the CSR.
Save to device creates a copy of the CSR and stores it in bootflash:/csr. To see it, run these commands:
9800#dir bootflash:/csr
Directory of bootflash:/csr/

1046531 -rw- 1844 Sep 28 2021 18:33:49 +00:00 9800-CSR1632856570.csr

26458804224 bytes total (21492699136 bytes free)
9800#more bootflash:/csr/9800-CSR1632856570.csr
-----BEGIN CERTIFICATE REQUEST-----
<Certificate Request>
-----END CERTIFICATE REQUEST-----
CLI configuration:
9800(config)#crypto pki trustpoint 9800-CSR
9800(ca-trustpoint)#enrollment terminal pem
9800(ca-trustpoint)#revocation-check none
9800(ca-trustpoint)#subject-name C=BE, ST=Brussels, L=Brussels, O=Cisco Systems, OU=Wireless TAC, CN=mywlc.local-domain
9800(ca-trustpoint)#rsakeypair 9800-keys
9800(ca-trustpoint)#subject-alt-name example.com,guestportal.com,webadmin.com
9800(ca-trustpoint)#exit

(config)#crypto pki enroll 9800-CSR
% Start certificate enrollment ..

% The subject name in the certificate will include: C=BE, ST=Brussels, L=Brussels, O=Cisco Systems, OU=Wireless TAC, CN=mywlc.local-domain
% The subject name in the certificate will include: mywlc
% Include the router serial number in the subject name? [yes/no]: no
% Include an IP address in the subject name? [no]: no
Display Certificate Request to terminal? [yes/no]: yes
Certificate Request follows:

-----BEGIN CERTIFICATE REQUEST-----
<Certificate Request>
-----END CERTIFICATE REQUEST-----

---End - This line not part of the certificate request---

Redisplay enrollment request? [yes/no]: no
Parameters available for subject name configuration:
C: Country, it has to be two capital letters only.
ST: Some State, refers to State or Province Name.
L: Location Name, refers to city.
O: Organization Name, refers to company.
OU: Organizational Unit Name, can refer to section.
CN: (Common Name)Refers to the subject to which the certificate is issued to, you must specify either the specific IP address to be accessed (wireless management IP, virtual IP, and so on) or configured hostname with FQDN.
Note: If you want to add a Subject Alternate Name, it is not possible on Cisco IOS XE versions before 17.8.1 due to Cisco bug ID CSCvt15177  . This scenario can result in some browser alerts due to SAN not present, to avoid this then create the key and CSR off-box as shown in Option 1.
Step 3 : Submit your CSR to your CA (Certification Authority)
The full string needs to be sent to the CA to get it signed.
-----BEGIN CERTIFICATE REQUEST-----
<Certificate Request>
-----END CERTIFICATE REQUEST-----
If you use a Windows Server CA to sign the certificate, download the signed certificate in Base64 format. Otherwise you need to export with utilities like Windows cert manager.
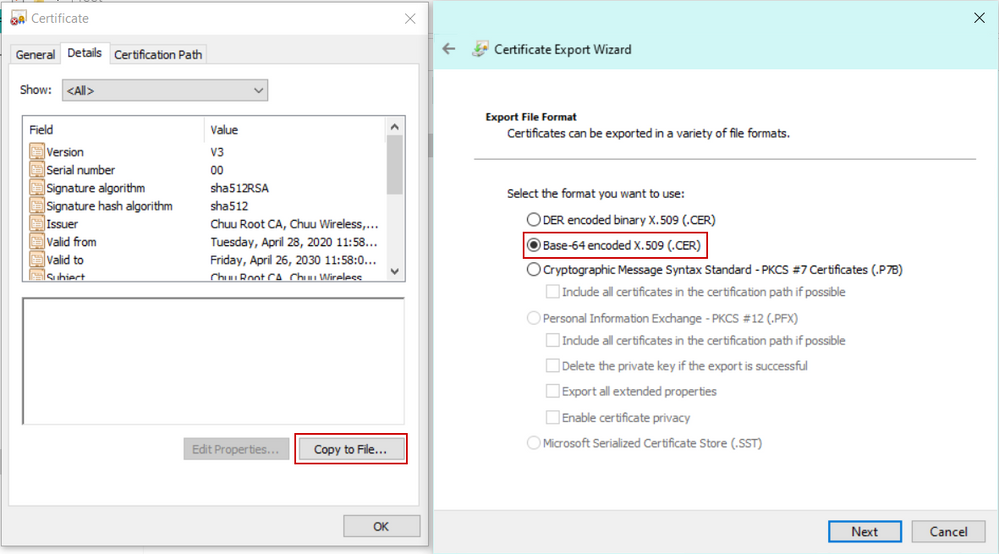
You usually receive from your CA the signed device certificate, the intermediate(s) CA(s) (if any) certificates and the Root CA certificate.
Step 4 : Authenticate the CA(s) to the 9800 WLC
If your certificate is signed directly by the root CA, you can check the instructons from Step4a (everything can be done using the GUI).
If your certificate is signed by a multi-level CA, then go to instructions listed on Step4b (CLI is required in this case).
Step 4a : Authenticate the root CA
Make 9800 trust the issuer CA. Download or get the issuer CA certificate in .pem format (Base64). Expand the Authentication Root CA section within the same menu, choose the previously defined trustpoint from the Trustpoint drop-down list, and paste the issuer CA certificate. Ensure that details are properly configured and click Authenticate.
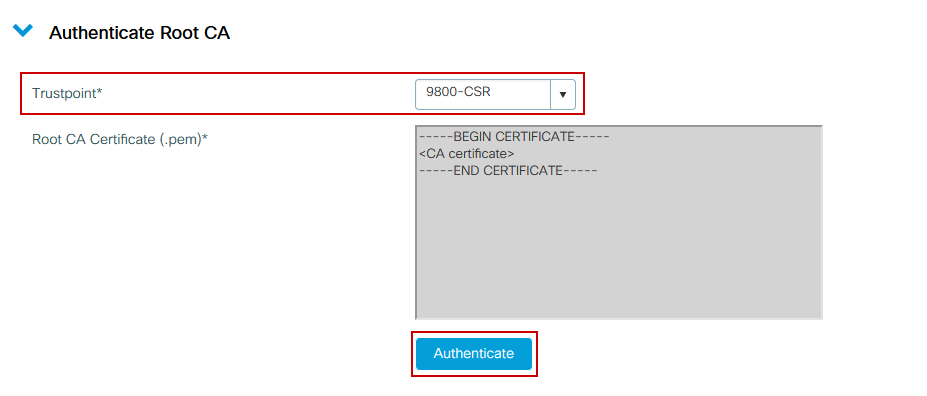
CLI configuration:
9800(config)# crypto pki authenticate 9800-CSR

Enter the base 64 encoded CA certificate.
End with a blank line or the word "quit" on a line by itself

-----BEGIN CERTIFICATE-----
<CA certificate>
-----END CERTIFICATE-----

Certificate has the following attributes:
       Fingerprint MD5: DD05391A 05B62573 A38C18DD CDA2337C
      Fingerprint SHA1: 596DD2DC 4BF26768 CFB14546 BC992C3F F1408809

% Do you accept this certificate? [yes/no]: yes
Trustpoint CA certificate accepted.
% Certificate successfully imported
Step 4b : Authenticate multi-level CA
In the scenario where multiple authorization levels exist, a new trustpoint is required for every additionnal CA level. If your certificate is direclty signed by the Root CA, then please refer to Step4a as only one trustpoint (the one cretated when generating the CSR) is required.
In case you have one intermediate CA and one Root CA, you need 2 trustpoints : the one already created (which contains the device certificate and the intermediate CA certificate, refering to the Root CA trustpoint) and a new one, containing the Root CA certificate. In case you have 2 intermediate certificate, you need 3 trustpoints.. and so on. These additionnals trustpoints only contain the authentication certificate and point to the next level of authentication. This process can be done in CLI only.
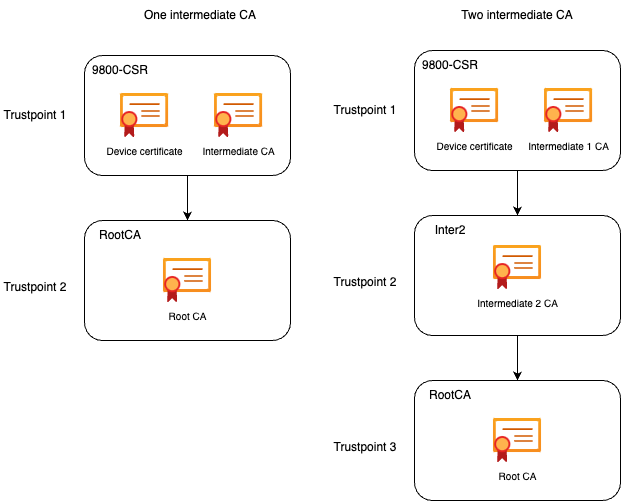
CLI configuration (example with one intermediate CA) :
9800(config)#crypto pki trustpoint RootCA
9800(ca-trustpoint)#enrollment terminal
9800(ca-trustpoint)#chain-validation stop
9800(ca-trustpoint)#revocation-check none
9800(ca-trustpoint)#exit
9800(config)#crypto pki authenticate RootCA

Enter the base 64 encoded CA certificate.
End with a blank line or the word "quit" on a line by itself

-----BEGIN CERTIFICATE-----
<Root CA certificate>
-----END CERTIFICATE-----

Certificate has the following attributes:
Fingerprint MD5: 6CAC00D5 C5932D01 B514E413 D41B37A8
Fingerprint SHA1: 5ABD5667 26B7BD0D 83BDFC34 543297B7 3D3B3F24

% Do you accept this certificate? [yes/no]: yes
Trustpoint CA certificate accepted.
% Certificate successfully imported

9800(config)#crypto pki trustpoint 9800-CSR <<< This is the trustpoint created with the CSR
9800(ca-trustpoint)#chain-validation continue RootCA <<< This is the trustpoint created above
9800(config)#crypto pki authenticate 9800-CSR

Enter the base 64 encoded CA certificate.
End with a blank line or the word "quit" on a line by itself

-----BEGIN CERTIFICATE-----
<Intermediate CA certificate>
-----END CERTIFICATE-----

Certificate has the following attributes:
Fingerprint MD5: DD05391A 05B62573 A38C18DD CDA2337C
Fingerprint SHA1: 596DD2DC 4BF26768 CFB14546 BC992C3F F1408809
Certificate validated - Signed by existing trustpoint CA certificate.

Trustpoint CA certificate accepted.
% Certificate successfully imported
Note: If there are more than one intermediate CAs in the certification chain, a new truspoint must be generated per additional certification level. This truspoints must reference the trustpoint that contains the next level of certifcation with the command chain-validation continue <trustpoint-name>.
CLI configuration (simplified example with 2 intermediate CAs) :
9800(config)#crypto pki trustpoint RootCA
9800(ca-trustpoint)#enrollment terminal
9800(ca-trustpoint)#chain-validation stop
9800(ca-trustpoint)#revocation-check none
9800(ca-trustpoint)#exit
9800(config)#crypto pki authenticate RootCA
-----BEGIN CERTIFICATE-----
<Root CA certificate>
-----END CERTIFICATE-----
9800(config)#crypto pki trustpoint Inter2 <<< This is the trustpoint for the 1st intermediate CA (from top of the chain)
9800(ca-trustpoint)#enrollment terminal
9800(ca-trustpoint)#chain-validation continue RootCA <<< This is the trustpoint created above
9800(config)#crypto pki authenticate Inter2
-----BEGIN CERTIFICATE-----
<Intermediate 2 CA certificate>
-----END CERTIFICATE-----
9800(config)#crypto pki trustpoint 9800-CSR <<< This is the trustpoint created with the CSR
9800(ca-trustpoint)#chain-validation continue Inter2 <<< This is the trustpoint created above
9800(config)#crypto pki authenticate 9800-CSR
-----BEGIN CERTIFICATE-----
<Intermediate 1 CA certificate>
-----END CERTIFICATE-----
Step 5 : Import the device signed certificate on the 9800
Load the signed certificate into the 9800 WLC. Expand the Import Device Certificate section within the same menu. Chose the previously defined Trustpoint and paste the signed device certificate provided by the CA. Then click import once the certificate information is verified.
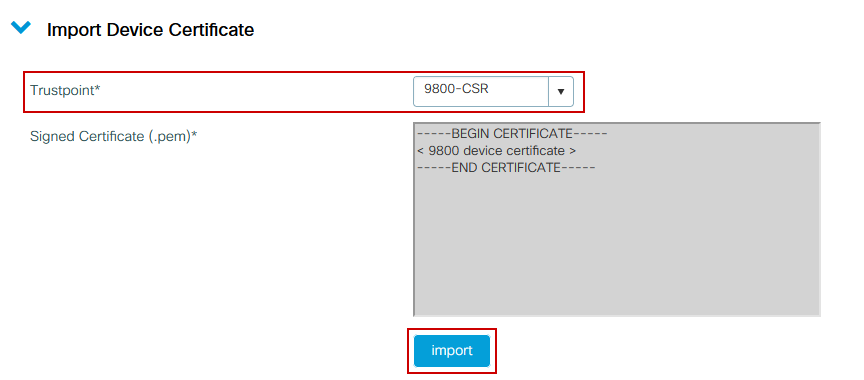
CLI configuration:
9800(config)#crypto pki import 9800-CSR certificate

Enter the base 64 encoded certificate.
End with a blank line or the word "quit" on a line by itself

-----BEGIN CERTIFICATE-----
< 9800 device certificate >
-----END CERTIFICATE-----

% Router Certificate successfully imported
At this point the device certificate is imported in the 9800 WLC along with all CA(s) and the certificate is now ready to be used (GUI access, WebAuth and so on)
Use the New Certificate
Web Administration (GUI access)
Navigate to Administration > Management > HTTP/HTTPS/Netconf and choose the imported certificate from the Trust Points drop-down list.
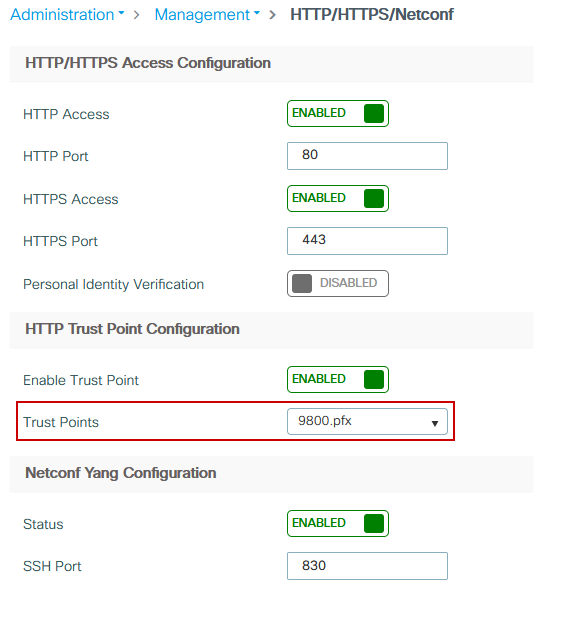
CLI configuration:
9800(config)#ip http secure-trustpoint 9800.pfx
9800(config)#no ip http secure-server
9800(config)#ip http secure-server
Local Web Authentication
Navigate to Configuration > Security > Web Auth, choose the global parameter map and choose the imported trustpoint from the Trustpoint drop-down list. Click Update & Apply to save the changes. Ensure that Virtual IPv4 Hostname matches the Common Name in the certificate.
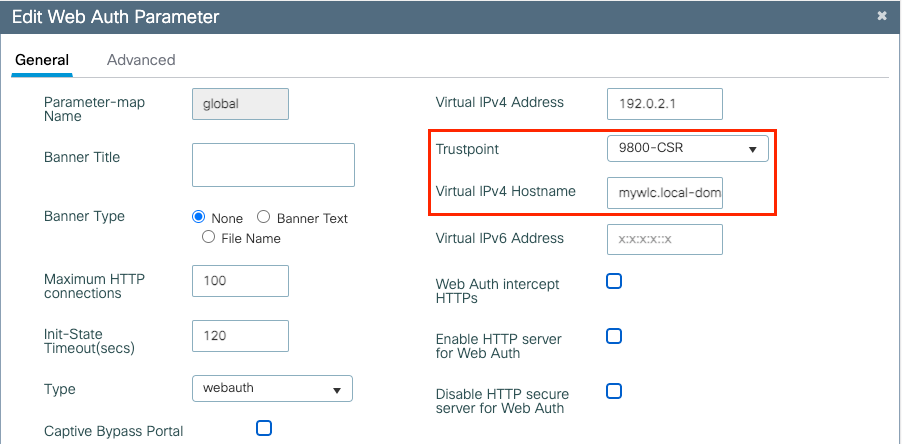
CLI configuration:
9800(config)#parameter-map type webauth global
9800(config-params-parameter-map)#type webauth
9800(config-params-parameter-map)#virtual-ip ipv4 192.0.2.1 virtual-host mywlc.local-domain
9800(config-params-parameter-map)#trustpoint 9800-CSR
In order to update certificate usage, restart HTTP services:
9800(config)#no ip http server
9800(config)#ip http server
.
High Availability Considerations
On a 9800 pair configured for Stateful Switchover High Availability (HA SSO), all certificates are replicated from the primary to the secondary at initial bulk-sync. This includes certificates where the private key was generated on the controller itself, even if the RSA key is configured to not-be-exportable. After the HA pair is established, any new certificate installed is installed on both controllers and all certificates are replicated in real time.
After failure, the former-secondary-now-active controller uses the certificates inherited from the primary transparently.
How to Ensure the Certificate is Trusted by Web Browsers
There are some important considerations to ensure a certificate is trusted by web browsers:
- Its Common Name (or a SAN field) must match the URL visited by the browser.
- It must be within its validity period.
- It must be issued by a CA or chain of CA whose root is trusted by the browser. For this, the certificate provided by the web server must contain all certificates of the chain until (not necessarily included) a certificate trusted by the client browser (typically the root CA).
- If it contains revocation lists, the browser needs to be able to download them and the certificate CN must not be listed.
Verify
You can use these commands to verify certificates configuration:
9800#show crypto pki certificate 9800.pfx

Certificate
Status: Available
Certificate Serial Number (hex): 1236
Certificate Usage: General Purpose
Issuer:
cn=Chuu Intermediate CA
ou=Chuu Wireless
o=Chuu Inc
st=CDMX
c=MX
Subject:
Name: alz-9800
e=user@example.com
cn=alz-9800
ou=Cisco Systems
o=Wireless TAC
l=CDMX
st=CDMX
c=MX
Validity Date:
start date: 17:54:45 Pacific Sep 28 2021
end date: 17:54:45 Pacific Sep 26 2031
Associated Trustpoints: 9800.pfx

CA Certificate
Status: Available
Certificate Serial Number (hex): 1000
Certificate Usage: Signature
Issuer:
cn=Chuu Root CA
ou=Chuu Wireless
o=Chuu Inc
l=Iztapalapa
st=CDMX
c=MX
Subject:
cn=Chuu Intermediate CA
ou=Chuu Wireless
o=Chuu Inc
st=CDMX
c=MX
Validity Date:
start date: 05:10:34 Pacific Apr 29 2020
end date: 05:10:34 Pacific Apr 27 2030
Associated Trustpoints: 9800.pfx
9800#show ip http server secure status

HTTP secure server status: Enabled
HTTP secure server port: 443
HTTP secure server ciphersuite: 3des-ede-cbc-sha aes-128-cbc-sha
 aes-256-cbc-sha dhe-aes-128-cbc-sha ecdhe-rsa-3des-ede-cbc-sha
 rsa-aes-cbc-sha2 rsa-aes-gcm-sha2 dhe-aes-cbc-sha2 dhe-aes-gcm-sha2
 ecdhe-rsa-aes-cbc-sha2 ecdhe-rsa-aes-gcm-sha2
HTTP secure server TLS version: TLSv1.2 TLSv1.1 TLSv1.0
HTTP secure server client authentication: Disabled
HTTP secure server trustpoint: 9800.pfx
HTTP secure server active session modules: ALL
You can verify your certificate chain on the 9800. In the case of a device certificate issued by an intermediate CA, itself issued by a root CA, you have one trustpoint by groups of two certificates so each level has its own trustpoint. In this case, the 9800 WLC has 9800.pfx with the device certificate (WLC certificate) and its issuing CA (intermediate CA). Then another trustpoint with the Root CA which issued that intermediate CA.
9800#show crypto pki certificate 9800.pfx
Certificate
Status: Available
Certificate Serial Number (hex): 1236
Certificate Usage: General Purpose
Issuer:
cn=Chuu Intermediate CA
ou=Chuu Wireless
o=Chuu Inc
st=CDMX
c=MX
Subject:
Name: alz-9800
e=user@example.com
cn=alz-9800
ou=Cisco Systems
o=Wireless TAC
l=CDMX
st=CDMX
c=MX
Validity Date:
start date: 17:54:45 Pacific Sep 28 2021
end date: 17:54:45 Pacific Sep 26 2031
Associated Trustpoints: 9800.pfx

CA Certificate
Status: Available
Certificate Serial Number (hex): 1000
Certificate Usage: Signature
Issuer:
cn=Chuu Root CA
ou=Chuu Wireless
o=Chuu Inc
l=Iztapalapa
st=CDMX
c=MX
Subject:
cn=Chuu Intermediate CA
ou=Chuu Wireless
o=Chuu Inc
st=CDMX
c=MX
Validity Date:
start date: 05:10:34 Pacific Apr 29 2020
end date: 05:10:34 Pacific Apr 27 2030
Associated Trustpoints: 9800.pfx

9800#show crypto pki certificate 9800.pfx-rrr1
CA Certificate
Status: Available
Certificate Serial Number (hex): 00
Certificate Usage: Signature
Issuer:
cn=Chuu Root CA
ou=Chuu Wireless
o=Chuu Inc
l=Iztapalapa
st=CDMX
c=MX
Subject:
cn=Chuu Root CA
ou=Chuu Wireless
o=Chuu Inc
l=Iztapalapa
st=CDMX
c=MX
Validity Date:
start date: 04:58:05 Pacific Apr 29 2020
end date: 04:58:05 Pacific Apr 27 2030
Associated Trustpoints: 9800-CSR 9800.pfx-rrr1
Certificate Verification with OpenSSL
OpenSSL can be useful to verify the certificate itself or do some conversion operations.
In order to display a certificate with OpenSSL :
openssl x509 -in <certificate-file> -text
In order to display the content of a CSR:
openssl req -noout -text -in <CSR filename>
If you want to verify the end certificate on the 9800 WLC but want to use something else than your browser, OpenSSL can do this and give you a lot of details.
openssl s_client -showcerts -verify 5 -connect <wlcURL>:443
You can replace <wlcURL> with the URL of either the webadmin of the 9800 or the URL of the guest portal (virtual IP). You can also put an IP address there. It tells you what certificate chain is received but certificate validation can never be 100% correct when an IP address is used instead of hostname.
In order to view the content and verify a PKCS12 (.pfx) certificate or certificate chain :
openssl pkcs12 -info -in <path to cert>
Here is an example of this command on a chain of certificate where the device certificate is issued to the Technical Assistance Center (TAC) by an intermediate CA called "intermediate.com", itself issued by a Root CA called "root.com" :
openssl pkcs12 -info -in chainscript2.pfx
Enter Import Password:
MAC Iteration 2048
MAC verified OK
PKCS7 Encrypted data: pbeWithSHA1And40BitRC2-CBC, Iteration 2048
Certificate bag
Bag Attributes
localKeyID: 1D 36 8F C2 4B 18 0B 0D B2 57 A2 55 18 96 7A 8B 57 F9 CD FD
subject=/C=BE/ST=Diegem/L=Diegem/O=Cisco/CN=TAC
issuer=/C=BE/ST=Diegem/O=Cisco/OU=TAC/CN=intermediate.com/emailAddress=int@int.com
-----BEGIN CERTIFICATE-----
< Device certificate >
-----END CERTIFICATE-----
Certificate bag
Bag Attributes: <No Attributes>
subject=/C=BE/ST=Diegem/O=Cisco/OU=TAC/CN=intermediate.com/emailAddress=int@int.com
issuer=/C=BE/ST=Diegem/L=Diegem/O=Cisco/OU=TAC/CN=RootCA.root.com/emailAddress=root@root.com
-----BEGIN CERTIFICATE-----
< Intermediate certificate >
-----END CERTIFICATE-----
Certificate bag
Bag Attributes: <No Attributes>
subject=/C=BE/ST=Diegem/L=Diegem/O=Cisco/OU=TAC/CN=RootCA.root.com/emailAddress=root@root.com
issuer=/C=BE/ST=Diegem/L=Diegem/O=Cisco/OU=TAC/CN=RootCA.root.com/emailAddress=root@root.com
-----BEGIN CERTIFICATE-----
< Root certificate >
-----END CERTIFICATE-----
PKCS7 Data
Shrouded Keybag: pbeWithSHA1And3-KeyTripleDES-CBC, Iteration 2048
Bag Attributes
localKeyID: 1D 36 8F C2 4B 18 0B 0D B2 57 A2 55 18 96 7A 8B 57 F9 CD FD
Key Attributes: <No Attributes>
Enter PEM pass phrase:
Verifying - Enter PEM pass phrase:
-----BEGIN ENCRYPTED PRIVATE KEY-----
< Private key >
-----END ENCRYPTED PRIVATE KEY-----
Troubleshoot
Use this command to troubleshoot. If done on a remote session (SSH or telnet) then terminal monitor is needed to display outputs:
9800#debug crypto pki transactions
Successful Scenario Debug Output
This output displays the expected output when a successful certificate import happens on a 9800. Use this for reference and identify the failure state:
Sep 28 17:35:23.242: CRYPTO_PKI: Copying pkcs12 from bootflash:9800.pfx
Sep 28 17:35:23.322: CRYPTO_PKI: Creating trustpoint 9800.pfx
Sep 28 17:35:23.322: %PKI-6-TRUSTPOINT_CREATE: Trustpoint: 9800.pfx created succesfully
Sep 28 17:35:23.324: CRYPTO_PKI: examining cert:
Sep 28 17:35:23.324: CRYPTO_PKI: issuerName=cn=Chuu Intermediate CA,ou=Chuu Wireless,o=Chuu Inc,st=CDMX,c=MX
Sep 28 17:35:23.324: CRYPTO_PKI: subjectname=e=user@example.com,cn=alz-9800,ou=Cisco Systems,o=Wireless TAC,l=CDMX,st=CDMX,c=MX
Sep 28 17:35:23.324: CRYPTO_PKI: adding RSA Keypair
Sep 28 17:35:23.324: CRYPTO_PKI: bitValue of ET_KEY_USAGE = 140
Sep 28 17:35:23.324: CRYPTO_PKI: Certificate Key Usage = GENERAL_PURPOSE
Sep 28 17:35:23.324: %CRYPTO_ENGINE-5-KEY_ADDITION: A key named 9800.pfx has been generated or imported by pki-pkcs12
Sep 28 17:35:23.331: CRYPTO_PKI: adding as a router certificate.Public key in cert and stored public key 9800.pfx match

Sep 28 17:35:23.333: CRYPTO_PKI: examining cert:
Sep 28 17:35:23.333: CRYPTO_PKI: issuerName=cn=Chuu Root CA,ou=Chuu Wireless,o=Chuu Inc,l=Iztapalapa,st=CDMX,c=MX
Sep 28 17:35:23.333: CRYPTO_PKI: subjectname=cn=Chuu Intermediate CA,ou=Chuu Wireless,o=Chuu Inc,st=CDMX,c=MX
Sep 28 17:35:23.333: CRYPTO_PKI: no matching private key presents.

[...]

Sep 28 17:35:23.335: CRYPTO_PKI: Setting the key_type as RSA
Sep 28 17:35:23.335: CRYPTO_PKI: Attempting to insert the peer's public key into cache
Sep 28 17:35:23.335: CRYPTO_PKI:Peer's public inserted successfully with key id 21
Sep 28 17:35:23.336: Calling pkiSendCertInstallTrap to send alert
Sep 28 17:35:23.337: CRYPTO_PKI: Deleting cached key having key id 31
Sep 28 17:35:23.337: CRYPTO_PKI: Attempting to insert the peer's public key into cache
Sep 28 17:35:23.337: CRYPTO_PKI:Peer's public inserted successfully with key id 32
Sep 28 17:35:23.338: CRYPTO_PKI: (A0323) Session started - identity selected (9800.pfx)
Sep 28 17:35:23.338: CRYPTO_PKI: Rcvd request to end PKI session A0323.
Sep 28 17:35:23.338: CRYPTO_PKI
alz-9800#: PKI session A0323 has ended. Freeing all resources.
Sep 28 17:35:23.338: CRYPTO_PKI: unlocked trustpoint 9800.pfx, refcount is 0
Sep 28 17:35:23.338: CRYPTO_PKI: Expiring peer's cached key with key id 32Public key in cert and stored public key 9800.pfx match

Sep 28 17:35:23.341: Calling pkiSendCertInstallTrap to send alert
Sep 28 17:35:23.341: CRYPTO_PKI: cert verified and inserted.
Sep 28 17:35:23.402: CRYPTO_PKI: Creating trustpoint 9800.pfx-rrr1
Sep 28 17:35:23.402: %PKI-6-TRUSTPOINT_CREATE: Trustpoint: 9800.pfx-rrr1 created succesfully
Sep 28 17:35:23.403: CRYPTO_PKI: Setting the key_type as RSA
Sep 28 17:35:23.404: CRYPTO_PKI: Attempting to insert the peer's public key into cache
Sep 28 17:35:23.404: CRYPTO_PKI:Peer's public inserted successfully with key id 22
Sep 28 17:35:23.405: Calling pkiSendCertInstallTrap to send alert
Sep 28 17:35:23.406: CRYPTO_PKI: no CRLs present (expected)
Sep 28 17:35:23.406: %PKI-6-PKCS12_IMPORT_SUCCESS: PKCS #12 import in to trustpoint 9800.pfx successfully imported.
Try to Import a PKCS12 Certificate That Does Not Have a CA
If you import a certificate and get the error: "CA cert is not found.", it means that your .pfx file does not contain the whole chain or one CA is not present.
9800(config)#crypto pki import pkcs12.pfx pkcs12 bootflash:pks12.pfx password <pwd removed>
% Importing pkcs12...
Source filename [pks12.pfx]?
Reading file from bootflash:pks12.pfx
% Warning: CA cert is not found. The imported certs might not be usable.
If you run the command openssl pkcs12 -info -in <path to cert> and only one certificate with one private key displays, it means the CA is not present. As a rule of thumb, this command ideally lists your whole chain of certificate. It is not required to include the top root CA if it is known by the client browsers already.
One way to fix this is to deconstruct the PKCS12 into PEM and rebuild the chain properly. In the next example, we had a .pfx file that contained only the device (WLC) certificate and its key. It was issued by an intermediate CA (which was not present in the PKCS12 file) which in turn was signed by a well known root CA.
Step 1. Export the private key out.
openssl pkcs12 -in <pkcs12 file> -out cert.key -nocerts -nodes
Step 2. Export the certificate as PEM.
openssl pkcs12 -in <pkcs12 file> -out certificate.pem -nokeys -clcerts
Step 3. Download the intermediate CA certificate as PEM.
The source of CA depends on the nature of it, if it is a public CA then an online search is enough to find the repository. Otherwise, the CA administrator must provide the certificates in Base64 format (.pem). If there are multiple levels of CA, then group them in a single file like the one presented at the end of the Option 1 import process.
Step 4. Rebuild the PKCS 12 from the key, device cert and CA certificate.
openssl pkcs12 -export -out fixedcertchain.pfx -inkey cert.key -in certificate.pem -certfile CA.pem
We now have "fixedcertchain.pfx" which we can happily import to the Catalyst 9800!
Exporting your private key
In case you migrate to another WLC or want to restore your WLC, you can end up in a situation where you want to export your private key in order to move it to another location.
#crypto key export rsa <key name> pem terminal aes <password>
Notes and Limitations
- Cisco IOS® XE does not support CA certificates with a valid beyond 2099 : Cisco bug ID CSCvp64208
- Cisco IOS® XE does not support SHA256 message digest PKCS 12 bundle (SHA256 certs are supported, but not if the PKCS12 bundle itself is signed with SHA256) : CSCvz41428. This is fixed in 17.12.1.
- You can see fragmentation if the WLC needs to carry user certificates, and the NAC/ISE appliance is reachable over the internet (for example, in an SD-WAN deployment). Certificates are nearly always larger than 1500 bytes (which means several RADIUS packets are sent to carry the certificate message) and if you have several different MTU across the network path, over fragmentation of the RADIUS packets themselves can occur. In such cases, we recommend that you send all of your UDP datagrams for the WLC traffic over the same path to avoid issues like delay/jitter which can be caused by internet weather


 Feedback