Configuring the BSE342 and BSM342 Base Stations
Available Languages
Contents
Introduction
The Cisco Aironet 340 Series Base Stations BSE342 and BSM342 (collectively referred to as Base Stations or BSx) provide home users and small offices with wireless connectivity to an intranet or the Internet. The Base Station, with an Ethernet RJ-45 port, can be connected to the Internet by digital subscriber line (DSL) or cable modem. The BSM342 is equipped with an integrated 56k v.90 dialup modem that enables multiple computers to access the Internet through one dialup connection.
You can quickly install and configure the Base Station with an easy-to-use graphical interface. The Base Station Client Utility (BSCU), included with the system and for use with Cisco Aironet client adapters, provides Windows clients an easy-to-use tool to perform these tasks. Linux and MacOS clients can quickly and easily configure the Base Station via Telnet or HTTP connections.
The BSE342 and BSM342 have no console port with which to make a direct cable connection. The default settings allow a wireless client PC to associate with the Base Station, from which point you can make a connection through the BSCU, a web browser, or a Telnet client without need of a wired connection.
Prerequisites
Requirements
Before you perform the tasks described in this document, use these procedures to install the Client Adapter:
You should also have the BSCU installed on the client PC (follow the steps detailed in the Install the BSCU section). If you plan to configure the Base Station from a Linux or MacOS client, you must be familiar with web browsers or Telnet.
Components Used
This document is applicable to BSE342 and BSM342 Base Stations that run any version of firmware.
While it is possible to use the Cisco Aironet BSx342 Base Station with many different wireless client platforms, currently the BSCU is supported only on platforms that run Microsoft Windows 95, 98, 2000, ME, and XP. Linux and MacOS clients must use a web browser or Telnet client to configure the Base Station through HTTP or Telnet.
Conventions
For more information on document conventions, refer to the Cisco Technical Tips Conventions.
Product Descriptions and Usage
BSE342
The Cisco Aironet BSE342 Base Station has a 10/100 BaseT Ethernet interface to connect to a wired network. The BSE342 can use Point-to-Point Protocol (PPP) over Ethernet (PPPoE), a protocol frequently required by Internet Service Providers (ISPs) for connection of a home network to the Internet through a DSL or cable modem.
BSM342
The BSM342 possesses the capabilities of the BSE342, and also incorporates a v.90 modem to allow dialup modem connection to an ISP.
Operating Modes and Descriptions
There are three operating modes configurable for the BSE342: Cable or DSL modem, Access Point, or PPPoE. The BSM342 has one additional mode: Dialup.
-
Cable/DSL modem mode allows the Base Station to connect to an ISP and the Internet through a cable or DSL modem.
-
PPP-over-Ethernet mode is used when your ISP uses PPP through a cable or DSL modem.
-
Access Point mode supports a standalone wireless network or connects to an internal LAN for wireless access. This configuration allows wireless terminals to access local LAN resources such as printers and servers.
-
Dial-up mode connects the Base Station to a telephone line and uses the internal modem to communicate with an ISP.
Configuration Through the Base Station Client Utility
Configuration of the Base Station through the BSCU involves these steps:
Install the BSCU
Follow these steps to install the BSCU:
-
Insert client radio card.
-
If the Base Station Connection Status (BSCS) utility is installed on the PC, right-click the telephone icon in the system tray and select Exit prior to installation of the BSCU.
-
Put the CD in CD-ROM drive of the computer to be used to configure the Base Station.
-
Use Windows Explorer to display the contents of the CD.
-
Double-click the BSCU folder to display it.
-
Double-click the setup.exe file. The installation wizard appears.
-
Follow the steps provided by the installation wizard.
-
When requested by the installation wizard, select Talk To A Base Station To Access The Internet.
-
Check the Launch Base Station Client Utility entry box and click Finish to start the utility.
Configure the Client and Associate to the Base Station
The Base Station does not have a console port. For initial configuration with the BSCU it is therefore necessary to connect to the Base Station through the radio link. In order to accomplish this, you must configure the client.
The Base Station has a factory default setting for Service Set Identifier (SSID) of tsunami. The SSID is used to identify clients that can associate to the Base Station. Set the SSID on the client to tsunami. Refer to Configuring the Client Adapter for additional client configuration information.
Follow these steps to configure the client and associate it to the base station:
-
From the Base Station Client Utility menu bar, choose Client.
-
Choose Edit Client Properties as shown in Figure 1.
Figure 1 - Menu Selection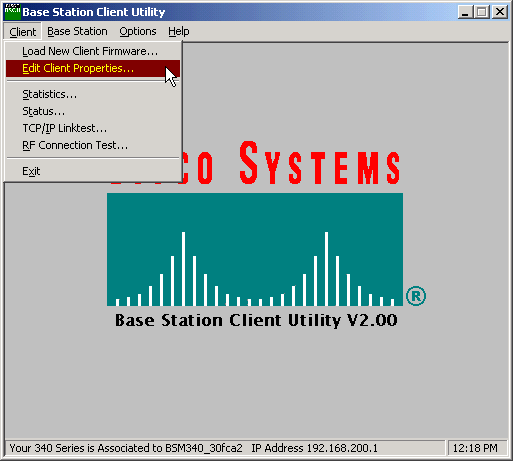
-
Ensure that the SSID is set to the default tsunami.
The Computer Name value defaults to the name configured in the Windows operating system. This name must be unique on the wireless network.
Note: A change to the Computer Name setting can cause other network programs on the PC to be inoperable and your PC login password to be unrecognized. Use caution when you change this setting.
-
Verify that the checkbox marked Enable Encryption (WEP) is unchecked.
-
Click OK.
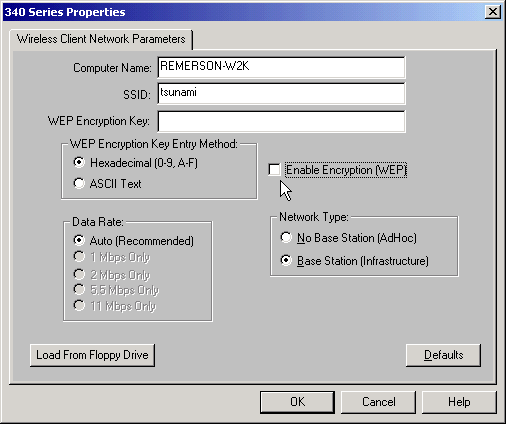

If the client fails at this point to associate with the Base Station, you must reset the Base Station to its default settings. Refer to Setting Defaults with the Reset Button.
The reset button is in a small hole on the back panel of the Base Station and is used to reset the Base Station parameters to the default values.
To activate the reset button, complete these steps:
-
Insert a straightened paper clip into the small hole and press.
-
Remove the paper clip.
-
The Status LED blinks amber to show the Base Station has these default parameter values:
Radio Network Name tsunami WEP Encryption Key 3031323334353637383930313233 Network Type Infrastructure Data Rate Auto Encryption Enabled Authentication Type Open Encryption 128-bit Encryption Association Mixed Cells Allowed The Base Station sends these settings if you click OK. Click Edit Base Station Settings to make changes to the Base Station.
Configure the Base Station
Once the BSCU shows that the wireless client is associated with the Base Station, you can proceed with configuration.
-
From the menu bar, choose Base Station.
-
Choose Set up Base Station.
Figure 4 - Menu Selection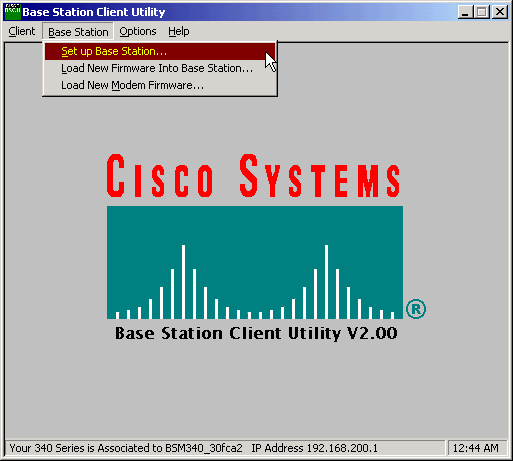
The Set Up Base Station With My Settings window displays the current Base Station settings.
Figure 5 - Current Settings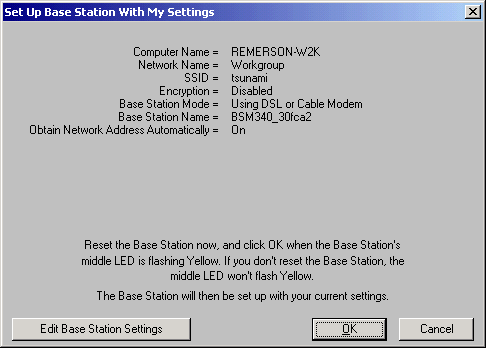
The Base Station can now be configured to suit its intended role in the network.
-
If you are satisfied with the displayed settings, click OK.
When you click OK to accept the Base Station settings, the BSCU configures the Base Station to the settings, then automatically configures the client radio in the wireless PC to the same Base Station settings.
Wireless Network Parameters
When you click the Edit Base Station Settings button, the Base Station Wireless Network Parameters screen is displayed, on which you can accept or change the SSID, the Wired Equivalent Privacy (WEP) key entry method, the WEP Encryption Key, and the encryption setting for the Base Station and client card.
Figure 6 - Wireless Network Parameters 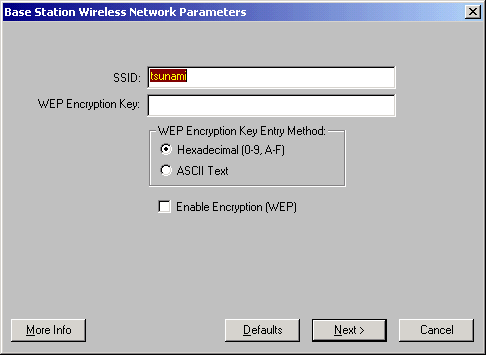
The SSID (Set Service Identifier) identifies the radio network of the Base Station and must be used by all wireless devices that communicate with the Base Station. To change this value, enter a new name in the entry box. You can enter from 1 to 32 ASCII characters.
WEP Encryption Key Entry Method selects the encryption key entry method. To changes this value, click either Hexadecimal (0-9, A-F), or ASCII Text.
The WEP Encryption Key provides security with 128-bit encryption. The encryption key must be set up exactly the same on all wireless devices and the Base Station. This entry is only available on client radio cards that support 128-bit WEP. Allowable entries in this field depend on the key entry method chosen. For ASCII entry, 1 to 13 ASCII characters can be used. If hexadecimal entry has been chosen, 1 to 26 hexadecimal characters (0-9, AF) may be used.
The Enable Encryption (WEP) checkbox enables or disables the use of 128-bit encryption. Click the box to change the setting.
Note: The SSID and WEP Encryption Key settings in all wireless client PCs must exactly match the settings in the Base Station. If you change these parameters in the Base Station, use the BSCU in all the other wireless PCs to reconfigure their client cards to match the new settings.
Once you have configured the network parameters, click the button labeled Next.
Base Station Properties
The Base Station Properties Screen allows you to select the connection type options shown in Figure 7.
Figure 7 - Base Station Properties
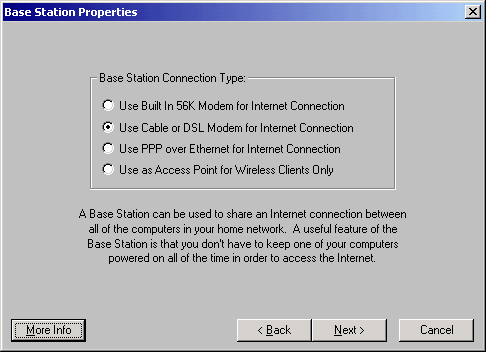
For descriptions of the different modes, see the Operating Modes and Descriptions section. Click the radio button of the mode you wish to use and click the Next button.
Setup for DSL/Cable Modem Mode
If you have a high speed Internet connection either from a DSL link or a cable modem you may attach the Base Station to the Ethernet interface on the DSL/Cable modem.
Cable or DSL modem mode is the default mode on the Base Station. This mode allows you to connect to the existing DSL or cable modem that is provided by your service provider.
In the Base Station Properties Screen (shown in Figure 7) select Use Cable or DSL Modem for Internet Connection and click Next.
Figure 8 - Cable/DSL Modem Properties
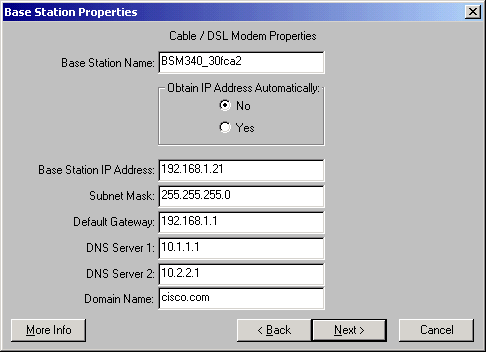
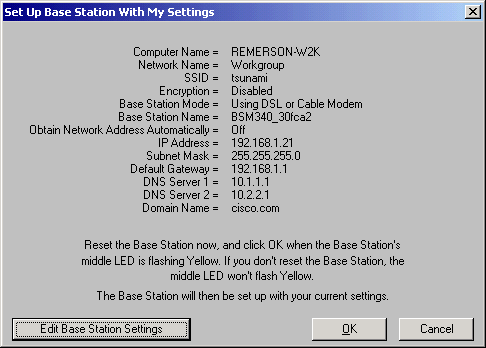
Click Next and you return to the main setup screen with the configured parameters. Click OK to send the parameters across the wireless link to the Base Station.
Figure 9 - Cable/DSL Settings
Setup for PPPoE Mode
PPP over Ethernet (PPPoE) mode is used when the ISP requires the protocol for communication through the cable modem or DSL modem. The Base Station is physically connected by Ethernet to the DSL or cable modem.
In the Base Station Properties Screen (shown in Figure 7) select Use PPP over Ethernet for Internet Connection and click Next.
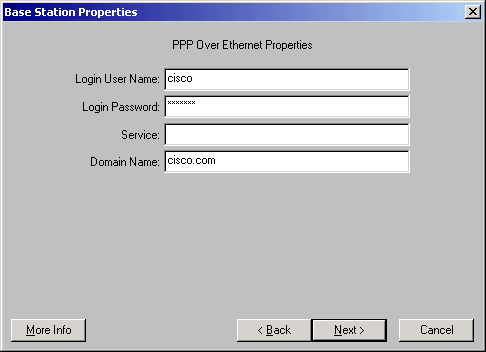
In the PPP Over Ethernet Properties screen that appears, enter your username, password provided from your ISP, and the domain name. Click Next.
Figure 10 - PPPoE Properties
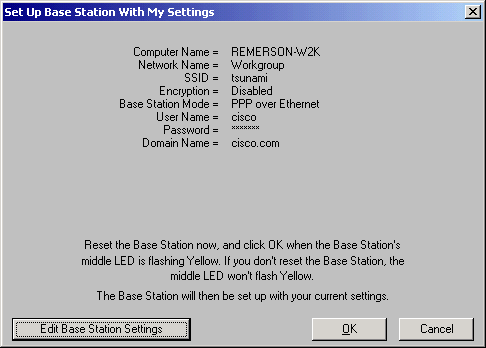
The new settings are displayed. Verify that the Base Station mode and other parameters are set and click OK to send the configuration to the Base Station.
Figure 11 - PPPoE Settings
Setup for Access Point Mode
In Access Point mode the Base Station can connect to an internal wired LAN. In this mode the wireless devices can access the wired LAN for network resources.
In Access Point mode the Base Station does not provide a DHCP server function or a NAT function for the wireless or wired devices. If the wired network contains a DHCP server, the wireless PCs can be set to automatically obtain network information through DHCP when the radio card is used. The Base Station functions as a typical Access Point and passes DHCP packets to or from the DHCP server.
Note: To obtain the Base Station IP address when you use an external DHCP server, you can use the IP Setup Utility (IPSU) found on the Cisco Aironet 340 Series Base Station CD (refer to Installing the IPSU).
In the Base Station Properties Screen (shown in Figure 7), click the Use as Access Point for Wireless Clients Only radio button and click Next.
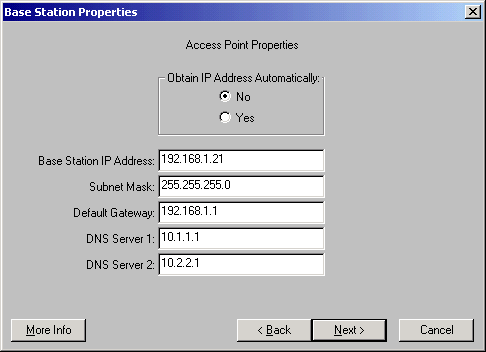
In the Access Point Properties screen that appears, select if the Base Station receives its IP information automatically. If not, fill in the address, mask, gateway, and DNS information as appropriate for your network, then click Next.
Figure 12 - Access Point Properties
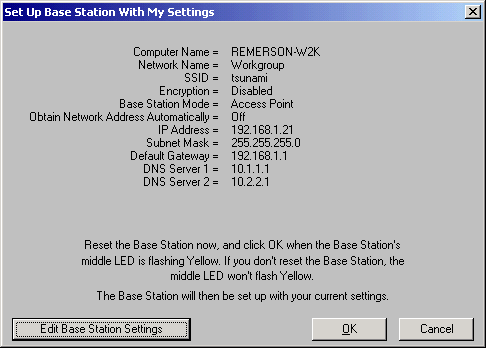
The new settings are displayed. Verify that the Base Station mode and other parameters are set and then click OK to send the configuration to the Base Station.
Figure 13 - Access Point Settings
Setup for Dialup
The BSM342 includes an integrated modem for dialup to an ISP in the absence of a broadband Internet connection. Client PCs can initiate a dial-on-demand connection, or can be configured to dial into the ISP when manually triggered.
In the Base Station Properties Screen (shown in Figure 7) select Use Built In 56k Modem for Internet Connection and click Next. The Dialup Modem Properties screen appears.
Figure 14 - Dialup Modem Properties
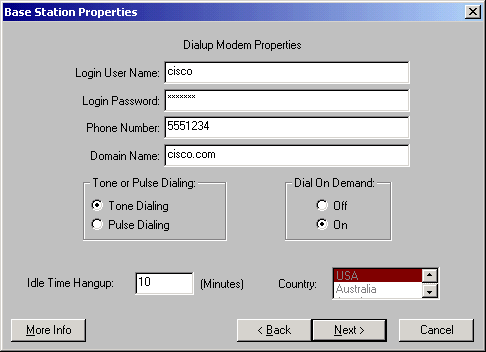
The Username, Password, Phone Number, and Domain Name settings should be provided by your ISP.
Select Tone Dialing or Pulse Dialing based on the capabilities of the phone line where the Base Station is attached.
Set the Dial on Demand setting to On if you want the modem to automatically connect to the ISP when there is traffic from the client PC. If you choose Off, you must click Connect on the Base Station Connection Status (BSCS) screen or (when you use an Internet browser) click Start a connection on the Base Station main menu screen to manually initiate the connection.
The Idle Hangup Time setting tells the modem how many minutes to stay connected to the ISP if no IP traffic is passed across the line. Be aware that the ISP may have a shorter idle time configured on their end of the connection.
The Country setting specifies the country code for the integrated modem. Set this to the country in which the Base Station is operated (not to the country to which the modem dial, if you dial internationally.)
Figure 15 - Dialup Modem Settings
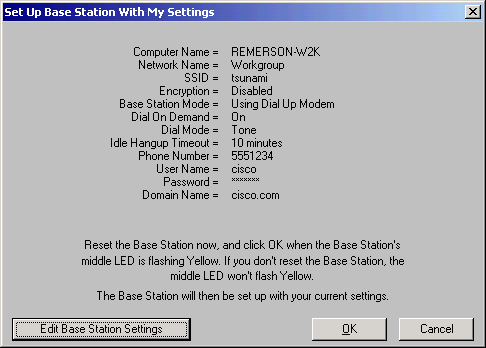
Click Next and the dialup settings are displayed. Verify the parameters, then click OK to send the configuration to the Base Station.
Base Station Configuration Through a Web Browser
If you use a non-Windows platform or wish not to use the BSCU, you can configure the Base Station from a web browser.
Browse to the Base Station
To connect to the Base Station with a web browser, enter the IP address of the BSx's IP address into the Address or Location area of the web browser. The default IP address is 192.168.200.1; if you have previously changed it, enter the correct address.
Note: If the browser fails to connect with either the default IP address or an address you have configured, reset the Base Station to its default settings. Refer to Setting Defaults with the Reset Button for the procedure.
Once connected, the main setup page is displayed.
Figure 16 - Main Setup Page
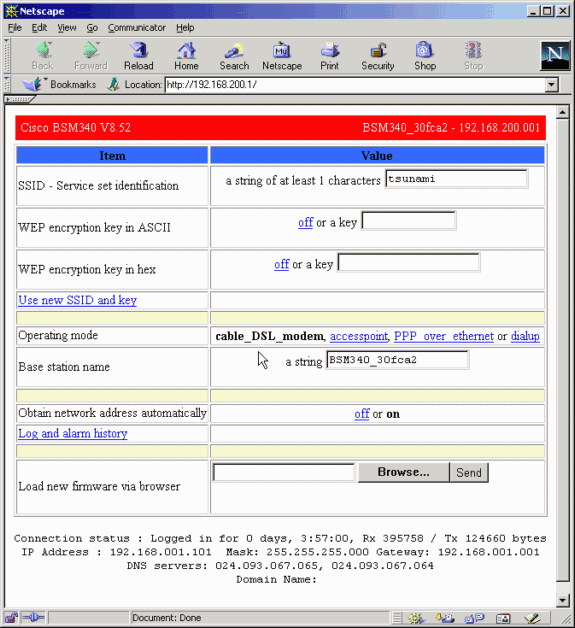
The main setup screen displays the current settings of the Base Station.
Base Station Properties
You should change the SSID and the WEP key defaults. To do so, type the new value in the text box. When you enter information in the browser entry boxes, you must press the Enter key to complete the entry. If you make changes to the SSID and WEP key, you must set them on your client machine with the Aironet Client Utility.
To activate the changes on the Base Station, click Use new SSID and key.
Setup for Cable/DSL Modem Mode
In Figure 16, you can see that the default operating mode of the Base Station is cable_DSL_modem, in black lettering. Other configurable options available in Cable/DSL Modem mode include:
-
Base Station name: Enter a new name for the Base Station here and press Enter.
-
Obtain network address automatically: If the Base Station receives IP addressing information from a DHCP server, leave this set to On. If not, select Off. The screen refreshes and shows the IP configuration options. Address, mask, gateway, DNS, and domain name information should be provided by your ISP. You must press Enter after you type each entry.
Setup for PPPoE Mode
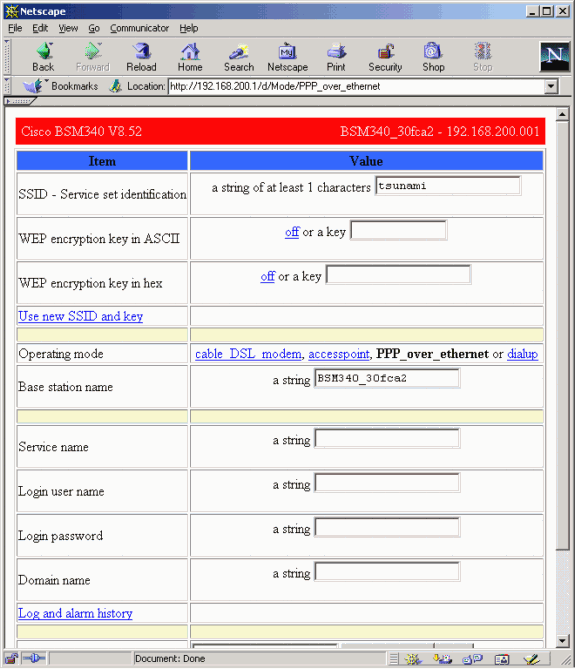
From the main page, shown in Figure 16, click PPP_over_ethernet.
The main page expands with PPPoE parameters to be entered. Fill in the login name, password, and the domain name. These values should be provided by your Internet service provider. Be sure to press Enter at the end of each entry.
Figure 17 - PPPoE Setup Page
Setup for Access Point Mode
From the main page, shown in Figure 16, click accesspoint.
The main page expands with Access Point parameters to be entered. Fill in the address, mask, gateway, DNS, and domain name information. Be sure to press Enter at the end of each entry.
Figure 18 - Access Point Setup Page
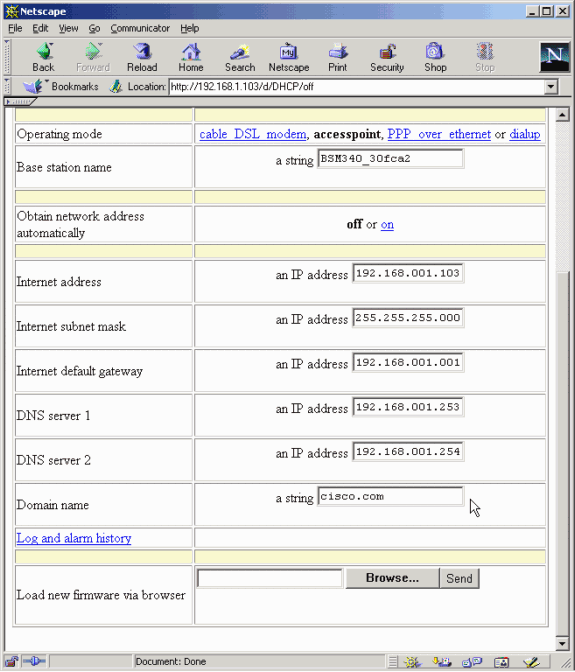
Setup for Dialup Mode
From the main page, shown in Figure 16, click PPP_over_ethernet.
The main page expands with PPPoE parameters to be entered. Fill in the login name, password, and the domain name. These values should be provided by your Internet service provider. Be sure to press Enter at the end of each entry.
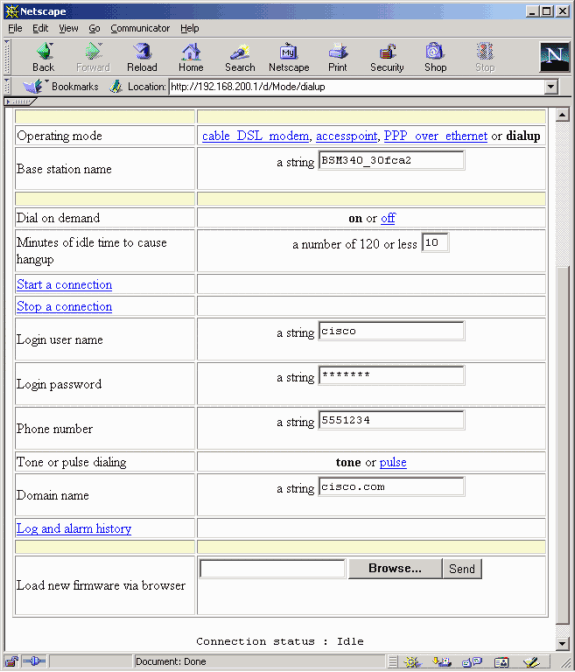
The Dial on Demand setting should be set to On if you want the modem to automatically connect to the ISP when there is traffic from the client PC. If you choose Off, you must click Start a connection to manually initiate the connection, or Stop a connection to manually terminate a modem call.
The Minutes of idle time to cause hangup setting tells the modem how many minutes to stay connected to the ISP if no IP traffic is passed across the line. Be aware that the ISP may have a shorter idle time configured on their end of the connection.
Figure 19 - Dialup Settings
Configuration Through Telnet
It is possible to open a wireless Telnet connection to the internal IP address of the Base Station.
When you are connected by Telnet to the BSx342, you see this menu:
Figure 20 - Telnet BSx342 Connection Menu
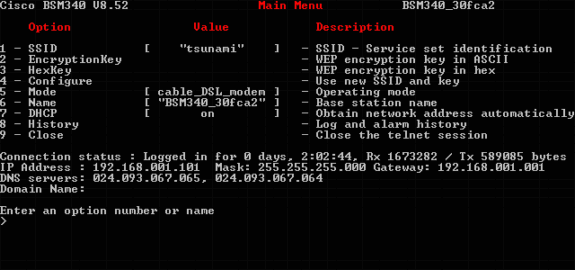
Configuration of the Base Station is straightforward. To access any of the options on the menu screen, you can type its number at the menu prompt.
Load Firmware
While the BSx342 comes pre-loaded with firmware and works out of the box, it is advisable to load the latest firmware for your BSx342:
-
To put the Base Station where you want to load the new firmware into reset mode, press the Reset button (located on the back of the unit to the left of the power connection) with a small object (such as a toothpick or paper clip) for three seconds.
The middle LED begins to flash yellow.
-
To upload the firmware image into the Base Station, you must use the BSCU.
Double-click the BSCU icon on your desktop, or navigate the Start button menus and choose Base Station Client Utility to start the BSCU.
-
Once the utility has loaded, select Base Station from the BSCU menu, and click Load New Firmware Into Base Station.
You are prompted to find the firmware file needed for upgrade. Search for the file and click the Open button.
-
A progress bar displays as the file is uploaded to the Base Station in reset mode.
The progress bar appears to stall at approximately 95 percent while the Base Station restarts. When the Base Station is back up, the computer from which the transfer is made reestablishes its connection to the Base Station, and the bar goes to 100 percent.
Related Information
Revision History
| Revision | Publish Date | Comments |
|---|---|---|
1.0 |
03-Aug-2004 |
Initial Release |
Contact Cisco
- Open a Support Case

- (Requires a Cisco Service Contract)


 Feedback