Introduction
This document describes how to handle flash corruption problems reported on Cisco IOS Access Points (AP).
Prerequisites
Requirements
Cisco recommends that you have basic knowledge of:
- AireOS Wireless LAN Controller (WLC)
- Lightweight APs
- Python 2.7 (nothing higher)
Components Used
The information in this document is based on these software and hardware versions:
- Cisco Aironet 1040, 1140, 1250, 1260, 1600, 1700, 2600, 2700, 3500, 3600, 3700, 700, AP801, and AP802 Series indoor access points
- Cisco Aironet 1520 (1522, 1524), 1530, 1550 (1552), 1570, and Industrial Wireless 3700 Series outdoor and industrial wireless access points
Note: There is a much higher prevalence in Wave1 AP models like 1700/2700/3700 and 2600/3600 on this issue vs other AP types due to flash HW type.
The information in this document was created from the devices in a specific lab environment. All of the devices used in this document started with a cleared (default) configuration. If your network is live, ensure that you understand the potential impact of any command.
Background Information
As per FN70330 - Cisco IOS AP stranded due to flash corruption issue, due to a number of software bugs an AP in normal operation, the flash file system on some Cisco IOS APs can become corrupt over time. This is seen especially after an upgrade is performed to the WLC but not necessarily limited to this scenario.
The AP works and serves the client while on this problem state which is not easily detectable.
Solution
Fix Before WLC Upgrade
In order to identify affected APs on the network and fix them before an upgrade. You need to run the WLAN Poller.
Caution: Before Upgrade, read this entire document.
WLAN Poller Logic
Every time the script is run it verifies whether an AP flash is accessible or not.
If it is accessible, it runs the command fsck flash:
If all is OK, move on to the next AP.
- else repeat the command up to 4 times. If there is a failure, the script can report this on the final report and this AP is eligible to be recovered.
if it is inaccessible
- the script flags AP on its final report and this AP is eligible to be recovered.
If it is accessible, AP can check MD5 values for critical files.
If all values good, move to the next AP.
- else, the script can report this on the final report and this AP is eligible to be recovered.
The script needs to be run three times.
- Run
- The script builds the MD5 database based on the MD5 checksum value for every file on the AP. The final MD5 value for a specific file is the one that has the more hits across the same AP family on WLC.
- Run
- The script compares MD5 checksum values vs its database. If value matches then the file is ok, if not then AP is flagged in order to recover on the third run.
- Run
- The script triggers command test capwap image capwap only for those APs that were flagged during the previous two steps.
Note: This recovery method causes the AP to reload once the image is downloaded and installed. Make sure you run it in a maintenance window.
Install / Prepare WLAN Poller
1. Download the WLAN Poller tool.
Note: If you download the latest version of the WLAN Poller tool from the previous link, you can skip steps 2 and 3. This version can auto-install all required components for your WLAN Poller tool. If you have an older version(.rar) of WLAN Poller, do the next step 2 and 3.
2. Move the file to a specific folder you want to store WLAN Poller files.
3. For instructions on how to install the script see the next link:
For a step by step guide on Windows 10 machine click here.
For a step by step guide on MAC OS click here.
4. Prepare the config.ini file.
Once the installation is completed and files are generated. You need to edit the file config.ini.
Specify WLC/AP connection mode:
; config global mode for WLC and AP connection: "ssh" or "telnet"
mode: ssh
ap_mode: ssh
Specify WLC/AP credentials:
; set global WLC credentials
wlc_user: <wlc_user>
wlc_pasw: <wlc_pasw>

; set global AP credentials
ap_user: <ap_user>
ap_pasw: <ap_pasw>
ap_enable: <ap_enable>
For the flash check/recover, these are the options.
To identify affected APs use:
; ap file system checks (WARNING: recover can force Cisco IOS image download and AP reload)
ap_fs_check: True
ap_fs_recover: False
To recover APs use:
; ap file system checks (WARNING: recover can force Cisco IOS image download and AP reload)
ap_fs_check: True
ap_fs_recover: True
Specify WLC Information
In this example, WLC name is 2504-WLC. You can find this information on WLC Monitor page.
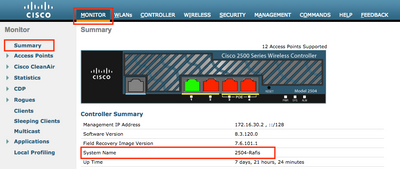
; WLC sections must be named as [WLC-<wlcname>]
[WLC-2504-Rafis]
active: True
ipaddr: <wlc-ip-addr>
You can add several WLCs. To do so, copy/paste the previous syntax with the new WLC information.
Note: You do not need to specify any AP list. The script picks up AP from the WLC.
Run WLAN Poller
From the directory where config files were created (Previous section, step 3). Use this command: wlanpoller --cli-logging .
Once the script is done, it provides this summary:
============================================================
Summary
============================================================
Total APs : 1
Processed APs : 1
Failed APs : 0
============================================================
Errors
============================================================
AP MD5 checksum mismatch : 2
AP FSCK recover : 1
============================================================
Note: Remember, the script needs to be run 2 times to have accurate information on how many AP are impacted.
WLAN Poller Output
On the path where the script was run. It creates these files.
- ap_md5_db.json: MD5 database
- Folder Log
- It stores all output display by the WLAN Poller on the terminal.
- Folder data
- It breaks down reports into this path: <year> / <month> / <day>
File: <timestamp>_ap_fs.csv - Summary of the checks executed on APs and their results.

Columns description
- ap_name: Name of the AP.
- ap_type: AP model.
- ap_uptime: Uptime for the AP (days).
- ap_ios_ver: Cisco IOS version.
- fs_free_bytes: Number of free bytes in the flash file system.
- flash_issue: True if any flash corruption has been observed.
- fs_zero_size: True when flash hung has been detected file system showing "-" - (show file system - command).
- fsck_fail: True if file system check has failed. - (fsck flash: - command).
- fsck_busy: True device or resource busy when is does flash fsck.
- fsck_recovered: True when an error occurred on fsck but it is fixed in next fsck.
- fsck_attempts: Number of attempts of fsck to recover the AP (max 4).
- md5_fail: True when md5 at least one file is different from the stored in the database.
- rcv_trigger: True when AP tried to download the image from WLC when the issue has been detected and recovery has been enabled.
File: <timestamp>_ap_md5.csv Details of the MD5 checksum values of all files (on all APs).

Columns description
- ap_name: Name of the AP.
- ap_type: AP model.
- ap_uptime: Uptime for the AP (days).
- filename: Cisco IOS image file name.
- md5_hash: md5 value for filename.
- is_good: True md5 value matches with value stored in db. False md5 mismatch observed for this file.
- is_zero_bytes: True when filename has 0 bytes based on md5checksum so file is incorrect.
- md5_error: Error message retrieving md5 value if it was not possible to get md5 for the filename.
Note: There could be scenarios where the WLAN Poller recovery script is unable to recover certain AP and those AP remains flagged as failed in the report. In those scenarios, manual AP recovery by telnet/SSH/console into AP CLI is recommended. Please open TAC SR if you needed assistance on this process. Attach all output generated from WLAN Poller to the case.
Stranded AP
If SSH/telnet Connection
You can do the next steps to try to recover AP:
AP# debug capwap console cli
AP# debug capwap client no-reload
- Format flash if success then you can continue to next step else quit.
AP# format flash:
- Load a recovery image. Recovery image can be found here.
archive download-sw /overwrite tftp://<IP address>/<file name>
- Check MD5 on loaded Recovery image, if fine continue to next step
AP# verify /md5 flash:/<image directory>/<image file>
You can compare CLI value vs value on the cisco web page.
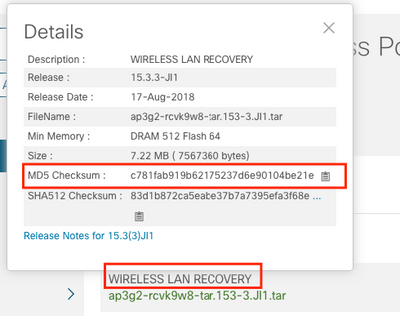
- Set boot variable to newly downloaded Recovery image:
AP#show boot
AP(config)#boot system flash:/RCV/RCV-image
If AP Rommon Status
You can try the same as the previous, but from boot commands. Here are the commands you can use:
ap: tftp_init
ap: ether_init
ap: flash_init
ap: format flash:
ap: set IP_ADDR <IP Address>
ap: set NETMASK <mask>
ap: set DEFAULT_ROUTER < default router >
ap: tar -xtract tftp://<IP address>/<file name> flash:
ap: set BOOT flash:/<file name>
ap: boot
Unable to SSH/Telnet
Bounce switch port, few times, verify if that helps.
Step by Step Guide to Install WLAN Poller on Windows 10
Note: If you download the latest version of the WLAN Poller tool, you can skip this section.
- Download and install Python 2.7.14 from this link.
- Download and install the C++ Compiler for Python for Windows clients from this link.
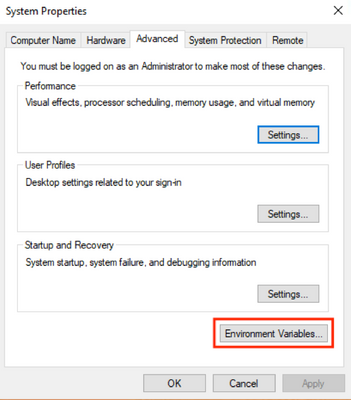
- Once it is installed go to the System Settings on your Control Panel and select Advanced System Settings (ensure that all the windows terminals are closed):

- In the window that pops-out select Environment Variables.
- In there, select the Path variable from the System variables and click Edit.
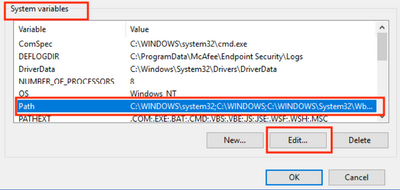
- On that window, add the path to the base directory where you installed Python 2.7.14.0 and the C:\<Base directory>\Scripts so that the command line of the laptop recognizes python commands. Click on New and add the path manually.
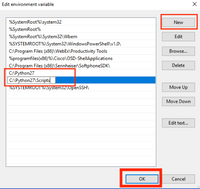
Close all the settings windows and the terminals (command prompt) opened if any.
- Verify if pip is installed, open a new terminal and enter pip --version:

Another option is to check if there is a file called pip or pip2 or pip2.7 on the folder: C:\Python27\Scripts :
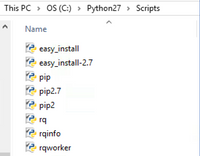
- If everything is OK go to the section upgrade pip, Step 8.
- If you get an error or you do not find the folder/files continue to read.
Install pip
- Close the terminal and install pip from the next link.
- Download and save the file get-pip.py. On the website look for:

- Copy the get-pip-py file to the folder C:\Python27.

Note: If you copy and paste the content from the website make sure that it does not have the py.txt extension, check this with a dir on the folder C:\Python27, if this happens, rename the file from the terminal.
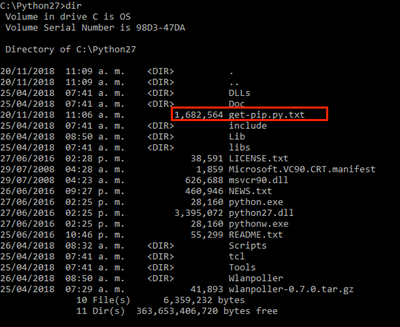
Rename the file with the next command:

- On the same folder C:\Python27 execute python get-pip.py.

- Upgrade PIP to the latest version with the next command: pip install --upgrade pip.

- The previous steps can install all packets needed. Now open a command line for Windows and go to the directory where you stored the .tar.gz WLAN Poller file (use: cd <Path to directory>).
- Install the script with the command pip install wlanpoller-0.7.1.dev90_md5rcv.tar.gz.
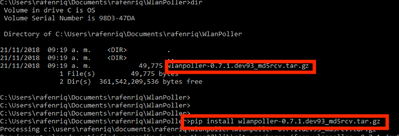
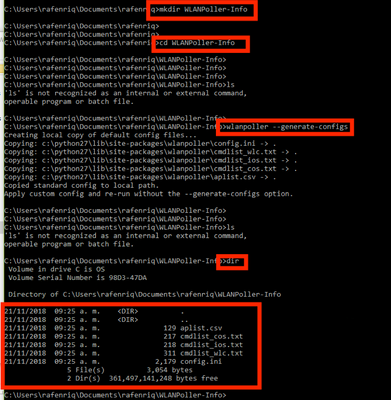
- Create a new directory which you want to store all WLAN Poller information.
- On the command line, move to that directory and run the command wlanpoller --generate-configs to create the setup variables and configuration files needed for the script to run:
Click here to continue with config.ini file.
Step by Step Guide to Install WLAN Poller on MacBook
Note: If you download the latest version of the WLAN Poller tool, you can skip this section.
MAC OS already has python installed. In order for you to install the rest of the packets, do the next steps:
- Move to the folder where you have the WLAN Poller file: cd <path>.
- Once there run this command: sudo pip install wlanpoller-<version>.tar.gz . For this you required sudo password (MACBook Admin password).
- Create a new directory to organize all the files that the script can create.
- mkdir <directory name>
- cd <directory name>
- Execute the next command so the script prepares all directories/files needed to run the script: wlanpoller --generate-configs.
Click here to continue with config.ini file.
WLAN Poller Restrictions
- WLAN Poller is only tested for support on Windows 10 64 bit systems and Apple MacBook version 10.11 or higher.
- If you do not use the newer version of the WLANPoller tool, only Python 2.7 version is supported on the older versions.
- If AP names have special characters like
 next errors would be seen during the script execution.
- The user would manually need to remove the special characters from AP name to fix the issue.
Related Information


 Feedback