Introduction
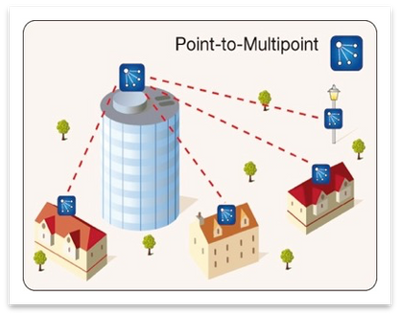
This document describes the setup of a Point to multi-point topology for Cisco Ultra-Reliable Wireless Backhaul (CURWB), it provides a step by step guide to configure and troubleshoot a Point to Multi Point (PMP) Ultra Reliable Wireless Backhaul (URWB) Network using web User Interface (UI).
Prerequisites
Components Used
- 1 x Laptop/PC
- 4 x PoE injectors 24VDC (FM-POE-STD)
- 1x PoE injectors 48VDC (FM-POE-STD-GBIT)/PoE switch
- 4x Fluidmesh transceiver to be used as subordinate (in this article we use FM1200V), it is possible to create a point to multi-point network starting from 2 subordinate radios associated with a parent radio.
- 1x Fluidmesh transceiver to be used as parent (in this article we use FM3200)
The information in this document was created from the devices in a specific lab environment. All of the devices used in this document started with a cleared (default) configuration. If your network is live, ensure that you understand the potential impact of any command.
Configure
Network Diagram
A radio located at the aggregation point, usually closest to the core network, is set as the MASTER radio or Mesh End. The Mesh End acts as the gateway between the Fluidmesh wireless network and the wired core network.
The Mesh Point acts as a remote/subordinate radio, usually points back to a Mesh End or another Mesh Point, in case of PMP it points back to the Mesh End
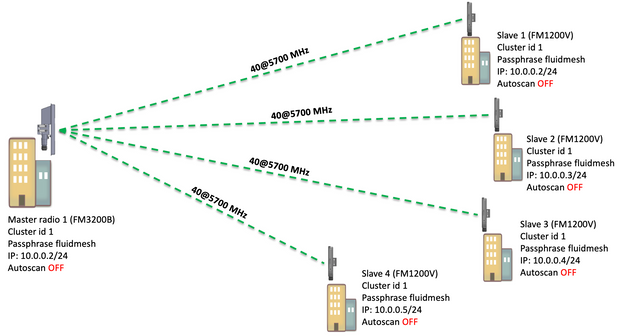
Point to Multi Point (PMP) can be configured on these devices: FM1200, FM3200E, FM3200B, FM4200M, FM4200F, FM3500E, FM4500M, and FM4500F
In this example, no bandwidth plugin is used, so the bandwidth is capped at 15MB for the FM3200B and at 2MB for the FM1200V.
Configurations
- Unbox the radios and power them up as shown in the picture:
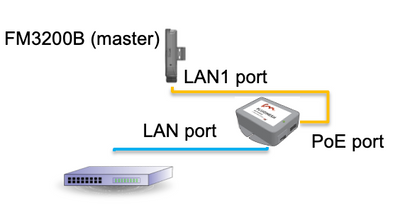
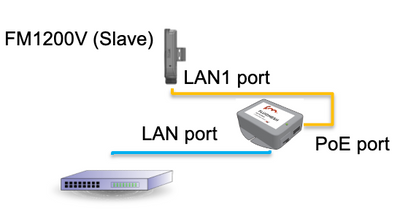
The LAN port on the PoE injector goes to the end device (PC/Laptop) and the PoE port on the PoE injector goes to the LAN1 port on the FM1200V/FM3200B
Make sure to perform a firmware upgrade on all the radios to the latest firmware release before starting the configuration.
- Login to the web UI of the parent radio with default credentials (admin/admin), the default IP address is 192.168.0.10/24
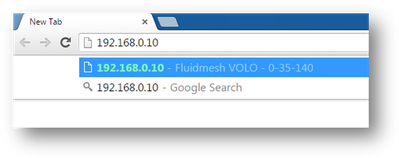
- When the radios are turned on for the first time, a License Agreement along with the option to select the country appears. You have to read and accept the license agreement & select the country where the radios are deployed. Selecting the incorrect country could make the unit not legal to use. Once you have accepted the license agreement, users can decide if they prefer to configure the unit using the Classic web interface or using the Wizard web interface.
- Choose “classic” to configure the parameters manually using the classic web-based interface.
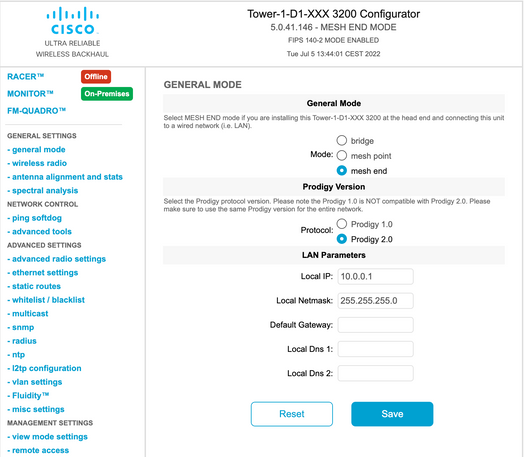
- On parent radio (FM3200B), Navigate to General mode and choose “Mesh end” as a mode,
Make sure to change the IP address/netmask of the radio before you power on and configure the remote radios. Ex, 10.0.0.1/24. once done click save.
- Navigate to the ‘wireless radio’ (Under 'General Settings'). From this page, the user can set a radio to operate on any of 295 carrier frequencies, and set a channel width between 5 MHz, for lower throughput links, or 40MHz for high throughput links.
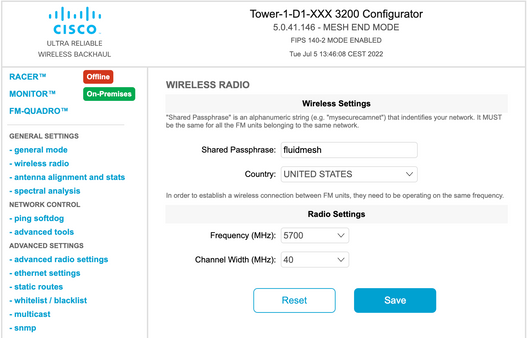
Choose a frequency with a channel width ex, 5700MHz from the list with a channel width of 40MHz, and make sure that the local and the remote radios share the same passphrase, frequency/channel width and they are on the same subnet, once done click save.
|
Width
|
Data Rate
|
Throughput
|
|
5 MHz
|
37 Mbps
|
20 Mbps
|
|
10MHz
|
75 Mbps
|
45 Mbps
|
|
20MHz
|
150 Mbps
|
90 Mbps
|
|
40MHz
|
300 Mbps
|
150-190 Mbps*
|
|
80MHz
|
866 Mbps
|
500 Mbps**
|
The throughputs mentioned are in ideal conditions. Actual throughput can vary depending on environmental conditions.
*150Mbps using FM1200V and the Gigabit Plugin. 190Mbps using the FM3200/4200/3500/4500 series.
**500Mbps only when using the FM3500/4500 series.
- Navigate to ‘advanced radio setting’ to set the radio mode as "MASTER" with FluidMAX cluster ID "1" and then adjust the transmission power, the goal is to have a signal strength between -45dBm and -55 dBm, once done, click Save.
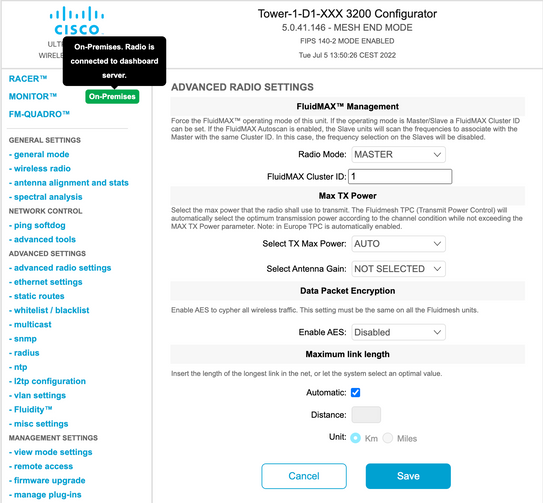
- When an user makes changes to a page and clicks Save, a message appears at the top of the page stating You do not have to “Apply” changes until you are finished making all the changes to this radio. Click Save on each page. Of course, users can “Discard” or “Review” all the changes as well. Once configuring the general settings (general mode and wireless radio), apply the configuration which causes the radio to reboot.

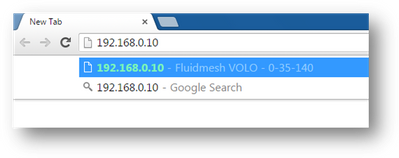
9. Login to the web UI of the first subordinate radio with default credentials (admin/admin), the default IP address is 192.168.0.10/24
10. Choose “classic” to configure the parameters manually using the classic web-based interface.
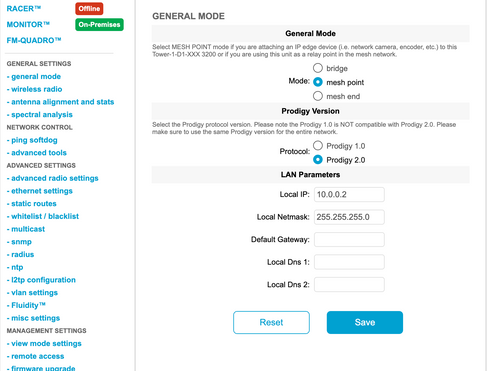
11. On the subordinate radio (FM1200V), Navigate to General mode and choose “Mesh Point” as a mode, once done click save
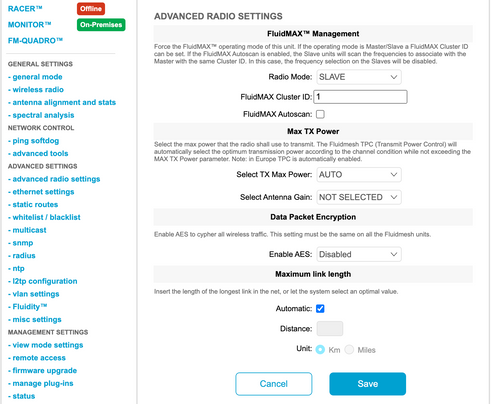
12. Navigate to ‘advanced radio setting’ to set the radio mode as "SLAVE" with FluidMAX cluster ID "1" and disable FluidMAX Autoscan. finally, then adjust the transmission power, the goal is to have a signal strength between -45dBm and -60 dBm, once done click save.
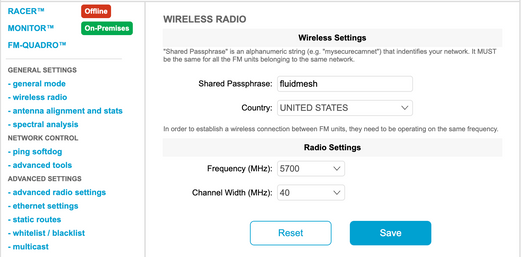
13. Navigate to the ‘wireless radio’ (Under 'General Settings'), and write fluidmesh as a passphrase and 5700MHz from the list with a channel width of 40MHz
14. apply the configuration which causes the radio to reboot.

15. Apply the same configuration to the rest of the subordinate radios i.e repeat steps from 9 until 14.
Make sure that the remote radios are on the same subnet ex, 10.0.0.0/24 but with different IP than the rest of the devices.
16. Once the radios are rebooted, thes ubordinate nodes must associate with the parent radio.
Verify
It is possible to validate and monitor the performance of the network using FMQuadro or from SSH
Using SSH
SSH to the mesh End radio with the admin credentials and issue the command:
using the command eng-stats, it

from here, you can monitor the current status of all the wireless links between the mesh end and the mesh points, Link Error Rate (LER), Packet Error Rate (PER) and so is the current throughput over ethernet and wireless
Using FMQuadro
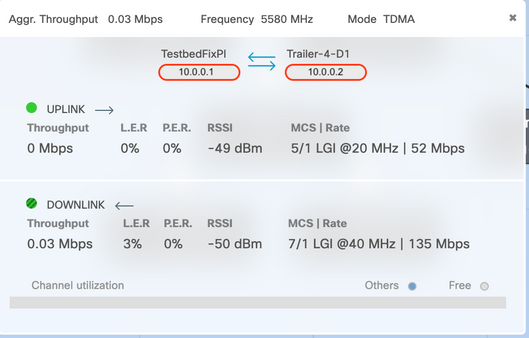
By clicking on the blue line which represents a wireless connection between the mesh end and the mesh point, you get an overview of the health of the wireless link and the current throughput
Troubleshoot
Hidden node problem
The hidden terminal problem occurs when a mesh point can communicate with the mesh end, but cannot directly communicate with other mesh points that are communicating with the mesh end. This leads to difficulties in the medium access control sublayer since multiple radios can send data packets to the mesh end simultaneously, which creates interference at the mesh end resulting in no packet getting through.
This issue could occur when fluidmax is enabled on the cluster, Fluidmax is a patent-pending technology developed by Cisco that allows all the different network(Mesh Network/P2MP) architectures to be supported without the need for any hardware change or manual software configuration. The devices detect automatically the architecture in use and consequently configure and adapt the communication protocols to best support the deployed topology. For example, if a point-to-multipoint set-up is detected, the patent-pending FluidMAX system automatically elects the optimal parent unit in the network and configures the other devices as subordinate nodes. The user is not required to do any manual configuration of the MASTER and SLAVE roles, neither different hardware is required for the different roles in the network. This unique Fluidmesh feature makes Fluidmesh an easy one-stop shop for any wireless needs you have from the simple point-to-point link to the city-wide mesh deployment.
To fix the hidden terminal issue, configure the Mesh End as "MASTER" and the mesh points as "SLAVE" in advanced radios settings as described in steps 7 and 12
Disable Token Tracker
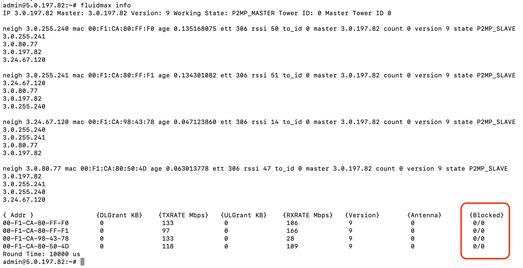
When a mesh point experiences bad connectivity back to the mesh end, the mesh end could block that mesh point for some time so the performance of the rest of mesh points do not degrade. To turn off this feature so as not to allow the mesh end to block any Mesh point, you need to disable the token tracker by issuing these commands on the mesh end
fluidmax tktrk disable
write
reboot
It is possible to check if a mesh point is currently blocked or has been blocked before by issuing this command, and then verify column 8 {blocked}
fluidmax info
Note that this requires a reboot of the mesh end.


 Feedback