Upgrade SD-WAN Controllers with the Use of vManage GUI or CLI
Available Languages
Download Options
Bias-Free Language
The documentation set for this product strives to use bias-free language. For the purposes of this documentation set, bias-free is defined as language that does not imply discrimination based on age, disability, gender, racial identity, ethnic identity, sexual orientation, socioeconomic status, and intersectionality. Exceptions may be present in the documentation due to language that is hardcoded in the user interfaces of the product software, language used based on RFP documentation, or language that is used by a referenced third-party product. Learn more about how Cisco is using Inclusive Language.
Contents
Introduction
This document describes the process to upgrade the Software-defined Wide Area Network (SD-WAN) Controllers.
Prerequisites
Requirements
Cisco recommends that you have knowledge of these topics:
- Cisco Software-defined Wide Area Network (SD-WAN)
- Cisco Software Central
- Download the Controllers software from software.cisco.com
- Run the AURA script before the upgrade CiscoDevNet/sure: SD-WAN Upgrade Readiness Experience
There could be multiple reasons to plan for a Controllers upgrade, such as:
- New releases with new features.
- Fix of known caveats/bugs.
- Deferred Releases.
Note: If the release has been deferred, it is a best practice to upgrade as soon as possible to the gold-star version. Deferred releases are not recommended on production controllers due to know defects.
When it is time to upgrade your Controllers, please consider the next useful information:
- Verify the Release Notes of the SD-WAN Controllers.
- Verify the Cisco vManage Upgrade Paths.
- Verify the Cisco SD-WAN Controllers meet the Recommended Computing Resources.
- Verify the End-of-Life and End-of-Sale Notices of the SD-WAN products.
Note: The order to upgrade the SD-WAN Controllers is vManage > vBonds > vSmarts.
Components Used
This document is based on these software versions:
- Cisco vManage 20.3.5 and 20.6.3.1
- Cisco vBond and vSmart 20.3.5 and 20.6.3
The information in this document was created from the devices in a specific lab environment. All of the devices used in this document started with a cleared (default) configuration. If your network is live, ensure that you understand the potential impact of any command.
Pre-checks to Be Performed Prior to a Controller Upgrade
Backup your Controller
- If cloud-hosted, confirm the latest backup is done or initiate a backup of config db as mentioned in the next step.
- You can view the current backups as well as trigger an on-demand snapshot from the SSP portal. Find more guidance here.
- If on-prem, take a config-db backup and VM snapshot of the controllers.
vManage# request nms configuration-db backup path /home/admin/db_backup
successfully saved the database to /home/admin/db_backup.tar.gz
- If on-prem, collect the show running-config and save this locally.
- If on-prem, ensure you know your neo4j password and notate to your exact current version.
Run an AURA Check
- Download and adhere to the steps in order to run AURA from CiscoDevNet/sure: SD-WAN Upgrade Readiness Experience
- Open to a TAC SR in order to address any questions related to the failed checks in the AURA report.
Ensure Send to Controllers/Send to vBond is Done
Check vManage Statistics Collection Interval
Cisco recommends the Statistics Collection Interval in Administration > Settings is set to the default timer of 30 minutes.

Note: Cisco recommends that your vSmarts and vBonds be attached to the vManage template before an upgrade.
Verify Disk Space on vSmart and vBond
Use the command df -kh | grep boot from vShell to determine the size of the disk.
controller:~$ df -kh | grep boot
/dev/sda1       2.5G  232M  2.3G  10% /boot
controller:~$
If the size is greater than 200 MB, proceed with the upgrade of the controllers.
If the size is less than 200 MB, pursue these steps:
1. Verify the current version is the only one listed under show software command.
VERSION    ACTIVE   DEFAULT PREVIOUS  CONFIRMED TIMESTAMP
------------------------------------------------------------------------------
20.11.1     true    true    false    auto     2023-05-02T16:48:45-00:00
20.9.1      false   false   true     user     2023-05-02T19:16:09-00:00
20.8.1      false   false   false    user     2023-05-10T10:57:31-00:00
2. Verify the current version is set as default under show software version command.
controller# request software set-default 20.11.1
status mkdefault 20.11.1: successful
controller#
3. If more versions are listed, remove any versions not active with the command request software remove <version>. This increases the space available to proceed with the upgrade.
controller# request software remove 20.9.1
status remove 20.9.1: successful
vedge-1# show software
VERSION   ACTIVE DEFAULT PREVIOUS CONFIRMED TIMESTAMP
------------------------------------------------------------------------------
20.11.1   true   true    false    auto      2023-05-02T16:48:45-00:00
controller#
4. Check the disk space in order to ensure it is greater than 200 MB. If it is not, open a TAC SR.
Controllers Upgrade Workflow
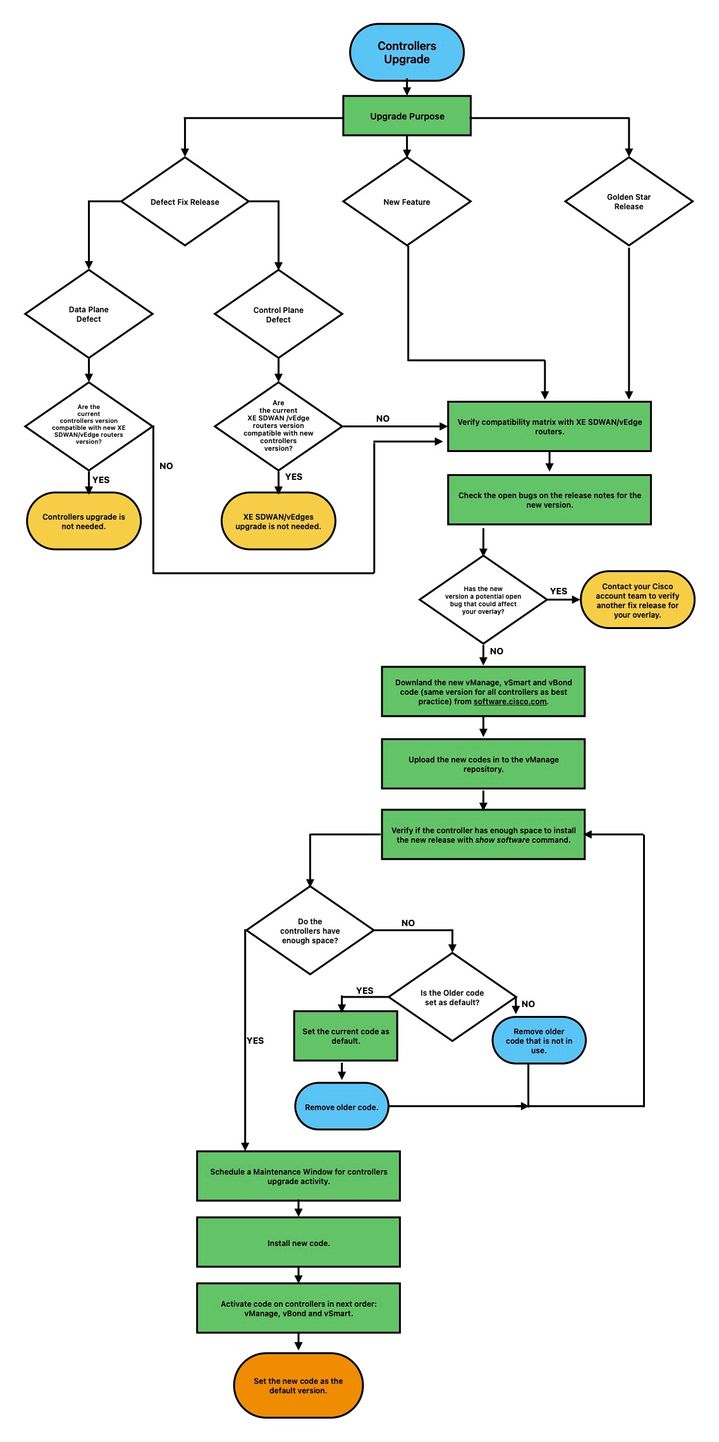
vManage Cluster Upgrade
In the case of cluster upgrade, the steps mentioned in the Cisco SD-WAN Getting Started Guide - Cluster Management [Cisco SD-WAN] - Cisco guide must be pursued.
Note: The vManage cluster upgrade has no impact on the data network.
Caution: f you have any questions or issues when you upgrade your cluster,contact TACbefore you proceed.
Upgrade SD-WAN Controllers via vManage Graphic User Interface (GUI)
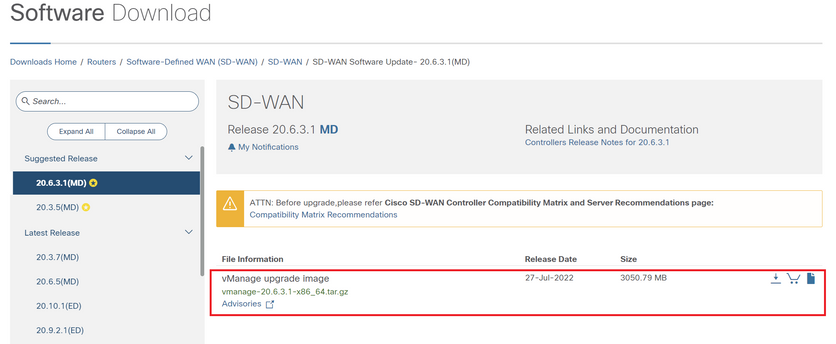
Step 1. Upload the software images to vManage repository
Navigate to Software Download and download the required software version image for vManage.
Note: There are two types of images for controllers: new deployment and upgrade. For the scope of this guide, the image to download must be an upgrade image.
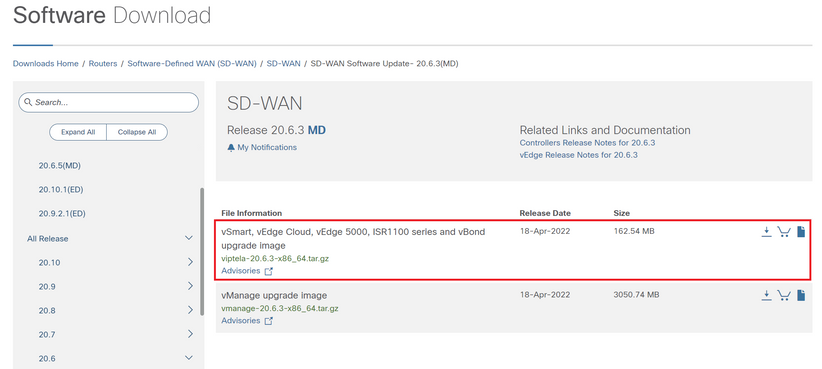
Navigate to Software Download and download the software version image for vBond and vSmart.
Note: The image for vBond and vSmart is the same.
To upload the new images, navigate to Maintenance > Software Repository > Software Images, click Add New Software and select vManage in the drop-down menu.

Select the images and click Upload.
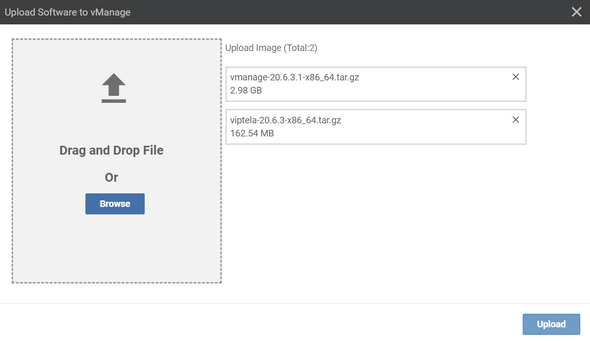
Once the images are uploaded, verify they are listed in Software Repository > Software Images.

Step 2. Installation, Activation and Set New Version as Default
This step explains how to perform the upgrade in three steps, installation, activation and set the new version as default.
vManage
Step A. Installation
On the main menu, navigate to Maintenance > Software Upgrade > vManage and click Upgrade.

In the Software Upgrade pop-up window, do as follows:
- Choose the vManage tab.
- Select the image version to upgrade to from the version drop-down list.
- Click Upgrade.
Note: This process does not execute a reboot of the vManage, only transfers, uncompresses and creates the directories needed for the upgrade.
Note: Backup of data volume is highly recommended before to proceed with the upgrade of vManage.
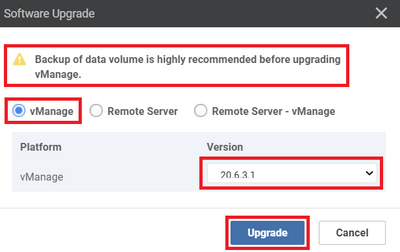
Verify the status of the task until it shows as Success.

Step B. Activation
On this step, vManage activates the new installed software version and reboots itself to boot up with the new software.
Navigate to Maintenance > Software Upgrade > vManage, and click Activate.

Select the new version and click Activate.
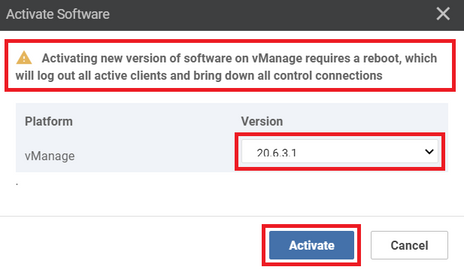
Note: The access to the GUI is not available while the vManage reboots. The complete activation can take up to 60 minutes.
After the process finishes, log in and navigate to Maintenance > Software Upgrade > vManage to verify the new version is activated.

Step C. Set Default Software Version
You can set a software image to be the default image on a Cisco SD-WAN device. It is recommended to set the new image as default after verify that the software operate as desired on the device and in the network.
If a factory reset on the device is performed, the device boots up with the image that is set as default.
Note: It is recommended to set the new version as default because if the vManage reboots, the old version is booted up. This can cause a corruption in the database. A version downgrade from a major release to an older one, it is not supported in vManage.
To set a software image as default image, do as follows:
- Navigate to Maintenance > Software Upgrade > vManage.
- Click Set Default Version, select the new version from the drop-down list and click Set Default.
Note: This process does not perform a reboot of vManage.

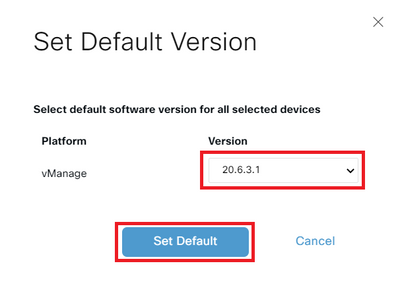
Verify the status of the task until it shows as Success.

To verify the Default Version, navigate to Maintenance > Software Upgrade > vManage.

vBond
Step A. Installation
On this step, vManage sends the new software to vBond and install the new image.
Navigate to Maintenance > Software Upgrade > Controller and click Upgrade.

In the Software Upgrade pop-up window, do as follows:
- Choose the vManage tab.
- Select the image version to upgrade to from the version drop-down list.
- ClickUpgrade.
Note: This process does not execute a reboot of the vBond, only transfers, uncompresses and creates the directories needed for the upgrade.
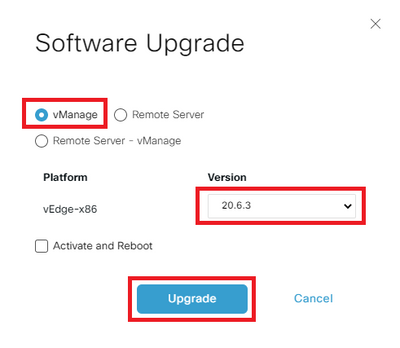
Verify the status of the task until it shows as Success.

Step B. Activation
On this step, vBond activates the new installed software version and reboots itself to boot up with the new software.
Navigate toMaintenance>Software Upgrade>Controller, and click Activate.

Select the new version and click Activate.
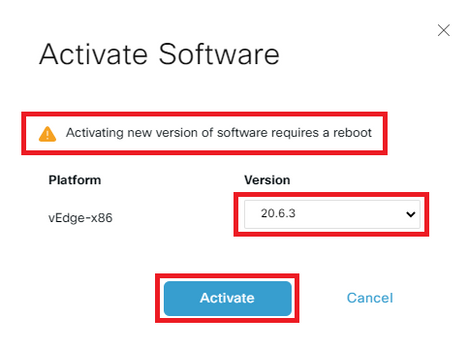
Note: This process requires a reboot of vBond. The complete activation can take up to 30 minutes.
Verify the status of the task until it shows as Success.

After the process finishes, navigate to Maintenance > Software Upgrade > Controller to verify the new version is activated.

Optional Step. Activate and Reboot the New Software Image
Note: This step is optional. You can check the box of Activate and Reboot option during the installation process. Use this procedure to install and activate the new upgraded software version.
Step C. Set Default Software Version
You can set a software image to be the default image on a Cisco SD-WAN device. It is recommended to set the new image as default after verify that the software operate as desired on the device and in the network.
If a factory reset on the device is performed, the device boots up with the image that is set as default.
To set a software image as default image, do as follows:
- Navigate toMaintenance>Software Upgrade>Controller.
- ClickSet Default Version, select the new version from the drop-down list and clickSet Default.
Note: This process does not perform a reboot of vBond.

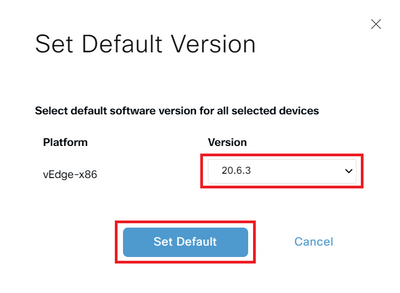
Verify the status of the task until it shows as Success.

To verify the Default Version, navigate to Maintenance > Software Upgrade > Controller.

vSmart
Step A. Installation
On this step, vManagesends the new software to vSmart and install the new image.
Navigate toMaintenance>Software Upgrade>Controller and click Upgrade.

In the Software Upgrade pop-up window, do as follows:
- Choose the vManage tab.
- Select the image version to upgrade to from the version drop-down list.
- ClickUpgrade.
Note: This process does not execute a reboot of the vSmart, only transfers, uncompresses and creates the directories needed for the upgrade.
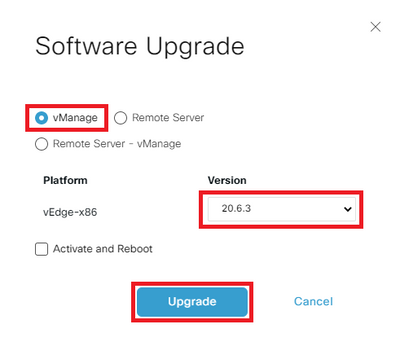
Verify the status of the task until it shows as Success.

Step B. Activation
On this step, vSmart activates the new installed software version and reboots itself to boot up with the new software.
Navigate toMaintenance>Software Upgrade>Controller, and click Activate.

Select the new version and click Activate.
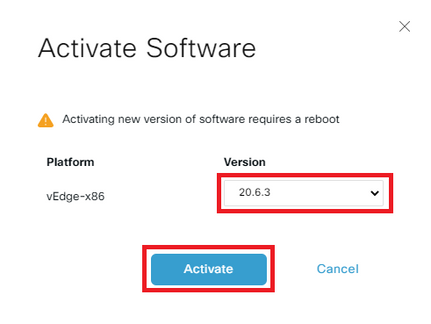
Note: This process requires a reboot of vSmart. The complete activation can take up to 30 minutes.
Verify the status of the task until it shows as Success.

After the process finishes, navigate to Maintenance > Software Upgrade > Controller to verify the new version is activated.

Optional Step. Activate and Reboot the New Software Image
Note: This step is optional. You can check the box of Activate and Reboot option during the installation process. Use this procedure to install and activate the new upgraded software version.
Step C. Set Default Software Version
You can set a software image to be the default image on a Cisco SD-WAN device. It is recommended to set the new image as default after verify that the software operate as desired on the device and in the network.
If a factory reset on the device is performed, the device boots up with the image that is set as default.
To set a software image as default image, do as follows:
- Navigate toMaintenance>Software Upgrade>Controller.
- ClickSet Default Version, select the new version from the drop-down list and clickSet Default.
Note: This process does not perform a reboot of vSmart.

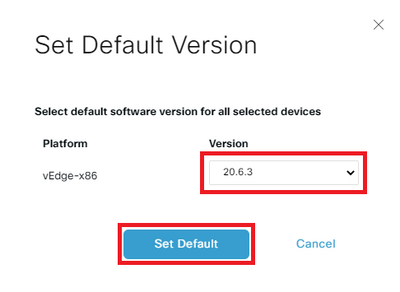
Verify the status of the task until it shows as Success.

To verify the Default Version, navigate to Maintenance > Software Upgrade > Controller.

Upgrade SD-WAN Controllers via CLI
Step 1. Installation
There are two options to install the image:
Option 1: From CLI with the Use of HTTP, FTP or TFTP.
To install the software image from within the CLI:
-
Configure the time limit to confirm that a software upgrade is successful. The time can be from 1 through 60 minutes.
Viptela# system upgrade-confirm minutes - Install the software:
Viptela# request software install url/vmanage-20.6.3.1-x86_64.tar.gz [reboot]Specify the image location in one of the next ways:
- The image file is on the local server:
/directory-path/
You can use the autocompletion feature on CLI to complete the path and filename.
- The image file is on an FTP server.
ftp://hostname/
- The image file is on an HTTP server.
http://hostname/
- The image file is on a TFTP server.
tftp://hostname/
Optionally, specify the VPN identifier in which the server is located.
Therebootoption activates the new software image and reboots the device after the installation completes.
3. If you did not include the reboot option in Step 2, activate the new software image and this automatically performs a reboot of the instance to boot the new version up.
Viptela# request software activate4. Confirm, within the configured upgrade confirmation time limit (12 minutes by default), that the software installation was successful:
Viptela# request software upgrade-confirmIf you do not issue this command within this time limit, the device automatically reverts to the previous software image.
Option 2: From vManage GUI
This step helps you to upload the images into vManage repository.
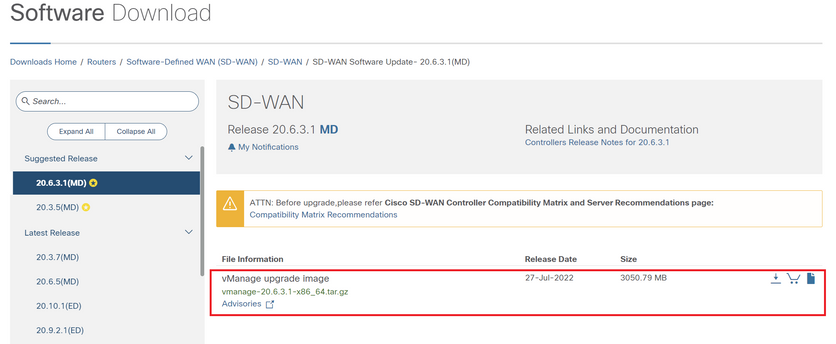
Navigate to Software Download and download the software version image for vManage.
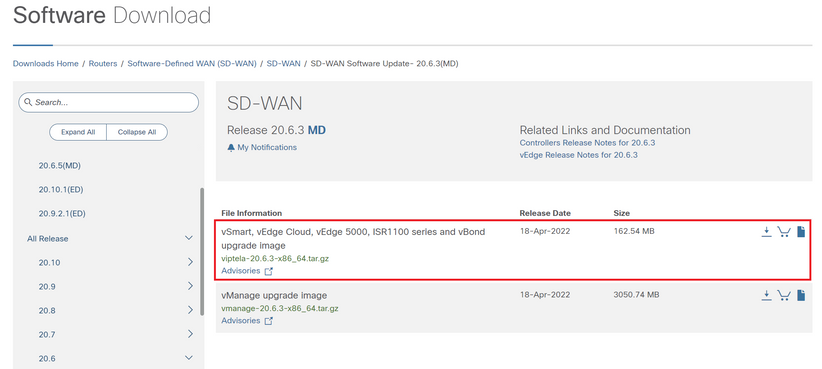
Navigate to Software Download and download the software version image for vBond and vSmart.
To upload the new images, on the main menu, navigate to Maintenance > Software Repository > Software Images, click Add New Software and on the drag-and-drop option select vManage.

Select the images and click Upload.
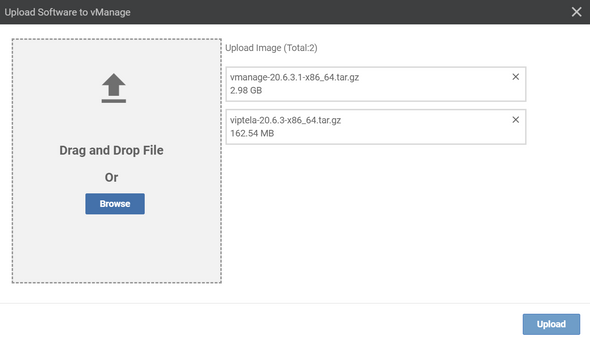
To verify if the images are available, navigate toSoftware Repository > Software Images.

Note: This procees needs to be done for all controllers.
vManage:
ClickUpgrade.

vBond:
Click Upgrade.

vSmart:
Click Upgrade.

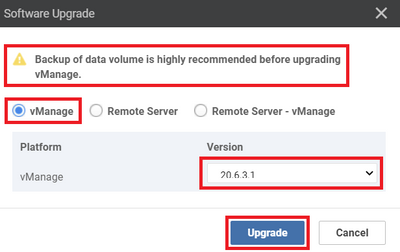
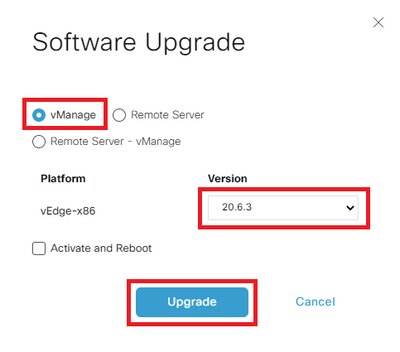
In the Software Upgrade pop-up window, do as follows:
- Choose the vManage tab.
- Select the image version to upgrade to from the version drop-down list.
- ClickUpgrade.
For vManage:
For vBond and vSmart:
Step 2. Activation
Once the installation is done, verify the software images that are installed in the controllers.
vmanage# show software

VERSION ACTIVE DEFAULT PREVIOUS CONFIRMED TIMESTAMP
---------------------------------------------------------------------------
20.3.5 true true - - 2023-02-01T22:25:24-00:00
20.6.3.1 false false false - -
vbond# show software

VERSION ACTIVE DEFAULT PREVIOUS CONFIRMED TIMESTAMP
--------------------------------------------------------------------------
20.3.5 true true - - 2022-10-01T00:30:40-00:00
20.6.3 false false false - -
vsmart# show software

VERSION ACTIVE DEFAULT PREVIOUS CONFIRMED TIMESTAMP
--------------------------------------------------------------------------
20.3.5 true true - - 2022-10-01T00:31:34-00:00
20.6.3 false false false - -
Note: To activate the image, issue the next command in the controllers (Controller by Controller, 1st vManage, 2nd vBond, 3rd vSmart).
vmanage# request software activate ?
Description: Display software versions
Possible completions:
20.3.5
20.6.3.1
clean Clean activation
now Activate software version
vmanage# request software activate 20.6.3.1
This will reboot the node with the activated version.
Are you sure you want to proceed? [yes,NO] yes

Broadcast message from root@vmanage (console) (Tue Feb 28 01:01:04 2023):

Tue Feb 28 01:01:04 UTC 2023: The system is going down for reboot NOW!
vbond# request software activate ?
Description: Display software versions
Possible completions:
20.3.5
20.6.3
clean Clean activation
now Activate software version
vbond# request software activate 20.6.3
This will reboot the node with the activated version.
Are you sure you want to proceed? [yes,NO] yes

Broadcast message from root@vbond (console) (Tue Feb 28 01:05:59 2023):

Tue Feb 28 01:05:59 UTC 2023: The system is going down for reboot NOW!
vsmart# request software activate ?
Description: Display software versions
Possible completions:
20.3.5
20.6.3
clean Clean activation
now Activate software version
vsmart# request software activate 20.6.3
This will reboot the node with the activated version.
Are you sure you want to proceed? [yes,NO] yes

Broadcast message from root@vsmart (console) (Tue Feb 28 01:13:44 2023):

Tue Feb 28 01:13:44 UTC 2023: The system is going down for reboot NOW!
Note: The controllers activate the new image and reboot themselves.
To verify that new software version is activated, issue the next command:
vmanage# show version
20.6.3.1
vmanage# show software

VERSION ACTIVE DEFAULT PREVIOUS CONFIRMED TIMESTAMP
---------------------------------------------------------------------------
20.3.5 false true true - 2023-02-01T22:25:24-00:00
20.6.3.1 true false false auto 2023-02-28T01:05:14-00:00
vbond# show version
20.6.3
vbond# show software

VERSION ACTIVE DEFAULT PREVIOUS CONFIRMED TIMESTAMP
--------------------------------------------------------------------------
20.3.5 false true true - 2022-10-01T00:30:40-00:00
20.6.3 true false false - 2023-02-28T01:09:05-00:00
vsmart# show version
20.6.3
vsmart# show software

VERSION ACTIVE DEFAULT PREVIOUS CONFIRMED TIMESTAMP
--------------------------------------------------------------------------
20.3.5 false true true - 2022-10-01T00:31:34-00:00
20.6.3 true false false - 2023-02-28T01:16:36-00:00
Step 3. Set Default Software Version
You can set a software image to be the default image on a Cisco SD-WAN device. It is recommended to set the new image as default after verify that the software operate as desired on the device and in the network.
If a factory reset on the device is performed, the device boots up with the image that is set as default.
Note: It is recommended to set the new version as default because if the vManage reboots, the old version is booted up. This can cause a corruption in the database. A version downgrade from a major release to an older one, it is not supported in vManage.
Note: This process does not perform a reboot of Controllers.
To set a software version as default, issue the next command in the controllers:
vmanage# request software set-default ?
Possible completions:
20.3.5
20.6.3.1
cancel Cancel this operation
start-at Schedule start.
| Output modifiers
<cr>
vmanage# request software set-default 20.6.3.1
status mkdefault 20.6.3.1: successful
vbond# request software set-default ?
Possible completions:
20.3.5
20.6.3
cancel Cancel this operation
start-at Schedule start.
| Output modifiers
<cr>
vbond# request software set-default 20.6.3
status mkdefault 20.6.3: successful
vsmart# request software set-default ?
Possible completions:
20.3.5
20.6.3
cancel Cancel this operation
start-at Schedule start.
| Output modifiers
<cr>
vsmart# request software set-default 20.6.3
status mkdefault 20.6.3: successful
To verify that new default version is set on controllers, issue the next command:
vmanage# show software

VERSION ACTIVE DEFAULT PREVIOUS CONFIRMED TIMESTAMP
---------------------------------------------------------------------------
20.3.5 false false true - 2023-02-01T22:25:24-00:00
20.6.3.1 true true false auto 2023-02-28T01:05:14-00:00
vbond# show software

VERSION ACTIVE DEFAULT PREVIOUS CONFIRMED TIMESTAMP
--------------------------------------------------------------------------
20.3.5 false false true - 2022-10-01T00:30:40-00:00
20.6.3 true true false - 2023-02-28T01:09:05-00:00
vsmart# show software

VERSION ACTIVE DEFAULT PREVIOUS CONFIRMED TIMESTAMP
--------------------------------------------------------------------------
20.3.5 false false true - 2022-10-01T00:31:34-00:00
20.6.3 true true false - 2023-02-28T01:16:36-00:00
Troubleshoot
1. If GUI goes down for a long time after activation, and never become reachable again, these outputs can be helpful to find the root cause out:
vmanage# request nms application-server status
NMS application server
Enabled: true   <<<<<<<<<<<   "false"
Status: running PID:26470 for 22279s   <<<<<<<<<<  "not running"
If the app-server status shows Enabled as false and the Status is not running, you can issue the next command to restore the GUI:
vmanage# request nms application-server restart
2. To verify the status of all the nms services, you can issue the next command:
vmanage# request nms all status
NMS service proxy
Enabled: true
Status: running PID:22194 for 22774s
NMS service proxy rate limit
Enabled: true
Status: running PID:24076 for 22795s
NMS application server
Enabled: true
Status: running PID:26470 for 22638s
NMS configuration database
Enabled: true
Status: running PID:25030 for 22697s
NMS coordination server
Enabled: true
Status: running PID:23918 for 22741s
NMS messaging server
Enabled: true
Status: running PID:23386 for 22795s
NMS statistics database
Enabled: true
Status: running PID:23284 for 22741s
NMS data collection agent
Enabled: true
Status: running PID:21708 for 22746s
NMS CloudAgent v2
Enabled: true
Status: running PID:25431 for 22704s
NMS cloud agent
Enabled: true
Status: running PID:21731 for 22747s
NMS SDAVC server
Enabled: false
Status: not running
NMS SDAVC proxy
Enabled: true
Status: running PID:21780 for 22747s
3. To verify the TCP handshake is completed, issue the next command:
vmanage# request nms all diagnostics
NMS service server
Checking cluster connectivity...
Pinging server on localhost:8443...
Starting Nping 0.7.80 ( https://nmap.org/nping ) at 2023-02-28 01:48 UTC
SENT (0.0023s) Starting TCP Handshake > localhost:8443 (127.0.0.1:8443)
RCVD (0.0023s) Handshake with localhost:8443 (127.0.0.1:8443) completed
SENT (1.0036s) Starting TCP Handshake > localhost:8443 (127.0.0.1:8443)
RCVD (1.0036s) Handshake with localhost:8443 (127.0.0.1:8443) completed
SENT (2.0051s) Starting TCP Handshake > localhost:8443 (127.0.0.1:8443)
RCVD (2.0051s) Handshake with localhost:8443 (127.0.0.1:8443) completed

Max rtt: 0.039ms | Min rtt: 0.029ms | Avg rtt: 0.035ms
TCP connection attempts: 3 | Successful connections: 3 | Failed: 0 (0.00%)
Nping done: 1 IP address pinged in 2.01 seconds
WARNING: Reverse DNS lookup on localhost timed out after 2 seconds

Checking server localhost...
Server network connections
--------------------------
tcp 0 0 127.0.0.1:37533 127.0.0.1:8443 TIME_WAIT -
tcp 0 0 127.0.0.1:40364 127.0.0.1:8443 ESTABLISHED 1614/python3
tcp 0 0 127.0.0.1:46626 127.0.0.1:8443 ESTABLISHED 1615/python3
tcp 0 0 127.0.0.1:46606 127.0.0.1:8443 ESTABLISHED 1617/python3
tcp 0 0 127.0.0.1:46654 127.0.0.1:8443 ESTABLISHED 21708/python3
tcp 0 0 127.0.0.1:36835 127.0.0.1:8443 TIME_WAIT -
tcp 0 0 127.0.0.1:46590 127.0.0.1:8443 ESTABLISHED 1616/python3
tcp 0 0 127.0.0.1:46255 127.0.0.1:8443 TIME_WAIT -
tcp6 0 0 :::8443 :::* LISTEN 23643/envoy
tcp6 0 0 127.0.0.1:8443 127.0.0.1:46606 ESTABLISHED 23643/envoy
tcp6 0 0 127.0.0.1:8443 127.0.0.1:46654 ESTABLISHED 23643/envoy
tcp6 0 0 127.0.0.1:8443 127.0.0.1:46626 ESTABLISHED 23643/envoy
tcp6 0 0 127.0.0.1:8443 127.0.0.1:40364 ESTABLISHED 23643/envoy
tcp6 0 0 127.0.0.1:8443 127.0.0.1:46590 ESTABLISHED 23643/envoy
NMS application server
Checking cluster connectivity...
Pinging server 0 on localhost:8443...
Starting Nping 0.7.80 ( https://nmap.org/nping ) at 2023-02-28 01:48 UTC
SENT (0.0023s) Starting TCP Handshake > localhost:8443 (127.0.0.1:8443)
RCVD (0.0023s) Handshake with localhost:8443 (127.0.0.1:8443) completed
SENT (1.0037s) Starting TCP Handshake > localhost:8443 (127.0.0.1:8443)
RCVD (1.0037s) Handshake with localhost:8443 (127.0.0.1:8443) completed
SENT (2.0050s) Starting TCP Handshake > localhost:8443 (127.0.0.1:8443)
RCVD (2.0050s) Handshake with localhost:8443 (127.0.0.1:8443) completed

Max rtt: 0.042ms | Min rtt: 0.031ms | Avg rtt: 0.035ms
TCP connection attempts: 3 | Successful connections: 3 | Failed: 0 (0.00%)
Nping done: 1 IP address pinged in 2.01 seconds

Disk I/O statistics for vManage storage
---------------------------------------
avg-cpu: %user %nice %system %iowait %steal %idle
1.59 0.05 0.63 0.11 0.00 97.62

Device tps kB_read/s kB_wrtn/s kB_dscd/s kB_read kB_wrtn kB_dscd


NMS configuration database
Checking cluster connectivity...
Pinging server 0 on localhost:7687,7474...
Starting Nping 0.7.80 ( https://nmap.org/nping ) at 2023-02-28 01:48 UTC
SENT (0.0023s) Starting TCP Handshake > localhost:7474 (127.0.0.1:7474)
RCVD (0.0023s) Handshake with localhost:7474 (127.0.0.1:7474) completed
SENT (1.0036s) Starting TCP Handshake > localhost:7687 (127.0.0.1:7687)
RCVD (1.0037s) Handshake with localhost:7687 (127.0.0.1:7687) completed
SENT (2.0050s) Starting TCP Handshake > localhost:7474 (127.0.0.1:7474)
RCVD (2.0050s) Handshake with localhost:7474 (127.0.0.1:7474) completed
SENT (3.0063s) Starting TCP Handshake > localhost:7687 (127.0.0.1:7687)
RCVD (3.0064s) Handshake with localhost:7687 (127.0.0.1:7687) completed
SENT (4.0077s) Starting TCP Handshake > localhost:7474 (127.0.0.1:7474)
RCVD (4.0078s) Handshake with localhost:7474 (127.0.0.1:7474) completed
SENT (5.0090s) Starting TCP Handshake > localhost:7687 (127.0.0.1:7687)
RCVD (5.0091s) Handshake with localhost:7687 (127.0.0.1:7687) completed

Max rtt: 0.061ms | Min rtt: 0.029ms | Avg rtt: 0.038ms
TCP connection attempts: 6 | Successful connections: 6 | Failed: 0 (0.00%)
Nping done: 1 IP address pinged in 5.01 seconds

Connecting to localhost...
+------------------------------------------------------------------------------------+
| type | row | attributes[row]["value"] |
+------------------------------------------------------------------------------------+
| "StoreSizes" | "TotalStoreSize" | 554253748 |
| "PageCache" | "Flush" | 19834 |
| "PageCache" | "EvictionExceptions" | 0 |
| "PageCache" | "UsageRatio" | 0.001564921426952844 |
| "PageCache" | "Eviction" | 0 |
| "PageCache" | "HitRatio" | 1.0 |
| "ID Allocations" | "NumberOfRelationshipIdsInUse" | 907 |
| "ID Allocations" | "NumberOfPropertyIdsInUse" | 15934 |
| "ID Allocations" | "NumberOfNodeIdsInUse" | 891 |
| "ID Allocations" | "NumberOfRelationshipTypeIdsInUse" | 27 |
| "Transactions" | "LastCommittedTxId" | 415490 |
| "Transactions" | "NumberOfOpenTransactions" | 1 |
| "Transactions" | "NumberOfOpenedTransactions" | 36268 |
| "Transactions" | "PeakNumberOfConcurrentTransactions" | 5 |
| "Transactions" | "NumberOfCommittedTransactions" | 31642 |
+------------------------------------------------------------------------------------+

15 rows available after 644 ms, consumed after another 20 ms
Completed
Disk space used by configuration-db
961M .
NMS statistics database
Checking cluster connectivity...
Pinging server 0 on localhost:9300,9200...
Starting Nping 0.7.80 ( https://nmap.org/nping ) at 2023-02-28 01:48 UTC
SENT (0.0022s) Starting TCP Handshake > localhost:9200 (127.0.0.1:9200)
RCVD (0.0023s) Handshake with localhost:9200 (127.0.0.1:9200) completed
SENT (1.0036s) Starting TCP Handshake > localhost:9300 (127.0.0.1:9300)
RCVD (1.0037s) Handshake with localhost:9300 (127.0.0.1:9300) completed
SENT (2.0050s) Starting TCP Handshake > localhost:9200 (127.0.0.1:9200)
RCVD (2.0050s) Handshake with localhost:9200 (127.0.0.1:9200) completed
SENT (3.0055s) Starting TCP Handshake > localhost:9300 (127.0.0.1:9300)
RCVD (3.0055s) Handshake with localhost:9300 (127.0.0.1:9300) completed
SENT (4.0068s) Starting TCP Handshake > localhost:9200 (127.0.0.1:9200)
RCVD (4.0068s) Handshake with localhost:9200 (127.0.0.1:9200) completed
SENT (5.0080s) Starting TCP Handshake > localhost:9300 (127.0.0.1:9300)
RCVD (5.0081s) Handshake with localhost:9300 (127.0.0.1:9300) completed

Max rtt: 0.043ms | Min rtt: 0.022ms | Avg rtt: 0.029ms
TCP connection attempts: 6 | Successful connections: 6 | Failed: 0 (0.00%)
Nping done: 1 IP address pinged in 5.01 seconds

Connecting to server localhost

Overall cluster health state
----------------------------
Total number of shards: 35
Total number of nodes: 1
Average shards per node: 35
Primary shard allocation of 35 is within 20% of expected average 35
Cluster status: healthy (green)

Cluster shard state
-------------------
There are no unassigned shards

Cluster index statistics
------------------------
health status index uuid pri rep docs.count docs.deleted store.size pri.store.size
green open trackerstatistics_2023_02_27t19_39_42 S-2Zq9MMRN-apsr562z-zw 1 0 0 0 261b 261b
green open sulstatistics_2023_01_11t21_21_16 BmnHn29dSFeGKjayJHz6aQ 1 0 0 0 261b 261b
green open deviceconfiguration_2023_01_11t21_21_24 0qF86WgoSTm3ysve6e_hnw 1 0 5 0 57.3kb 57.3kb
green open deviceevents_2023_01_11t21_21_23 1rOapbVwR_ipH1PvcWbhVg 1 0 406 0 153.4kb 153.4kb
green open alarm_2023_01_11t21_21_20 mY4hmLf8ScaL32cD_Jzlzw 1 0 73 3 203.2kb 203.2kb
green open umbrella_2023_01_11t21_21_21 0AEhzE0wTaiwbvgE2m9e_g 1 0 0 0 261b 261b
green open sleofflinereport_2023_01_11t21_21_19 j0ALD8s6SgW_ostXGkSKLA 1 0 0 0 261b 261b
green open deviceevents_2023_02_27t19_39_57 kKT6LOFRSaSQ45YIq_BW8Q 1 0 133 0 75.2kb 75.2kb
green open eioltestatistics_2023_02_27t19_39_50 mSI3dVEISeKa4HVaDAUcQA 1 0 0 0 261b 261b
green open utddaqioxstatistics_2023_01_11t21_21_21 Uw52JOTMRo2aw0W2ZfBF-w 1 0 0 0 261b 261b
green open fwall_2023_01_11t21_21_20 ImSKES5UQ_m50NA3xE916A 1 0 0 0 261b 261b
green open approutestatsstatistics_routing_summary_2023_02_28t00_54 8cTHcjROSMaf7gLaqpOztg 1 0 0 0 261b 261b
green open apphostingstatistics_2023_01_11t21_21_24 F0CnoCsBSIGLsFJD5oPB9g 1 0 0 0 261b 261b
green open urlf_2023_01_11t21_21_24 541JR9PjRJ2F5VCAnnu_qQ 1 0 0 0 261b 261b
green open bridgemacstatistics_2023_01_11t21_21_17 B_Za3olfTU-shOcmVpJ5AA 1 0 0 0 261b 261b
green open wlanclientinfostatistics_2023_01_11t21_21_19 QW3fxuqaScm5girepulUEA 1 0 0 0 261b 261b
green open devicesystemstatusstatistics_2023_01_11t21_21_23 0eyHAP6uTH2KukP-eTqZow 1 0 90067 0 36.8mb 36.8mb
green open nwpi_2023_01_11t21_21_22 p0ohA5eAS4-mUo2V5CUAew 1 0 0 0 261b 261b
green open vnfstatistics_2023_01_11t21_21_24 ZFoka_AORoen37PNrxVTGg 1 0 0 0 261b 261b
green open device-tag-v1 8L9UIFgGTkCkUct2KcDHyQ 1 0 6 0 3.4kb 3.4kb
green open artstatistics_2023_01_11t21_21_22 ziMT4UixSMCVl16W2PsoaQ 1 0 0 0 261b 261b
green open dpistatistics_application_summary_2023_02_28t00_54 OtYhwgXIRkepG1gVoWLiEQ 1 0 0 0 261b 261b
green open bridgeinterfacestatistics_2023_01_11t21_21_22 qk7AuPzUTqasOxM0G0DtSA 1 0 0 0 261b 261b
green open speedtest_2023_01_11t21_21_22 MdR4FUFlROKqBYXmhXDR-w 1 0 0 0 261b 261b
green open aggregatedappsdpistatistics_2023_01_11t21_21_24 g4y-eKklTL-PHwwRvKmiyQ 1 0 0 0 261b 261b
green open ipsalert_2023_01_11t21_21_21 l3L6NhB6Sha31mp0UZBgig 1 0 0 0 261b 261b
green open flowlogstatistics_2023_01_11t21_21_20 F9uuICzfS6Cq8GcGkU0wTA 1 0 0 0 261b 261b
green open nwpiflowraw_2023_01_11t21_21_22 FdIv-sjwQGiq0YPVh2-alw 1 0 0 0 261b 261b
green open auditlog_2023_01_11t21_21_21 LLsBmyAjRWiIJiDYkEBVqg 1 0 407 0 447.7kb 447.7kb
green open interfacestatistics_2023_01_11t21_21_23 u8LXrT8qTcmeeeIFSo3h0w 1 0 0 0 261b 261b
green open approutestatsstatistics_transport_summary_2023_02_28t00_54 g6V1J_ByS8-6PfH9_lRkmg 1 0 0 0 261b 261b
green open qosstatistics_2023_01_11t21_21_16 Yr6x2NsYTC2c9o8KUgb9ZA 1 0 0 0 261b 261b
green open approutestatsstatistics_2023_01_11t21_21_18 OIWGMGvoSSO-xZUd-ajI-g 1 0 0 0 261b 261b
green open cloudxstatistics_2023_02_27t19_40_01 tAx45uDeQ0Gz5XnAUafpyg 1 0 0 0 261b 261b
green open dpistatistics_2023_02_27t19_39_54 yTkRk7XRSA2tTeRmDM--Dg 1 0 0 0 261b 261b
NMS coordination server
Checking cluster connectivity...
Pinging server 0 on localhost:2181...
Starting Nping 0.7.80 ( https://nmap.org/nping ) at 2023-02-28 01:48 UTC
SENT (0.0021s) Starting TCP Handshake > localhost:2181 (127.0.0.1:2181)
RCVD (0.0021s) Handshake with localhost:2181 (127.0.0.1:2181) completed
SENT (1.0033s) Starting TCP Handshake > localhost:2181 (127.0.0.1:2181)
RCVD (1.0033s) Handshake with localhost:2181 (127.0.0.1:2181) completed
SENT (2.0047s) Starting TCP Handshake > localhost:2181 (127.0.0.1:2181)
RCVD (2.0047s) Handshake with localhost:2181 (127.0.0.1:2181) completed

Max rtt: 0.039ms | Min rtt: 0.032ms | Avg rtt: 0.035ms
TCP connection attempts: 3 | Successful connections: 3 | Failed: 0 (0.00%)
Nping done: 1 IP address pinged in 2.00 seconds
WARNING: Reverse DNS lookup on localhost timed out after 2 seconds

Checking server localhost...
Server network connections
--------------------------
tcp 0 0 127.0.0.1:2181 0.0.0.0:* LISTEN 23864/docker-proxy
tcp 0 0 127.0.0.1:34397 127.0.0.1:2181 TIME_WAIT -
tcp 0 0 127.0.0.1:2181 127.0.0.1:47388 ESTABLISHED 23864/docker-proxy
tcp 0 0 127.0.0.1:40733 127.0.0.1:2181 TIME_WAIT -
tcp 0 0 127.0.0.1:45953 127.0.0.1:2181 TIME_WAIT -
tcp6 0 0 127.0.0.1:47388 127.0.0.1:2181 ESTABLISHED 26470/java
NMS container manager is disabled
NMS SDAVC server is disabled
Related Information
Cisco SD-WAN Overlay Network Bring-Up Process
Revision History
| Revision | Publish Date | Comments |
|---|---|---|
4.0 |
13-Oct-2023 |
vManage Cluster Upgrade Section |
3.0 |
11-Jul-2023 |
Pre-checks to Be Performed Prior to a Controller Upgrade |
2.0 |
27-Apr-2023 |
Initial Release |
1.0 |
26-Apr-2023 |
Initial Release |
Contributed by Cisco Engineers
- Cesar Daniel AvilaTechnical Consulting Engineer
- Ian EstradaTechnical Consulting Engineer
Contact Cisco
- Open a Support Case

- (Requires a Cisco Service Contract)
 Feedback