Recommended Trace Levels for IVR Translation Routing
Available Languages
Contents
Introduction
This document provides guidelines for quick tracing in a Cisco IP Interactive Voice Response (IP IVR) and Cisco IP Queue Manager (IP QM) environment with Cisco Unified Contact Center Express (IPCC Express) using translation routing for queuing.
Note: This document only serves as a guide and does not cover all situations. While you troubleshoot some situations, you might need to collect more data than what is outlined in this document.
Prerequisites
Requirements
Cisco recommends that you have knowledge of these topics:
-
Cisco CallManager
-
Cisco Customer Response Solution (CRS) (IP IVR or IP QM)
Components Used
The information in this document is based on these software and hardware versions:
-
Cisco CallManager version 3.x and 4.x
-
Cisco CRS version 3.x or 4.x
The information in this document was created from the devices in a specific lab environment. All of the devices used in this document started with a cleared (default) configuration. If your network is live, make sure that you understand the potential impact of any command.
Related Products
Refer to the matrix in Cisco Customer Response Solutions (CRS) Software and Hardware Compatibility Guide for information on complete compatibility between Cisco CallManager and CRS, and CRS versions involved in this solution.
Cisco CRS provides a single, consistent, and easy-to-manage platform for these products:
-
Cisco IPCC Express Edition (IPCC Express)
-
Cisco IP IVR
-
Cisco IP QM
Conventions
Refer to Cisco Technical Tips Conventions for more information on document conventions.
Set MIVR Trace Levels
IP IVR / IP QM 3.x
Complete these steps in order to turn on the MIVR trace for IP IVR or IP QM:
-
Select System > Engine from the CRA Administrator menu bar.
The engine web page appears.
-
Click the Trace Configuration hyper-link in the left panel.
The Trace Configuration web page appears.
-
Increase the Number of Trace Files to 100 and each file size to 5 MB (Suggested).
-
Turn on these MIVR trace Debug levels:
-
SS_TEL
-
SS_ICM
-
LIB_ICM
The system generates and stores the MIVR log. The name of the log file is CiscoMIVRxxx.log, where xxx represents the sequence number. The log file resides in C:\Program files\wfavvid\log for IP IVR / QM 3.x.
Note: Restart the CRA Engine if required to reflect the changes in the number of files and file sizes for MIVR logs.
-
IP IVR / IP QM 4.x
Complete these steps in order to turn on the MIVR trace for IP IVR or QM:
-
Open AppAdmin.
-
Select System > Tracing > CRS Engine > Trace Configuration.
-
Enable tracing:
-
Under SUBSYSTEMS, turn on these MIVR trace Debug levels:
-
SS_TEL
-
SS_ICM
-
-
Under MISCELLANEOUS, turn on this MIVR trace Debug level:
-
ENG
-
-
Under LIBRARIES, turn on this MIVR trace Debug level:
-
LIB_ICM
The system generates and stores the MIVR log. The name of the log file is CiscoMIVRxxx.log, where xxx represents the sequence number. The log file resides in C:\Program Files\wfavvid\log\MIVR.
-
-
Set JTAPI Trace Levels
Complete these steps in order to turn on the JTAPI trace:
-
Click Start > Programs > Cisco JTAPI > JTAPI Preference.
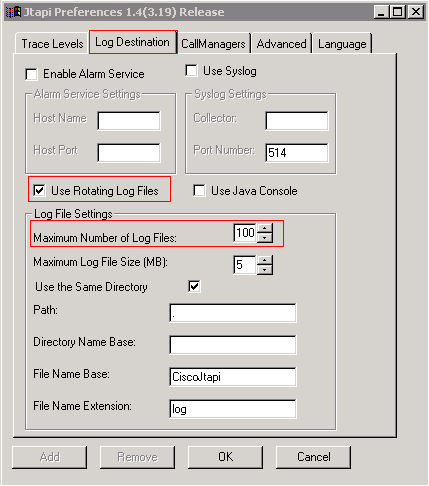
The Jtapi Preferences window appears (see Figure 1).
-
Click the Log Destination tab.
Figure 1 – JTAPI Preferences: Log Destination Tab
-
Check the Use Rotating Log Files check box.
-
Increase the maximum number of log files to 100 in the Log File Settings section. (Suggested)
-
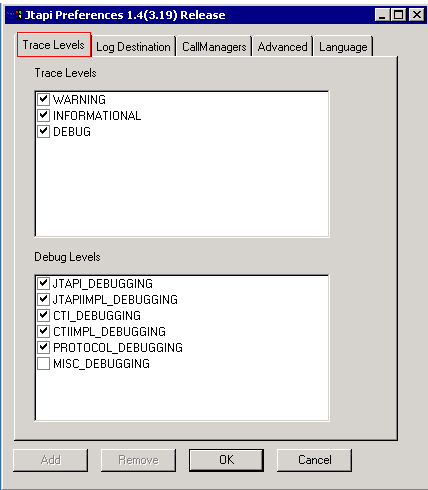
Click the Trace Levels tab (see Figure 2).
-
Check the WARNING, INFORMATIONAL, and DEBUG check boxes in the Trace Levels section.
Figure 2 – JTAPI Preferences: Trace Levels
-
Check these check boxes in the Debug Levels section:
-
JTAPI_DEBUGGING
-
JTAPIIMPL_DEBUGGING
-
CTI_DEBUGGING
-
CTIIMPL_DEBUGGING
-
PROTOCOL_DEBUGGING
Note: Do not check MISC_DEBUGGING unless Cisco TAC explicitly asks for it.
The system generates and stores the JTAPI log in these locations:
-
IP IVR / IP QM 3.x:
C:\Program Files\wfavvid\log
-
IP IVR / IP QM 4.x:
C:\Program Files\wfavvid\log\JTAPI\
The name of the log file is CiscoJTAPIxx.log, where xx represents the sequence number.
-
Restart of the Jtapi subsystem is required for the trace settings and file sizes to be reflected in the JTAPI traces.
-
If a command window flashes and the Jtapi Preferences dialog box fails to load, get the JRE download from these URLs:
-
http://java.sun.com/j2se/1.3/download.html (If realtime reporting tool will be run)
-
http://java.sun.com/j2se/1.4.2/download.html (If realtime reporting tool will not run)
-
After you complete the test(s), pull back the appropriate the logs, check that the incident time is covered in the logs and provide the logs to Cisco Technical Support.
-
Related Information
Contact Cisco
- Open a Support Case

- (Requires a Cisco Service Contract)


 Feedback