How to Configure Unified Communications Manager Directory Integration in a Multi-Forest Environment
Available Languages
Download Options
Bias-Free Language
The documentation set for this product strives to use bias-free language. For the purposes of this documentation set, bias-free is defined as language that does not imply discrimination based on age, disability, gender, racial identity, ethnic identity, sexual orientation, socioeconomic status, and intersectionality. Exceptions may be present in the documentation due to language that is hardcoded in the user interfaces of the product software, language used based on RFP documentation, or language that is used by a referenced third-party product. Learn more about how Cisco is using Inclusive Language.
Contents
Introduction
This document discusses how to configure Cisco Unified Communication Manager (CUCM) Directory Integration in a Multi-Forest Environment.
Prerequisites
Requirements
Cisco recommends that you have:
- Knowledge of deployment and configuration of CUCM directory integration.
- Knowledge of deployment and configuration of Microsoft Active Directory Application Manager (ADAM) 2003 or Microsoft Lightweight Directory Services (AD LDS) 2008 or 2012.
- CUCM Release 9.1(2) or later.
- When you use CUCM Release 9.1(2) or later, the LDAP filter can be changed with the Administrative web interface.
- The number of user accounts to be synchronized must not exceed 60,000 accounts per CUCM Publisher. When more than 60,000 accounts need to be synchronized, the IP Phone Services Software Development Kit (SDK) must be used in order to provide a custom directory. See the Cisco Developer Network for additional details. When you use Unified CM Release 10.0(1) or later, the maximum number of user accounts supported is 160,000.
- Microsoft ADAM 2003 or Lightweight Directory Services (LDS) 2008 or 2012.
- The requirement for SSL when you use bind redirection should not be disabled. If it is disabled, it causes the password of a Windows security principal to pass to the computer that runs ADAM without encryption. Thus, it should be disabled only in a test environment.
- User ID (sAMAccountName ) needs to be unique across all the forests.
- If there is an AD LDS setup and if the CUCM UserID mapped to sAMAccountName needs to be used, then that agreement should be configured as the AD.
- When you configure the domain trust relationship between ADAM instance host domain and user accounts host domain, the domain functional level and the forest functional level should be 2003 or later.
- CUCM supports only a single application directory partition in AD LDS, multi partition is not supported currently.
Components Used
This document is not restricted to specific software and hardware versions.
The information in this document was created from the devices in a specific lab environment. All of the devices used in this document started with a cleared (default) configuration. If your network is live, make sure that you understand the potential impact of any command.
Preface
Microsoft AD LDS, formerly known as ADAM, can be used to provide directory services for directory-enabled applications. Instead of using your organization's Active Directory Domain Service (AD DS) database in order to store the directory-enabled application data, AD LDS can be used to store the data. AD LDS can be used in conjunction with AD DS so that you can have a central location for security accounts (AD DS) and another location in order to support the application configuration and directory data (AD LDS). With AD LDS, you can reduce the overhead associated with AD replication, you do not have to extend the AD schema in order to support the application, and you can partition the directory structure so that the AD LDS service is only deployed to the servers that need to support the directory-enabled application.
- Install from Media Generation - The ability to create installation media for AD LDS with Ntdsutil.exe or Dsdbutil.exe.
- Audit - Audit changed values within the directory service.
- Database Mounting Tool - Gives you the ability to view data within snapshots of the database files.
- AD Sites and Services Support - Gives you the ability to use AD Sites and Services in order to manage the replication of the AD LDS data changes.
- Dynamic List of LDIF files - With this feature, you can associate custom LDIF files with the current default LDIF files used for setup of AD LDS on a server.
- Recursive Linked-Attribute Queries - LDAP queries can follow nested attribute links in order to determine additional attribute properties, such as group memberships.
There are a lot of differences between ADAM and AD, ADAM can only deliver part of the functions delivered by AD.

Overview
The objective of this document is to explain the mechanisms that allow CUCM, or any other Cisco products that use Directory Integration Service (DirSync), to get user information and perform authentication from different AD domains that can exist in different forests. In order to achieve this objective, ADAM is used in order to synchronize its user database with different AD Domain Controllers or other LDAP sources.
ADAM can create a database of users and store their details. Single Sign On (SSO) functionality is desired in order to avoid end users having to maintain different sets of credentials in different systems; therefore, ADAM bind redirection is used. ADAM bind redirection is a special function for applications that support LDAP bind as an authentication mechanism. In some cases, the special schema, or naming context, might force you to avoid AD, which makes ADAM a necessary choice. This avoids users having to remember multiple passwords due to the employment of an additional directory with its own user ID and password.
A special user proxy object in ADAM maps to a regular AD user account. The user proxy does not have an actual password stored in the ADAM object itself. When the application performs its normal bind operation, it checks the ID locally, but checks the password against AD under the covers as shown in this figure. The application does not need to be aware of this AD interaction.

ADAM bind redirection should be used only in special cases where an application can perform a simple LDAP bind to ADAM. However, the application still needs to associate the user with a security principal in AD.
ADAM bind redirection occurs when a bind to ADAM is attempted with use of a special object called a proxy object. A proxy object is an object in ADAM that represents a security principal in AD. Each proxy object in ADAM contains the SID of a user in AD. When a user attempts to bind to a proxy object, ADAM takes the SID that is stored in the proxy object, together with the password that is supplied at bind time, and presents the SID and the password to AD for authentication. A proxy object in ADAM does not store a password, and users cannot change their AD passwords through ADAM proxy objects.
The password is presented in plain text to ADAM because the initial bind request is a simple LDAP bind request. For this reason, an SSL connection is required by default between the directory client and ADAM. ADAM uses Windows Security APIs in order to present the password to AD.
You can get more information on bind redirection in Understanding ADAM bind redirection .
Active Directory Multiple Forest Support Scenario in CUCM
In order to explain the method, imagine a scenario where Cisco Systems (Forest 2) has acquired two other companies: Tandberg (Forest 3) and Webex (Forest 1). In the migration phase, integrate the AD structure of each company in order to allow the deployment of a single Cisco Unified Communications cluster.

In the example, company Cisco (Forest 2) has two domains, Forest root domain called CISCO (dns cisco.com) and a subdomain called EMERG (dns emerg.cisco.com). Both of these domains have a Domain Controller that is also a Global Catalog, and each one is hosted in Windows 2008 Server SP2.
Company Tandberg (Forest 3) has a single domain with a Domain Controller that is also a Global Catalog, and it is hosted in Windows 2008 Server SP2.
Company Webex (Forest 1) has a single domain with a Domain Controller that is also a Global Catalog, and it is hosted in Windows 2003 R2 Server SP2.
AD LDS is installed in the Domain Controller for domain CISCO, or can be a separate machine; in fact it could be anywhere in one of the three forests. The DNS infrastructure must be in place such that domains in one forest can communicate with domains in other forests and to establish the appropriate trust relationships and validations between the forests.
Domain Trust Relationship
For the authentication of the users to work, you need to have a trust between the domain where the ADAM instance is hosted, and the other domain(s) that hosts the user accounts. This trust can be a one-way trust if required (outgoing trust from the domain that hosts the ADAM instance to the domain(s) that hosts the user accounts). This way, the ADAM instance will be able to forward the authentication requests to DCs in those account domains.
Furthermore, you will need to have a user account from both account domains that has access to all attributes of all user accounts in the domain. This account is used by ADAMSync in order to synchronize the Account Domain users to ADAM.
Last but not least, the machine that runs ADAM must be able to find all domains (DNS), find domain controllers in both domains (with DNS), and connect to these Domain Controllers.
Complete these steps in order to set up the intertrust relationships:
- Open Active Directory Domains and Trusts, right-click the domain that hosts AD LDS, and choose Properties.

- Click the Trusts tab, and click New Trust.

- Follow the wizard and enter the name of the domain that you want to establish the trust with. Click Next.

- Click the Forest trust radio button. Click Next.

- On the direction of the trust only 'one-way: outgoing' is required. Click the One-way: outgoing radio button. Click Next.

- Allow the wizard to configure both domains. Click the Both this domain and the specified domain radio button. Click Next.

- Enter the credentials for the other domain. Click Next.

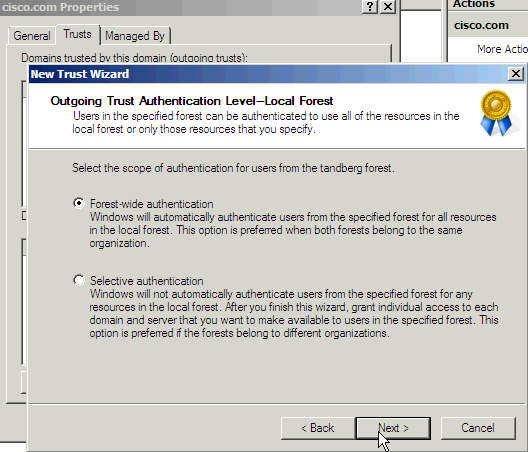
- Click the Forest-wide authentication radio button. Click Next.
- Click the Yes, confirm the outgoing trust radio button. Click Next.

This is the result that you receive after you run this process for both the Tandberg and Webex domains. The domain emerg is there by default since it is a child domain. Click OK.

Install AD LDS
Install AD LDS in 2008
- Open Server Manager, click Roles, and click Add Roles.

-
Check the Active Directory Lightweight Directory Services check box. Click Next.

- The AD LDS Services Installation Progress window appears.

Install AD LDS in 2012
Complete these steps in order to set up AD LDS in 2012:
- Open Server Manager and choose Add Roles and Features. Click Next and click Installation Type in order to move to the Installation Type page.

- Choose the default options and click Next.

- Click the Select a server from the server pool radio button in order to select the default server. Click Next.

- Check the Active Directory Lightweight Directory Services check box and click Add Features. Continue with the installation.

- Click Next in the subsequent pages.
- Click the Restart the destination server automatically if required checkbox and click Install in order to install the feature.

- After the installation is completed successfully, click Close in order to close the wizard.

Install the Instance for Multiple Forest Support
AD LDS can run different instances of the services with different ports which allows for different user directory "applications" to be run on the same machine. By default AD LDS chooses ports 389/LDAP and 636/LDAPS, but if the system already has any kind of LDAP services that run them it will use ports 50000/LDAP and 50001/LDAPS. Each instance will have a pair of ports that increment based on the previous numbers used.
In some cases, due to a Microsoft bug, the ports are already used by the Microsoft DNS server and the instance wizard gives an error (which is not self-explanatory). This error can be fixed when you reserve the ports in the TCP/IP stack. If you find this problem, see AD LDS service start fails with error "setup could not start the service..." + error code 8007041d.
Multiple Forest Support in 2008
- In the server manager, choose Roles and then Active Directory Lightweight Directory Services. Click Click here to create an AD LDS instance.

- Click the A unique instance radio button. Click Next.

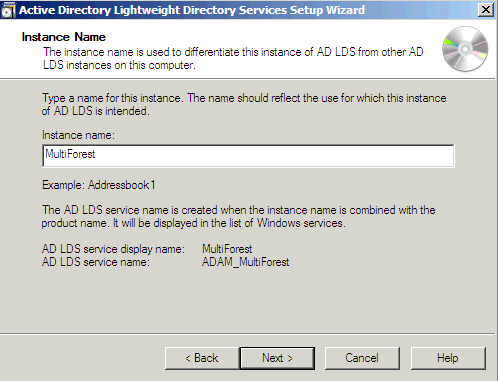
- In the Instance name field, enter the name of the instance. It is MultiForest in this example. Click Next.
- Enter the selected LDAP port number and SSL port number or allow the system to choose them for you. Click Next.

-
Note: CUCM supports only single application directory partition, multi partition is not supported currently.
See Step 5: Practice Working with Application Directory Partitions for information on how to create an Application Directory Partition. The process to create a directory partition for each domain that you want to synchronize against works based on LDAP referral (RFC 2251) and requires that the LDAP client (CUCM, CUP, and so on) supports referrals.Click the Yes, create an application directory partition radio button. Enter the partition name in the Partition name field for the instance. Do not provide a cn like in the example of the wizard, because most of the time that creates an error in the Schemas. In this scenario, the same partition as the AD domain controller that hosts AD LDS (dc=Cisco,dc=com) was entered. Click Next.

- Click the This account radio button. Enter a User name and Password in order to start the server. Click Next.

-
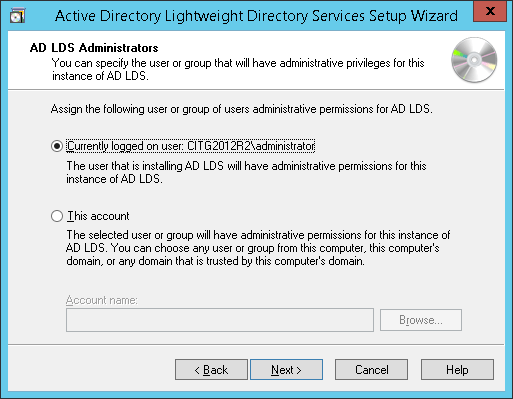
Click the Currently logged on user radio button. Enter the name of the user with administrative permissions. Click Next.

- Import the highlighted default LDIF files in order to build the schema. Click Next.

Note: If ADAM is installed on a Windows 2003 sever, then the previous screen will have only four options: MS-AZMan.LDF, MS-InetOrgPerson.LDF, MS-User.LDF, and MS-UserProxy.LDF. From these four, check only the check boxes for MS-User.LDF and MS-InetOrgPerson.LDF.
Multiple Forest Support in 2012
- Open the Administrative tools and double-click Active Directory Lightweight Directory Services Setup Wizard.

- Click Next.

- Check the A unique instance radio button. Click Next.

- Enter an Instance Name and Description for the instance. The name "MultiForest" is entered here. Click Next.

- Enter the LDAP and SSL port numbers. The preferred ports are 389 and 636 respectively. If the domain server is a child server and if the parent domain uses these ports, then by default different port numbers will be populated. In that case, do not change them and continue with the installation. Click Next.

- Here, by default, other port numbers have been populated. Click Next.

-
Note: CUCM supports only single application directory partition, multi partition is not supported currently.
See Step 5: Practice Working with Application Directory Partitions for information on how to create an Application Directory Partition. The process to create a directory partition for each domain that you want to synchronize against works based on LDAP referral (RFC 2251) and requires that the LDAP client (CUCM, CUP, and so on) supports referrals. See Microsoft Support for more information.Click the Yes, create an application directory partition radio button. Enter the Partition Name. Create the partition for LDS as cisco.com. Any suitable value can be provided. Click Next.

- Choose the default options in subsequent pages and continue.


- Check the MS-InetOrgPerson.LDF, MS-User.LDF, MS-UserProxy.LDF, and MS-UserProxyFull.LDF check boxes. Click Next.


- Click Next in order to start the installation.


- The installation is completed successfully. Click Finish.

Configure ADAM Schema Analyzer
If the user IDs (sAMAccountNames) are unique across different domains and there are not multiple users with the same ID in different domains of different forests, then the users can be synchronized from the AD to the respective forests on the AD LDS, all of which can exist on a single partition on the AD LDS in a multi forest setup. For example, consider the figure in the Active Directory Multiple Forest Support Scenario in CUCM section, and if a user ID ‘alice’ exists in only one of the three domains the setup in this scenario would be as follows:
PARTITION FOREST DN
P1 cisco.com DC=cisco,DC=com
webex.com DC=webex, DC=cisco,DC=com
tandberg.com DC=Tandberg, DC=cisco,DC=com
In order to configure CUCM with AD LDS, the user ID (sAMAccountName) needs to be unique across all the forests. CUCM currently supports only a single partition in AD LDS.
If the sAMAccountNames are not unique, consider using any of these attributes if they uniquely identify a user account - email, telephoneNumber, employeeNumber, uid, or userPrincipalName.
- Copy the schema from the domain to ADAM.
- Open AD DS/LDS schema analyzer (ADSchemaAnalyzer.exe) in the directory c:\windows\adam.
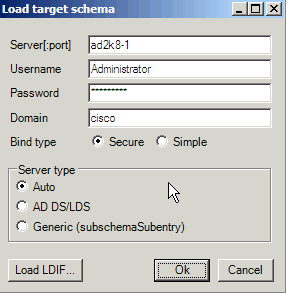
- Choose File > Load target schema.

- Provide the credentials of the source AD Domain Controller that you want to import from. Click Ok.
- Choose File > Load base schema.

- Specify the AD LDS to which you want to connect and extend the schema. Click Ok.

- Choose Schema > Mark all non-present elements as included.

- Choose File > Create LDIF file. In this example, the file created via this step is diff-schema.ldf. In order to simplify the process the file should be created in c:\windows\adam.

An option available to help organize the files that need to be generated is to create a separate directory in order to allow for these files to be separated from the main c:\windows\adam directory. Open a command prompt and create a log directory in c:\windows\adam.
cd \windows\adam
mkdir logs - Import the ldif schema, created with ADSchema Analyzer, to AD LDS.
ldifde -i -s localhost:50000 -c CN=Configuration,DC=X
 #ConfigurationNamingContext -f diff-schema.ldf -j c:\windows\adam\logs
Refer to Using LDIFDE to import and export directory objects to Active Directory for additional ldifde options and command formats.

Extend the AD LDS Schema with the User-Proxy Objects
The object for the proxy authentication needs to be created and the object class 'user' will not be used. The object class that is created, userProxy, is what allows the bind redirection. The object class detail needs to be created in a ldif file. The file is a creation of a new file, which in this example is MS-UserProxy-Cisco.ldf. This new file is generated from the original MS-UserProxy.ldf and edited, use a text edit program, to have this content:
#==================================================================
# @@UI-Description: AD LDS simple userProxy class.
#
# This file contains user extensions for default ADAM schema.
# It should be imported with the following command:
#   ldifde -i -f MS-UserProxy.ldf -s server:port -b username domain password -k -j . -c
"CN=Schema,CN=Configuration,DC=X" #schemaNamingContext
#
#==================================================================

dn: CN=User-Proxy,CN=Schema,CN=Configuration,DC=X
changetype: ntdsSchemaAdd
objectClass: top
objectClass: classSchema
cn: User-Proxy
subClassOf: top
governsID: 1.2.840.113556.1.5.246
schemaIDGUID:: bxjWYLbzmEiwrWU1r8B2IA==
rDNAttID: cn
showInAdvancedViewOnly: TRUE
adminDisplayName: User-Proxy
adminDescription: Sample class for bind proxy implementation.
objectClassCategory: 1
lDAPDisplayName: userProxy
systemOnly: FALSE
possSuperiors: domainDNS
possSuperiors: organizationalUnit
possSuperiors: container
possSuperiors: organization
defaultSecurityDescriptor:
 D:(OA;;CR;ab721a53-1e2f-11d0-9819-00aa0040529b;;PS)S:
defaultHidingValue: TRUE
defaultObjectCategory: CN=User-Proxy,CN=Schema,CN=Configuration,DC=X
systemAuxiliaryClass: msDS-BindProxy
systemMayContain: userPrincipalName
systemMayContain: givenName
systemMayContain: middleName
systemMayContain: sn
systemMayContain: manager
systemMayContain: department
systemMayContain: telephoneNumber
systemMayContain: mail
systemMayContain: title
systemMayContain: homephone
systemMayContain: mobile
systemMayContain: pager
systemMayContain: msDS-UserAccountDisabled
systemMayContain: samAccountName
systemMayContain: employeeNumber
systemMayContain: initials
systemMayContain: ipPhone
systemMayContain: displayName
systemMayContain: msRTCSIP-primaryuseraddress
systemMayContain: uid

dn:
changetype: modify
add: schemaUpdateNow
schemaUpdateNow: 1
-
Save MS-UserProxy-Cisco.ldf file in C:\windows\adam.
Import the new object class to AD LDS.
ldifde -i -s localhost:50000 -c CN=Configuration,DC=X #ConfigurationNamingContext -f
 MS-UserProxy-Cisco.ldf -j c:\windows\adam\logs

Import the Users From AD DC to AD LDS
The user from each domain now needs to be imported to AD LDS. This step needs to be repeated for each domain that needs to synchronize. This example only shows the process against one of the domains. Start with the original MS-AdamSyncConf.xml and create an XML file for each domain that needs to be synchronized and modify the file with the details specific to each domain to have this content:
<?xml version="1.0"?>
<doc>
<configuration>
<description>Adam-Sync1</description>
<security-mode>object</security-mode>
<source-ad-name>ad2k8-1</source-ad-name>
<source-ad-partition>dc=cisco,dc=com</source-ad-partition>
<source-ad-account></source-ad-account>
<account-domain></account-domain>
<target-dn>dc=cisco,dc=com</target-dn>
<query>
<base-dn>dc=cisco,dc=com</base-dn>
<object-filter>
(|(&(!cn=Administrator)(!cn=Guest) (!cn=ASPNET)
(!cn=krbtgt)(sAMAccountType=805306368))(&(objectClass=user)(isDeleted=TRUE)))
</object-filter>
<attributes>
<include>objectSID</include>
<include>mail</include>
<include>userPrincipalName</include>
<include>middleName</include>
<include>manager</include>
<include>givenName</include>
<include>sn</include>
<include>department</include>
<include>telephoneNumber</include>
<include>title</include>
<include>homephone</include>
<include>mobile</include>
<include>pager</include>
<include>msDS-UserAccountDisabled</include>
<include>samAccountName</include>
<include>employeeNumber</include>
<include>initials</include>
<include>ipPhone</include>
<include> displayName</include>
<include> msRTCSIP-primaryuseraddress</include>
<include>uid</include>
<exclude></exclude>
</attributes>
</query>
<user-proxy>
<source-object-class>user</source-object-class>
<target-object-class>userProxy</target-object-class>
</user-proxy>
<schedule>
<aging>
<frequency>0</frequency>
<num-objects>0</num-objects>
</aging>
<schtasks-cmd></schtasks-cmd>
</schedule>
</configuration>
<synchronizer-state>
<dirsync-cookie></dirsync-cookie>
<status></status>
<authoritative-adam-instance></authoritative-adam-instance>
<configuration-file-guid></configuration-file-guid>
<last-sync-attempt-time></last-sync-attempt-time>
<last-sync-success-time></last-sync-success-time>
<last-sync-error-time></last-sync-error-time>
<last-sync-error-string></last-sync-error-string>
<consecutive-sync-failures></consecutive-sync-failures>
<user-credentials></user-credentials>
<runs-since-last-object-update></runs-since-last-object-update>
<runs-since-last-full-sync></runs-since-last-full-sync>
</synchronizer-state>
</doc>
In this file, these tags should be replaced to match the domain:
- <source-ad-name> - Use the host name of the domain.
- <source-ad-partition> - Use the root partition from the source AD DC that you want to import from (for example, dc=Cisco, dc=com, or dc=Tandberg, dc=com ).
- <base-dn> - Choose the container from which to import from. For example, if all users of the domain are required this should be the same as <source-ad-partition>, but if users are from a specific organizational unit (such as Finance OU), it should be similar to OU=Finance, DC=Cisco, DC=com.
Refer to Search Filter Syntax for more information on how to create an <object-filter>.
Save the newly created XML file in C:\windows\adam.
Open a command window, cd \windows\adam.
Enter the command, ADAMSync /install localhost:50000 c:\windows\ADAM\AdamSyncConf1.xml /log c:\windows\adam\logs\install.log.
Verify that the file AdamSyncConf1.xml is the newly created XML file.
Synchronize the users with the command ADAMSync /sync localhost:50000 "dc=cisco,dc=com" /log c:\windows\adam\logs\sync.log.
The result should be similar to:

In order to complete an automatic sync from AD to ADAM , use the Task scheduler in Windows.
Create a .bat file with this content in it:
"C:\Windows\ADAM\ADAMSync" /install localhost:50000 c:\windows\ADAM\AdamSyncConf1.xml /log c:\windows\adam\logs\install.log
"C:\Windows\ADAM\ADAMSync" /sync localhost:50000 "dc=cisco,dc=com" /log c:\windows\adam\logs\syn.log
Schedule the task to run the .bat file as and when required. This takes care of additions, modifications, and deletions that happen in AD to be reflected in ADAM as well.
You can create another .bat file and schedule it to complete an automatic sync from the other forest.
Create the User in AD LDS for CUCM Synchronization and Authentication
- Open ADSI Edit from the Administrator tools in the Startup menu.
- Choose File > Connection (or Action > Connect To).
- Connect to base dn of the AD LDS tree (DC=Cisco,DC=com) and specify the host and port where it is hosted (localhost:50000). Click OK.

- Right-click the base DN and choose New > Object.

- Choose user. Click Next.

- In the Value field, enter the chosen object name. In this example "root" is the chosen name (any name could be chosen here). Click Next.

- In order to provide a password to the new user, right-click the user and choose Reset Password.

- The new user is disabled by default. In order to enable the new user, right-click the user and choose Properties.

- Browse to the attribute msDS-UserAccountDisabled and click Edit.
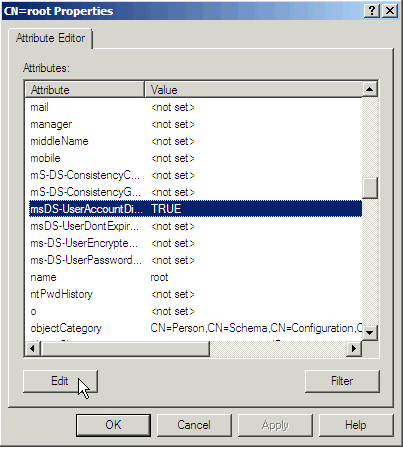
- Click the False radio button in order to enable the user account. Click OK.

- Click the True radio button in order to ensure the password will never expire. Click OK.

- The new user needs to be added to one group that has reading permission to the AD LDS, which in this example Administrators was chosen. Browse to CN=Roles > CN=Administrators. Right-click CN=Administrators and choose Properties.
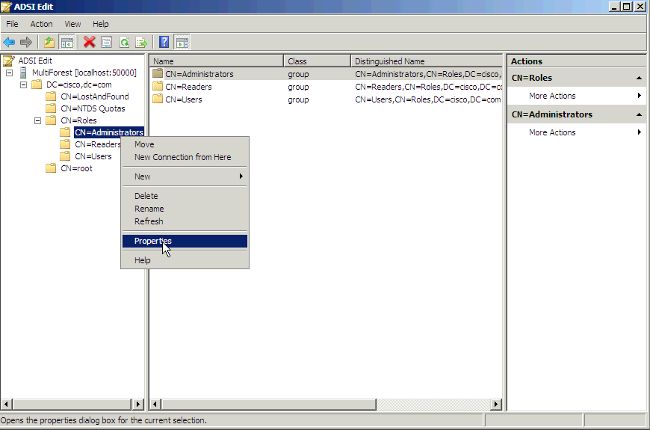
- Choose the attribute member and click Edit.

- Enter the new DN that was created previously, cn=root,dc=Cisco,dc=com, to this group. Click OK.

- Choose Update Schema Now and restart AD LDS.


Configure Bind Redirection
By default, binding to ADAM with bind redirection requires an SSL connection. SSL requires the installation and use of certificates on the computer that runs ADAM and on the computer that connects to ADAM as a client. If certificates are not installed in your ADAM test environment, you can disable the requirement for SSL as an alternative.
By default, SSL is enabled. In order to make the LDAPS protocol work in ADAM/LDS you will need to generate a certificate.
In this example, the Microsoft Certification Authority Server is used in order to issue the certificate. In order to request a certificate, go to the web page of the Microsoft CA - http://<MSFT CA hostname>/certsrv and complete these steps:
- Click Request a certificate.
- Click Advanced certificate request.
- Click Create and submit a request to this CA.
- In the Name textbox, enter the full DNS name of the ADAM/AD LDS server.
- Ensure Type of certificate is Server authentication certificate.
- For the format, choose PCKS10.
- Choose Mark Keys as exportable.
- Optionally, fill in the other information.
- In the Friendly name textbox, enter the full dns name of the ADAM/AD LDS server.
- Click Submit.
Go back to the certification authority interface and click the Pending Certificates folder. Right-click the certificate request made by the ADAM/AD-LDS machine and issue the certificate.
The certificate has now been created and resides in the "Issued certificates" folder. Next , you need to download and install the certificate:
- Open http://<MSFT CA hostname>/certsrv.
- Click View the status of a pending certificate request.
- Click the certificate request.
- Click the certificate in order to install it.
In order to let the ADAM service use the certificate, you need to put the certificate in the ADAM service's personal store:
- From the Start menu, choose Run. Type mmc. This opens the managment console.
- Click File \ Add/Remove snap-in.
- Click Add and choose Certificates.
- Chose Service account.
- Choose Local computer.
- Choose your ADAM instance service.
- Add a new Certificate snap-in, but this time choose My user account instead of Service account.
- Click Close and click Ok.
- In the Certificates - Current user-tree, open the Personal folder.
- Select the certificate and copy it into the same location under "Certificates - adam instance name".
In order to grant Read permission on the server authentication certificate to the Network service account, complete these steps:
- Navigate to this default directory where the installed or imported certificates are stored - C:\ProgramData\Microsoft\Crypto\RSA\MachineKeys.
- Right-click the appropriate server authentication certificate. Click Properties.
- Click the Security tab. Click Edit.
- In the Permissions dialog box, click Add.
- In the Select Users, Computers, or Groups dialog box, enter Network Service. Click OK.
- Restart your ADAM instance.
More information can be found in Appendix A: Configuring LDAP over SSL Requirements for AD LDS.
Next, upload the certificate of the CA that issued the certificate to the ADAM/AD LDS machine as a CUCM directory trust.
Refer to the Cisco Unified Communications Operations System Administration Guide for additional details.
Choose the checkbox in order to use SSL in LDAP Directory page and LDAP Authentication page.
Enter 50001 (in this example) for the LDAP port, which is the SSL port number given when you installed the ADAM/AD LDS instance.
In order to disable the SSL requirement for bind redirection, complete these steps:
- Click Start, point to Administrative Tools, and click ADSI Edit.
- On the Action menu, choose Connect to.
- In the Computer field, enter localhost:50000 (this is theADAM host and port.).

- In the Connection Point section, click the Select a well-known Naming Context radio button. From the drop-down list, choose Configuration. Click OK.
- In the console tree, browse to this container object in the configuration partition: CN=Directory Service,CN=Windows NT,CN=Services.
- Right-click CN=Directory Service and choose Properties.

- In Attributes, click msDS-Other-Settings. Click Edit.
- In Values, click RequireSecureProxyBind=1 and then click Remove.
- In Value to add, enter RequireSecureProxyBind=0, click Add, and then click OK.
- Restart AD LDS for the changes to take effect.
Configure CUCM
ADAM/AD LDS synchronization and authentication is supported in CUCM Version 9.1(2) and later.
- Choose System > LDAP > LDAP System.
- Select Microsoft ADAM or Lightweight Directory Services.
- You can choose any of these LDAP userid attributes: mail, employee Number, or telephone Number.
uid is only used with standalone ADAM/AD LDS and not with AD multi-forest support.

Currently, for LDAP Server type "Microsoft ADAM or Lightweight Directory Services" mode, samAccountName is not included in the LDAP Attribute for Userid drop-down . The reason is that it is not an attribute supported with standalone ADAM/AD LDS. If the CUCM UserID mapped to sAMAccountName needs to be used then that agreement should be configured as AD.

- Configure LDAP synchronization with the credentials of the user created in AD LDS.


- Configure LDAP authentication with the credentials of the user created in AD LDS.

LDAP Filters in CUCM
The object class User is no longer used. Therefore, the LDAP filter needs to be changed to use userProxy instead of User.
The default filter is:
(&(objectclass=user)(!(objectclass=Computer))(!(msDS-UserAccountDisabled=TRUE)))
In order to modify this filter, log in to CCMAdmin with a web browser and choose the LDAP Custom Filter option from the LDAP configuration menu.

This filter is used in the LDAP directory page while configuring LDAP the synchronization agreement as shown in the previous figure.

Contributed by Cisco Engineers
Contact Cisco
- Open a Support Case

- (Requires a Cisco Service Contract)
 Feedback