Configure Hybrid Calendar Service With Microsoft Exchange for WebEx
Available Languages
Download Options
Bias-Free Language
The documentation set for this product strives to use bias-free language. For the purposes of this documentation set, bias-free is defined as language that does not imply discrimination based on age, disability, gender, racial identity, ethnic identity, sexual orientation, socioeconomic status, and intersectionality. Exceptions may be present in the documentation due to language that is hardcoded in the user interfaces of the product software, language used based on RFP documentation, or language that is used by a referenced third-party product. Learn more about how Cisco is using Inclusive Language.
Contents
Introduction
This document describes how to set up the hybrid calendar service for your cloud-registered devices on Webex Cloud with Microsoft Exchange.
Prerequisites
Requirements
Cisco recommends that you have knowledge of these topics:
- Cisco Webex Control Hub
- Cisco Expressway
- Microsoft Active Directory (AD)
- Microsoft Exchange Server (2013, 2016 or 2019)
Components Used
- Cisco Webex Control Hub
- Cisco Expressway-C already deployed for the Cloud Connector
- Microsoft Active Directory Server already deployed
- Microsoft Exchange
The information in this document was created from the devices in a specific lab environment. All of the devices used in this document started with a cleared (default) configuration. If your network is live, ensure that you understand the potential impact of any command.
Background Information
The Hybrid Calendar Service allows you to connect Microsoft Exchange, Office 365 or Google Calendar environment to Cisco Webex. The integration can be made via on-premise connector, configured purely cloud-based or in a hybrid setup manner.
The benefits of this feature are:
- Simple meeting scheduling
- @webex: Populates the meeting invite with Webex Personal Room details.
- @meet: Creates a space in Webex App with meeting details and adds join information to the meeting invite.
- View your meetings list on Webex registered applications and devices
- One-button to push (OBTP) capability.
- Ad-hoc booking from Room Devices
- Parse a SIP URE or other video address from the body of a calendar invitation.
- Show when you are Out of Office
Configure
Set Up an Impersonation Account for On-Premises Microsoft Exchange
Before you begin
- You must choose a mail-enabled account to use as the service account. (The account does not have to be from an administrator, but it must have a mailbox.)
- Do not use an impersonation account that is used by other services such as Cisco Unity Connection, Cisco TelePresence Management Suite (TMS) and so on.
- If you limited the set of users that are synchronized with Active Directory via (Lightweight directory access protocol) LDAP filters, you must limit the impersonation with a new or already in existence management scope in Exchange.
Tip: For instructions and more detailed information from Microsoft on management scopes and impersonation, visit the Microsoft Exchange Server configuration guidelines.
Procedure
Step 1. Sign in to a server on which Exchange Management Shell is installed. Sign in with one of these accounts:
- An account that is a member of the Enterprise Admins group.
- An account that can grant permissions on Exchange objects in the configuration container.
Step 2. Run the next command in Exchange Management Shell:
new-ManagementRoleAssignment -Name:RoleName -Role:ApplicationImpersonation -User 'ServiceUserName'
where:
- RoleName is the name that you want to give the assignment, for example, CalendarConnectorAcct. The name that you enter for RoleName appears when you run get-ManagementRoleAssignment.
- ServiceUserName is the name of the account you selected, in domain\alias format.
Note: This is the user who is already created on the AD with which the exchange is synced, and has domain admin rights.

You can run the command Get-ManagementRoleAssignment to review the roles assigned to each user:

Configure a throttling policy and apply it to the Impersonation Account
A custom throttling policy helps the Calendar Connector work smoothly:
- In Exchange Server 2013 and 2016, the policy removes Exchange Web Services (EWS) limits from the impersonation account, to avoid max concurrency issues.
- In Exchange Server 2010, the policy overrides the default policy. The default is tailored for user load, not for an enterprise application.
Step 1. In the Exchange Management Shell, create the policy.
- For Exchange Server 2013 or 2016, enter:
New-ThrottlingPolicy -Name "CalendarConnectorPolicy" -EWSMaxConcurrency unlimited -EWSMaxBurst unlimited -EWSRechargeRate unlimited -EWSCutOffBalance unlimited -EWSMaxSubscriptions 5000

Note: The CalendarConnectorPolicy is a name, you can keep that name anything, for example, CalendarConPolicy.
- For Exchange Server 2010, enter:
New-ThrottlingPolicy -Name "CalendarConnectorPolicy" -EWSMaxConcurrency $null -EWSPercentTimeInAD 100 -EWSPercentTimeInCAS 500 -EWSPercentTimeInMailboxRPC 300 -EWSMaxSubscriptions 5000 -EWSFastSearchTimeoutInSeconds 60 -EWSFindCountLimit 1000
Step 2. If you use Exchange Server 2013 or 2016, and the impersonation account does not have a mailbox, run this command:
Enable-Mailbox "impersonation account" -Database "database name"
Note: This step was skipped, as the impersonation account which was created for this lab recreation already had a mailbox created.
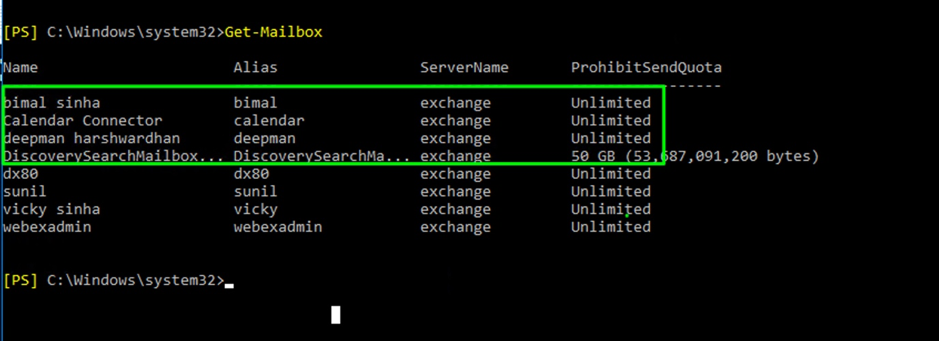
Step 3. Apply the new policy to the impersonation account:
Set-ThrottlingPolicyAssociation -Identity "impersonation account" -ThrottlingPolicy "CalendarConnectorPolicy"
Where:
- impersonation account is the name of the impersonation account you use as the service account for the Calendar Connector.
- CalendarConnectorPolicy is the name of the policy that you created in Step 2.
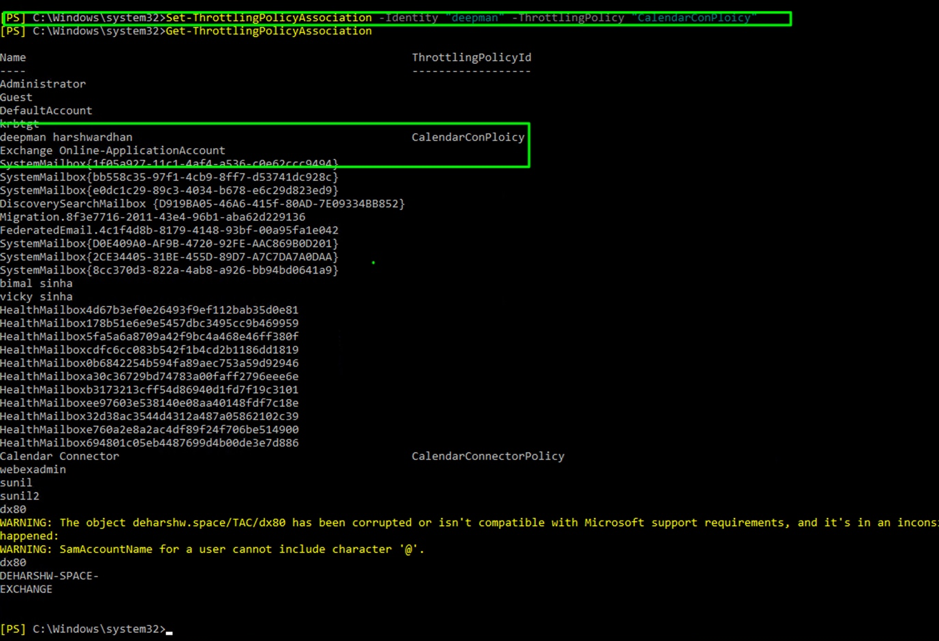
Step 4. Confirm that the mailbox now uses the new policy:
Get-ThrottlingPolicyAssociation -Identity "impersonation account" | findstr "ThrottlingPolicy"
Append Exchange CA Certificate to the Expressway Trusted CA List
Step 1. In the Expressway-C connector host, navigate to Maintenance > Security certificates > Trusted CA certificate
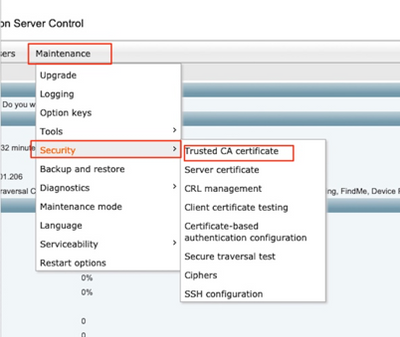
Step 2. Review the Certificate Authority (CA) certificates in the trust list to check if the correct CA certificate is already trusted.
Step 3. To append any new CA certificates:
- Click on Browse (or the equivalent in your browser) to locate and select the PEM file.
- Click on Append CA certificate.

The newly appended CA certificate appears in the list of CA certificates.
To replace a CA certificate with an updated one, for a particular issuer and subject:
- Check the checkbox next to the Issuer details.
- Click Delete.
- Append the replacement certificate as described previously.
Install Management Connector and Calendar Connector on Expressway and register it on Cloud
Firstly, add the expressway as a resource on the Control hub under your organization.
Step 1. Login to https://admin.webex.com with your admin credentials of your organization and navigate to Services.
Step 2. Select the Hybrid Calendar with Exchange card and click on Set-up:
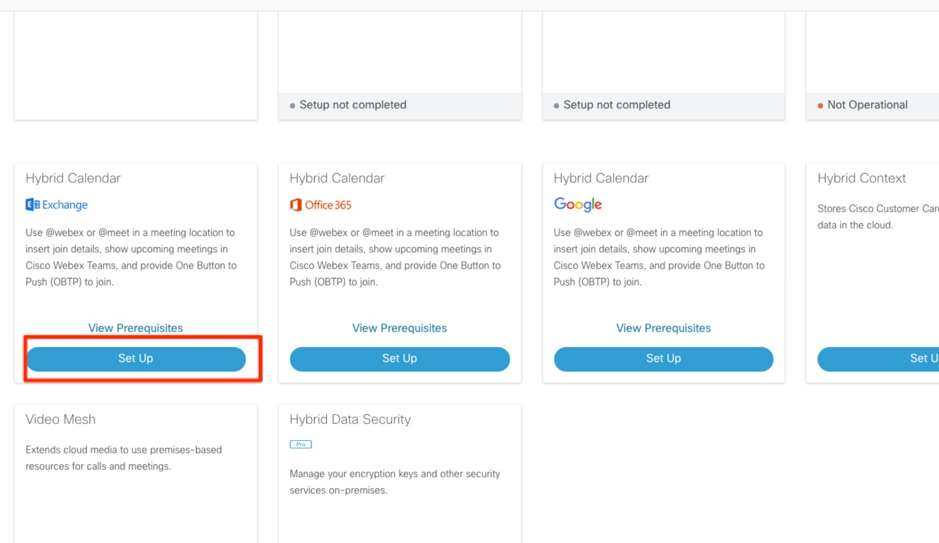
Note: Make sure you go through the View Prerequisites before installation, to make sure you fulfil all the requirements for this solution to work.
Step 3. Select Next
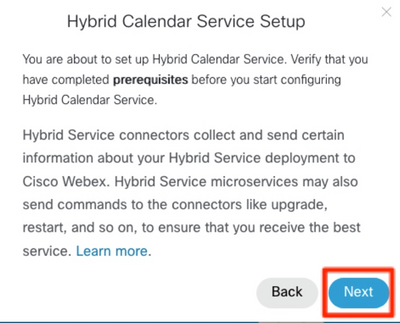
Step 4. Enter the Fully Qualified Domain Name (FQDN) of your expressway on which you install the connectors, and click Next.
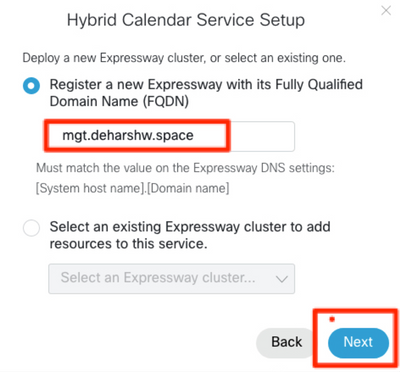
Note: At this time, your computer must be able to resolve the DNS A record of the expressway connector and must be able to reach the expressway's IP address.
Step 5. Click Next.
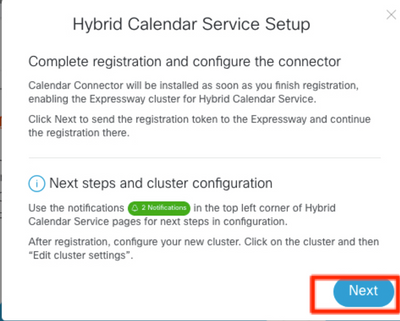
After this step, the expressway web Graphic User Interface (GUI) opens in a new tab and the log-in prompt appears.
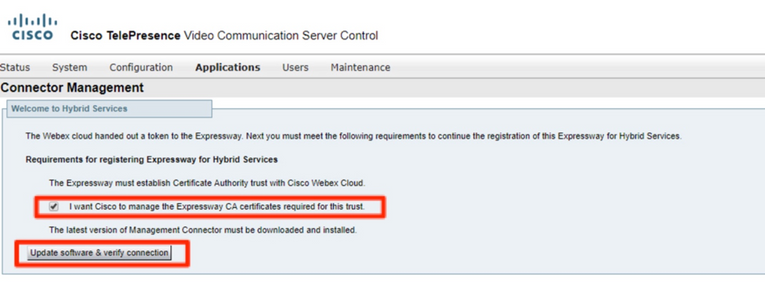
Step 6. Log in with expressway admin credentials.
Step 7. Check the checkbox that states: I want Cisco to manage the Expressway CA certificates required for this trust.
Step 8. Click on the Update software & verify the connection.
Step 9. Click on Register.

After a few seconds, the browser redirects you to the control hub, where after login, you get to the shown page.
Step 10. Select the checkbox Allow Access to the Expressway and click on Continue.
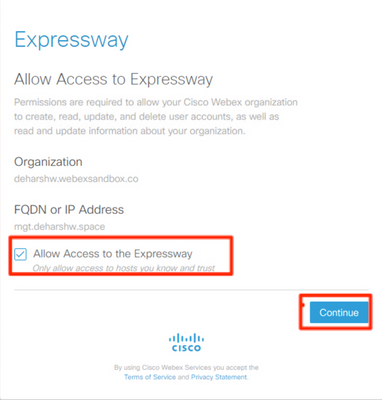
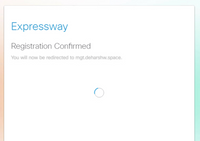
Afterwards, the confirmation that the registration is completed appears.
The browser redirects you back to Expressway, where you can see that the Connector Management is in running status with the version mentioned as well.
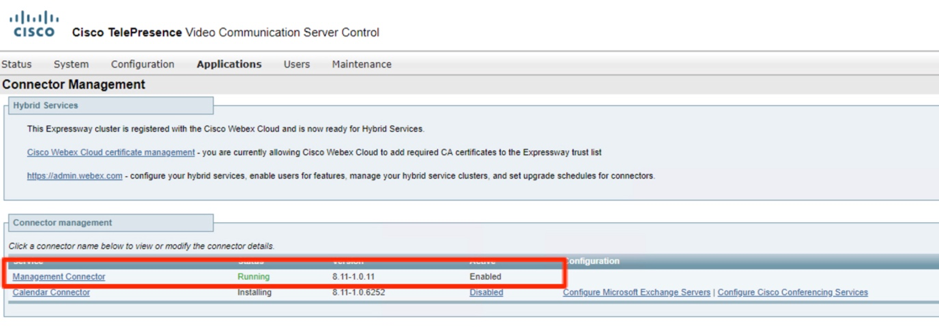
After a few minutes, the installation of the Calendar Connector also starts.

Step 11. On the control hub under Services, the status changes to Not Operational.
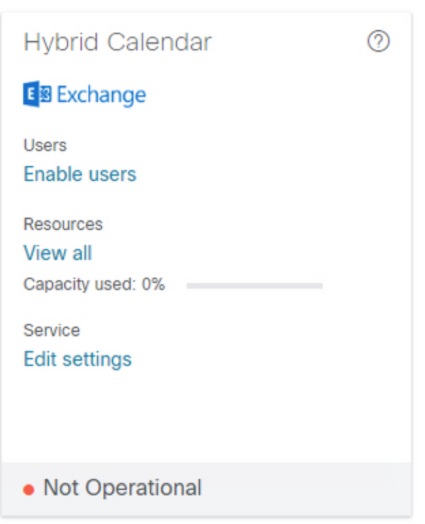
Before you start with the configuration of the Microsoft Exchange server on the Expressway, you require to configure the impersonation account in the Microsoft Exchange Server first.
Link the Calendar Connector to Microsoft Exchange
Step 1. Navigate to Applications >Hybrid Services > Calendar Services > Microsoft Exchange Configuration
Step 2. Click on Add New.
Step 3. Configure the Service account: This is the impersonation account details which you created on Exchange
Display Name : Any name of your choice
Type : Exchange On-Premises
Enable this Exchange server : Yes
NTLM Authentication: Checked
Basic Authentication: Checked
As auto-discovery is not set up, it is not used. Thus, Autodiscover mode requires to be set to Provide Exchange address directly
Enter the IP address or FQDN of the Microsoft Exchange server
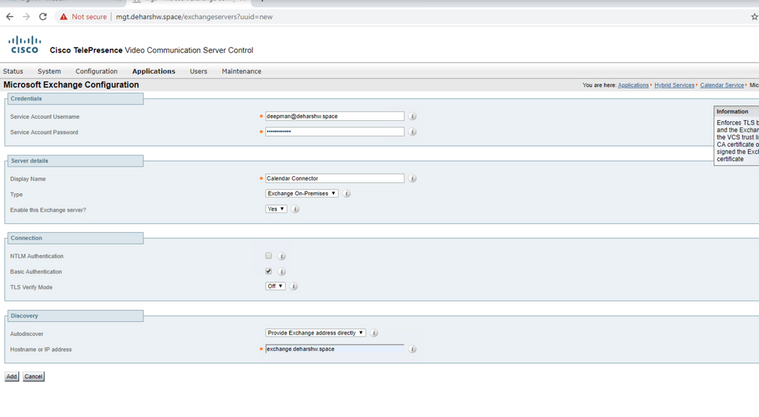
Step 4. In the field Scheduling Account Email Address, you require to configure an email account on the Exchange Side.
The scheduling account is used as the meeting organizer for all meetings booked from Webex Devices. This account books the room the same way as a user normally does. When the meetings are booked from the scheduling account and a room is invited, the room policies in the calendaring system are respected. Ensure that you have entered a valid email address that has permission to book the rooms for which you have enabled Room Booking.
Since this account is used to book meetings for all the rooms for a given Exchange configuration, it’s important to make sure that its mailbox is regularly cleaned up, in order to not reach or exceed the Exchange mailbox limits. If your Exchange is already set up with a suitable retention policy, make sure it applies to this account. If not, you must configure the mailbox so that all default folders (emails, sent items, and meetings) are automatically deleted after a number of days. The account at the end is like a normal Email Account that is used solely for scheduling purposes.
Step 5. In the Autodiscovery section, you must Use Autodiscover.

Note: Expressway-C uses Active Directory domain or Directory Site name to locate the AD.
You can either use SCP or not. If you set this field to Yes, the first autodiscover step that the calendar connector takes is an Active Directory Service Connection Point (SCP) record lookup to get a list of autodiscover URLs. The calendar connector uses the Active Directory domain, Active Directory site, Query mode, and LDAP TLS Verify Mode and fields only if you enable this step. These fields provide the information necessary to find and query an LDAP server in Active Directory. Even if this step fails, autodiscovery must succeed at a later step.
If you want to continue without SCP, then you just need to add the email address of a user so that the calendar connector can test the autodiscovery process.
Use the email address of a user that you have enabled for the Hybrid Calendar Service, as it appears in Control Hub.

Note: It is recommended to create a specific account on the Exchange server for the Scheduling Account and for the Autodiscovery one. There is no specific way to name those accounts.
Step 6. Click on Add.
Step 7. Wait for the server to build a connection with the Microsoft Exchange server, if there is an error then it must pop up on top, otherwise, the land page is shown as in the image

Configure the Calendar Connector’s Webex Site Settings
Step 1. From the Expressway-C connector host, navigate to Applications > Hybrid Services > Calendar Service > Cisco Conferencing Services Configuration, and then click New.
Step 2. Select Type as Webex under Conferencing Services Type.
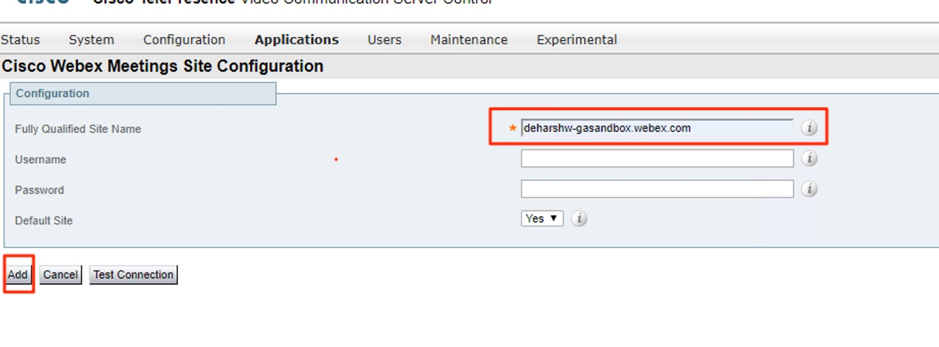
Step 3. Enter the Fully Qualified Site Name for this Cisco Webex Meetings site.
Example:
If your site is accessed as example-co.webex.com, you must enter example-co.webex.com.
Step 4. Enter a valid Webex user account email address, leave the password field blank, and then click Test Connection to validate the site information that you entered. If the connection test fails, you can save the configuration with both the user name and password fields blank.
Step 5. Indicate whether or not this site is the default.
The default site is used for @webex unless the user has a different site configured in their My Personal Room setting in the Webex app (either because the user's Webex site has been linked to Webex by an administrator, or because the user configured the setting with a different site).
Step 6. Click Save to save the configuration.
Step 7. Review the Cisco WebEx Meetings Site UUID
Step 8. Start the Calendar Connector. Navigate to Expressway-C > Applications > Hybrid Services > Connector Management > Select Calendar Connector. The status must change from Not Enabled to Running.
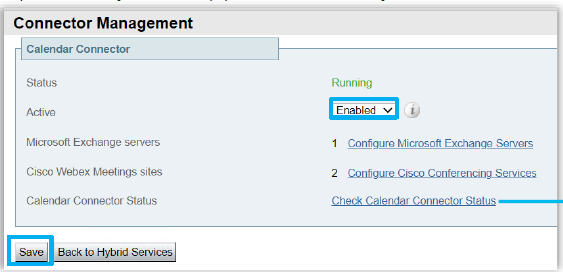
Step 9. Navigate to Applications > Hybrid Services > Calendar Services > Calendar Connector Status and verify the Status.

Configure @webex and @meet Keywords
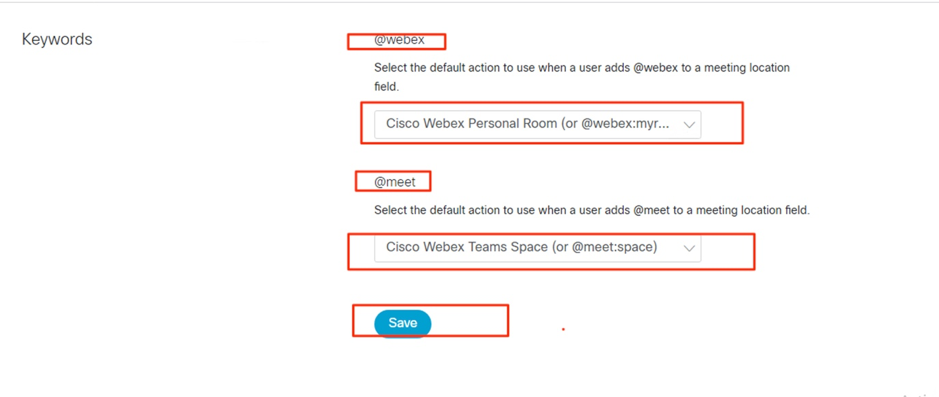
When users add @webex to a meeting location by default, the calendar service updates the meeting with their Cisco Webex Personal Room details. When users add @meet, by default, the service updates the meeting with Cisco Webex space details. As an administrator, you can change these default actions for either keyword.
Regardless of how you set these actions, power users can add the modifier :space or :myroom to specify the action for either keyword. For instance, if you add @webex:space, it causes the service to update the meeting with Webex space details.
Step 1. From the customer view in https://admin.webex.com, navigate to Services.
Step 2. From the Hybrid Calendar card for your calendar environment, click Edit settings.
Note: If you have the Hybrid Calendar Service set up for multiple calendar environments, you can access the keywords settings from multiple pages in Control Hub, but the values that you set apply to all environments.
Step 4. In the Keywords section, select the default action that you want for each keyword.
Step 5. Click Save.
Start the Calendar Connector
Step 1. From the Expressway-C, navigate to Applications > Hybrid Services > Connector Management.
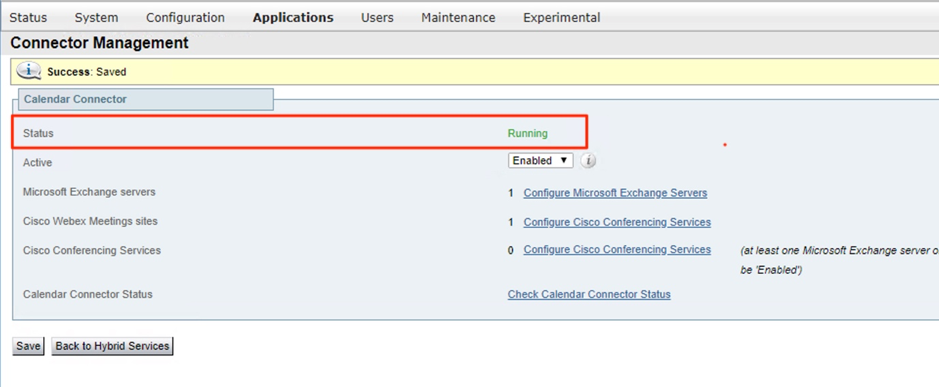
Step 2 The Connector management section of the page has a list of connectors and the status of each one. The Management Connector is Running and the Calendar Connector is Not enabled.
Step 3. Click Calendar Connector.
Step 4. Select Enabled from the Active drop-down list.
Step 5. Click Save.
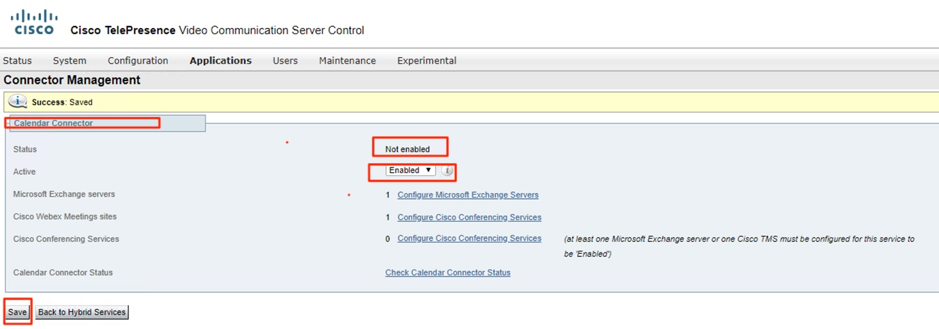
The Calendar Connector starts and the status changes to Running.
Enable the Hybrid Calendar Service for Users
Step 1. From the customer view in https://admin.webex.com, navigate to Users.
Step 2. Choose a specific user from the list, or use the search to narrow the list, and then click the row to open an overview of the user.
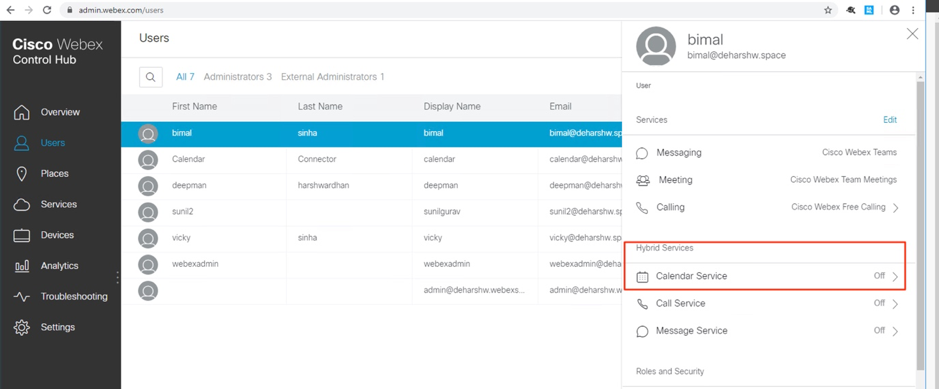
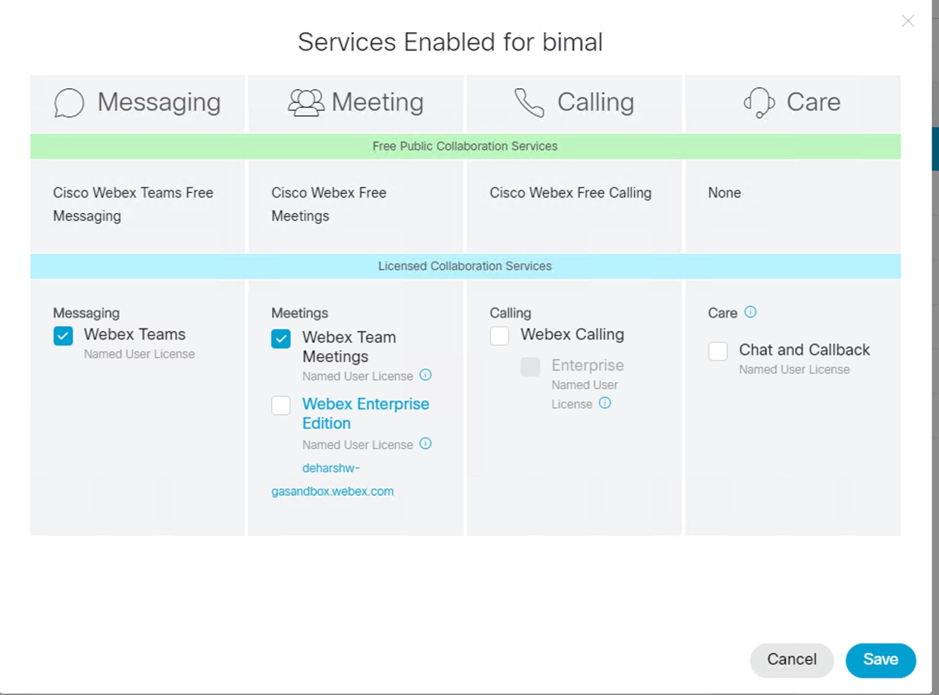
Step 3. Click Edit, and then ensure that the user is assigned to at least one paid service under Licensed Collaboration Services. Make the necessary changes, and then click Save.
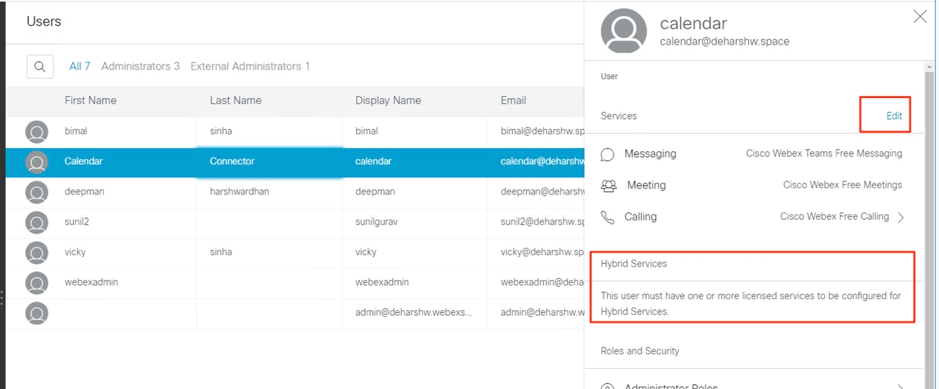
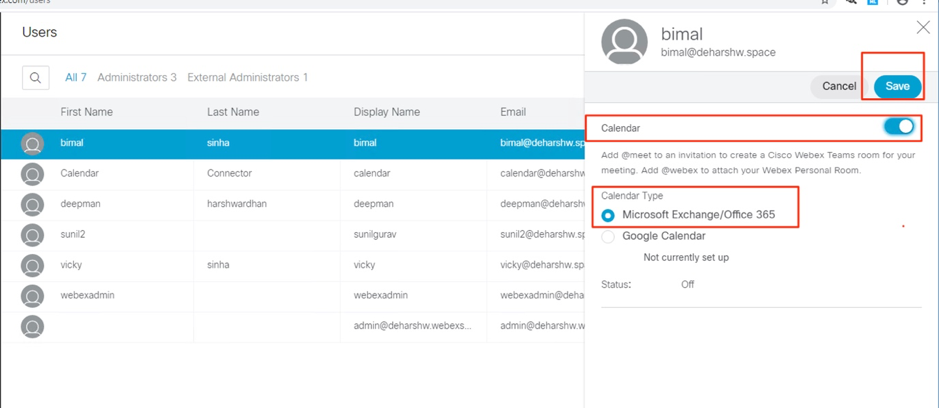
Step 4. Select the Calendar Service, toggle on Calendar, choose Microsoft Exchange and then save your changes.
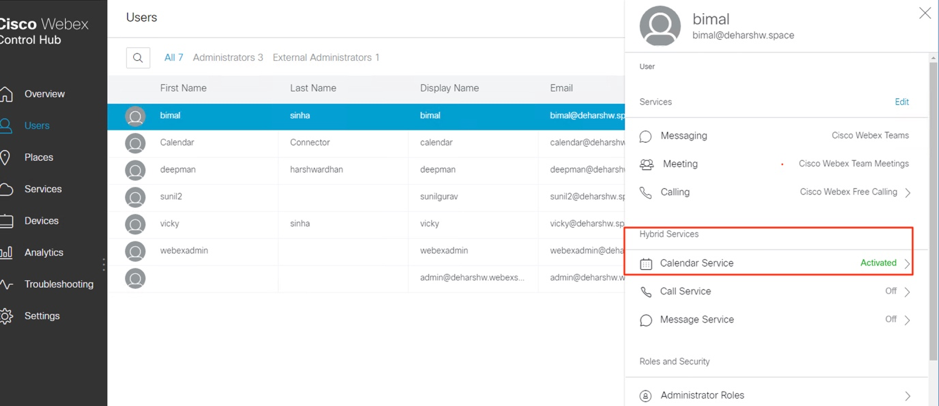
Step 5. After you activate the service, the user status changes from Pending Activation to Activated.

The time length for this change depends on the number of users that you have enabled for the service.
Users receive an email that indicates the feature is enabled.
Register Devices for Calendar Scheduling
Step 1. From the customer view in https://admin.webex.com , navigate to Places, and then click on Add Place.
Step 2. Enter a name for the place (such as the name of the physical room), and then click Next.
Step 3. Choose Other Cisco device, and then click Next.
You can only have one type of device in a single space. For example, you can add up to 10 desk phones to a lobby or a single Cisco Webex Room Device or a Webex Board, but not a combination of the two.
Step 4. Choose a call service to assign to devices in the place:
- Free Calling (default)—For Cisco Webex app and SIP address calling.
- Cisco Webex Calling (formerly Spark Call)—To add PSTN service through a cloud-preferred media provider. Assign a phone number and extension to the device, and then click Next.
- Cisco Webex Hybrid Call Service Connect—To use call service (PSTN access or internal extension access) through your on-premises call control. Unified CM provides the phone number or extension for the devices in the place.
The service discovers where the email address is located on a Unified CM cluster. Once discovered, the service creates the Cisco Spark-RD and identifies the directory number and SIP URI associated with the account.
Step 5. (Optional) Toggle on the calendar service so that people can use One Button to Push (OBTP) on this device, and then click Next.
Step 6. If you chose Hybrid Call Service Connect, enter the Unified CM mail ID for the account that you created earlier, optionally choose the Resource Group that the local Call Connector belongs to, and then click Done.
Step 7. If you toggled on the calendar service, enter or paste the email address of the calendar mailbox for the room device. This is the email address that is used to schedule meetings.
- For devices that are planned to be scheduled in Google Calendar, enter the Google resource email address from G Suites (Calendar > Resources). See About calendar resources (rooms, etc) for more information.
- For devices that are planned to be scheduled in Microsoft Exchange or Office 365, enter the email address of the room mailbox. (See "Create and Manage Room Mailboxes" on the Microsoft Docs website for more information.)
Step 8. Click Next, and then activate the device with the code provided.
Places that you added Hybrid Call Service can take approximately 5 to 10 minutes to activate while the email address, directory URI, and directory number are discovered on a Cisco Unified Communications Manager cluster. After activation, the phone number is displayed on Cisco Webex devices in hybrid-enabled Places.
Associate Users to their Webex Personal Rooms with Cisco Webex
Step 1. Sign in to the Cisco Webex app.
Step 2. Navigate to Meetings.
Step 3. Under My Personal Room, if the Personal Room link does not appear, enter it in the form at https://company.webex.com/meet/username or company.webex.com/meet/username, enter your host PIN, and select Save.
If the link is missed, have users who can schedule meetings that include room or desk devices or boards associate their Personal Rooms with Cisco Webex themselves.
Verify
Test join button with room devices or Personal Meetings
Step 1. In Outlook, Outlook Web Access, create a new meeting and then add a keyword such as @webex:space or @meetto theLocationfield (for room devices) or @webex (for Personal room meetings)
Step 2. Navigate to the Scheduling Assistant and clickAdd room, and choose the device you want to add.
Step 3. Fill out other meeting information as needed, and send the invitation.
Step 4. When the meeting is scheduled to begin, verify that theJoinbutton appears on the device.
- More information on how to Schedule a meeting using @webex or @meet in this Webex help center link.
- More information on how to Show when you are out of office in this Webex help center link.
Troubleshoot
Information to collect
- Organization Name and ID / Webex meeting site
- What are the symptoms of the issue?
- When did the issue start (if it is not a new deployment)?
- Timestamp
- Users / Devices affected
- Meeting invite export (.ics or .eml)
- Expressway logs
Verify the status of users in Control Hub (Single user)
Step 1. Navigate to Control Hub > Management > Users > Select the User.
Step 2. Identify and the Status section. Click it.
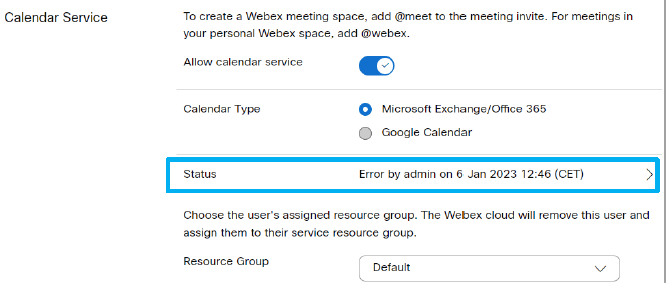

Step 3. Verify the details of the error and act accordingly.
Verify the status of users in Control Hub (User Status Report)
Step 1. Navigate to Control Hub > Services > Hybrid > Select the Hybrid Calendar Tab.
Step 2. Select the users enabled under the Exchange card. A User status Report appears.
Step 3. Select the Activated, Pending Activation and/or error users.
Step 4. Export to CSV.
Check the Hybrid Calendar Status and Events
Step 1. Navigate to Control Hub > Services > Hybrid > Select the Hybrid Calendar Tab.
Step 2. Click on the right-bottom side of the Exchange card.

Verify the Management and Calendar Connector Health
Step 1. Navigate to Expressway-C > Applications > Hybrid Services > Connector Management to see the overall health of all your connectors.
Step 2. Navigate to Applications > Hybrid Services > Calendar Service > Calendar Connector Status to see the Calendar Connector health.
Troubleshoot Alarms and Events
Step 1. Navigate to Expressway-C > Status > Alarms.
Step 2. Navigate to Expressway-C > Status > Logs > Event log.
The Cisco Webex Hybrid Services are tagged [Hybrid Services] and have IDs in the 60000 - 69999 range. (601XX is from Calendar Service).
Step 3. Configure the Logs
- Set the logs to debug level (Maintenance > Diagnostics > Hybrid Services Log Levels).
- Start Diagnostic logging (Maintenance > Diagnostics > Diagnostic Logging)
- Reproduce the issue.
Step 4. Collect the Logs
- Stop the diagnostic Log and Collect (Maintenance > Diagnostics > Hybrid Services Log Levels).
- Send Logs to the Cloud (Cloud Applications > Hybrid Services > Connector Logging)
- The log bundle can be analyzed by the TAC Engineer. Provide the Serial Number of the Expressway or the generated Search Key
- Log Snapshot for intermittent issues (Maintenance > Diagnostic > System Snapshot > Create logs snapshot)

Note: The Expressway must be allowed to HTTPs connect to *.clouddrive.com. TCP Port 443 (secure).

Related Information
Revision History
| Revision | Publish Date | Comments |
|---|---|---|
1.0 |
12-Apr-2023 |
Initial Release |
Contributed by Cisco Engineers
- Deepman HarshwardhanCisco TAC
- Charles KeCisco CX
- Miguel Castillo TorresCisco PS
Contact Cisco
- Open a Support Case

- (Requires a Cisco Service Contract)
 Feedback