Unity Connection Version 10.5 SAML SSO Configuration Example
Available Languages
Download Options
Bias-Free Language
The documentation set for this product strives to use bias-free language. For the purposes of this documentation set, bias-free is defined as language that does not imply discrimination based on age, disability, gender, racial identity, ethnic identity, sexual orientation, socioeconomic status, and intersectionality. Exceptions may be present in the documentation due to language that is hardcoded in the user interfaces of the product software, language used based on RFP documentation, or language that is used by a referenced third-party product. Learn more about how Cisco is using Inclusive Language.
Contents
Introduction
This document describes how to configure and verify Security Assertion Markup Language (SAML) Single Sign-on (SSO) for Cisco Unity Connection (UCXN).
Prerequisites
Requirements
Network Time Protocol (NTP) Setup
For SAML SSO to work, you must install the correct NTP setup and make sure that the time difference between the Identity Provider (IdP) and the Unified Communications applications does not exceed three seconds. For information about synchronizing clocks, see the NTP Settings section in Cisco Unified Communications Operating System Administration Guide.
Domain Name Server (DNS) Setup
Unified Communications applications can use DNS in order to resolve Fully Qualified Domain Names (FQDNs) to IP addresses. The Service Providers and the IdP must be resolvable by the browser.
Active Directory Federation Service (AD FS) Version 2.0 must be installed and configured in order to handle SAML requests.
Components Used
The information in this document is based on these software and hardware versions:
- AD FS Version 2.0 as IdP
- UCXN as Service Provider
- Microsoft Internet Explorer Version 10
The information in this document was created from the devices in a specific lab environment. All of the devices used in this document started with a cleared (default) configuration. If your network is live, make sure that you understand the potential impact of any command.
Background Information
SAML is an XML-based, open-standard data format for data exchange. It is an authentication protocol used by Service Providers in order to authenticate a user. The security authentication information is passed between an IdP and the Service Provider.
SAML is an open standard that enables clients to authenticate against any SAML-enabled collaboration (or Unified Communication) service regardless of the client platform.
All Cisco Unified Communication web interfaces, such as Cisco Unified Communications Manager (CUCM) or UCXN, use SAML Version 2.0 protocol in the SAML SSO feature. In order to authenticate the Lightweight Directory Access Protocol (LDAP) user, UCXN delegates an authentication request to the IdP. This authentication request generated by the UCXN is an SAML Request. The IdP authenticates and returns an SAML Assertion. The SAML Assertion shows either Yes (authenticated) or No (authentication failed).
SAML SSO allows a LDAP user to log into client applications with a username and password that authenticates on the IdP. A user sign-in to any of the supported web applications on Unified Communication products, after you enable the SAML SSO feature, also gains access to these web applications on UCXN (apart from CUCM and CUCM IM and Presence):
|
Unity Connection users |
Web applications |
|---|---|
|
LDAP users with administrator rights |
|
|
LDAP users without administrator rights |
|
Configure
Network Diagram
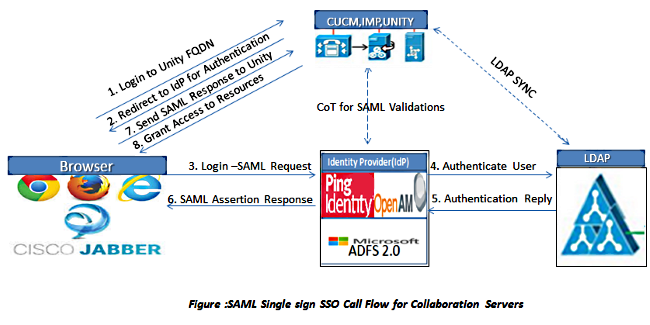
Directory Setup
- Sign into the UCXN Administration Page and select LDAP and click LDAP Setup.
- Check Enable Synchronizing from LDAP Server and click Save.

- Click LDAP.
- Click LDAP Directory Configuration.
- Click Add New.
- Configure these items:
- LDAP directory account settings
- User attributes to be synchronized
- Synchronization schedule
- LDAP server Hostname or IP address and port number
- Check Use SSL if you want to use Secure Socket Layer (SSL) in order to communicate with the LDAP directory.
Tip: If you configure LDAP over SSL, upload the LDAP directory certificate onto CUCM. Refer to the LDAP directory content in the Cisco Unified Communications Manager SRND for information about the account synchronization mechanism for specific LDAP products and general best practices for LDAP synchronization.

- Click Perform Full Sync Now.

Note: Make sure Cisco DirSync service is enabled in the Serviceability web page before you click Save.
- Expand Users and select Import Users.
- In the Find Unified Communications Manager End Users list, select LDAP Directory.
- If you want to import only a subset of the users in the LDAP directory with which you have integrated UCXN, enter the applicable specifications in the search fields.
- Select Find.
- In the Based on Template list, select the Administrator template that you want UCXN to use when it creates the selected users.
Caution: If you specify an administrator template, the users will not have mailboxes.
- Check the check boxes for the LDAP users for whom you want to create UCXN users and click Import Selected.

Enable SAML SSO
- Log into the UCXN Administration user interface.
- Choose System > SAML Single Sign-on and the SAML SSO Configuration window opens.

- In order to enable SAML SSO on the cluster, click Enable SAML SSO.
- In the Reset Warning window, click Continue.
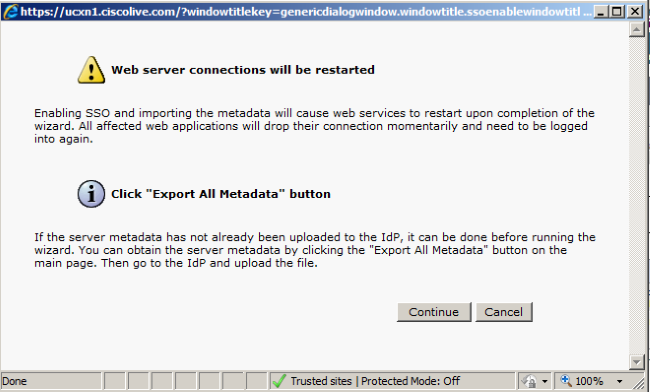
- On the SSO screen, click Browse in order to import the FederationMetadata.xml metadata XML file with the Download Idp Metadata step.

- Once the metadata file is uploaded, click Import IdP Metadata in order to import the IdP information to UCXN. Confirm that the import was successful and click Next to continue.
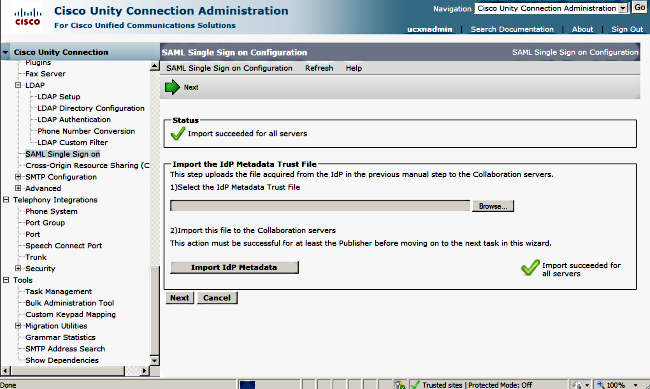
- Click Download Trust Metadata Fileset (do this only if you have not configured ADFS already with UCXN Metadata) in order to save the UCXN metadata to a local folder and go to Add UCXN as Relaying Party Trust. Once the AD FS configuration is completed, proceed to Step 8.

- Select SSO as the administrative user and click Run SSO Test.
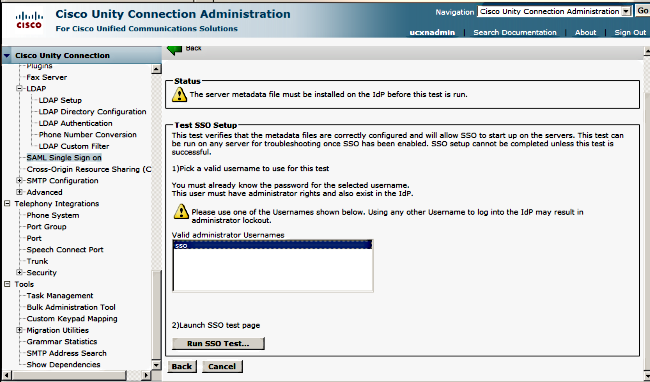
- Ignore Certificate Warnings and proceed further. When you are prompted for credentials, enter user SSO's username and password and click OK.
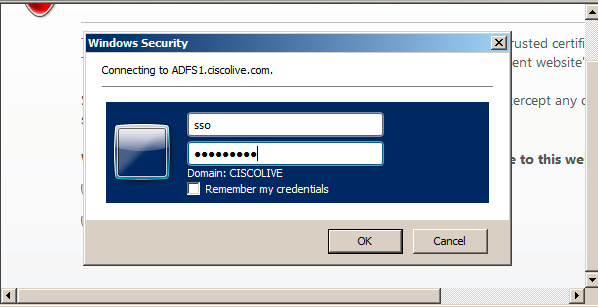
Note: This configuration example is based on UCXN and AD FS self-signed certificates. In case you use Certificate Authority (CA) certificates, appropriate certificates must be installed on both AD FS and UCXN. Refer to Certificate Management and Validation for more information.
- After all steps are complete, you receive the "SSO Test Succeeded!" message. Click Close and Finish in order to continue.
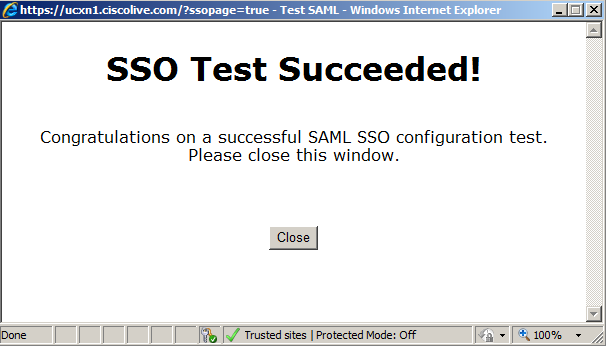
You have now successfully completed the configuration tasks to enable SSO on UCXN with AD FS.
Mandatory Note: Run the SSO Test for UCXN Subscriber if it is a cluster in order to enable SAML SSO. AD FS must be configured for all of the nodes of UCXN in a cluster.
Tip: If you configure all nodes' metadata XML files on IdP and you start to enable the SSO operation on one node, then SAML SSO will be enabled on all of the nodes in the cluster automatically.
You can also configure CUCM and CUCM IM and Presence for SAML SSO if you want to use SAML SSO for Cisco Jabber Clients and give a true SSO experience to end users.
Verify
Open a web browser and enter the FQDN of UCXN and you see a new option under Installed Applications called Recovery URL to bypass Single Sign-on (SSO). Once you click the Cisco Unity Connection link, you are prompted for credentials by the AD FS. After you enter user SSO's credentials, you will be successfully logged into Unity Administration page, Unified Serviceability page.

Note: SAML SSO does not enable access to these pages:
- Prime Licensing Manager
- OS Administration
- Disaster Recovery system
Troubleshoot
There is currently no specific troubleshooting information available for this configuration.
Refer to Troubleshooting SAML SSO for Collaboration Products 10.x for more information.
Contributed by Cisco Engineers
- A M Mahesh BabuCisco TAC Engineer
Contact Cisco
- Open a Support Case

- (Requires a Cisco Service Contract)
 Feedback