Configure Secure Ad Hoc Conference on CUCM 15
Available Languages
Download Options
Bias-Free Language
The documentation set for this product strives to use bias-free language. For the purposes of this documentation set, bias-free is defined as language that does not imply discrimination based on age, disability, gender, racial identity, ethnic identity, sexual orientation, socioeconomic status, and intersectionality. Exceptions may be present in the documentation due to language that is hardcoded in the user interfaces of the product software, language used based on RFP documentation, or language that is used by a referenced third-party product. Learn more about how Cisco is using Inclusive Language.
Introduction
This document describes the configuration of the Secure Ad Hoc Conference on CUCM 15.
Prerequisites
Requirements
Cisco recommends that you have knowledge of these topics:
- CUCM
- VG (Voice Gateway)
- Security concept
Components Used
The information in this document is based on these software and hardware versions:
- CUCM (mix mode) version: 15.0.0.98100-196
- CISCO2921 version: 15.7(3)M4b (use as CA and Secure Conference Bridge)
- NTP Server
- 3 8865NR IP Phone
The information in this document was created from the devices in a specific lab environment. All of the devices used in this document started with a cleared (default) configuration. If your network is live, ensure that you understand the potential impact of any command.
Configure
Task 1. Configure Secure Conference Bridge and register to CUCM.
Step 1. Configure Public key infrastructure server and Trust Point.
Step 1.1. Configure the NTP server and HTTP server.
VG-CME-1(config)#ntp server x.x.x.x (IP address of the NTP server)
VG-CME-1(config)#ip http server
Step 1.2. Configure Public key infrastructure server.
VG-CME-1(config)#crypto pki server testCA
VG-CME-1(cs-server)#database level complete
VG-CME-1(cs-server)#database url nvram:
VG-CME-1(cs-server)#grant auto
VG-CME-1(cs-server)#lifetime certificate 1800
Step 1.3. Configure Trust Point for testCA.
VG-CME-1(config)#crypto pki trustpoint testCA
VG-CME-1(ca-trustpoint)#enrollment url http://x.x.x.x:80 (IP Address of testCA)
VG-CME-1(ca-trustpoint)#revocation-check none
VG-CME-1(ca-trustpoint)#rsakeypair testCA
Step 1.4. Wait around 30 seconds, then issue the command no shutdown in order to enable testCA server.
VG-CME-1(config)#crypto pki server testCA
VG-CME-1(cs-server)#no shutdown
%Some server settings cannot be changed after CA certificate generation.
% Please enter a passphrase to protect the private key
% or type Return to exit
Password:

Re-enter password:
% Generating 1024 bit RSA keys, keys will be non-exportable...
[OK] (elapsed time was 2 seconds)

% Certificate Server enabled.
Step 2. Configure Trust Point for Secure Conference Bridge and register it to testCA.
Step 2.1. Configure Trust Point for Secure Conference Bridge and name it SecureCFB.
VG-CME-1(config)#crypto pki trustpoint SecureCFB
VG-CME-1(ca-trustpoint)#enrollment url http://x.x.x.x:80 (IP Address of testCA)
VG-CME-1(ca-trustpoint)#serial-number none
VG-CME-1(ca-trustpoint)#fqdn none
VG-CME-1(ca-trustpoint)#ip-address none
VG-CME-1(ca-trustpoint)#subject-name cn=SecureCFB
VG-CME-1(ca-trustpoint)#revocation-check none
VG-CME-1(ca-trustpoint)#rsakeypair SecureCFB
Step 2.2. Authenticate SecureCFB and type 'yes' in order to accept the certificate.
VG-CME-1(config)#crypto pki authenticate SecureCFB
Certificate has the following attributes:
       Fingerprint MD5: 383BA13D C37D0E5D 9E9086E4 8C8D1E75
      Fingerprint SHA1: 6DB8F323 14BBFBFF C36C224B B3404513 2FDD97C5

% Do you accept this certificate? [yes/no]: yes
Trustpoint CA certificate accepted.
Step 2.3. Enroll SecureCFB and set a password.
VG-CME-1(config)#crypto pki enroll SecureCFB
%
% Start certificate enrollment ..
% Create a challenge password. You will need to verbally provide this
   password to the CA Administrator in order to revoke your certificate.
   For security reasons your password will not be saved in the configuration.
   Please make a note of it.

Password:
Re-enter password:

% The subject name in the certificate will include: cn=SecureCFB
% The fully-qualified domain name will not be included in the certificate
Request certificate from CA? [yes/no]: yes
% Certificate request sent to Certificate Authority
% The 'show crypto pki certificate verbose SecureCFB' commandwill show the fingerprint.
Step 3. Configure Trust Point for CUCM on Secure Concerence Bridge.
Step 3.1. Download the CallManager certificate from CUCM and copy the pem file (Cisco Unified OS Administration > Security > Certificate Management).
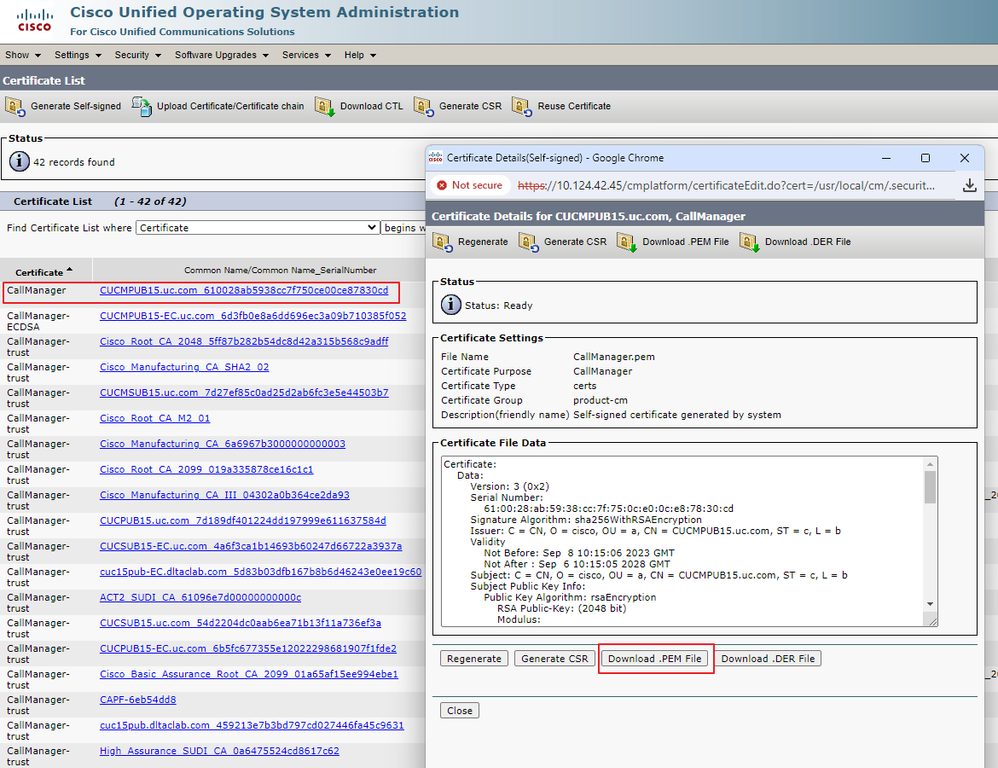 Download CallManager certificate
Step 3.2. Configure Trust Point, paste the pem file, and type yes in order to accept the certificate.
VG-CME-1(config)#crypto pki trustpoint cucm-pub
VG-CME-1(ca-trustpoint)# enrollment terminal
VG-CME-1(ca-trustpoint)# revocation-check none
VG-CME-1(ca-trustpoint)# crypto pki authenticate cucm-pub

Enter the base 64 encoded CA certificate.
End with a blank line or the word "quit" on a line by itself

-----BEGIN CERTIFICATE-----
MIIDozCCAougAwIBAgIQYQAoq1k4zH91DOAM6HgwzTANBgkqhkiG9w0BAQsFADBc
MQswCQYDVQQGEwJDTjEOMAwGA1UECgwFY2lzY28xCjAIBgNVBAsMAWExGTAXBgNV
BAMMEENVQ01QVUIxNS51Yy5jb20xCjAIBgNVBAgMAWMxCjAIBgNVBAcMAWIwHhcN
MjMwOTA4MTAxNTA2WhcNMjgwOTA2MTAxNTA1WjBcMQswCQYDVQQGEwJDTjEOMAwG
A1UECgwFY2lzY28xCjAIBgNVBAsMAWExGTAXBgNVBAMMEENVQ01QVUIxNS51Yy5j
b20xCjAIBgNVBAgMAWMxCjAIBgNVBAcMAWIwggEiMA0GCSqGSIb3DQEBAQUAA4IB
DwAwggEKAoIBAQD4Xfdl9MWY/bSDXzGjtd301vYqKdRpqVYpWD7E+NrH7zRgHhz+
M7gAeqdRCSC/iKUF2g44rCRjlM0C/9xN3pxvOnNequg/Tv0wjpHm0X2O4x0daH+F
AwElWNYZZvUQ6+2xtkTuUcqeXDnnbS6fLIadP/CfgQwKX5U1Ec575ypUet6Fp2n2
4UouLQ5iFEMmX9gzGR7YKjeE+t61X5NmvYc6IyP8MH77sgvti7+xJurlJUnvBFG2
ELXM0rL7uUoqw/rjMT6XxK+0Ft4bkOsVnjI+vOUUBUoTcbFFrsfrcOnVQjPJhHue
MLAaRzkDo5p1xo+UnNgv2uSH9HAID/NS1VTDAgMBAAGjYTBfMAsGA1UdDwQEAwIC
tDAdBgNVHSUEFjAUBggrBgEFBQcDAQYIKwYBBQUHAwIwHQYDVR0OBBYEFKrIBeQi
OF6Hp0QCUfVYzKWiXx2hMBIGA1UdEwEB/wQIMAYBAf8CAQAwDQYJKoZIhvcNAQEL
BQADggEBAJSw2vOwJ4UatmkaFpeLc9B1YZr8X6BkxBY1skW2qOLps61ysjDG61VQ
GjxpPLMY1ISyIVr5dqGyjcaGLCUDUUcu66zEPxFNGnSYimBBhGR6NrDyo4YjOk+S
1I3TfRK+2F9NMhW2xTvuygoXLtyibvrZULhNo3vDPYQdTe1z54oQNU4BD8P+MCq9
+MzltCXEpVU6Jp71zC5HY+GF+Ab/xKBNzDjyY+OT8BFiO2wC8aaEaBvByNRzCSPD
MpU5cRaKVip2pszoR9mG3Rls4CkK93OX/OzFqkIemDmY5WcylcCsybxAMbjdBDY9
err7iQZzjoW3eD5HxJKyvSffjDRtqg8=
-----END CERTIFICATE-----

Certificate has the following attributes:
       Fingerprint MD5: 259A3F16 A5111877 901F00C8 F58C5CE3
      Fingerprint SHA1: E4E91B76 B09C8BDF 81169444 BF5B4D77 E0738987

% Do you accept this certificate? [yes/no]: yes
Trustpoint CA certificate accepted.
% Certificate successfully imported
Step 4. Configure CUCM in order to trust the Secure conference bridge.
Step 4.1. Copy the General Purpose Certificate, and save it as a SecureCFB.pem file. Copy the CA certificate, and save it as testCA.pem file.
VG-CME-1(config)#crypto pki export SecureCFB pem terminal
% CA certificate:
-----BEGIN CERTIFICATE-----
MIIB+zCCAWSgAwIBAgIBATANBgkqhkiG9w0BAQQFADARMQ8wDQYDVQQDEwZ0ZXN0
Q0EwHhcNMjQwNTEwMDg0NDI3WhcNMjcwNTEwMDg0NDI3WjARMQ8wDQYDVQQDEwZ0
ZXN0Q0EwgZ8wDQYJKoZIhvcNAQEBBQADgY0AMIGJAoGBAM2LqiIs9nddFOx/YN7y
hhp9KGl2Eb8Zxq9E2mXfKpHOpbcGEic5ain+rXf1qauA8/pNYwvBurAZm2pWzFHQ
q4qGL8KWDwJCPTwPI5rJOJAMIYzMh4WdQerWP4iEI2LGtxCb1q8b3w0wJE0Q2OG4
4kDSeArkKe0cb26WZC1oVK1jAgMBAAGjYzBhMA8GA1UdEwEB/wQFMAMBAf8wDgYD
VR0PAQH/BAQDAgGGMB8GA1UdIwQYMBaAFJOFqPH+VBcd01d9SzCphNkWGqcWMB0G
A1UdDgQWBBSThajx/lQXHdNXfUswqYTZFhqnFjANBgkqhkiG9w0BAQQFAAOBgQAS
V8x9QjJ5pZKmezDYvxPDFe4chIkCD7o8JOcutSdAi7H+2Z+GO4CF55EDTZdLZPtn
GwQ01gbtDX07PTrOYRWOSZLSJSdPQlTJ3WDNr+NBhZjfe6EzfsLasD8L0VYG96GX
vjRQbdRmqbrG5H0ZUUz0cu93AXjnRl2nLoAkKcrjcQ==
-----END CERTIFICATE-----

% General Purpose Certificate:
-----BEGIN CERTIFICATE-----
MIIB6jCCAVOgAwIBAgIBAjANBgkqhkiG9w0BAQUFADARMQ8wDQYDVQQDEwZ0ZXN0
Q0EwHhcNMjQwNTEwMDg1NTA4WhcNMjcwNTEwMDg0NDI3WjAUMRIwEAYDVQQDEwlT
ZWN1cmVDRkIwgZ8wDQYJKoZIhvcNAQEBBQADgY0AMIGJAoGBALhk11yOPnUNtjEQ
JLJIMPnoc6Zb9vDrGoIlMdsz/cZwKTiGCs9PYYxwcPBExOOR+XrE9MmEO7L/tR6n
NkKz84ddWNz0gg6wHWM9gcje22bIsIeU6UCxo4ovra2pExXphusqEmg5yLQwyeJc
5JqcoAYXuRpnKLTfn5Nnh6iUCsWrAgMBAAGjTzBNMAsGA1UdDwQEAwIFoDAfBgNV
HSMEGDAWgBSThajx/lQXHdNXfUswqYTZFhqnFjAdBgNVHQ4EFgQU3y9zfDoTJ8WV
XIpX3wdcieq1zpkwDQYJKoZIhvcNAQEFBQADgYEABfaa6pqRaDyfpW/tu5pXBRHP
SfZzpv+4ktsjAiOG7oGJGT0RpnuiKCq+V2oucJBtWWAPbVx+ZBG3Eogi1c2GoDLK
yYvuaf9zBJHIcM5mv6x81qxLF7FKZaepQSYwsQUP50/uKXa0435Kj/CZoLpKhXR2
v/p2jzF9zyPIBuQGOEo=
-----END CERTIFICATE-----
Step 4.2. Upload SecureCFB.pem to CallManager-trust store on CUCM (Cisco Unified OS Administration > Security > Certificate Management).
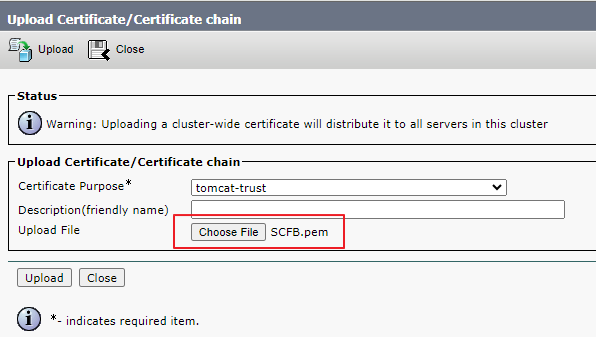 Upload SecureCFB.pem
Step 5. Configure Secure Conference Bridge on VG.
VG-CME-1(config)#voice-card 0
VG-CME-1(config-voicecard)# dsp service dspfarm

VG-CME-1(config)#dspfarm profile 666 conference security
VG-CME-1(config-dspfarm-profile)# trustpoint SecureCFB
VG-CME-1(config-dspfarm-profile)# codec g711ulaw
VG-CME-1(config-dspfarm-profile)# codec g711alaw
VG-CME-1(config-dspfarm-profile)# codec g729r8
VG-CME-1(config-dspfarm-profile)# maximum sessions 4
VG-CME-1(config-dspfarm-profile)# associate application SCCP

VG-CME-1(config)#sccp local GigabitEthernet 0/1
VG-CME-1(config)#sccp ccm x.x.x.x identifier 666 version 7.0+ (IP address of CUCM)
VG-CME-1(config)#sccp

VG-CME-1(config)#sccp ccm group 666
VG-CME-1(config-sccp-ccm)# associate ccm 666 priority 1
VG-CME-1(config-sccp-ccm)# associate profile 666 register SecureCFB

VG-CME-1(config)#dspfarm profile 666 conference security
VG-CME-1(config-dspfarm-profile)# no shutdown
Step 6. Configure Secure Conference Bridge on CUCM (Cisco Unified CM Administration > Media Resources > Conference Bridge > Add New).
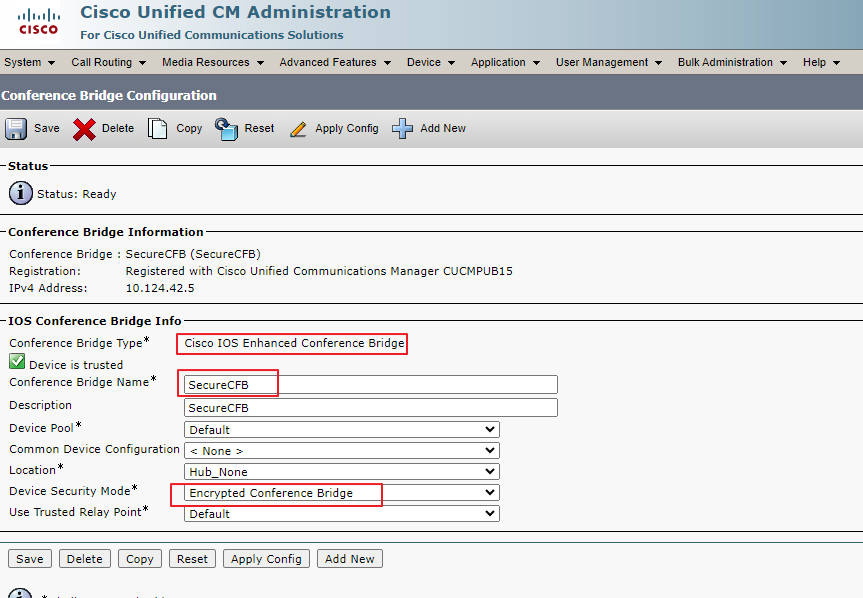 Configure Secure Conference Bridge
Task 2. Register 3 8865NR IP Phones with security mode.
Set Device Security Profile to Encrypted mode on IP Phone.
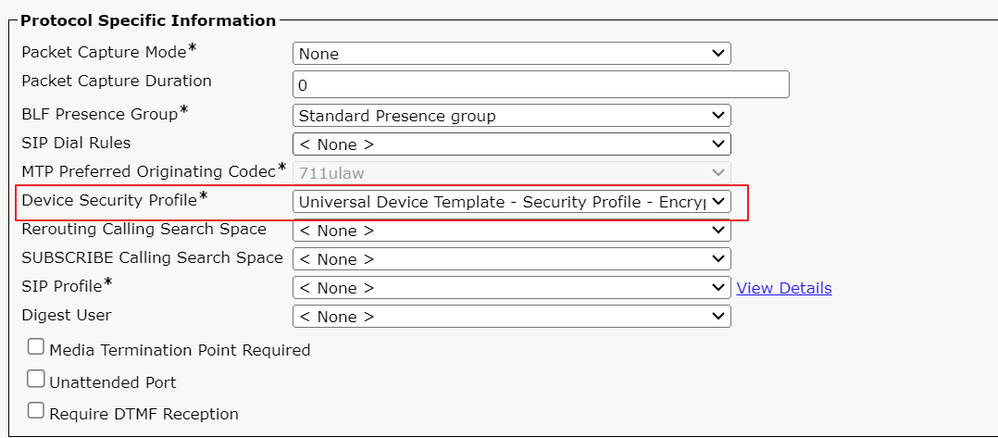 Set Device Security Profile to Encrypted mode
IP Phone shows Security mode with Encrypted under Admin settings > Security Setup.
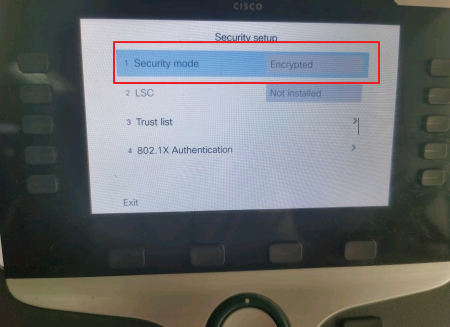 Security mode was Encrypted
Task 3. Configure the Media Resource Group List with Secure Conference Bridge and assign it to the IP Phones.
Step 1. Create a Media Resource Group MRG_SecureCFB and assign SecureCFB to it (Cisco Unified CM Administration > Media Resources > Media Resources Group).
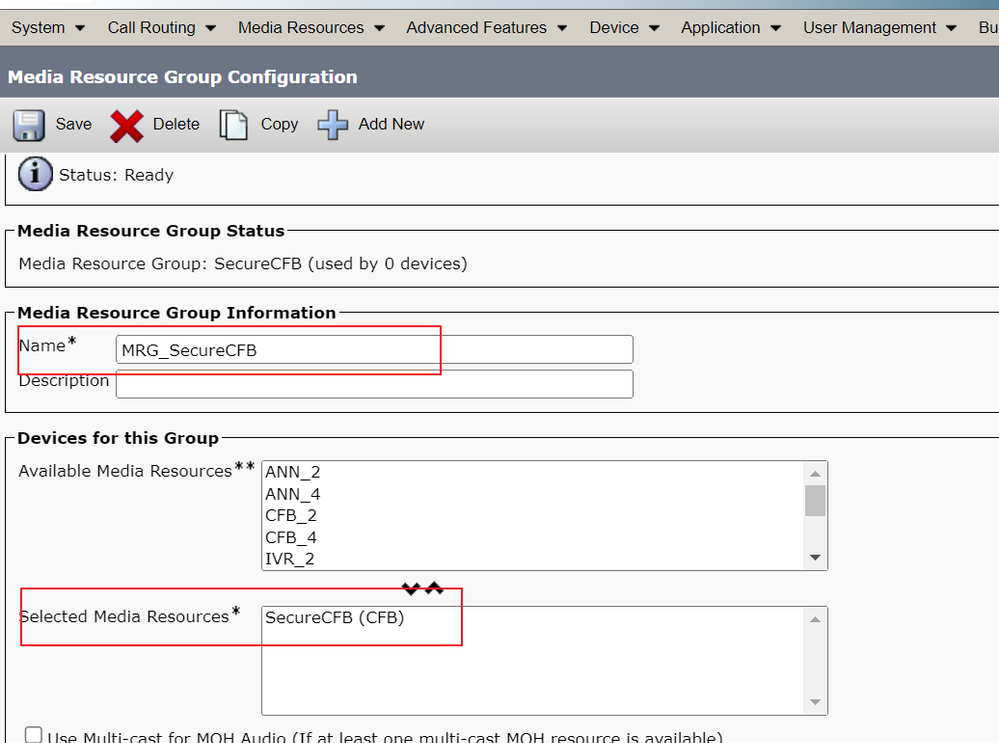 Create a Media Resource Group MRG_SecureCFB
Step 2. Create a Media Resource Group List MRGL_SecureCFB and assign MRG_SecureCFB to it (Cisco Unified CM Administration > Media Resources > Media Resources Group List).
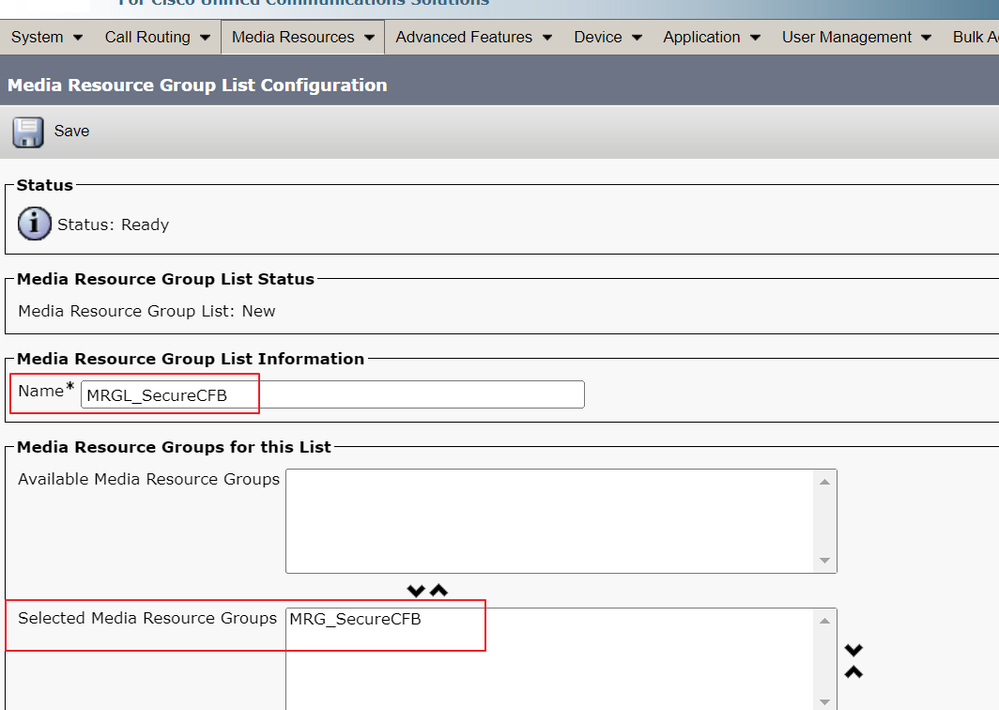 Create a Media Resource Group List MRGL_SecureCFB
Step 3. Assign the Media Resource Group List MRGL_SecureCFB to all the 8865NR.
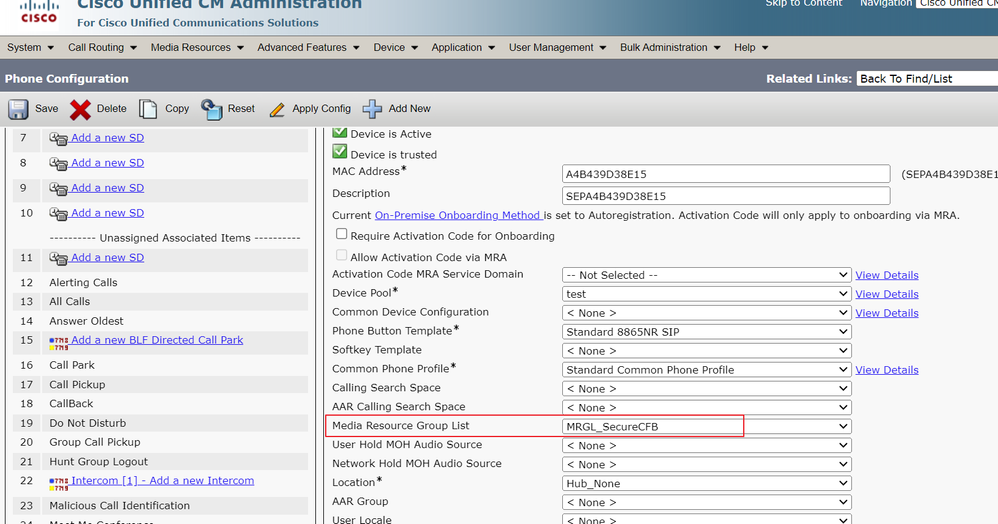 Assign Media Resource Group List
Verify
IP Phone 1 with DN 1001, IP Phone 2 with DN 1002, IP Phone 3 with DN 1003.
Test step.
1. 1001 call 1002.
2. 1001 press conference soft key and call 1003.
3. 1001 press conference soft key to involve the Secure Ad Hoc Conference.
Cisco IP Phones display a conference security icon in order to indicate the call was encrypted.
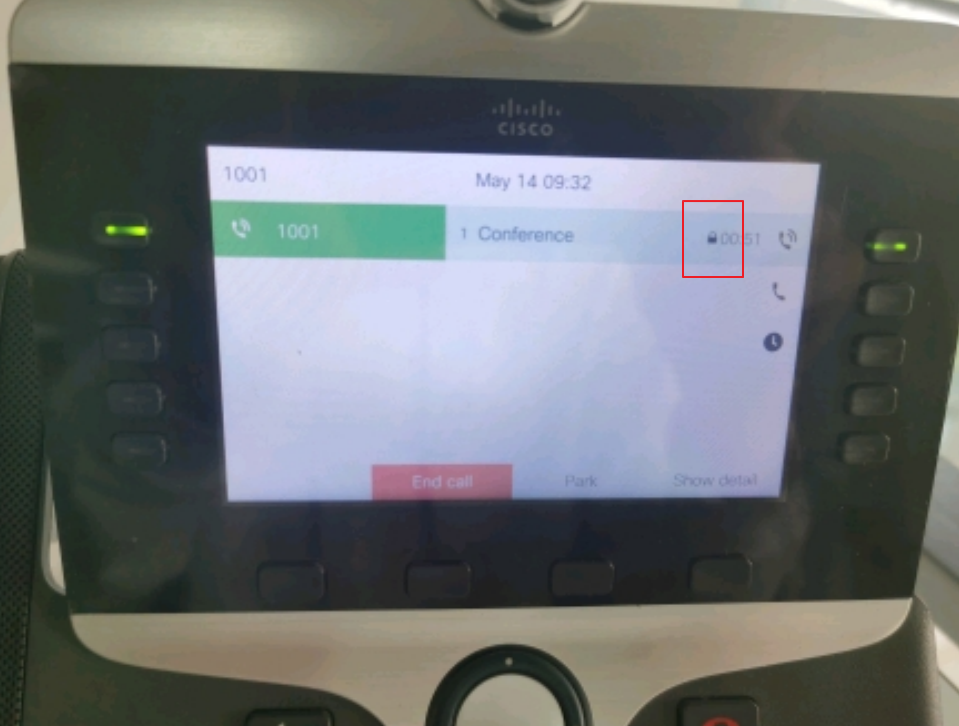 Test call was encrypted
Troubleshoot
Collect the next information via RTMT.
Cisco CallManager (calllogs gives information about the calls, sdl folder contains CUCM traces).
From the SDL trace, it is seen that 1001 sends an SIP REFER message when 1001 press conference soft key to conference 1002 and 1003.
00018751.002 |17:53:18.056 |AppInfo |SIPTcp - wait_SdlReadRsp: Incoming SIP TCP message from x.x.x.x on port 51320 index 7 with 2039 bytes:
[587,NET]
REFER sip:CUCMPUB15 SIP/2.0
Via: SIP/2.0/TLS x.x.x.x:51320;branch=z9hG4bK4d786568
From: "1001" <sip:1001@x.x.x.x>;tag=a4b439d38e15003872a7c133-28fd5212
To: <sip:CUCMPUB15>
Call-ID: a4b439d3-8e150010-2f865ab1-7160f679@x.x.x.x
Session-ID: b14c8b6f00105000a000a4b439d38e15;remote=00000000000000000000000000000000
Date: Tue, 14 May 2024 09:53:17 GMT
CSeq: 1000 REFER
User-Agent: Cisco-CP8865NR/14.2.1
Accept: application/x-cisco-remotecc-response+xml
Expires: 60
Max-Forwards: 70
Contact: <sip:8a854224-e17e-93da-8e71-6a2796f28fc7@x.x.x.x:51320;transport=tls>;+u.sip!devicename.ccm.cisco.com="SEPA4B439D38E15"
Referred-By: "1001" <sip:1001@x.x.x.x>
Refer-To: cid:3e94126b@x.x.x.x
Content-Id: <3e94126b@x.x.x.x>
Allow: ACK,BYE,CANCEL,INVITE,NOTIFY,OPTIONS,REFER,REGISTER,UPDATE,SUBSCRIBE
Content-Length: 1069
Content-Type: application/x-cisco-remotecc-request+xml
Content-Disposition: session;handling=required
<?xml version="1.0" encoding="UTF-8"?>
<x-cisco-remotecc-request>
<softkeyeventmsg>
<softkeyevent>Conference</softkeyevent>
<dialogid>
<callid>a4b439d3-8e150007-1991b55f-00f9dcf7@x.x.x.x</callid>
<localtag>a4b439d38e1500333f1eb5d4-68656916</localtag>
<remotetag>171~ca425666-d5e7-42aa-a428-23dde46063a5-17600290</remotetag>
</dialogid>
<linenumber>0</linenumber>
<participantnum>0</participantnum>
<consultdialogid>
<callid>a4b439d3-8e150008-415a60f5-7c35c82d@x.x.x.x</callid>
<localtag>a4b439d38e15003562c2c59a-69dbf571</localtag>
<remotetag>176~ca425666-d5e7-42aa-a428-23dde46063a5-17600292</remotetag>
</consultdialogid>
<state>false</state>
<joindialogid>
<callid></callid>
<localtag></localtag>
<remotetag></remotetag>
</joindialogid>
<eventdata>
<invocationtype>explicit</invocationtype>
</eventdata>
<userdata></userdata>
<softkeyid>0</softkeyid>
<applicationid>0</applicationid>
</softkeyeventmsg>
</x-cisco-remotecc-request>
00018751.003 |17:53:18.056 |AppInfo |SIPTcp - SignalCounter = 300
Then, CUCM does digit analysis and finally routes to device SecureCFB.
00018997.000 |17:53:18.134 |SdlSig |CcRegisterPartyB |tcc_register_party_b |Cdcc(1,100,39,7) |Cc(1,100,38,1) |1,100,251,1.33^*^* |[R:N-H:0,N:2,L:0,V:0,Z:0,D:0] CI=17600297 CI.branch=0 CSS= AdjunctCSS= cssIns=0 aarCSS= aarDev=F FQDN=pi=0si1 CallRef=0 OLC=1 Name=locale: 1 Name: 4 UnicodeName: pi: 0 encodeType=10 qsig-encodeType=10 ConnType=3 XferMode=8 ConnTime=3 nwLoc=0IpAddrMode=0 ipAddrType=0 ipv4=x.x.x.x:0 region=Default capCount=6 devType=1 mixerCId=16778218 mediaReq=0 portToPort.loc=0 MOH.MRGLPkid= MOH.userHoldID=0 MOH.netHoldID=0 MOH.supp=1 devName=SECURECFB mobileDevName= origEMCCCallingDevName= mobilePartyNumber=pi=0si1 mobileCallType=0 ctiActive=F ctiFarEndDev=1 ctiCCMId=1 devCepn=38281c14-d78f-46d6-8199-63297bcfddae lineCepn= activeCaps=0 VideoCall=F MMUpdateCapMask=0x3e MMCap=0x1 SipConfig: BFCPAllowed=F IXAllowed=F devCap=0 CryptoCapCount=6 secure=3 loginId= UnicodeName: retriedVideo=FFromTag=ToTag=CallId= UAPortFlag=F wantDTMFRecep=1 provOOB=0 supp DTMF=1 DTMF Cfg=1 DTMF PT=() DTMF reqMed=1 isPrefAltScript=F cdpnPatternUsage=2 audioPtyId=0 doNotAppendLineCSS=F callingDP= BCUpdate=0 ccBearCap.itc=0 ccBearCap.l=0 ccBearCap.itr=0 protected=1 flushCapIns=0 geolocInfo=null locPkid= locName= deductBW=F fateShareId= videoTrafficClass=Unspecified bridgeParticipantID callingUsr= remoteClusterID= isEMCCDevice=F dtmCall=F dtmPrimaryCI=0 dtmMediaIFPid=(0,0,0,0) dtmMcNodeId=0 dtmMTPForDTMFTranslation=F emc=T QSIGIMERoute=F eo=0 eoUpdt=1 vCTCUpdt=1 honorCodec=F honorUpdt=1 finalCalledPartition= cTypeUpdt=0 BibEnabled=0 RecordingQSIGAPDUSupported=F FarEndDeviceName=LatentCaps=null icidVal= icidGenAddr= oioi= tioi= ptParams= CAL={v=-1, m=-1, tDev=F, res=F, devType=0} displayNameUpdateFieldFlag=0 CFBCtrlSecIcon=F connBeforeANN=F External Presentation Info [ pi=0si1locale: 1 Name: UnicodeName: pi: 0 mIsCallExternal=F ] ControlProcessType=0 controlProcessTypeUpdateFieldFlag=1 origPi=0
Related Information
- https://www.cisco.com/c/en/us/td/docs/voice_ip_comm/cucm/security/15_0/cucm_b_security-guide-release-15.pdf
- Cisco Technical Support & Downloads

Note: Secure Conference Over Trunks and Gateways Unified Communications Manager supports secure conference over intracluster trunks (ICTs), H.323 trunks/gateways, and MGCP gateways; however, encrypted phones that are running release 8.2 or earlier revert to RTP for ICT and H.323 calls, and the media does not get encrypted. If a conference involves a SIPtrunk, the secure conference status is nonsecure. In addition, SIPtrunk signaling does not support secure conference notifications to off-cluster participants.
Revision History
| Revision | Publish Date | Comments |
|---|---|---|
1.0 |
06-Sep-2024 |
Initial Release |
Contributed by Cisco Engineers
- Alan LiuCisco TAC Engineer
Contact Cisco
- Open a Support Case

- (Requires a Cisco Service Contract)
 Feedback