Configure SAML SSO on Cisco Unified Communications Manager with ADFS 3.0
Available Languages
Download Options
Bias-Free Language
The documentation set for this product strives to use bias-free language. For the purposes of this documentation set, bias-free is defined as language that does not imply discrimination based on age, disability, gender, racial identity, ethnic identity, sexual orientation, socioeconomic status, and intersectionality. Exceptions may be present in the documentation due to language that is hardcoded in the user interfaces of the product software, language used based on RFP documentation, or language that is used by a referenced third-party product. Learn more about how Cisco is using Inclusive Language.
Contents
Introduction
This document describes the steps to configure Single Sign-On with Active Directory Federation Service (ADFS 3.0) with the use of Windows 2012 R2 on Cisco Unified Communication Manage (CUCM), Cisco Unity Connection (CUC), Expressway products. Steps to configure Kerberos are also included in this document.
Prerequisites
Requirements
Cisco recommends that you have knowledge of Single Sign-On (SSO) and Windows products.
Components Used
The information in this document is based on these software and hardware versions:
- CUCM 11.5
- CUC 11.5
- Expressway 12
- Windows 2012 R2 Server with these roles:
- Active Directory Certificate Services
- Active Directory Federation Services
The information in this document was created from the devices in a specific lab environment. All of the devices used in this document started with a cleared (default) configuration. If your network is live, ensure that you understand the potential impact of any command.
Configuration Pre-Check
Before you install ADFS3, these server roles need to already exist in the environment:
• Domain Controller and DNS
• All servers must be added as A Records along with their Pointer Record (a type of DNS record that resolves an IP address to a domain or hostname)
A Records
In fhlab.com. hosts cmpubhcsc, cmsubhcsc, cucpubhcsc, cucsubhcsc, expwyc, expwye, impubhcsc and imsubhcsc have been added.

Pointer (PTR) Records

SRV Records are Needed to be in Place for Jabber Discovery Services

-
Root CA (assuming the certificates will be Enterprise CA-signed)
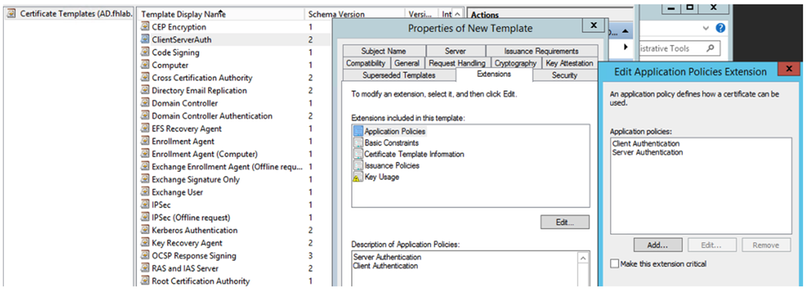
A Certificate Template needs to be created based on the Web Server Certificate Template, the former is duplicated, renamed and on the Extensions tab, Application Policies is modified adding a Client Authentication Application Policy. This template is needed to sign all internal certificates (CUCM, CUC, IMP and Expressway Core) in a LAB environment the internal CA can also sign the Expressway E Certificate Signing Requests (CSR).

The template created needs to be issued to be able to sign CSR.

On the CA certificate web, select the template that has been created previously.

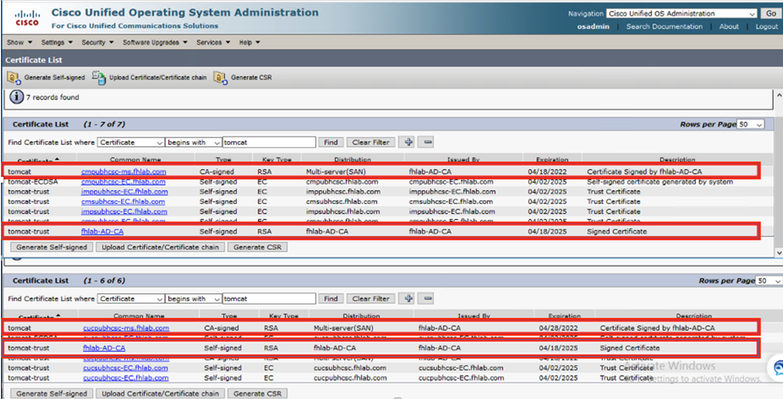
CUCM, IMP and CUC Multi-Server CSR must be Generated and signed by the CA. The Certificate purpose must be tomcat.

CA Root Certificate must be uploaded to Tomcat Trust and the signed Certificate to tomcat.

-
IIS
If not, this section will go thru the installation of these roles. Otherwise, skip this section and proceed directly to the download of ADFS3 from Microsoft.
After you install Windows 2012 R2 with DNS, promote the server to a Domain Controller.
The next task will be to install Microsoft Certificate Services.
Navigate to Server Manager and add a new role:

Select the Active Directory Certificate Services role.

And deploy these services - Certificate Authority Certificate Enrollment Policy Web Service first. After those two roles are installed, configure them and then install Certificate Enrollment Web Service and Certificate Authority Web Enrollment. Configure them.
Additional role services and features required such as IIS will also be added, when the Certification Authority is installed.
Depending on your deployment, you can select Enterprise or Standalone.

For the CA Type, you can select Root CA or Subordinate CA. If there is no other CA already running in the organization, select Root CA.

The next step is to create a private key for your CA.

This step is only needed if you install the ADFS3 on a separate Windows Server 2012. After you configure the CA, the Role Services for IIS needs to be configured. This is necessary for Web Enrollment on the CA. For most ADFS deployments, an extra Role in IIS, click on ASP.NET under Application Development is required.

In Server Manager, click on Web Server > IIS, and then right-click on Default Web Site. The Binding needs to be changed to also allow HTTPS in addition to HTTP. This is done to support HTTPS.

Select Edit Bindings.

Add a new Site Binding and select HTTPS as the type. For the SSL certificate, pick the server certificate that should have the same FQDN as your AD server.

All the prerequisite roles are installed in the environment, so now you can proceed with the installation of ADFS3 Active Directory Federation Services (on Windows Server 2012).
For the Server Role, navigate to Server Manager > Manage > Add Server Roles and Features and then select Active Directory Federation Services if you install the IDP inside the customer network, on the private LAN.


Once the installation completes, you can open it from the taskbar or start menu.

ADFS3 Initial Configuration
This section will go thru the installation of a new, Stand-alone Federation server but it can also be used to install it on a Domain Controller
Select Windows and type AD FS Management in order to launch the ADFS Management console as shown in the image.

Select the AD FS 3.0 Federation Server Configuration Wizard option in order to start your ADFS server configuration. These screenshots represent the same steps in AD FS 3.

Select Create a new Federation Service and click Next.

Select Stand-alone Federation Server and click Next as shown in the image.

Under SSL certificate, select the self-signed certificate from the list. The Federation Service name will auto-populate. Click Next.

Review the settings and click Next in order to apply the settings.

Confirm that all the components have completed successfully and click Close in order to end the wizard and return to the main management console. This might take a few minutes.

ADFS is now effectively enabled and configured as an Identity Provider (IdP). Next, you need to add CUCM as a trusted Relying partner. Before you can do this, you need to first do some configuration in CUCM Administration.
Configure SSO on CUCM with ADFS
LDAP Configuration
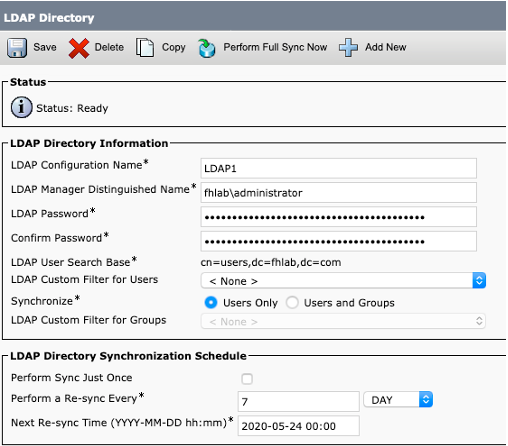
The cluster needs to be LDAP-integrated with Active Directory and LDAP authentication needs to be configured before going any further. Navigate to System tab > LDAP System as shown in the image.

Then, navigate to System tab > LDAP Directory.


After Active Directory users have been synchronized with CUCM, LDAP authentication needs to be configured.

An end-user in CUCM needs to have certain Access Control Groups assigned to his/her end-user profile. The ACG is Standard CCM Super Users. The user will be used to test SSO when the environment is ready.

CUCM Metadata
This section will show the process for the CUCM Publisher.
The first task is to get the CUCM metadata, for that you need to browse to the URL; https://<CUCM Pub FQDN>:8443/ssosp/ws/config/metadata/sp or it can be downloaded from System tab > SAML Single Sign-on. This can be done per node or Cluster Wide. Preferable to do this Cluster Wide.

Save the data locally with a meaningful name such as sp_cucm0a.xml, you are going to need it after.
Configure ADFS Relying Party
Flip back to the AD FS 3.0 Management console.

Click on Add Relying Party Trust Wizard.

Click Start to continue.
Select the federationmedatada.xml metadata XML file that you saved earlier and click Next.

Use CUCM_Cluster_Wide_Relying_Party_trust as the display name and click Next.

Select the first option and click Next.

Select Permit all users to access this relying party and click Next as shown in the image.

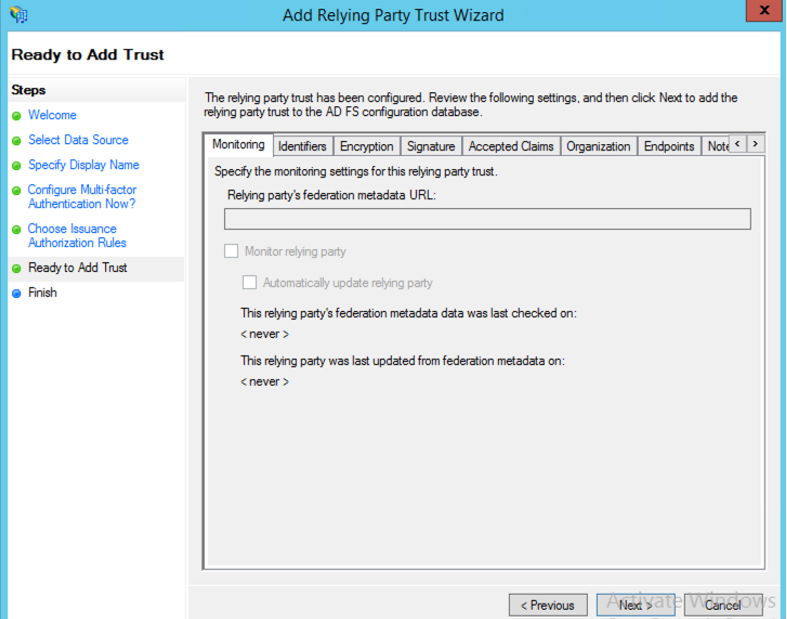
Review the configuration and click Next as shown in the image.

Uncheck the box and click Close.

With the secondary mouse button select the Relying Party Trust you just created and Edit Claim Rules configuration as shown in the image.

Click Add Rule as shown in the image.

Select Send LDAP Attributes as Claims and click Next.

Configure these parameters:
Claim Rule Name: NameID
Attribute Store: Active Directory (double Click the drop-down menu arrow)
LDAP Attribute: SAM-Account-Name
Outgoing Claim Type: uid
Click FINISH/OK to continue.
Please note that uid is not in lower case and does not already exist in the drop-down menu. Type it.

Click Add Rule again in order to add another rule.

Select Send Claims Using a Custom Rule and click Next.

Create a custom rule called Cluster_Side_Claim_Rule.
Copy and paste this text in the rule window directly from here. Sometimes, quotes are changed if edited on a text editor and that will make the rule to fail when you test SSO:
c:[Type ==

"http://schemas.microsoft.com/ws/2008/06/identity/claims/windowsaccountname"]
=> issue(Type = "http://schemas.xmlsoap.org/ws/2005/05/identity/claims/nameidentifier",
Issuer = c.Issuer, OriginalIssuer = c.OriginalIssuer, Value = c.Value, ValueType = c.ValueType,
Properties["http://schemas.xmlsoap.org/ws/2005/05/identity/claimproperties/format"] =
"urn:oasis:names:tc:SAML:2.0:nameid-format:transient",
Properties["http://schemas.xmlsoap.org/ws/2005/05/identity/claimproperties/namequalifier"]
= "http://<ADFS FQDN>/adfs/com/adfs/services/trust",
Properties["http://schemas.xmlsoap.org/ws/2005/05/identity/claimproperties/spnamequalifier"] =
"<CUCM Pub FQDN>");

c:[Type == "http://schemas.microsoft.com/ws/2008/06/identity/claims/windowsaccountname"]
=> issue(Type = "http://schemas.xmlsoap.org/ws/2005/05/identity/claims/nameidentifier",
Issuer = c.Issuer, OriginalIssuer = c.OriginalIssuer, Value = c.Value, ValueType = c.ValueType,
Properties["http://schemas.xmlsoap.org/ws/2005/05/identity/claimproperties/format"] =
"urn:oasis:names:tc:SAML:2.0:nameid-format:transient",
Properties["http://schemas.xmlsoap.org/ws/2005/05/identity/claimproperties/namequalifier"] =
"http://AD.fhlab.com/adfs/services/trust",
Properties["http://schemas.xmlsoap.org/ws/2005/05/identity/claimproperties/spnamequalifier"] =
"cmpubhcsc.fhlab.com");
Click Finish to continue.

You should now have two rules defined on ADFS. Click Apply and OK to close the rules window.

CUCM is now successfully added as a trusted relying party to ADFS.

Before you continue, please Restart the ADFS service. Navigate to Start Menu > Administrative Tools > Services.
IDP Metadata
You need to provide CUCM with information about our IdP. This information is exchanged using XML metadata. Ensure to perform this step on the server where ADFS is installed.

First, you need to connect to the ADFS (IdP) using a Firefox browser to download the XML metadata. Open a browser to https://<ADFS FQDN>/FederationMetadata/2007-06/FederationMetadata.xml and SAVE the metadata to a local folder.
Now, navigate to CUCM configuration to the system Menu > SAML Single Sign-On menu.

Flip back to the CUCM Administration and select SYSTEM > SAML Single Sign-On.

Select Enable SAML SSO.
Click Continue in order to acknowledge the warning.

On the SSO screen and click on Browse.. in order to import the FederationMetadata.xml metadata XML file you saved earlier as shown in the image.

Select the XML file and click Open in order to upload it to CUCM from the Downloads under Favourites.

Once uploaded click on Import IdP Metadata to import the IdP information to CUCM. Confirm the import was successful and click Next to continue.

Select the user belonging to the Standard CCM Super Users and click RUN SSO TEST.

When presented with a user authentication dialogue box login with the appropriate username and password.

If everything was correctly configured you should see a message saying SSO Test Succeeded!

Click CLOSE and FINISH to continue.
We have now successfully completed the basic configuration tasks to enable SSO on CUCM using ADFS.
Configure SSO on CUC
The same process can be followed to enable SSO in Unity Connection.
LDAP integration with CUC.

Configure LDAP Authentication.

Import the Users from LDAP that will have voicemail assigned and also the user that will serve for testing SSO.

Navigate to Users > Edit > Roles as shown in the image.

Assign the testing user the role of System Administrator.

CUC Metadata
You should have by now downloaded CUC metadata, created the RelyingPartyTrust for CUC and uploaded CUC metadata and created the rules I AD FS on ADFS 3.0

Go to SAML Single Sign-On and Enable SAML SSO.

Configure SSO on Expressway
Import Metadata to Expressway C
Open a browser to https://<ADFS FQDN>/FederationMetadata/2007-06/FederationMetadata.xml and SAVE the metadata to a local folder
Upload to Configuration > Unified Communications > IDP.
Export Metadata From Expressway C
Go to configuration -> Unified Communications -> IDP -> Export SAML Data
Cluster mode uses a self-signed certificate (with long lifetime) that is included in the SAML
metadata and used for signing SAML requests
-
On cluster-wide mode, to download the single cluster-wide metadata file, click Download
-
On per-peer mode, to download the metadata file for an individual peer, click Download next to the peer. To export all in a .zip file, click Download All.
Add a Relying Party Trust for Cisco Expressway-E
First, create Relying Party Trusts for the Expressway-Es and then Add a claim rule to send identity as UID attribute.

OAuth with Refresh Login
In Cisco CUCM Enterprise Parameters, Verify OAuth with Refresh login flow parameter is enabled. Go to Cisco Unified CM Administration > Enterprise Parameters > SSO and OAuth Configuration.

Authentication Path

- If the authentication path is set to “SAML SSO authentication” only Jabber clients using an SSO enabled Unified CM cluster would be able to use MRA on this Expressway. This is an SSO only configuration.
- Expressway MRA support for all IP phones, all TelePresence endpoints, and any Jabber clients homed to a Unified CM cluster not configured for SSO will require the authentication path to include UCM/LDAP authentication.
- If one or more of the Unified CM clusters supports Jabber SSO, select the “SAML SSO and UCM/LDAP” to allow for both SSO and basic authentication.
SSO Architecture
SAML is an XML-based open-standard data format that enables administrators to access a defined set of Cisco collaboration applications seamlessly after signing into one of those applications. SAML SSO uses the SAML 2.0 protocol to offer cross-domain and cross-product single sign-on for Cisco collaboration solutions.
On-Premise Login Flow

MRA Login Flow

OAuth
OAuth is a standard which supports authorization. A user must be authenticated before they can be authorized. The authorization code grant flow provides a method for a client to obtain access and refresh tokens to access a resource (Unified CM, IM&P, Unity and Expressway services). This flow is also based on redirection and thus requires the client to be able to interact with an HTTP user-agent (web browser) controlled by the user. The client will make an initial request to the authorization server using HTTPS. The OAuth server redirects the user to an authentication service. This may be running on Unified CM or an external IdP if SAML SSO is enabled. Depending on the authentication method being used, a web page view may be presented to the end user to authenticate themselves. (Kerberos authentication is an example that would not display a web page.) Unlike the implicit grant flow, a successful authentication code grant flow will result in the OAuth servers issuing an “Authorization Code” to the web browser. This is a one-use, short-lived unique code that is then passed back from the web browser to the client. The client provides this “Authorization Code” to the authorization server together with a pre-shared secret and receives in exchange an “Access Token” and a “Refresh Token”. The client secret used in this step enables the authorization service to limit the use to only registered and authenticated clients. The tokens are used for the following purposes:
Access/Refresh Token
Access Token: This token is issued by the authorization server. The client presents the token to a resource server when it needs to access protected resources on that server. The resource server is able to validate the token and trusts connections using the token. (Cisco access tokens default to a lifetime of 60 minutes)
Refresh Token: This token again is issued by the authorization server. The client presents this token to the authorization server together with the client secret when the access token has expired or is due to expire. If the refresh token is still valid then the authorization server will issue a new access token without requiring another authentication. (Cisco refresh tokens default to a lifetime of 60 days). If the refresh token has expired, then a new full OAuth authorization code grant flow has to be initiated to obtain new tokens.
OAuth Authorization Code Grant Flow is better
In the implicit grant flow, the access token is passed to the Jabber client via a HTTP user agent (browser). In the authorization code grant flow, the access token is exchanged directly between the authorization server and the Jabber client. The token is requested from the authorization server using a time-limited unique authorization code. This direct exchange of the access token is more secure and reduces risk exposure.
The OAuth authorization code grant flow supports the use of refresh tokens. This delivers a better experience to the end user since they don’t need to re-authenticate as frequently (by default 60 days)
Configure Kerberos
Select Windows Authentication
Internet Information Services (IIS) Manager > Sites > Default Web Site > Authentication > Windows Authentication > Advance Settings.
-
Uncheck Enable Kernel-mode authentication.
-
Ensure Extended Protection is Off.

ADFS Supports both Kerberos NTLM
Ensure that AD FS Version 3.0 supports both the Kerberos protocol and the NT LAN Manager (NTLM) protocol because all Non-Windows clients cannot use Kerberos and rely on NTLM.
In the right-pane, select Providers and ensure Negotiate and NTLM are present under Enabled Providers:

Configure Microsoft Internet Explorer
Ensure that Internet Explorer > Advanced > Enable Integrated Windows Authentication is checked.

Add ADFS URL under Security > Intranet zones > Sites

Add CUCM, IMP, and Unity hostnames to Security > Trusted Sites

User Authentication
Ensure that Internet Explorer > Security > Local Intranet > Security Level for this Zone > Custom Level > User Authentication - Logon > Automatic Logon in Intranet Zone.

Jabber Login in SSO
There are no configuration changes required for Cisco Jabber. If Unified CM has been configured to use SAML SSO with an external IdP the login screen of the IdP may be displayed rather than the Unified CM login screen.

Troubleshoot
Most of the lesson learned was during our lab setup.
Internet Explorer (IE)
Ensure that you can log in to CUCM/IM&P using SSO in IE browser as a prerequisite to test Jabber SSO.
Sites Adding to IE
Click on the Internet Options of the IE and navigate to the Security tab. Click on the Local Intranet > Sites > Advanced. Add the websites to the zone (i.e. Add IDP FQDN to the SITE).

Out of Sync Issue
If you get an error for out of sync something like this.
Invalid SAML response. This may be caused when time is out of sync between the Cisco Unified Communications Manager and IDP servers. Please verify the NTP configuration on both servers. Run "utils ntp status" from the CLI to check this status on Cisco Unified Communications Manager. If there is a time mismatch between CUCM and IdP, you receive this error: "Invalid SAML response." This error might be caused when time is out of sync between the CUCM and IdP servers. For SAML SSO to work, you must install the correct NTP setup and make sure that the time difference between the IdP and the Unified Communications applications does not exceed three seconds.
In order to ensure that your users aren’t affected by server synchronization issues, please set a skew of at least two minutes on the "NotBefore" attribute by following the instructions:
-
Open your Powershell in ADFS.
-
Check the current NotBeforeSkew by running the following command in the Powershell:
Get-ADFSRelyingPartyTrust –identifier “application FQDN”
Get-ADFSRelyingPartyTrust -identifier "cmpubhcsc.fhlab.com"

- In the Powershell response, scroll to the attribute "NotBeforeSkew." The number next to the "NotBeforeSkew" will be the current time skew of that attribute in minutes.

-
Next, set the "NotBeforeSkew" to be 3 minutes by running the following command in the Powershell:
Set-ADFSRelyingPartyTrust –TargetIdentifier “application FQDN" –NotBeforeSkew 3.

-
Check the new "NotBeforeSkew" by running the following command again:
-
Get-ADFSRelyingPartyTrust –identifier “cmpubhcsc.fhlab.com”

* The NotBeforeSkew should now be set to “3”.
NOTE: You can also have to import the metadata from the IDP to SP (i.e. CUCM).
Revoke a Token
https://<CUCMaddress>:8443/ssosp/token/revoke?user_id=<end_user>

https://10.89.228.146:8443/ssosp/token/revoke?user_id=farfar

{"revoked_tokens":{"status":"success","user_id":"farfar","clientID_tokens":
[{"client_id":"C1b4b988f3efa1c3fc97d0d0a36f6b97f244b4fafe55e8d9d78774e305bae9ab1",
"refresh_token":"fa8ff04aabb4a40bc493f810f9fff09a8f735d24fb05df7c9191f294611710a3"},
{"client_id":"C1b4b988f3efa1c3fc97d0d0a36f6b97f244b4fafe55e8d9d78774e305bae9ab1",
"refresh_token":"9ecf6a5092f1167df085f018320e2135b487f585b9cbb3e59474a0643f1a961f"},
{"client_id":"C1b4b988f3efa1c3fc97d0d0a36f6b97f244b4fafe55e8d9d78774e305bae9ab1",
"refresh_token":"30ab864ce41c78b9b4324a46f865dd47add4b16d7717986d715405496119bc87"},
{"client_id":"C1b4b988f3efa1c3fc97d0d0a36f6b97f244b4fafe55e8d9d78774e305bae9ab1",
"refresh_token":"33d025dd7b88fefe99173757a54ada771821d763a23b71cc9ca233e1c91ffd65"},
{"client_id":"C1b4b988f3efa1c3fc97d0d0a36f6b97f244b4fafe55e8d9d78774e305bae9ab1",
"refresh_token":"a5f0d293d3dbbbe4ef1af9379a78df04ed9a168c450de42982e3796cef758c0f"},
{"client_id":"C1b4b988f3efa1c3fc97d0d0a36f6b97f244b4fafe55e8d9d78774e305bae9ab1",
"refresh_token":"252912f2af65346f7ec2887505aef7d0ee2cd918f0253662b9b53ebf45e490e8"},
{"client_id":"C1b4b988f3efa1c3fc97d0d0a36f6b97f244b4fafe55e8d9d78774e305bae9ab1",
"refresh_token":"28c33fcbbc4d47bc6d658855f0699bbe1b3c264c0ed7a04eedc578f6b89fd4de"},
{"client_id":"C1b4b988f3efa1c3fc97d0d0a36f6b97f244b4fafe55e8d9d78774e305bae9ab1",
"refresh_token":"cb5269c40cdf4cc4e2e0a0f520d719851f132691d609ffe65c143952a3f7d2d7"},
{"client_id":"C1b4b988f3efa1c3fc97d0d0a36f6b97f244b4fafe55e8d9d78774e305bae9ab1",
"refresh_token":"acd338a0858c8f140866962e1150bcfd1768b3d8fd959700ed70ea5bff571e83"},
{"client_id":"C1b4b988f3efa1c3fc97d0d0a36f6b97f244b4fafe55e8d9d78774e305bae9ab1",
"refresh_token":"3acee9b52c039e58a0be060c20b8134aea5445ba141d6daedc9fb2366e0eb4d0"},
{"client_id":"C1b4b988f3efa1c3fc97d0d0a36f6b97f244b4fafe55e8d9d78774e305bae9ab1",
"refresh_token":"4a4ac2e56c4663ff20797228b3e67511a56ae3fd1f831303df3642206f8a9742"},
{"client_id":"C1b4b988f3efa1c3fc97d0d0a36f6b97f244b4fafe55e8d9d78774e305bae9ab1",
"refresh_token":"db9ae2351f51e85a01a0dc64b35fa75f052eaa6b3793a29f9dfdb86d589dc97a"},
{"client_id":"C1b4b988f3efa1c3fc97d0d0a36f6b97f244b4fafe55e8d9d78774e305bae9ab1",
"refresh_token":"1118b7fbcaa407541dc8e21ed70ccc581f3e7f58a31fdb94c637d7ac1279a6b8"},
{"client_id":"C1b4b988f3efa1c3fc97d0d0a36f6b97f244b4fafe55e8d9d78774e305bae9ab1",
"refresh_token":"2f33962f1671acc9c7acfb6cff6dff3d9ddf7e2df0a5d7747020347c08e8f18a"},
{"client_id":"C1b4b988f3efa1c3fc97d0d0a36f6b97f244b4fafe55e8d9d78774e305bae9ab1",
"refresh_token":"70a46c24974499c1f87b1b167795c4654460e665f2f5f1696b0a93e2887ae442"},
{"client_id":"C1b4b988f3efa1c3fc97d0d0a36f6b97f244b4fafe55e8d9d78774e305bae9ab1",
"refresh_token":"c05fb1c913a0cbd2984d370365d085ad8315b916a5651511401a695d17129584"},
{"client_id":"C1b4b988f3efa1c3fc97d0d0a36f6b97f244b4fafe55e8d9d78774e305bae9ab1",
"refresh_token":"47ba99793ededfe1cba3f0b83a2738c0a79f1833979ad3c6c362291f92f8fdf8
Perform a manual LDAP sync or delete the user from the database to immediately prevent a user from using Jabber. Even if a Jabber client presents valid access or refresh token to the UDS service on CUCM, the user must be “active” in the CUCM user database to be authenticated.
Changing the Refresh Token expiry timer Enterprise parameter automatically revokes all Refresh Tokens issued by that CUCM cluster.
Bootstrap File
Jabber users are directed to the WebEx Connect cloud for authentication, instead of an on-premises Instant Messaging and Presence (IM&P) server, or through an Expressway (Collaboration Edge) configured for Mobile and Remote Access (MRA).
In Jabber-bootstrap.properties file located @ C:\ProgramData\Cisco Systems\Cisco Jabber file we can exclude webex
ServiceDiscoveryExcludedServices: WebEx
SSO Failing Due MSIS7066
We did encounter a scenario where the SSO failed. When performing an SSO login test to CUCM on Firefox browser, it was redirected to IdP, entered the credentials, but then CUCM displayed the following error:
Invalid Status code in Response. This may be caused by a configuration error in the IDP. Please check the IDP logs and configuration
Took a glance at the ADFS (i.e. IDP) Event Viewer at the below location
Event Viewer -> Application and Services Logs -> AD FS -> Admin
Here is an excerpt of the Error:
Exception details:
Microsoft.IdentityServer.RequestFailedException: MSIS7066: Authentication failed for the request. ---> System.Security.SecurityException: The user name or password is incorrect.
After digging it came out that admin credential of the Domain Controller got changed but ADFS services did not get updated
-
Open the Services configuration window (you can access it from Windows Control Panel > Administrative Tools or from the Start menu when you type services).
-
Find your service (Active Directory Federation Services) and double-click it to open its properties (or right-click it and select Properties).

Contributed by Cisco Engineers
- Farrukh HassanCisco Advanced Services
- Hugo Levya VidalCisco Advanced Services
Contact Cisco
- Open a Support Case

- (Requires a Cisco Service Contract)

 Feedback