Enable UC servers for Extension Mobility Cross Cluster (EMCC)
Available Languages
Download Options
Bias-Free Language
The documentation set for this product strives to use bias-free language. For the purposes of this documentation set, bias-free is defined as language that does not imply discrimination based on age, disability, gender, racial identity, ethnic identity, sexual orientation, socioeconomic status, and intersectionality. Exceptions may be present in the documentation due to language that is hardcoded in the user interfaces of the product software, language used based on RFP documentation, or language that is used by a referenced third-party product. Learn more about how Cisco is using Inclusive Language.
Contents
Introduction
This document describes extension mobility cross cluster feature which is being introduced in Cisco Unified Communications Manager (CUCM) 8.0 and higher releases.
Prerequisites
Requirements
There are no specific requirements for this document.
Components Used
The information in this document is based on these software and hardware versions
- CUCM 9.X and higher
The information in this document was created from the devices in a specific lab environment. All of the devices used in this document started with a cleared (default) configuration. If your network is live, make sure that you understand the potential impact of any command.
Background Information
EMCC Solution
EMCC addresses the problem of extension mobility cross clusters specifies cross-registration. Cross-registration implies these characteristics:
- User from home cluster logs in to a phone at visiting cluster.
- Login procedure conveys the device information into the home cluster database.
- Home cluster database builds a temporary device with user device profile.
- Home cluster TFTP server builds the phone configuration file.
- After login, visiting cluster directs the phone to home cluster TFTP server.
- Phone downloads its TFTP configuration from home cluster (HC) TFTP server and then cross-registers with home cluster Cisco Unified Communications Manager.
Configure
1. Service Activation
Navigate to Cisco Unified Serviceability > Tools > Service Activation.
Choose a server, and activate these services by checking the check box next to each service:
- Cisco CallManager
- Cisco TFTP
- Cisco Extension Mobility
- Cisco Bulk Provisioning Service (can activate only on the publisher)

2. EM Phone Service
-
Navigate to CUCM Administration > Device > Device Settings > Phone Services.
- Create an Extension Mobility phone service.
- In CUCM Administration, navigate to Device > Device Settings > Phone Services.
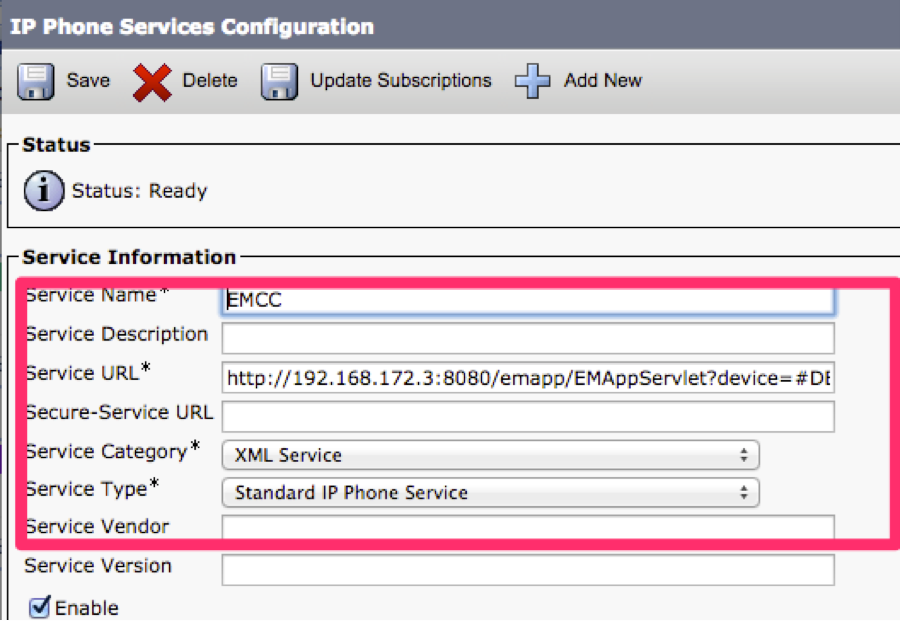
Click Add New, and fill in the fields in the IP Phone Services Configuration window as:
- Service Name: Extension Mobility.
- ASCII Service Name: Extension Mobility.
- Service Description: Extension Mobility.
- Service URL: http://10.89.80.19:8080/emapp/EMAppServlet?device=#DEVICENAME#&EMCC=#EMCC#
- Secure-Service URL:https://10.89.80.19:8443/emapp/EMAppServlet?device=#DEVICENAME#&EMCC=#EMCC#
- Check the Enable check box.
10.Click Save to save the Extension Mobility phone service.
3. Add Device Profile for Users who needs EM
Navigate to CUCM Administration > Device > Device Settings > Device Profile
- Add a device profile for users who need Extension Mobility. The device profile gets used to overlay with a real device when the user logs in (both for Extension Mobility and EMCC). Perform these steps:
1. In CUCM Administration, navigate to Device > Device Settings > Device Profile.
2. Add a new device profile for a specific device type with a specific protocol, assigning a meaningful name to the new device profile. Example:7971 SCCP Device Profile.
3. In the new device profile, configure the EMCC CSS field.
4. This calling search space (CSS) gets applied to the real device configuration when the user travels and uses an IP phone of a different (visiting) cluster.
5. Configure this field as if setting the CSS field in the Phone Configuration window of a local IP phone.
- Refer to EMCC Call Routing section for more details about the EMCC CSS field.
- Add a directory number (DN) to the new device profile. Example:4001
- In the Directory Number Configuration window, choose the Configure Device (<your new device profile name>) option in the Related Links drop-down list box.
- You return to the Device Profile Configuration window.
- In the Device Profile Configuration window, choose the Subscribe/Unsubscribe Services option in the Related Links drop-down list box.
- In the popup window that displays, choose the Extension Mobility service in the Select a Service drop-down list box.
- Click Next.
- Click Save and close the popup window.
- The Device Profile Configuration window will look, as shown in this image.

4. Configure End User
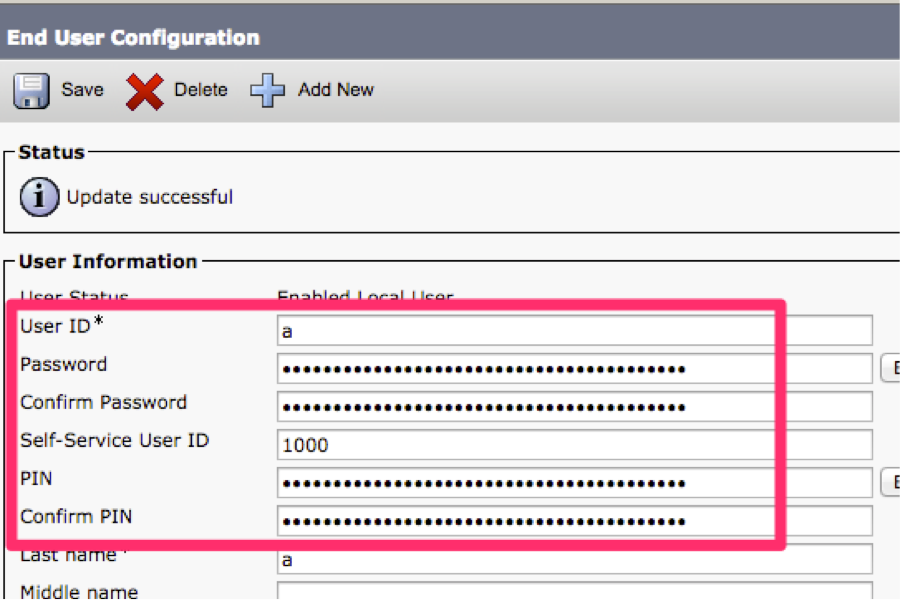
- Add users for Cisco EMCC:
- In Cisco Unified Communications Manager Administration, choose User Management > End User.
- Click Add New to add a new end user.
- In the End User Configuration window that displays, configure at least these fields: User ID, Password, PIN, Last name, First name.
- In the Extension Mobility pane, check the Enable EMCC check box.
- Choose the device profile that you configured in Step 3 from the Available Profiles list pane in the Extension Mobility pane.
- Use the down arrow to move the device profile to the Controlled Profiles list pane.
- Click Save to save the end user configuration.


5. Enable EM on the devices
- Check the EM on the Phone page.
- Subscribe EMCC Phone Service .
- Navigate to CUCM Administration > Device > Phone.

- Subscribe/unsubscribe services
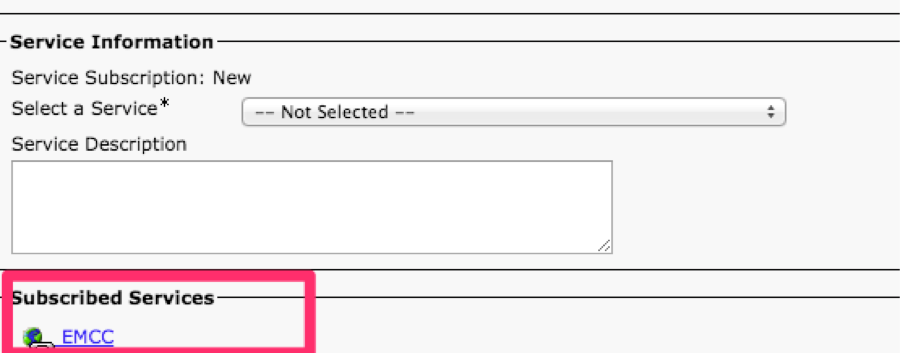
- Till now this configuration has to be done on both Home and Visiting Clusters.
6. Configure Bulk Certificate Management
Navigate to CUCM OS Administration > Security > Bulk Certificate Management.

7. Export
- Certificate Type: All, then export, as shown in this image.

8. Consollidate
- Certificate Type: All, consolidate.

9. Import
- Certificate Type: All, import.
Note: After you import all the certificates on each cluster, for each cluster, you need to restart CUCM
 10. Enable Video calls
- In order to enable EMCC for video calls, configure Common Phone Profile (Device > Device Settings > Common Phone Profile) or configure Enterprise Phone Configuration (System > Enterprise Phone Configuration) to enable video calls.
- In either window, set the Video Capabilities drop-down list box as Enabled. (This setting may be enabled by default per cluster.)
11. Configure EMCC template
- Add EMCC devices—Add EMCC Templates:
- CUCM Administration, Bulk Administration > EMCC > EMCC Template > Click Add New.

12. Insert/Update EMCC Configuration
- Add EMCC devices—Set default EMCC template.
- In CUCM Administration, choose Bulk Administration > EMCC > Insert/Update EMCC.
- Click Update EMCC Devices.
- In the Default EMCC Template drop-down list box, choose the EMCC Device Template that you configured in Step 11.
- Click Run Immediately.
- In order to verify whether the job ran successfully, choose Bulk Administration > Job Scheduler and look for the Job ID of your job. Check that your job ran successfully.

13. Insert/Update EMCC Configuration
- Add EMCC devices > Insert the EMCC Devices.
- In CUCM Administration, navigate Bulk Administration > EMCC > Insert/Update EMCC.
- Click Insert EMCC Devices.
- Change the value in the Number of EMCC Devices to be added field.
- Click Run Immediately.
- Refresh this window and check that the Number of EMCC Devices already in database value now displays the number of devices that you added (for example, 5).
- Alternately, navigate Bulk Administration > Job Scheduler to check on whether the job completed successfully.
- Maximum Number of EMCC Base Devices To Add.
- Include EMCC in the total number of devices that get supported in the cluster, using this calculation: phones + (2 x EMCC devices) <= MaxPhones.
- CUCM systems specify a MaxPhones value of 60,000.
- EMCC login does not affect the number of licenses that get used in the home cluster.

14.Configure Geolocation Filter
- Configure enterprise parameters and add a geolocation filter:
- In CUCM Administration, choose System > Enterprise Parameters.
- For the Cluster ID enterprise parameter, configure a unique cluster ID for every participating cluster.
- In CUCM Administration, navigate System > Geolocation Filter.
- Click Add New.
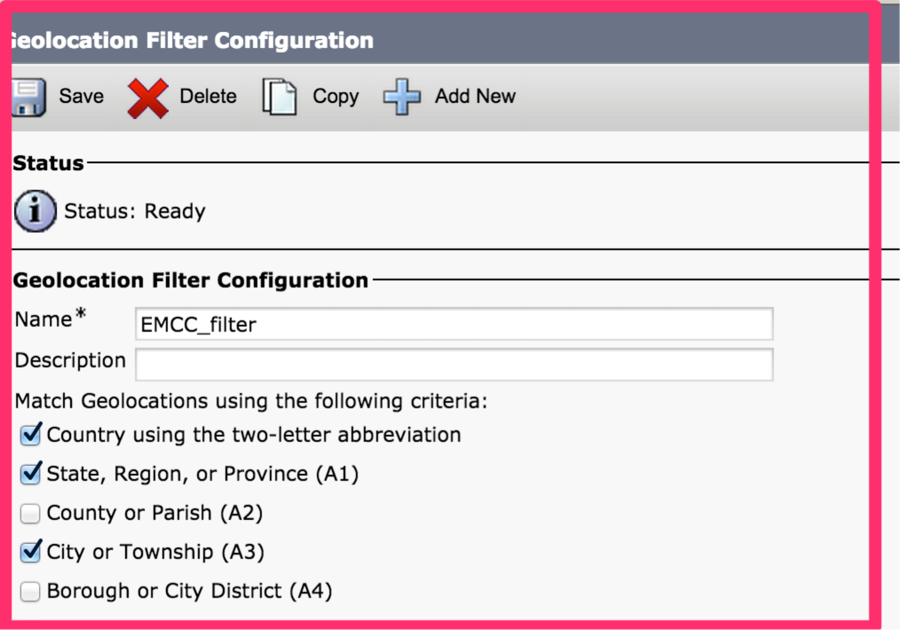
- Create a new geolocation filter.
- Example name: EMCC Geolocation Filter.
- Specify criteria for matching, such as Country, State, and City.
15.Configure EMCC Feature
- Configure EMCC feature parameters:
- In Cisco Unified Communications Manager Administration, navigate Advanced Features > EMCC > EMCC Feature Configuration.
- In the EMCC Feature Configuration window that displays, configure these feature parameters: Default TFTP Server for EMCC Login Device, EMCC Geolocation Filter, Default Server for Remote Cluster Update.
Note: Each feature parameter must be previously configured before you can choose them in the drop-down list box that associates with each feature parameter.
Note: You can keep the default values for other EMCC feature parameters or you can change as needed.

16.Configure SIP Trunk
- Configure one or two intercluster SIP trunks for EMCC.
Note: You may configure one trunk for both PSTN Access and RSVP Agent services (in Step 17) or one trunk for each service. You need no more than two EMCC SIP trunks.
- In CUCM Administration, choose Device > Trunk.
- Click Add New.
- Specify these settings: Trunk Type: SIP Trunk, Trunk Service Type: Extension Mobility Cross Clusters
- Click Next.
- In the Trunk Configuration window that displays, specify the settings in the Device Information pane. These values show example values. Name: EMCC-ICT-SIP-Trunk-1 and Device Pool: Default
- In the SIP Information pane, specify these example settings: SIP Trunk Security Profile: Non Secure SIP Trunk Profile and SIP Profile: Standard SIP Profile
- In the Geolocation Configuration pane, specify this setting: Send Geolocation Information: Check this check box.
- Click Save to save the intercluster SIP trunk for EMCC.

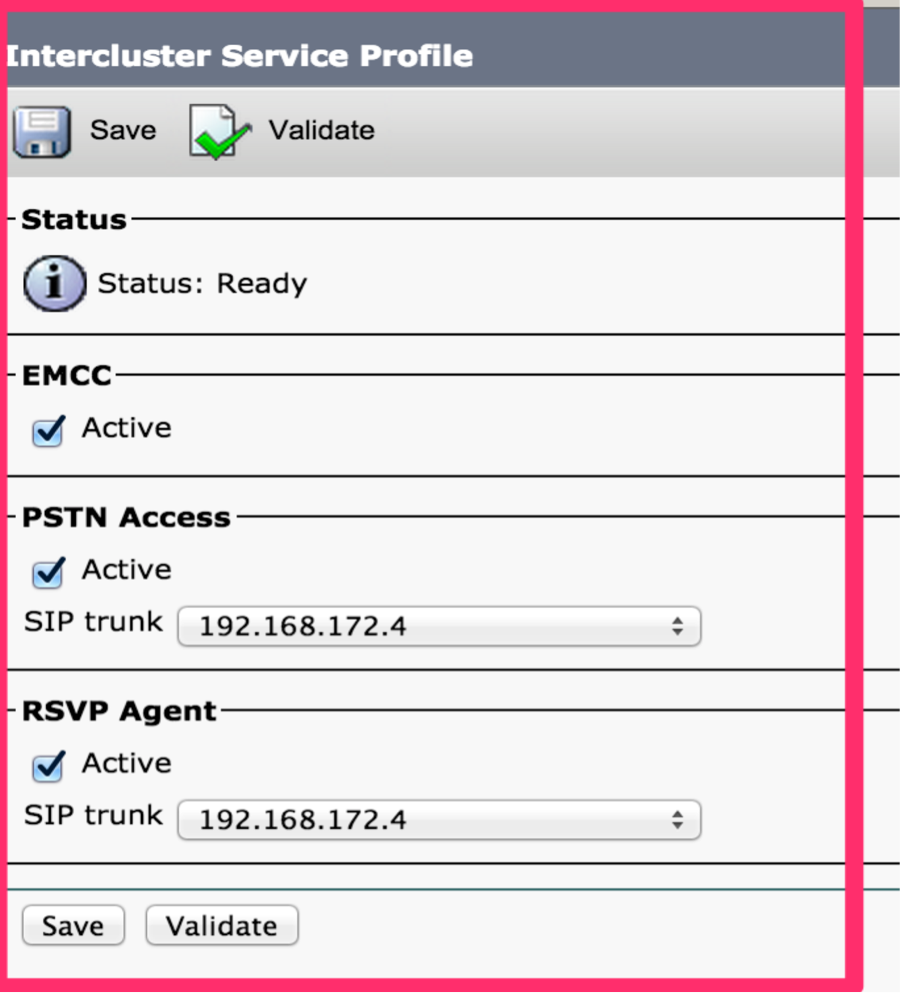
17. Configure Service Profile
- Configure EMCC intercluster service profile:
- In CUCM Administration, choose Advance Features > EMCC > EMCC Intercluster Service Profile.
- Check the Active check box in the EMCC pane.
- Check the Active check box in the PSTN Access pane.
- In the PSTN Access SIP Trunk drop-down list box, choose a SIP trunk that you configured in Step 16.
- Check the Active check box in the RSVP Agent pane.
- In the RSVP Agent SIP Trunk drop-down list box, choose another SIP trunk that you configured in Step 16.
- Click Validate to validate your settings.
- If no failure messages display in the popup window, click Save.
18.Configure Remote Cluster Service
- Configure EMCC remote cluster services:
- Navigate to CUCM Administration > Features > Remote Cluster.
- Click Add New.
- In the Remote Cluster Configuration window that displays, configure these settings: Cluster ID: Ensure that this cluster ID matches the enterprise parameter value of the cluster ID of the other cluster(s) and Fully Qualified Name: Use the IP address of the remote cluster or a domain name that can resolve to any node on the remote cluster.

Note: TFTP is intentionally disabled as Proxy TFTP is not supported with EMCC. The Configure Remote Cluster Services section of the Feature Configuration Guide for Cisco Unified Communications Manager states the following:
For extension mobility cross cluster, the TFTP check box should always be disabled.
19.Configure Service Paramter
- Configure service parameters:
- Navigate to CUCM >System > Service Parameters.
- From the Server drop-down list box, choose a server.
- From the Service drop-down list box, choose the Cisco Extension Mobility service.
- Click the Advanced button at the top of the window.
- As needed, configure these service parameters in the Clusterwide Parameters (Parameters that apply to all servers) pane: Inter-cluster Maximum Login Time and EMCC Allow Proxy: Set this value asTrue.
- Note For EMCC, the call logs always get cleared.
- Note For EMCC, multiple logins are always allowed.

Verify
Navigate to Device > Phone > Verify, as shown in this image.

Troubleshoot
For troubleshooting EMCC related issues please refer to the following article. Troubleshoot Extension Mobility Cross Cluster (EMCC)
Known Defects while configuring EMCC
CSCuy43181  Error Bulk cert import from 10.5.2.13900-2, or higher, to lower versions.
CSCvd78861  Issue with vendorConfigHelp for Fallback feature configuration and EMCC feature
CSCvn19301  : Expansion Modules don't power on with SCCP phones using EMCC
CSCvn30046  : EMCC SIP trunk calls fail when connecting to CUCM 12.x Cluster
CSCvw78247  "&EMCC=#EMCC#" appended to Extension Mobility Service URL
CSCvw50430  12.5 SU3 EM API returns only one server for EMCC
CSCvn52593  EMCC is failing with Login is Unavailable(0)
CSCvn57656  ALL-LANG: ccmadmin: Corrupted characters in EMCC Intercluster Service Profile
CSCvt97890  EMCC calls routed through EMCC sip trunk will not present the original device calling name
CSCvs39175  CM 12.0(1) Feature Configuration Guide doesn't mention ITLRecovery certificate is needed for EMCC
Revision History
| Revision | Publish Date | Comments |
|---|---|---|
1.0 |
29-Jul-2016 |
Initial Release |
Contributed by Cisco Engineers
- Sivakumar ShanmugamCisco TAC
- Patrick KinaneCisco TAC
Contact Cisco
- Open a Support Case

- (Requires a Cisco Service Contract)
 Feedback