Configure Single SAML IdP Connection/Agreement per Cluster with AD FS Version 2.0
Available Languages
Download Options
Bias-Free Language
The documentation set for this product strives to use bias-free language. For the purposes of this documentation set, bias-free is defined as language that does not imply discrimination based on age, disability, gender, racial identity, ethnic identity, sexual orientation, socioeconomic status, and intersectionality. Exceptions may be present in the documentation due to language that is hardcoded in the user interfaces of the product software, language used based on RFP documentation, or language that is used by a referenced third-party product. Learn more about how Cisco is using Inclusive Language.
Contents
Introduction
This document describes how to configure Single Security Assertion Markup Language (SAML) Identity Provider (IdP) connection/agreement per cluster with Active Directory Federation Service (AD FS).
Prerequisites
Requirements
Cisco recommends that you have knowledge of these topics:
- Cisco Unified Communications Manager (CUCM) 11.5 or later
- Cisco Unified Communications Manager IM and Presence version 11.5 or later
- Active Directory Federation Service version 2.0
Components Used
The information in this document is based on these software versions:
- Active Directory Federation Service version 2.0 as IdP
- Cisco Unified Communications Manager version 11.5
- Cisco IM and Presence Server version 11.5
Background Information
For SAML SSO, needs to be a circle of trust between the Service Provider (SP) and the IdP. This trust is created as part of SSO Enablement, when trust (metadata) is exchanged. Download the Metadata from CUCM and uploads it to IdP, similarly download the metadata from IdP and upload it to CUCM.
Prior CUCM 11.5, originating node generates the metadata file, also it collects the metadata files from other nodes in the cluster. It adds all Metadata files to a single zip file then presents to the administrator. Administrator has to unzip this file and provision each files on the IdP. For example, 8 metadata files for an 8 node cluster.
Single SAML IdP connection/agreement per cluster feature is introduced from 11.5. As part of this feature, CUCM generates a single Service Provider metadata file for all CUCM and IMP nodes in the cluster. The new name format for the metadata file is <hostname>-single-agreement.xml
Basically, one node creates the Metadata and pushes it to other SP nodes in the cluster. This enables ease of provisioning, maintenance and management. For example, 1 metadata files for an 8 node cluster.
The cluster wide metadata file make use of Multiserver tomcat certificate which ensures the key pair is used is same for all nodes in the cluster. The metadata file also have a list of Assertion Consumer Service (ACS) urls for each nodes in the cluster.
CUCM and Cisco IM and Presence version 11.5 Supports both the SSO Modes, cluster-wide (one metadata file per cluster) and per node (existing model).
This document describes how to configure the cluster-wide mode of the SAML SSO with AD FS 2.0.
The information in this document was created from the devices in a specific lab environment. All of the devices used in this document started with a cleared (default) configuration. If your network is live, make sure that you understand the potential impact of any command.
Configure
Step 1. Export SP metadata from CUCM
Open a web browser, log in to CUCM as administrator, and navigate toSystem >SAML Single Sign On.
By default, Cluster Wide radio button is selected. Click Export All Metadata. The metadata data file presented to administrator in the name <hostname>-single-agreement.xml

Step 2. Download IDP metadata from AD FS
In order to download IdP metadata, refer to the link https:// <FQDN of ADFS>/federationmetadata/2007-06/federationmetadata.xml
Step 3. Provision IdP
As shown in the image, navigate to AD FS 2.0 Management/Trust Relation Ships/ Relying Party trust. Click Add Relying Party Trust.

Add Relying Party Trust Wizard opens as shown in the image, now click on Start.

Click the import data about relying party from a file. Browse the SP metadata downloaded from CUCM SAML SSO Configuration Page. Then Click Next, as shown in the image:

Type the Display Name and any optional notes for the Relying Party. Click Next., as shown in the image:

Select Permit all users to access this relying party to permit all users to access this relying party and then click Next, as shown in the image:

Under Ready to Add Trust page, you can review the settings for the Relying Party Trust, which has been configured. Now click Next, as shown in the image:

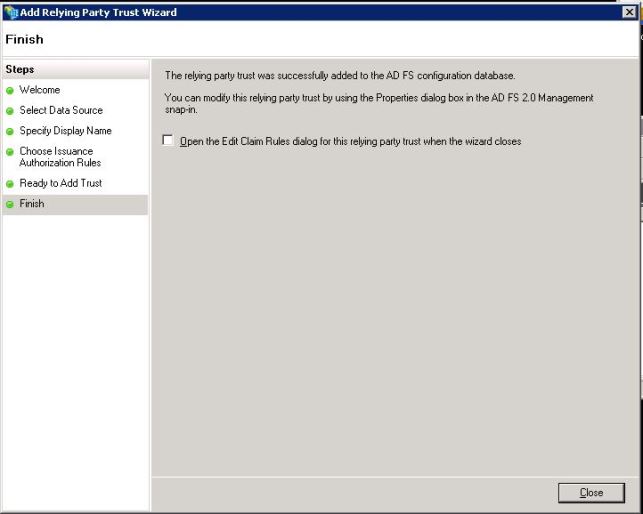
Finish Page confirms that relying party trust was successfully added to the AD FS configuration Database. Uncheck the Box and Click Close, as shown in the image:
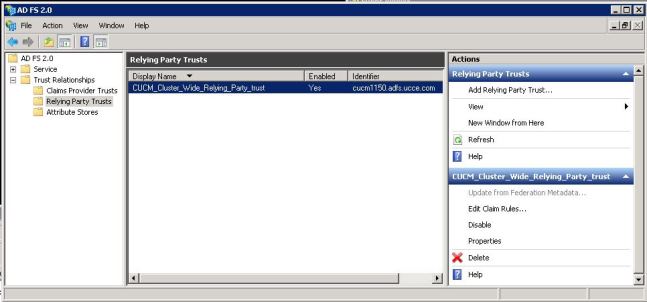
Right Click the Relying Party Trusts and click on Edit Claim Rules, as shown in the image:
Now click on Add Rule., as shown in the image:

When the Add Transform Claim Rule opens, click Next with the default claim rule template Send LDAP Attributes as Claims, as shown in the image:

Click Configure Claim Rule as shown in this image. LDAP Attribute must match with the LDAP Attribute in LDAP Directory configuration in the CUCM. Manage outgoing claim type as uid. Click Finish, as shown in the image:

Add the custom rule for the relying party. Click Add rule. Select Send Claims using a Custom Rule and then click Next, as shown in the image:

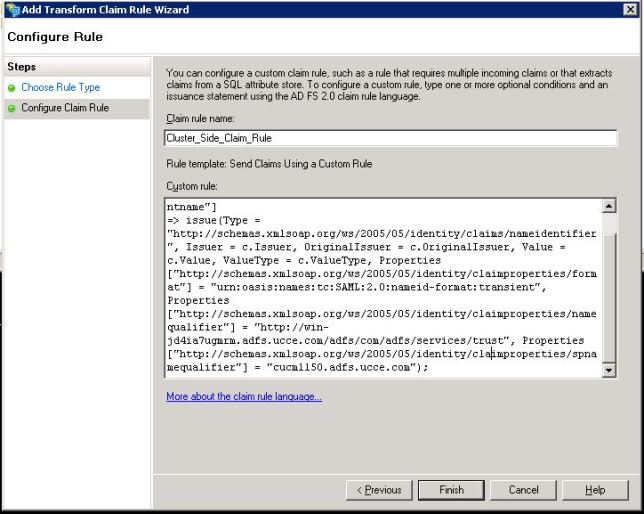
In Configure Claim rule, type a Claim Rule Name then Copy the Claim Rule given and past in the Custom Rule field in the wizard modifying the namequalifier and spname qualifier in the Claim rule. Click Finish., as shown in the image:
Claim Rule:
c:[Type == "http://schemas.microsoft.com/ws/2008/06/identity/claims/windowsaccountname"]

=> issue(Type = "http://schemas.xmlsoap.org/ws/2005/05/identity/claims/nameidentifier", Issuer = c.Issuer, OriginalIssuer = c.OriginalIssuer, Value = c.Value, ValueType = c.ValueType, Properties["http://schemas.xmlsoap.org/ws/2005/05/identity/claimproperties/format"] = "urn:oasis:names:tc:SAML:2.0:nameid-format:transient", Properties["http://schemas.xmlsoap.org/ws/2005/05/identity/claimproperties/namequalifier"] = "http://<FQDN of ADFS>/adfs/com/adfs/services/trust", Properties["http://schemas.xmlsoap.org/ws/2005/05/identity/claimproperties/spnamequalifier"] = "<Entity ID in the SP Metadata>");


Entity ID = Open the SP metadata and check the Entity ID. Basically, its the CUCM Publisher’s FQDN.
As shown in the image, Click Apply then OK.

Step 4. Enable SAML SSO
Open a web browser, log in to CUCM as administrator, and navigate toSystem >SAML Single Sign On.
By default, Cluster Wide radio button is selected. Click Enable Saml SSO, as shown in the image:

As shown in the image, the pop up notifies the warning for webserver restart and information to choose the cluster wide SAML SSO or Per-Node SAML SSO according to idp. Click Continue.

The criteria to enable Cluster-wide SSO is that you must have a multiserver tomcat certificate already deployed. Click Test for Multi-Server tomcat Certificate, as shown in the image:

Once it is confirmed, all nodes have Multi Server Certificate displays an All Nodes have Multi Server Certificate, and then click Next, as shown in the image:

As shown in the image, click Next.

Browse and select the IdP metadata downloaded. Click Import IdP Metadata, as shown in the image:
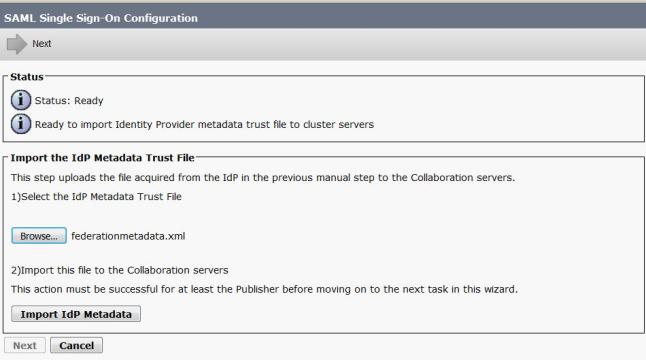
The page confirms the Import succeeded for all servers and then click Next, as shown in the image:

As shown in the image, click Next, since already exported the SP metadata from the initial SAML SSO configuration Page.

CUCM has to be in sync with the LDAP Directory. Wizard shows the valid administrator users configured in the LDAP Directory. Select the user and click Run SSO Test, as shown in the image:

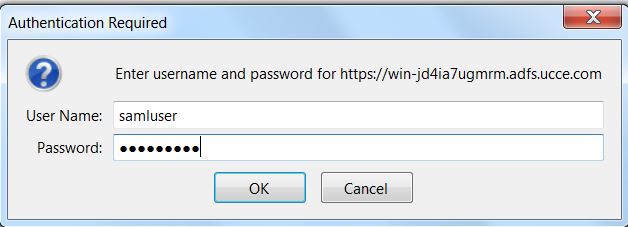
As shown in the image, enter the user ID and respective password once it prompts.
The pop up, as shown in the image confirms the test is Succeeded.

As shown in the image, click Finish in order to complete the configuration for enabling SSO.

The page shown in the image confirms that SAML SSO Enabling process is initiated on all servers.

Log out and log in back to CUCM using SAML SSO credentials. Navigate to System >SAML Single Sign On. Click Run SSO Test for other nodes in the cluster, as shown in the image:

Verify
Use this section to confirm that your configuration works properly.
Confirm the SSO Test is succesful for the nodes which are SAML SSO enabled. Navigate to System >SAML Single Sign On. Successful SSO tests shows the status Passed.

Once the SAML SSO is activated, Installed Applications and Platform Applications are listed for CUCM login page, as shown in this image.

Once the SAML SSO is activated, Installed Applications and Platform Applications are listed for IM and Presence login page, as shown in this image:

Troubleshoot
This section provides information you can use to troubleshoot your configuration.
In order to set the SSO logs to debug, use command set samltrace level DEBUG
Collect the SSO logs Using RTMT or from activelog /tomcat/logs/ssosp/log4j/*.log location using CLI.
Example for SSO logs shows the metadata generated and sending to other nodes
2016-05-28 14:59:34,026 DEBUG [http-bio-443-exec-297] cluster.SAMLSSOClusterManager - Call GET API to generate Clusterwide SP Metadata in the Local node.
2016-05-28 14:59:47,184 DEBUG [http-bio-443-exec-297] cluster.SAMLSSOClusterManager - Call to post the generated SP Metadata to other nodes
2016-05-28 14:59:47,185 INFO  [http-bio-443-exec-297] cluster.SAMLSSOClusterManager - Begin:postClusterWideSPMetaData
2016-05-28 14:59:47,186 DEBUG [http-bio-443-exec-297] cluster.SAMLSSOClusterManager - Nodes [cucm1150, cucm1150sub.adfs.ucce.com]
2016-05-28 14:59:47,186 DEBUG [http-bio-443-exec-297] cluster.SAMLSSOClusterManager - Post ClusterWideSPMetadata to the cucm1150
2016-05-28 14:59:47,187 DEBUG [http-bio-443-exec-297] cluster.SAMLSSOClusterManager - Post ClusterWideSPMetadata to the cucm1150sub.adfs.ucce.com
Contributed by Cisco Engineers
- Jebin Joseph KalaritharaCisco TAC Engineer
Contact Cisco
- Open a Support Case

- (Requires a Cisco Service Contract)
 Feedback