Introduction
This document describes how to register a Cisco Wireless phone to a Cisco Unified Communication Manager (CUCM) server. This document has a detailed configuration of CUCM, Access Point and Wireless phone.
Prerequisites
Requirements
Cisco recommends that you have knowledge of the CUCM and Cisco Access Points.
Components Used
The information in this document is based on these software and hardware versions:
- CUCM Version 9.1.2.15126-1.
- Cisco Aironet 1140 Series Access Point, version 15.3(3)JBB2
- Cisco 7925 phone, version 1.4(7)
The information in this document was created from the devices in a specific lab environment. All of the devices used in this document started with a cleared (default) configuration. If your network is live, make sure that you understand the potential impact of any command.
Configure
Use the information that is described in this section in order to register a Cisco wireless phones with the CUCM server.
Access Point Configuration
How to Access the Access Point (AP)
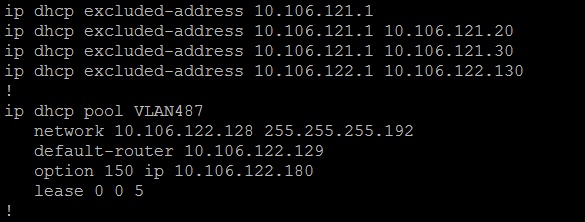
Configure DHCP on your L3 Switch or ensure that the switch to which the Aironet will be connected has access to the DHCP server.
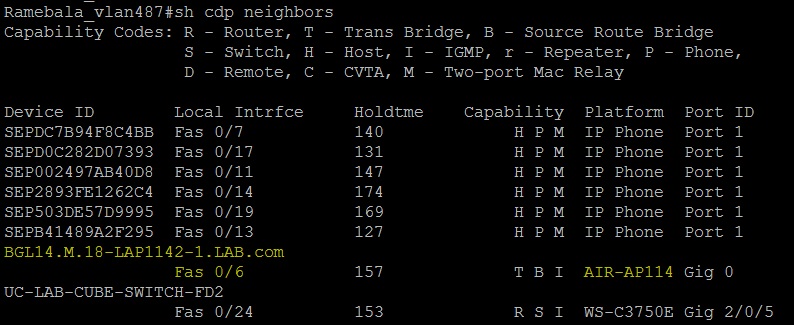
After you connect the Aironet to the switchport of a Cisco switch, you can find the Aironet’s details by using show cdp neighbors command on switch.
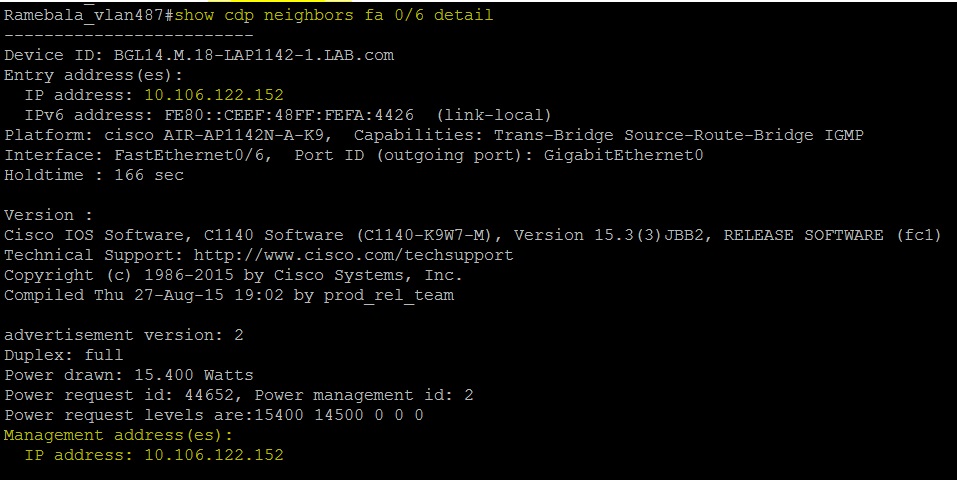
In order to find out the IP address of the Aironet (which would have taken via DHCP), use the command show cdp neighbors fa 0/6 detail on the switch.
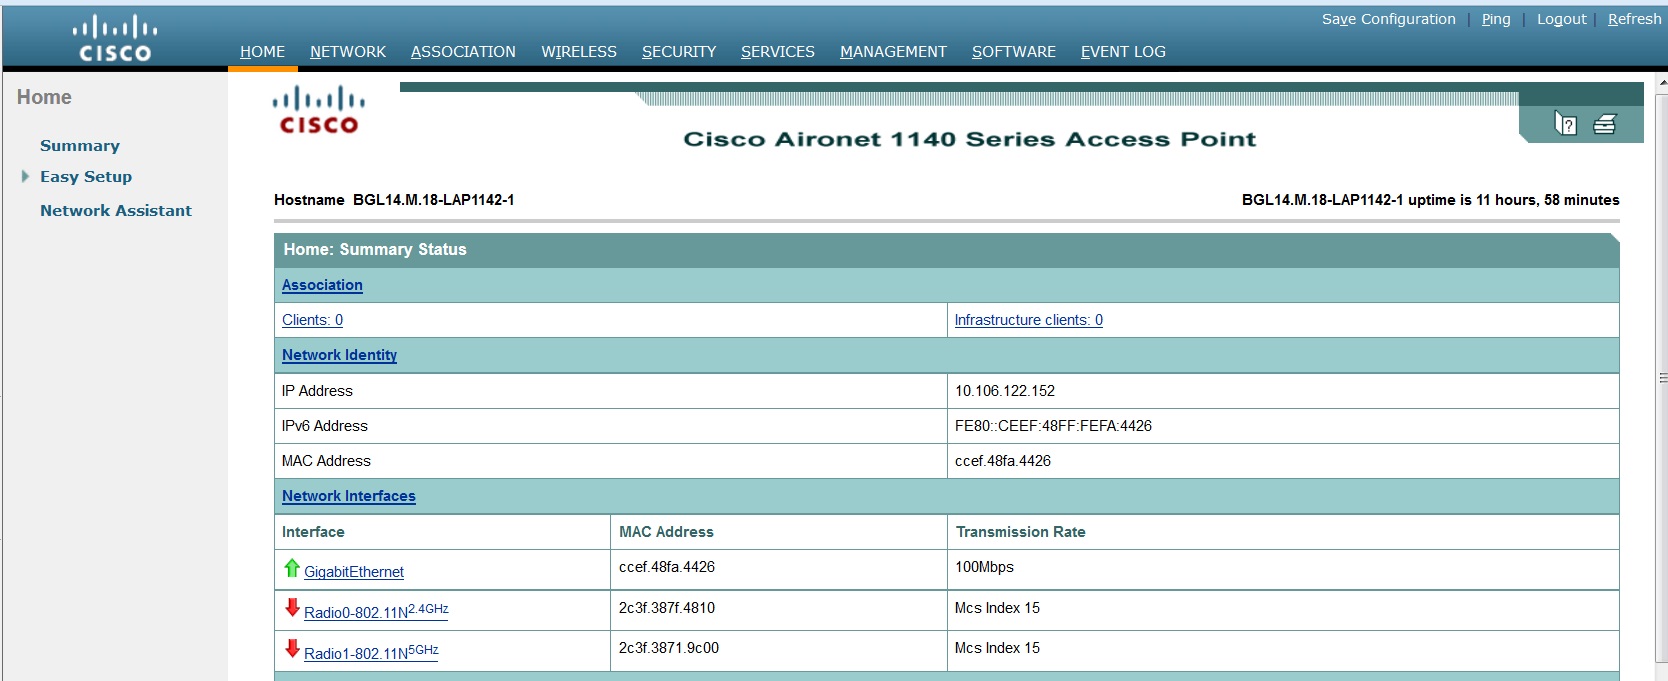
Default username and passwords for the Aironet will be Cisco and Cisco.
You can either use Graphical User Interface (GUI) access of Aironet or Command Line Interface (CLI) access of Aironet to perform the configuration changes. In this document use of GUI access of Aironet has been made.
Enable Radio Interfaces
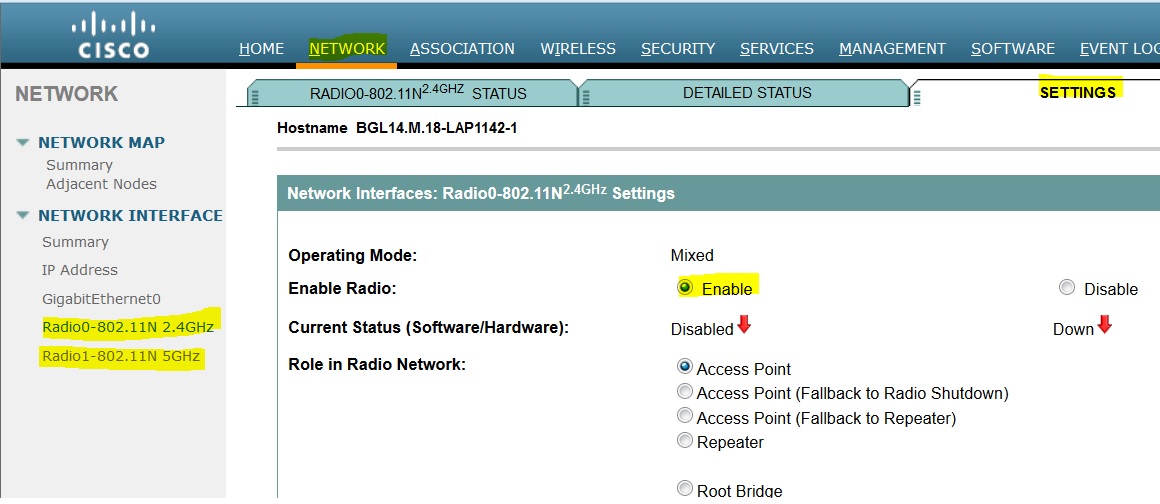
Navigate to NETWORK menu and click on each Radio interfaces and select the Enable radio button under Enable Radio of SETTINGS tab, as shown in this image. Enable all the radio interfaces.
Add New VLAN
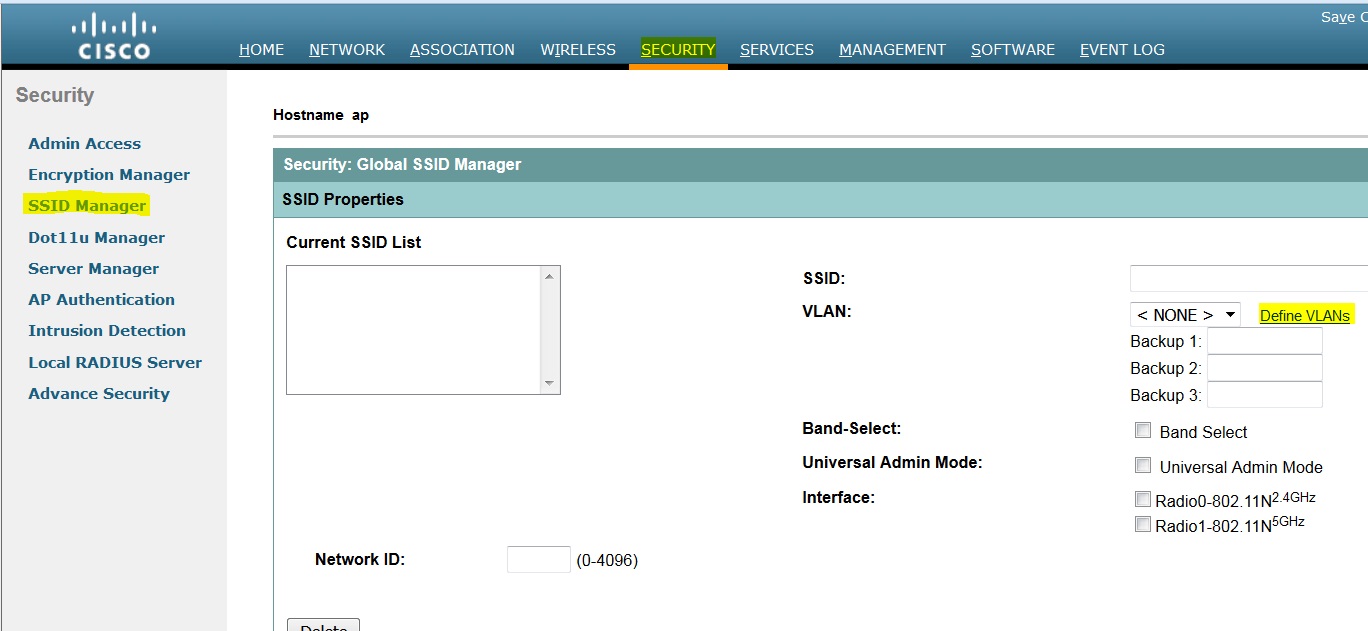
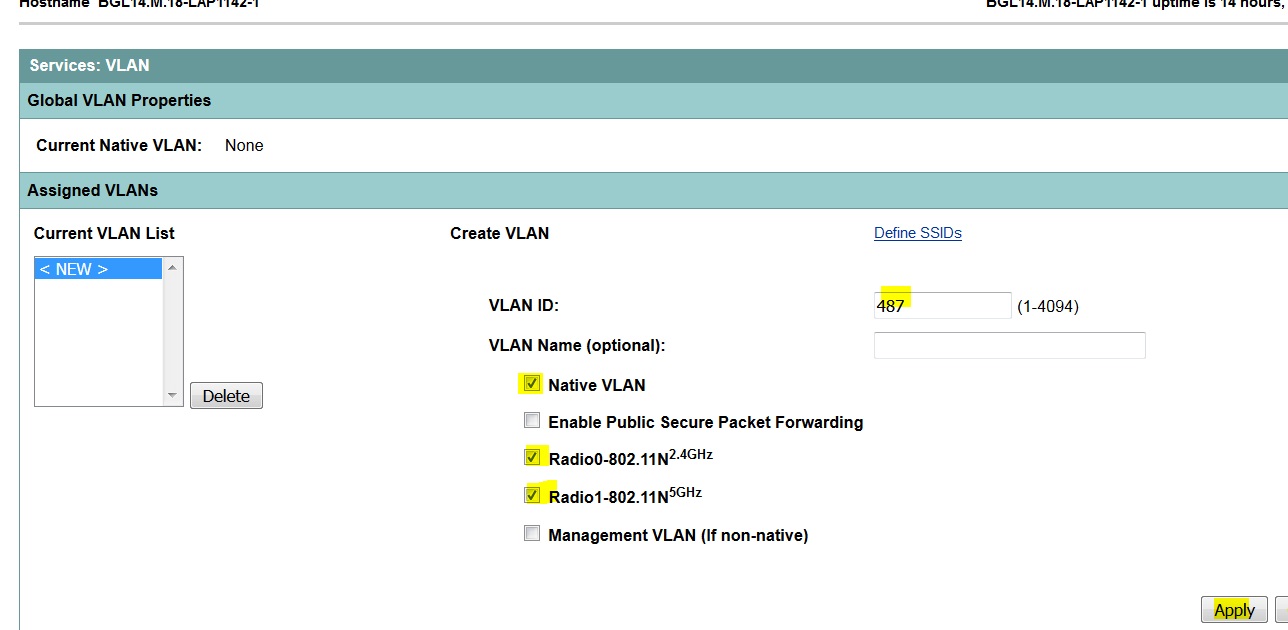
Navigate to SECURITY menu and choose SSID Manager after that click on DefineVLANs, you will get an option to ADD VLANs, once done click on the APPLY button.
As shown in the image, VLAN 487 is added and checked for both the Radios.
If this VLAN is Native VLAN, you can check the box Native VLAN.
Creation of New SSID and Associate the VLAN
Navigate to the SECURITY menu and select SSID Manager.
Select <NEW> under Current SSID List and give SSID value.
Check the box for both Radio interfaces.
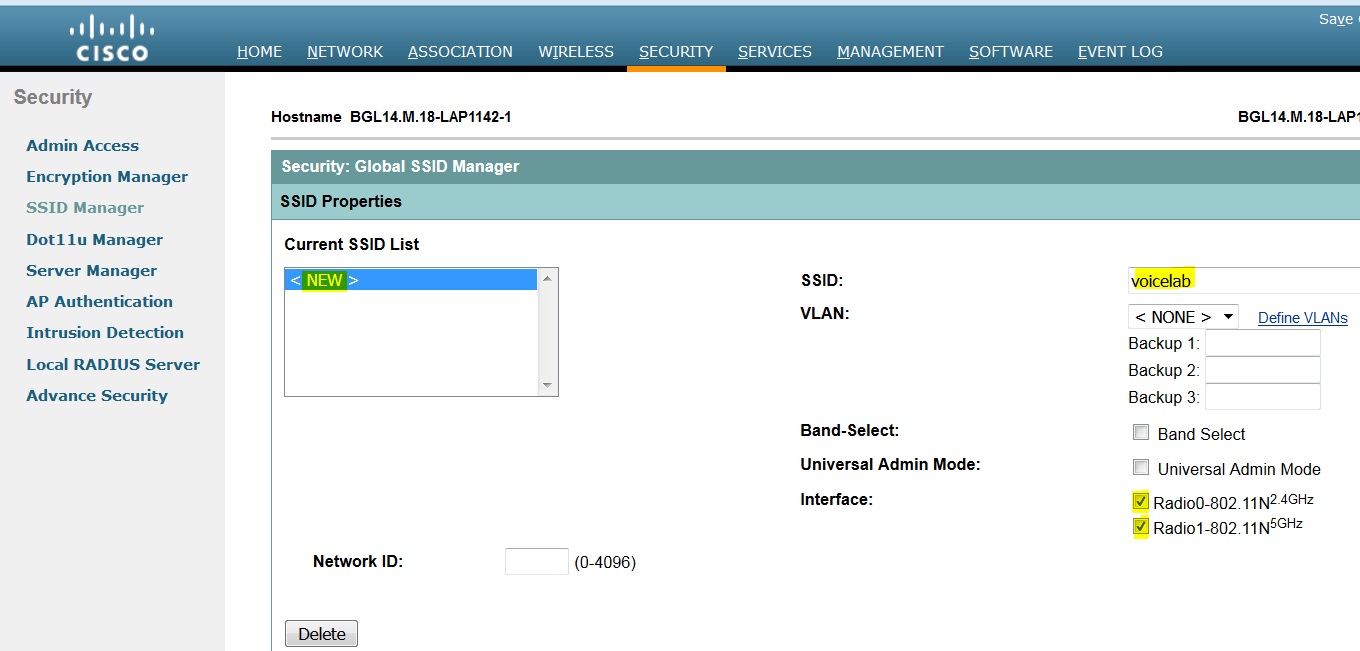
Click on Apply button.
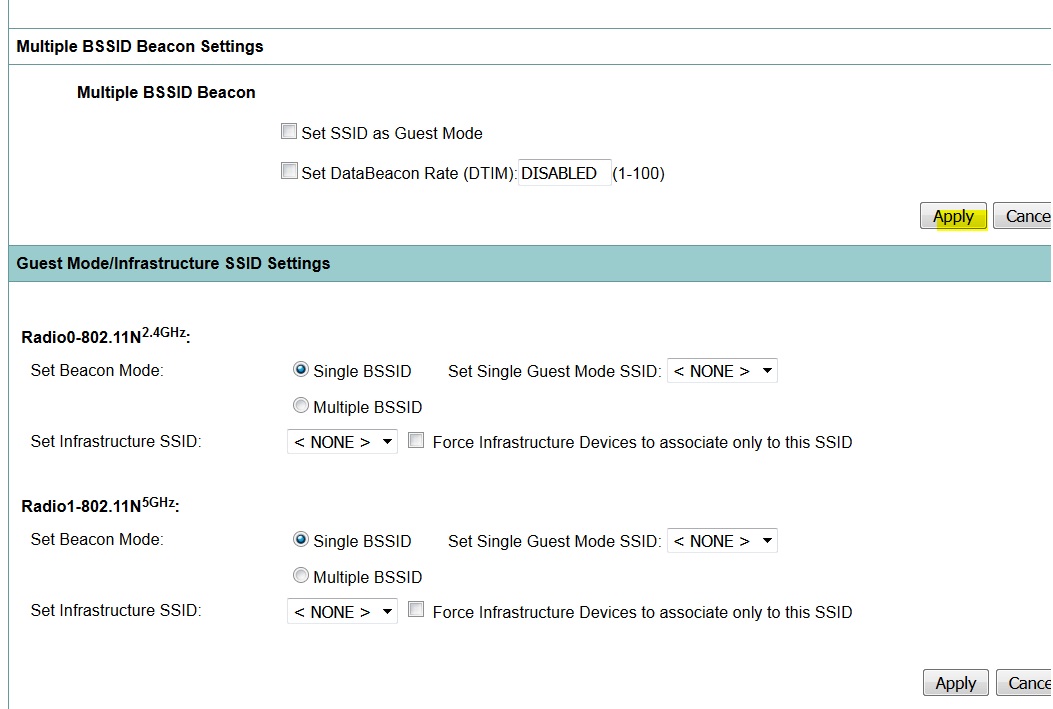
Note: If the radio interface does not coming up after radio interfaces from the GUI are enabled, login to CLI and execute no shutdown command under radio interfaces (Dot11Radio).
How to Make SSID Visible to Clients
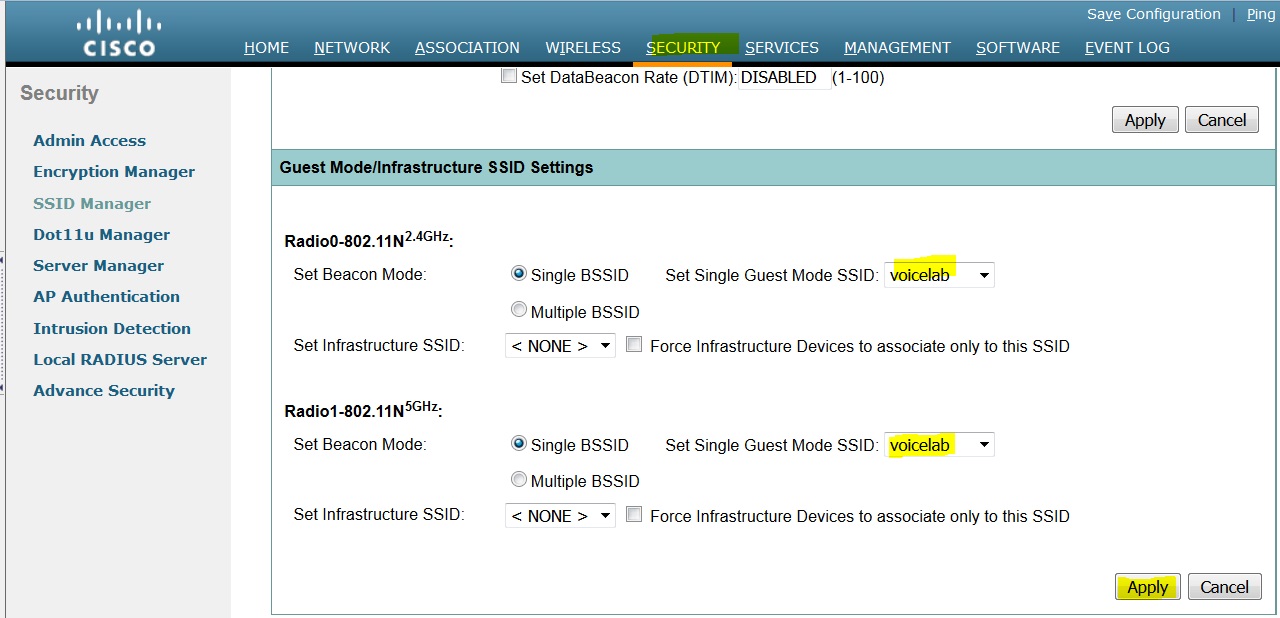
In order to see the SSID on the clients, you have to choose the SSIDs under set Single Guest Mode SSID for all the radios as shown in this image.
How to Verify the Connected Clients
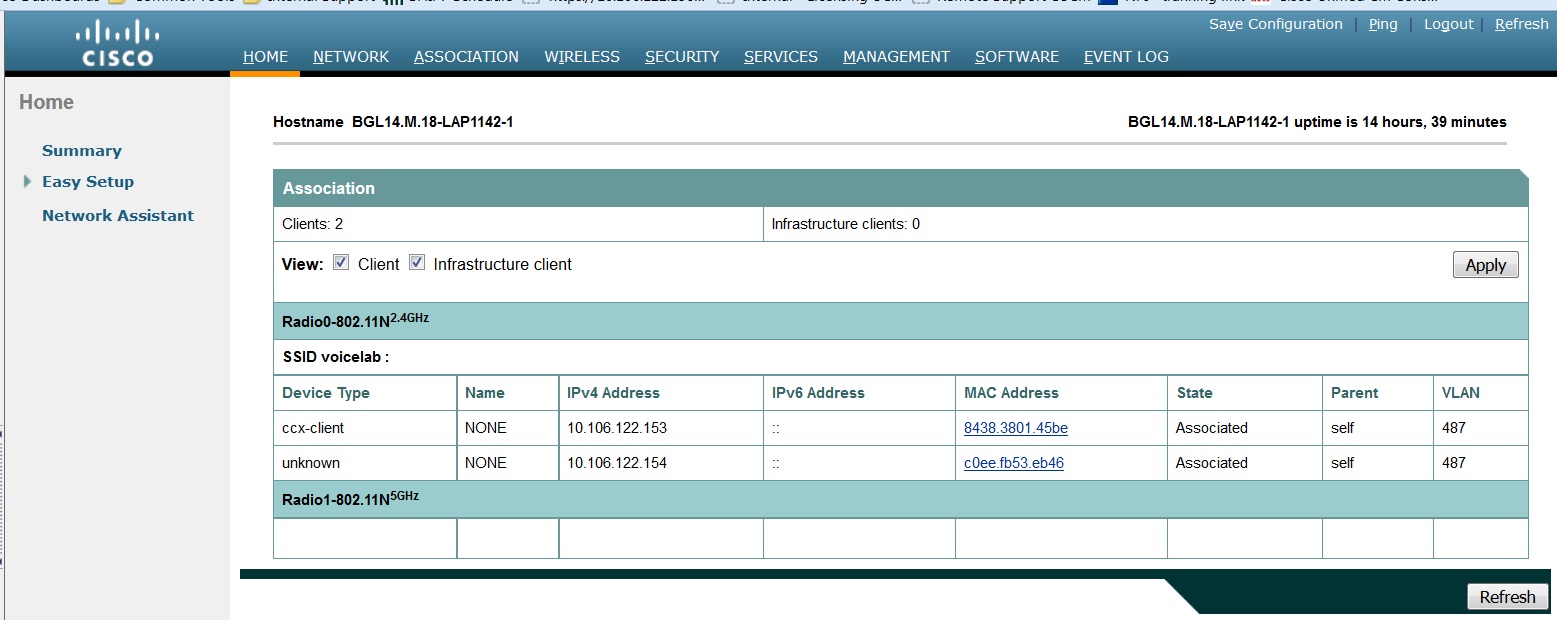
After the client gets connected to the Access Point, you will see the client details on the HOME menu.
Optional - How to set password to SSID
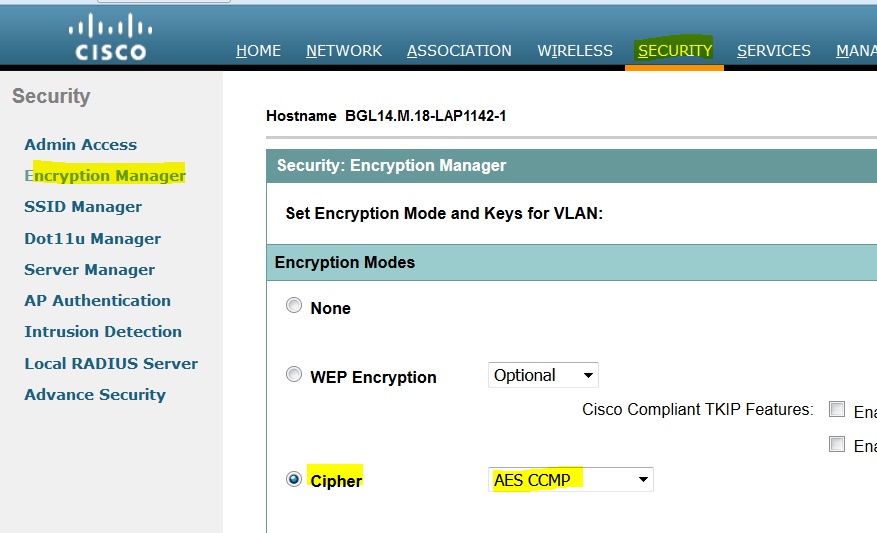
Navigate to SECURITY tab and choose Encryption Manager.
On the Encryption Modes, choose Cipher and select AES CCMP.
After this click APPLY.
Then select the SSID Manager under the SECURITY menu
Set the Key Management as Mandatory and check the box Enable WPA and choose WPAv2.
Give SSID’s password under WPA Pre-shared Key.
After this click the APPLY button.

CUCM Configuration
How to Add 7925 Phone to the CUCM Server
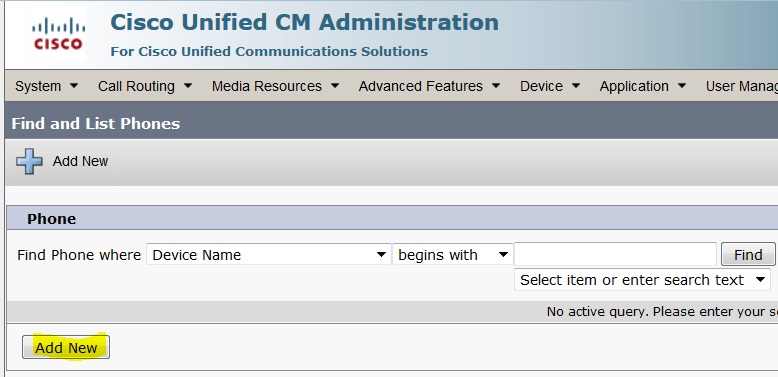
Login to CUCM Administration GUI and navigate to Device > Phone

Click on the Add New button.
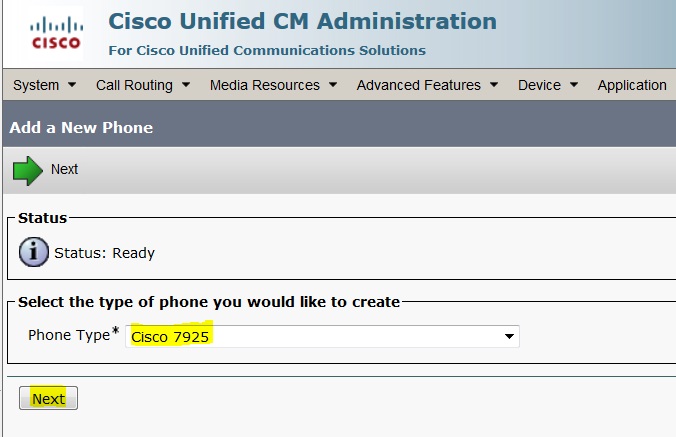
Choose Cisco 7925 under Phone Type and click Next button (you can chose the phone type in accordance with the wireless phones that you have).
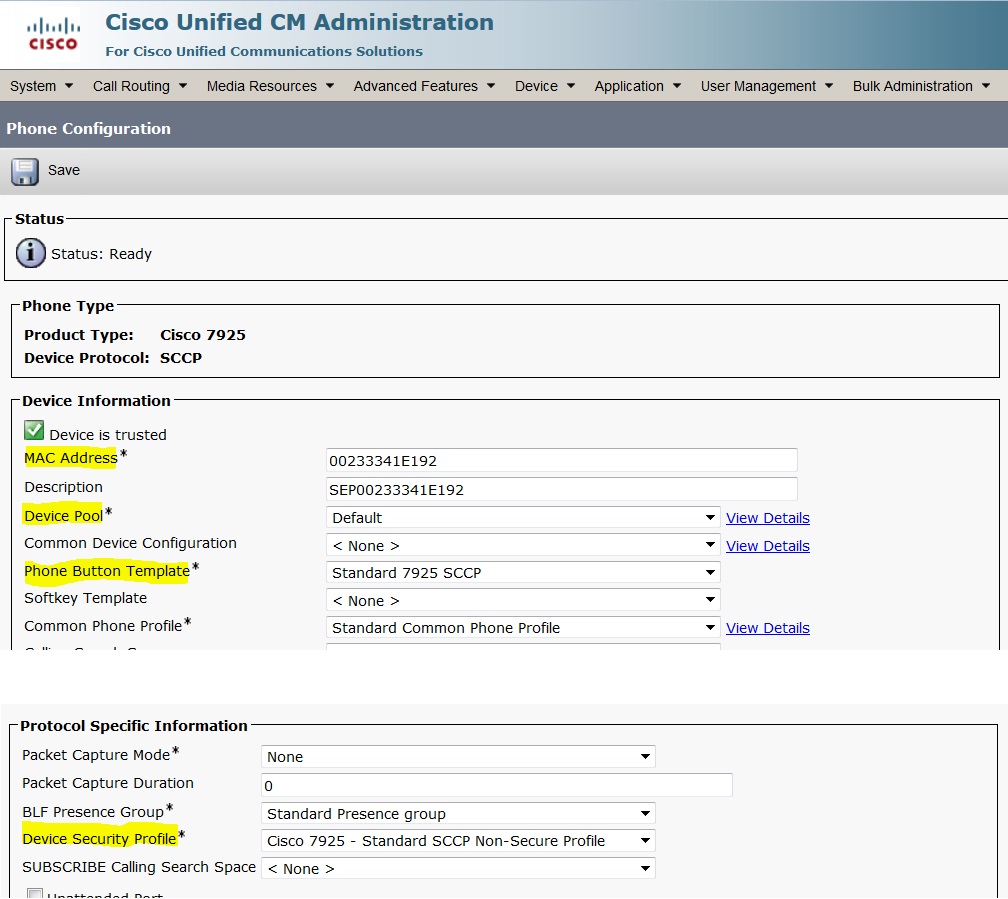
Under Phone Configuration page, add the MAC Address of the phone and assign appropriate values to specific sections as shown in the image and click the Save button.
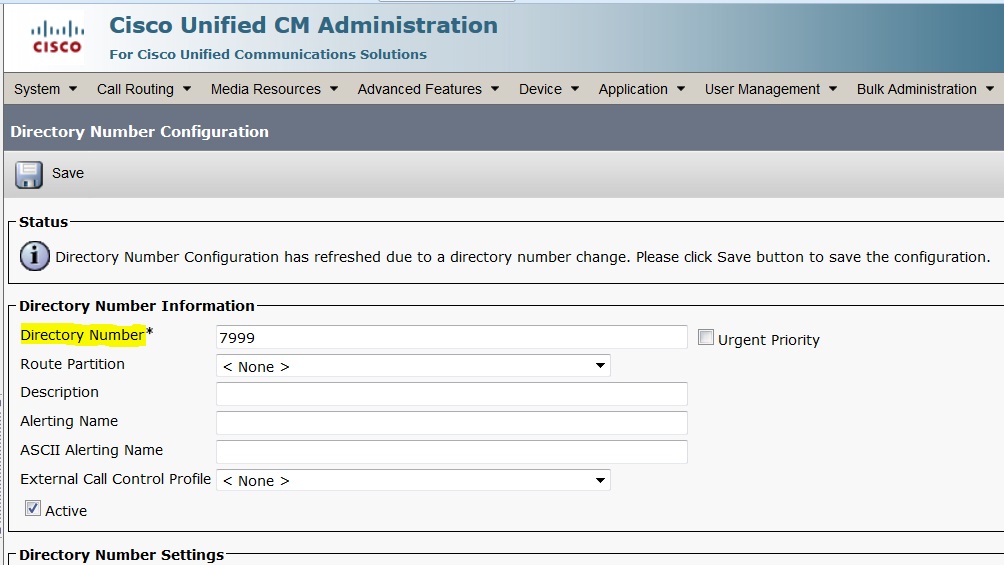
Click on Add a new Line and give a directory number to this phone.
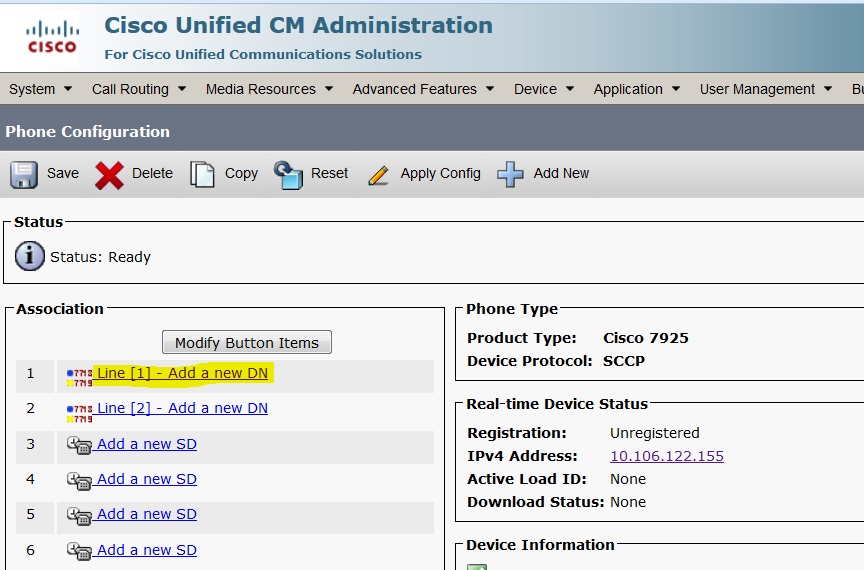
Give any Directory number and then click on the SAVE button. After that, click on Apply Config and Reset buttons.
Physical 7925 Phone Configuration
Profile Name
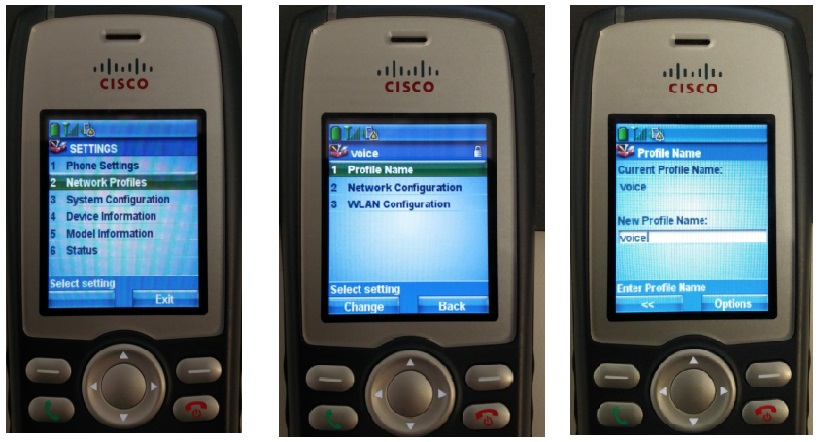
Navigate to Settings > Network Profiles
- Get into any profile
- Type **# to unlock the phone settings
- Give any profile name
Network Configuration
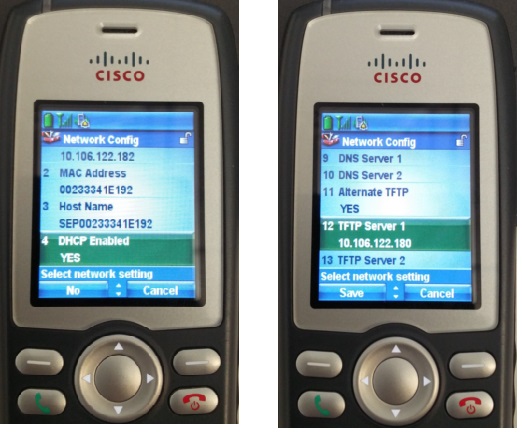
Navigate to Settings > Network Profile > Network Configuration
Set DHCP Enabled value to YES
If the TFTP IP is not pulled from the DHCP server, add the TFTP IP address manually here.
WLAN Configuration
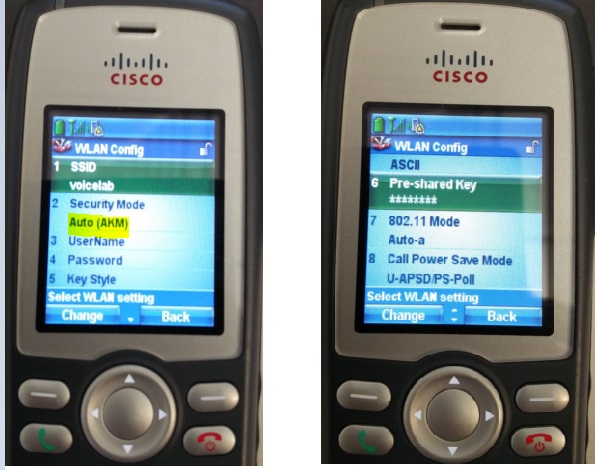
Navigate to Settings > Network Profile > WLAN Config
- Give SSID name (configured on Access Point) then press Option and select SAVE
- Set the Security Mode as Auto (AKM)
- Under Pre-shared Key section, enter the SSID's password (in our lab we set this as voicelab123)
Verify
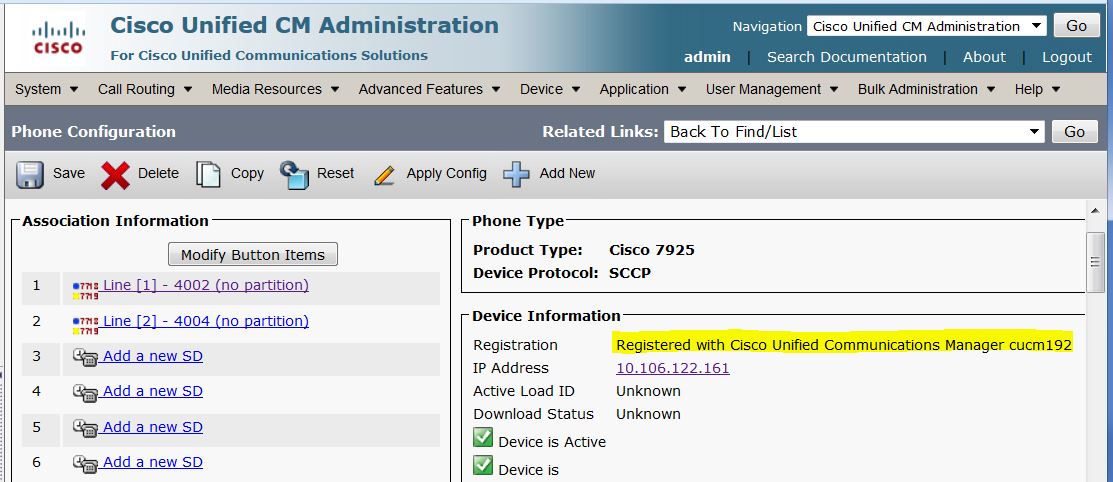
Once the phone is registered with the CUCM, the wireless phone displays the configured Directory Number on the screen. On the Phone Configuration page of CUCM Administration GUI, you see that the phone is in the registered state as shown in the image.
Troubleshoot
There is currently no specific troubleshooting information available for this configuration.
