Introduction
The document describes the steps required in order to change Cisco Unified Communications Manager (CUCM) Security Mode from Mixed mode to Non-Secure mode. It also shows how the content of a Certificate Trust List (CTL) file is changed when this move is completed.
There are three major parts to change CUCM Security Mode:
1a. Run the CTL client and select the desired variant of Security Mode.
1b. Enter the CLI command in order to select the desired variant of Security Mode.
2. Restart Cisco CallManager and Cisco TFTP services on all CUCM servers that run these services.
3. Restart all the IP phones so that they can download the updated version of the CTL file.
Note: If the cluster security mode is changed from Mixed mode to Non-Secure mode the CTL file still exists on the server(s) and on the phones, but the CTL file does not contain any CCM+TFTP (server) certificates. Since CCM+TFTP (server) certificates do not exist in the CTL file, this forces the phone to register as Non-Secure with CUCM.
Prerequisites
Requirements
Cisco recommends that you have knowledge of CUCM Version 10.0(1) or later. Additionally, ensure that:
- The CTL Provider service is up and runs on all active TFTP servers in the cluster. By default the service runs on TCP port 2444, but this can be modified in the CUCM Service Parameter configuration.
- The Certificate Authority Proxy Function (CAPF) Services is up and runs on the Publisher node.
- Database (DB) Replication in the cluster works correctly and the servers replicate data in real-time.
Components Used
The information in this document is based on these software and hardware versions:
- CUCM Release 10.0.1.11900-2 cluster of two nodes
- Cisco 7975 IP phone (registered with Skinny Call Control Protocol (SCCP), firmware version SCCP75.9-3-1SR3-1S)
- Two Cisco Security Tokens are necessary in order to set the cluster to Mixed mode
- One of the Security Tokens listed previously is necessary in order to set the cluster to Non-Secure mode
The information in this document was created from the devices in a specific lab environment. All of the devices used in this document started with a cleared (default) configuration. If your network is live, make sure that you understand the potential impact of any command.
Background Information
In order to run the CTL Client plugin it is required to have access to at least one security token that was inserted in order to create or update the latest CTL file exists on the CUCM Publisher server. In other words, at least one of the eToken certificates that exists in the current CTL file on CUCM must be on the security token that is used to change the Security mode.
Configure
Change the CUCM Cluster Security from Mixed Mode to Non-Secure Mode with the CTL Client
Complete these steps in order to change the CUCM cluster security from Mixed mode to Non-Secure mode with the CTL client:
- Obtain one security token that you inserted to configure the latest CTL file.
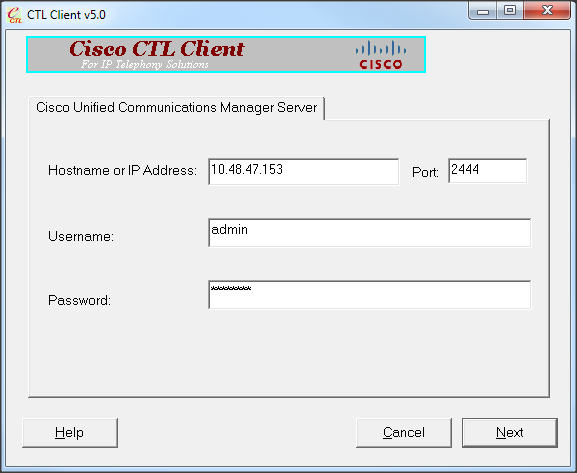
- Run the CTL client. Provide the IP hostname/address of the CUCM Pub and the CCM Administrator credentials. Click Next.
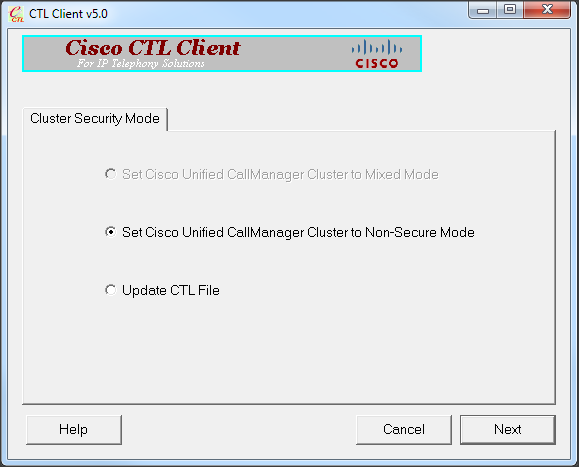
- Click the Set Cisco Unified CallManager Cluster to Non-Secure Mode radio button. Click Next.
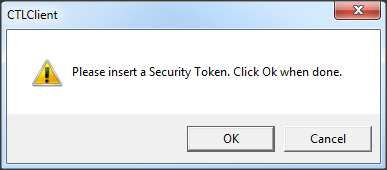
- Insert one security token that was inserted to configure the latest CTL file and click OK. This is one of the tokens that was used to populate the certificate list in CTLFile.tlv.
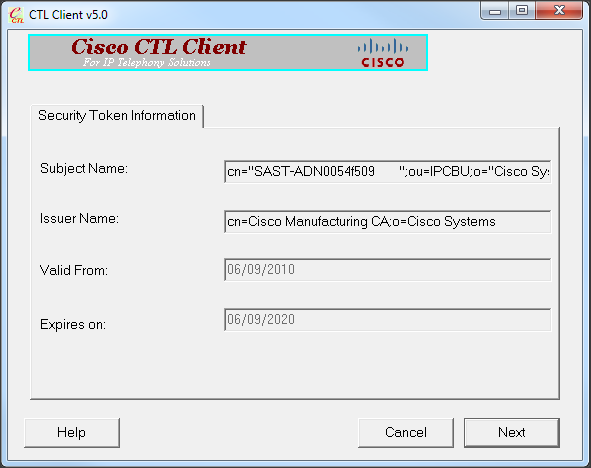
- The Security Token details are displayed. Click Next.
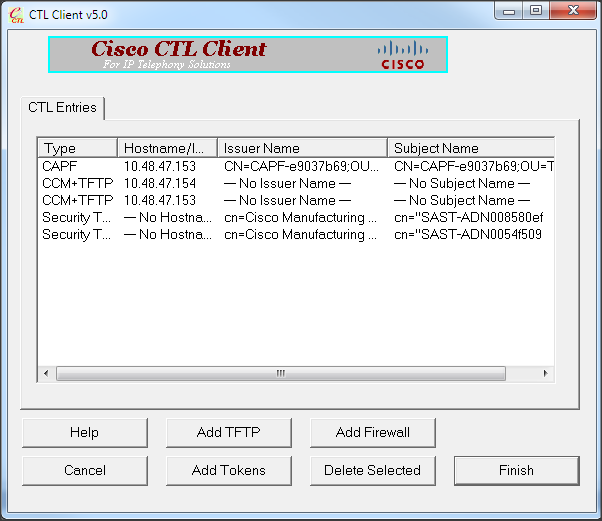
- Content of the CTL file is displayed. Click Finish. When prompted for the password, enter Cisco123.
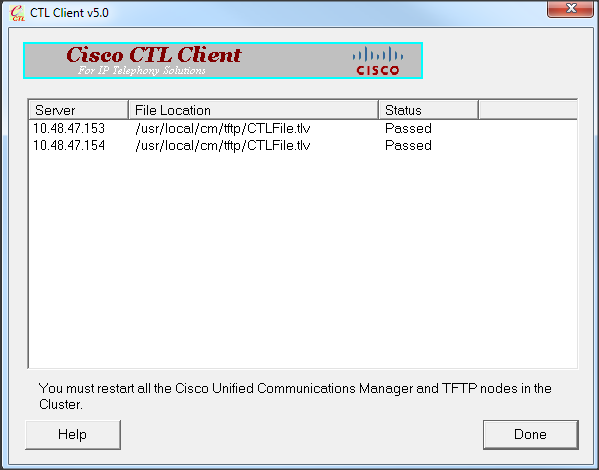
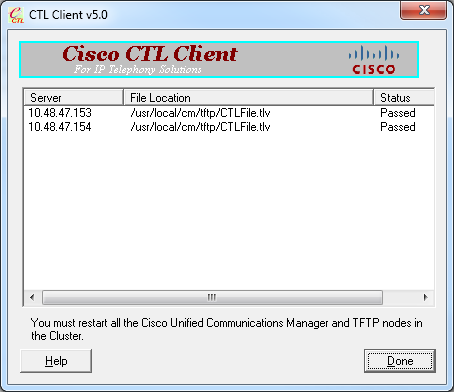
- The list of CUCM Servers on which the CTL file exists is displayed. Click Done.
- Choose CUCM Admin Page > System > Enterprise Parameters and verify that the cluster was set to Non-Secure Mode ("0" indicates Non-Secure).

- Restart the TFTP and Cisco CallManager services on all nodes in the cluster that run these services.
- Restart all the IP phones so that they can obtain the new version of the CTL file from CUCM TFTP.
Change the CUCM Cluster Security from Mixed Mode to Non-Secure Mode with the CLI
This configuration is only for CUCM Release 10.X and later. In order to set the CUCM Cluster Security mode to Non-Secure, enter the utils ctl set-cluster non-secure-mode command on Publisher CLI. After this is complete, restart the TFTP and Cisco CallManager services on all nodes in the cluster that run these services.
Here is sample CLI output that shows the use of the command.
admin:utils ctl set-cluster non-secure-mode
This operation will set the cluster to non secure mode. Do you want to continue? (y/n):

Moving Cluster to Non Secure Mode
Cluster set to Non Secure Mode
Please Restart the TFTP and Cisco CallManager services on all nodes in the cluster that
 run these services
admin:
Verify
Use this section to confirm that your configuration works properly.
In order to verify the CTLFIle.tlv, you can use one of two methods:
- In order to verify the content and MD5 checksum of the CTLFIle.tlv present on the CUCM TFTP side, enter the show ctl command on the CUCM CLI. The CTLFIle.tlv file should be the same on all CUCM nodes.
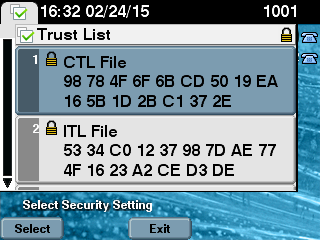
- In order to verify the MD5 checksum on the 7975 IP Phone, choose Settings > Security Configuration > Trust List > CTL File.
Note: When you check the checksum on the phone you will either see MD5 or SHA1, dependent upon the phone type.
CUCM Cluster Set to Security Mode - CTL File Checksum
admin:show ctl
The checksum value of the CTL file:
98784f6f6bcd5019ea165b1d2bc1372e(MD5)
9c0aa839e5a84b18a43caf9f9ff23d8ebce90419(SHA1)
[...]
On the IP phone side, you can see that it has the same CTL file installed (MD5 checksum matches when compared to the output from CUCM).
CUCM Cluster Set to Non-Secure Mode - CTL File Content
Here is an example of a CTL file from a CUCM cluster set to Non-Secure mode. You can see that the CCM+TFTP certificates are empty and do not contain any content. The rest of the certificates in the CTL files are not changed and are exactly the same as when CUCM was set to Mixed mode.
admin:show ctl
The checksum value of the CTL file:
7879e087513d0d6dfe7684388f86ee96(MD5)
be50e5f3e28e6a8f5b0a5fa90364c839fcc8a3a0(SHA1)


Length of CTL file: 3746
The CTL File was last modified on Tue Feb 24 16:37:45 CET 2015

        Parse CTL File
        ----------------

Version:        1.2
HeaderLength:   304 (BYTES)

BYTEPOS TAG             LENGTH  VALUE
------- ---             ------  -----
3       SIGNERID        2       117
4       SIGNERNAME      56      cn="SAST-ADN0054f509        ";ou=IPCBU;o="Cisco Systems
5       SERIALNUMBER    10      3C:F9:27:00:00:00:AF:A2:DA:45
6       CANAME          42      cn=Cisco Manufacturing CA;o=Cisco Systems
7       SIGNATUREINFO   2       15
8       DIGESTALGORTITHM        1
9       SIGNATUREALGOINFO       2       8
10      SIGNATUREALGORTITHM     1
11      SIGNATUREMODULUS        1
12      SIGNATURE       128
                45  ec  5  c  9e  68  6d  e6
                5d  4b  d3  91  c2  26  cf  c1
                ee  8c  b9  6  95  46  67  9e
                19  aa  b1  e9  65  af  b4  67
                36  7e  e5  ee  60  10  b  1b
                58  c1  6  64  40  cf  e2  57
                aa  86  73  14  ec  11  b  a
                3b  98  91  e2  e4  6e  4  50
                ba  ac  3e  53  33  1  3e  a6
                b7  30  0  18  ae  68  3  39
                d1  41  d6  e3  af  97  55  e0
                5b  90  f6  a5  79  3e  23  97
                fb  b8  b4  ad  a8  b8  29  7c
                1b  4f  61  6a  67  4d  56  d2
                5f  7f  32  66  5c  b2  d7  55
                d9  ab  7a  ba  6d  b2  20  6
14      FILENAME        12
15      TIMESTAMP       4

        CTL Record #:1
                  ----
BYTEPOS TAG             LENGTH  VALUE
------- ---             ------  -----
1       RECORDLENGTH    2       1186
2       DNSNAME         1
3       SUBJECTNAME     56      cn="SAST-ADN0054f509        ";ou=IPCBU;o="Cisco Systems
4       FUNCTION        2       System Administrator Security Token
5       ISSUERNAME      42      cn=Cisco Manufacturing CA;o=Cisco Systems
6       SERIALNUMBER    10      3C:F9:27:00:00:00:AF:A2:DA:45
7       PUBLICKEY       140
9       CERTIFICATE     902     19 8F 07 C4 99 20 13 51 C5 AE BF 95 03 93 9F F2 CC 6D 93 90 (SHA1 Hash HEX)
10      IPADDRESS       4
This etoken was used to sign the CTL file.

        CTL Record #:2
                  ----
BYTEPOS TAG             LENGTH  VALUE
------- ---             ------  -----
1       RECORDLENGTH    2       1186
2       DNSNAME         1
3       SUBJECTNAME     56      cn="SAST-ADN008580ef        ";ou=IPCBU;o="Cisco Systems
4       FUNCTION        2       System Administrator Security Token
5       ISSUERNAME      42      cn=Cisco Manufacturing CA;o=Cisco Systems
6       SERIALNUMBER    10      83:E9:08:00:00:00:55:45:AF:31
7       PUBLICKEY       140
9       CERTIFICATE     902     85 CD 5D AD EA FC 34 B8 3E 2F F2 CB 9C 76 B0 93 3E 8B 3A 4F (SHA1 Hash HEX)
10      IPADDRESS       4
This etoken was not used to sign the CTL file.

        CTL Record #:3
                  ----
BYTEPOS TAG             LENGTH  VALUE
------- ---             ------  -----
1       RECORDLENGTH    2       33
2       DNSNAME         13      10.48.47.153
4       FUNCTION        2       CCM+TFTP
10      IPADDRESS       4

        CTL Record #:4
                  ----
BYTEPOS TAG             LENGTH  VALUE
------- ---             ------  -----
1       RECORDLENGTH    2       1004
2       DNSNAME         13      10.48.47.153
3       SUBJECTNAME     60      CN=CAPF-e9037b69;OU=TAC;O=Cisco;L=Krakow;ST=Malopolska;C=PL
4       FUNCTION        2       CAPF
5       ISSUERNAME      60      CN=CAPF-e9037b69;OU=TAC;O=Cisco;L=Krakow;ST=Malopolska;C=PL
6       SERIALNUMBER    16      79:59:16:C1:54:AF:31:0C:0F:AE:EA:97:2E:08:1B:31
7       PUBLICKEY       140
9       CERTIFICATE     680     A0 A6 FC F5 FE 86 16 C1 DD D5 B7 57 38 9A 03 1C F7 7E FC 07 (SHA1 Hash HEX)
10      IPADDRESS       4

        CTL Record #:5
                  ----
BYTEPOS TAG             LENGTH  VALUE
------- ---             ------  -----
1       RECORDLENGTH    2       33
2       DNSNAME         13      10.48.47.154
4       FUNCTION        2       CCM+TFTP
10      IPADDRESS       4

The CTL file was verified successfully.

admin:
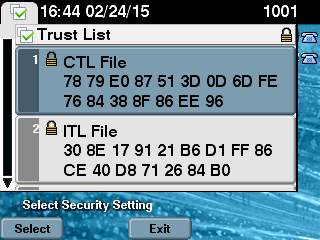
On the IP Phone side, after it was restarted and downloaded the updated CTL file version, you can see that the MD5 checksum matches when compared to the output from CUCM.
Put the CUCM Cluster Security from Mixed Mode to Non-Secure Mode When USB Tokens Are Lost
Security tokens for secured clusters could be lost. In that situation, you need to consider these two scenarios:
- The cluster runs version 10.0.1 or later
- The cluster runs a version earlier than 10.x
In the first scenario, complete the procedure described in the Change the CUCM Cluster Security from Mixed Mode to Non-Secure Mode with the CLI section in order to recover from the issue. Since that CLI command does not require a CTL token, it could be used even if the cluster was put in Mixed mode with the CTL client.
The situation gets more complex when a version earlier than 10.x of CUCM is in use. If you lose or forget the password of one of the tokens, you can still use the other one to run the CTL client with current CTL files. It is highly recommended to obtain another eToken and add it to the CTL file as soon as possible for the sake of redundancy. If you lose or forget the passwords for all the eTokens listed in your CTL file, you need to get a new pair of eTokens and run a manual procedure as explained here.
- Enter the file delete tftp CTLFile.tlv command in order to delete the CTL file from all the TFTP servers.
admin:file delete tftp CTLFile.tlv
Delete the File CTLFile.tlv?
Enter "y" followed by return to continue: y
files: found = 1, deleted = 1

admin:show ctl
Length of CTL file: 0
CTL File not found. Please run CTLClient plugin or run the CLI - utils ctl..
 to generate the CTL file.
Error parsing the CTL File.
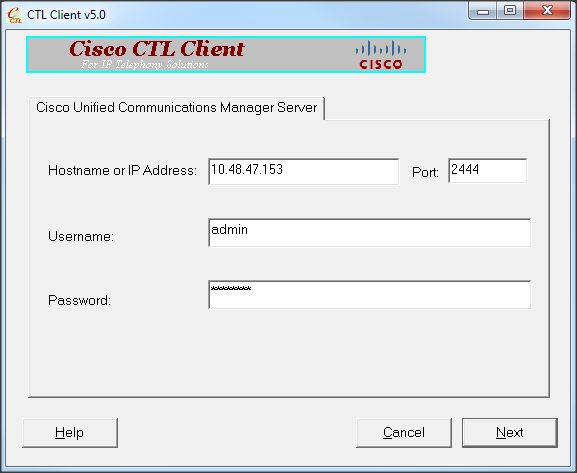
- Run the CTL client. Enter the IP hostname/address of the CUCM Pub and the CCM Administrator credentials. Click Next.
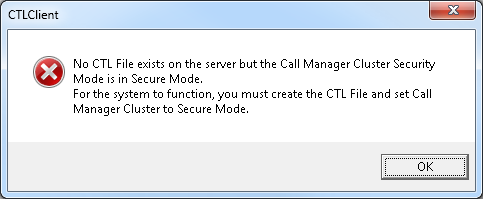
- Since the cluster is in Mixed mode, however no CTL file exists on Publisher, this warning is displayed. Click OK in order to ignore it and proceed forward.
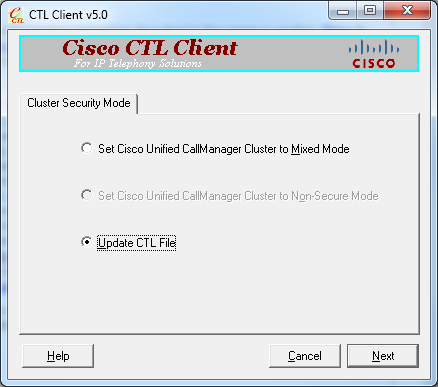
- Click the Update CTL File radio button. Click Next.
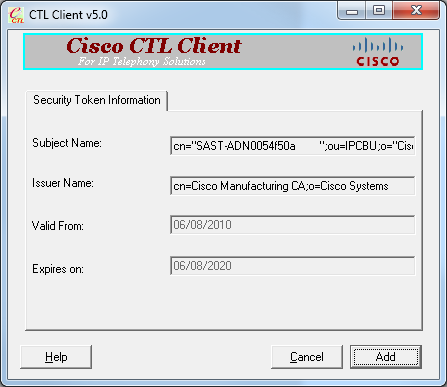
- The CTL client asks to add a Security Token. Click Add in order to proceed.
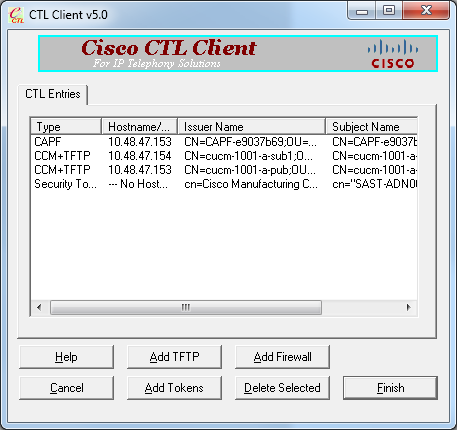
- The screen displays all the entries in new CTL. Click Add Tokens in order to add the second token from the new pair.
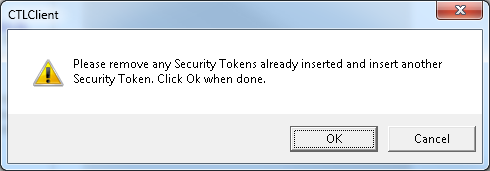
- You will be prompted to remove the current token and insert a new one. Click OK once done.
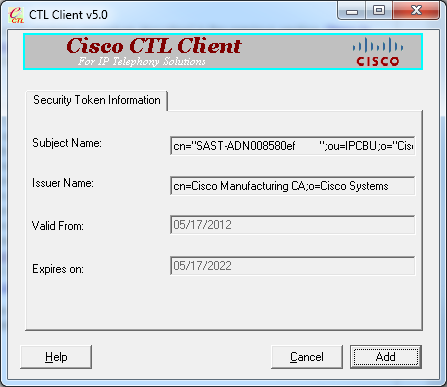
- A screen that shows details of the new token is displayed. Click Add in order to confirm them and add this token.
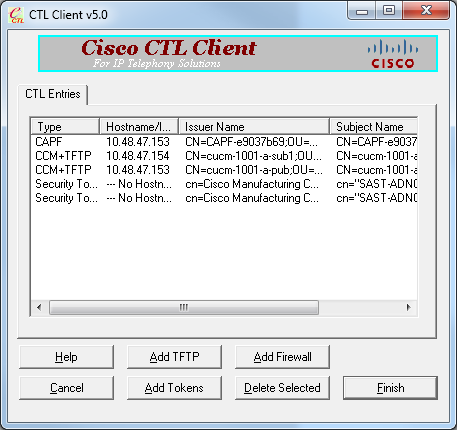
- You will be presented with new list of CTL entries that show both added Tokens. Click Finish in order to generate new CTL files.
- In the Token Password field, enter Cisco123. Click OK.
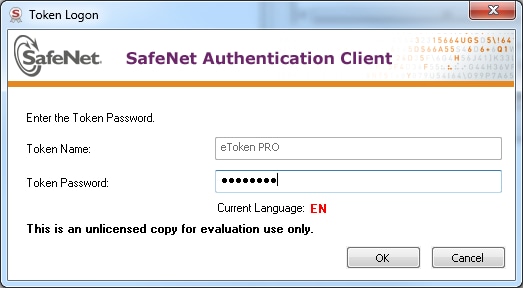
- You will see confirmation that the process was successful. Click Done in order to confirm and exit the CTL client.
- Restart Cisco TFTP followed by the CallManager service (Cisco Unified Serviceability > Tools > Control Center - Feature Services). The new CTL file should be generated. Enter the show ctl command for verification.
admin:show ctl
The checksum value of the CTL file:
68a954fba070bbcc3ff036e18716e351(MD5)
4f7a02b60bb5083baac46110f0c61eac2dceb0f7(SHA1)


Length of CTL file: 5728
The CTL File was last modified on Mon Mar 09 11:38:50 CET 2015
- Delete the CTL file from each phone in the cluster (this procedure could vary based on phone type - please consult documentation for details, such as the Cisco Unified IP Phone 8961, 9951, and 9971 Administration Guide).
Note: The phones might still be able to register (dependent upon the security settings on the phone) and work without proceeding with step 13. However, they will have the old CTL file installed. It could cause issues if certificates are regenerated, another server is added to the cluster or server hardware is replaced. It is not recommended to leave the cluster in this status.
- Move the cluster to Non-Secure. See the Change the CUCM Cluster Security from Mixed Mode to Non-Secure Mode with the CTL Client section for details.
Troubleshoot
There is currently no specific troubleshooting information available for this configuration.


 Feedback