Introduction
This document describes how to generate a new Certificate Signing Request (CSR) with the information in the existing Expressway certificate.
Prerequisites
Requirements
Cisco recomends that you have knowledge of these topics:
- Certificate Attributes
- Expressways or Video Communication Server (VCS)
Components Used
This document is not restricted to specific software and hardware versions.
The information in this document was created from the devices in a specific lab environment. All of the devices used in this document started with a cleared (default) configuration. If your network is live, ensure that you understand the potential impact of any command.
Configure
Step 1. Locate the Current Certificate Information.
In order to obtain the information contained in the current certificate, navigate to Maintenance > Security > Server Certificate on the Expressway Graphical User Interface (GUI).
Locate the section Server certificate data and select Show (decoded).
Look for the information in the Common Name (CN) and Subject Alternative Name (SAN) as shown in the image:
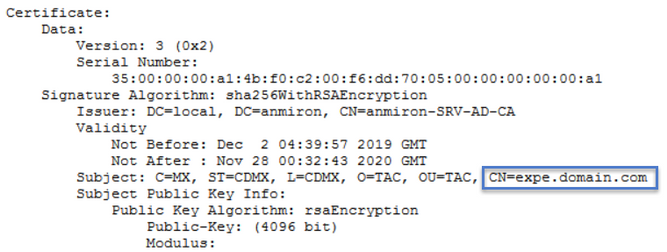

Now that you know the CN and the SAN's copy them so they can be added to the new CSR.
Optionaly you can copy the additional information for the certificate which is Country (C), State (ST), Locality (L), Organization (O), Organizational Unit (OU). This information is next to the CN.
Step 2. Create a New CSR with the Information Obtained Above.
In order to create the CSR navigate to Maintenance > Security > Server Certificate.
Locate the section Certificate signing request (CSR) and select Generate CSR as shown in the image:

Enter the values collected from the current certificate.
The CN cannot be modified unless it is a cluster. In case of a cluster you can select the CN to be the Expressway Fully Qualified Domain Name (FQDN) or the cluster FQDN. In this document a single server is used and hence the CN correspods to what you obtained from the current certificate as shown in the image:

For the SANs you have to enter the values manually in case they are not autopopulated, in order to do it you can enter the values on the Additional alternative names, if you have multiple SANs they have to be comma separated for example: example1.domain.com, example2.domain.com, example3.domain.com. Once added the SANs are listed on the Alternative name as it will appear section, as shown in the image:

The Additional information is required, if it is not autopopulated or has to be changed, it has to be manually entered as shown in the image:
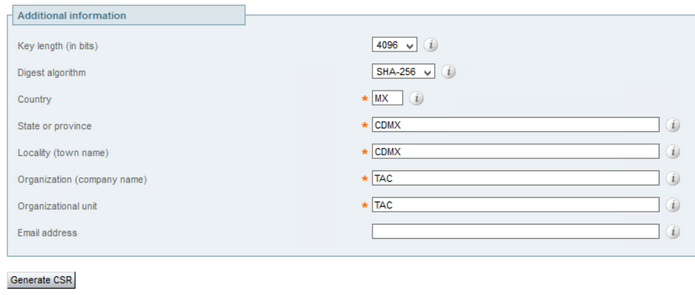
Once finished, select Generate CSR.
Step 3. Verify and Download the New CSR.
Now that the CSR is generated you can select Show (decoded) on the Certificate signing request (CSR) section to verify that all the SANs are present, as shown in the image:

In the new window look for the CN and the Subject Alternative Name as shown in the image:

The CN is always added as a SAN automatically:

Now that the CSR has been verified you can close the new window and select Download (decoded) on the Certificate signing request (CSR) section as shown in the image:

After it is downloaded you can send the new CSR to your Certificate Authority (CA) to be signed.
Step 4. Verify the Information Contained in the New Certificate.
Once the new certificate is returned from the CA you can verify if all the SANs are present in the certificate. In order to do that, you can open the certificate and look for the SANs attributes. In this document a Windows PC is used to see the attributes, this is not the only method as long as you can open or decode the certificate to review the attribues.
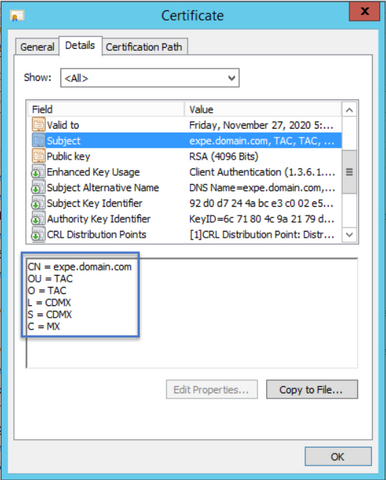
Open the certificate and navigate to the Details tab and look for Subject, it should contain the CN and the Additional Information as shown in the image:
Also look for the Subject Alternative Name section, it must contain the SANs you entered in the CSR as shown in the image:
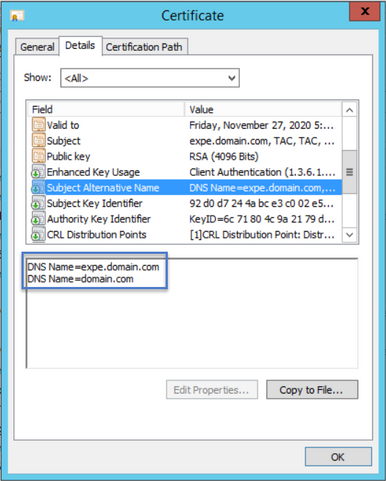
If all the SANs you entered in the CSR are not present in the new certificate contact you CA to see if extra SANs are permited for your certificate.
Step 5. Upload the New CA Certificates to the Servers Trusted Store if Applicable.
If the CA is the same that signed your old Expressway certificate you can discard this step. If it is a different CA then you have to upload the new CA certificates to the trusted CA list in each of the Expressway servers. If you have Transport Layer Security (TLS) zones between the Expressways, for example between an Expressway-C and an Expressway-E you have to upload the new CAs on both servers so that they can trust each other.
In order to do that you can upload your CA certificates one by one. Navigate to Maintenance > Security > Trusted CA certificates on the Expressway's.
- Select Browse.
- On the new page Select the CA Certificate.
- Select Append CA Certificate.
This procedure has to be done for each CA certificate in the certificate chain (Root and Intermediates) and has to be done in all the Expressway servers even if they are clustered.
Step 6. Upload the new Certificate to the Expressway Server.
If all the information in the new certificate is correct, in order to upload the new certificate navigate to: Maintenance > Security > Server Certificate.
Locate the Upload new certificate section as shown in the image:
- Select Browse on the Select the server certificate file section.
- Select the new certificate.
- Select Upload server certificate data.

If the new certificate is accepted by the Expressway, the Expressway prompts for a restart to apply the changes and the message displays the new expiration date for the certificate, as shown un the image:
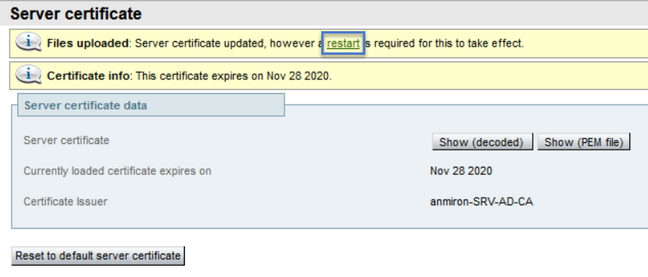
In order to restart the Expressway select restat.
Verify
Once the server is back the new certificate must have been installed, you can navigate to: Maintenance > Security > Server Certificate in order to confirm.
Locate the Server certificate data and look for the Currently loaded certificate expires on section, it displays the new expiration date for the certificate as shown in the image:

Troubleshoot
There is currently no specific troubleshooting information available for this configuration.