Introduction
This document describes the installation of an option key on a Cisco Expressway Series device via the web interface and Command Line Interface (CLI).
Prerequisites
Requirements
Cisco recommends that you have knowledge of these topics:
Expressway Installation
Have successfully installed your Expressway and applied a valid IP address that is reachable via web interface and or CLI.
Have applied for and received an option key valid for your Expressway serial number.
Have access to the Expressway with an admin account by web interface or CLI.
Have used a web browser such as Firefox, Internet Explorer or Chrome.
Note: Expressway Series installation guides can be found here:
http://www.cisco.com/c/en/us/support/unified-communications/expressway-series/products-installation-and-configuration-guides-list.html
Components Used
The information in this document is based on these software versions:
Expressway Version x8.8.1
Expressway Core x7.X and x8.X releases
Expressway Edge x7.X and x8.X releases
PuTTY (terminal emulation software)
---Alternatively, you could use any terminal emulation software that supports Secure Shell (SSH) such as Secure CRT, TeraTerm and so on.
Licensing email with an Option Key.
A web browser such as Firefox, Internet Explorer or Chrome.
The information in this document was created from the devices in a specific lab environment. All of the devices used in this document started with a cleared (default) configuration. If your network is live, make sure that you understand the potential impact of any command.
Configure
This web interface example video supplements this document.
Web Interface Option Key Installation Example
Step 1: Once you have installed your Expressway, have your serial number and applied for your option key using your PAK and serial number, you receive a license email from the Cisco licensing team which may or may not contain a release key and option keys. In the example email, you can see an example of an option key for a VCS device, which is ok, the email looks the same for an Expressway Series device.
Note: Examples of PAK are outside the scope of this document.
EMAIL EXAMPLE

Step 2: Log in to the web interface and navigate to Maintenance > Option Keys:
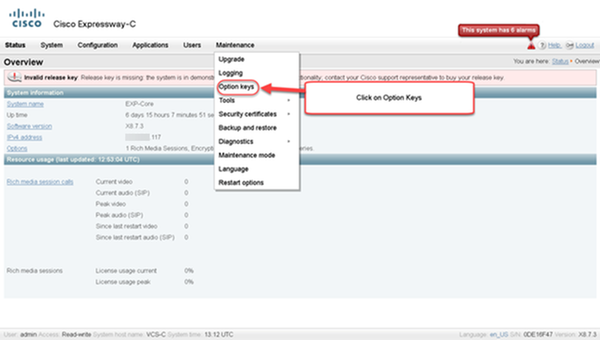
Step 3: Copy the option key you received in your license email and enter it in the Add option key and click Add option:

Note: Be careful to add the option key in the Add Option key field. A common mistake is to add an option key in the Release key field. This mistake results in an error condition.
Note: You can repeat this process for any option key that you want to add. Once added, the option key takes effect immediately. A restart is NOT required with one exception. The Expressway Series option key DOES require a restart when applied.
CLI Option Key Configuration Example
Step 1: Start a Secure Shell (SSH) session using PuTTY. Enter the Expressway IP Address value in the Host Name (or IP Address) field, click the SSH Radio Button and click Open:
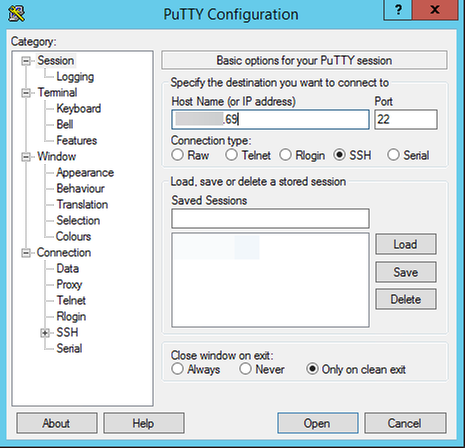
Step 2: Log in with an admin account and enter the admin account password when prompted.
Step 3: Type the command xCommand OptionKeyAdd Key: [option key]:
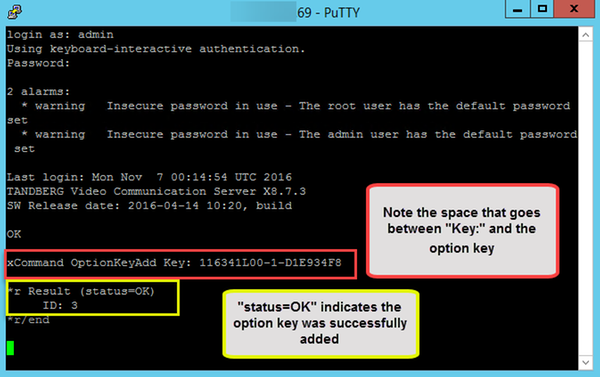
Note: You can repeat this process for any option key that you want to add. The process is the same for both Expressway Core and Expressway Edge devices.
Important Keys
The Expressway Series option key changes the Virtual Machine (VM) from a VCS Series to an Expressway Series:
Note: A restart is required after adding this option key for it to take effect. Click the restart link to restart the Expressway and follow the prompts.

The Traversal Server option key turns an Expressway-C into an Expressway-E and the Advanced Networking option key adds the Dual-NIC feature and NAT features:
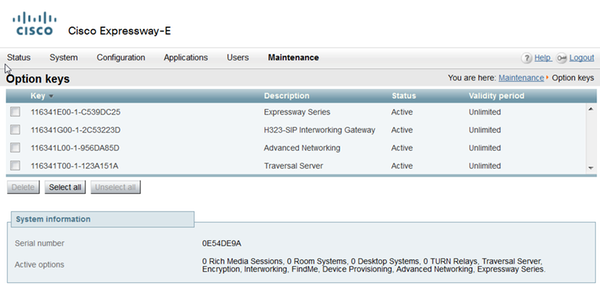
On Expressway x8.8.X there is a new license Room Systems option key and Desktop Systems option key which allow you to register Collaboration Endpoints to an Expressway-C.
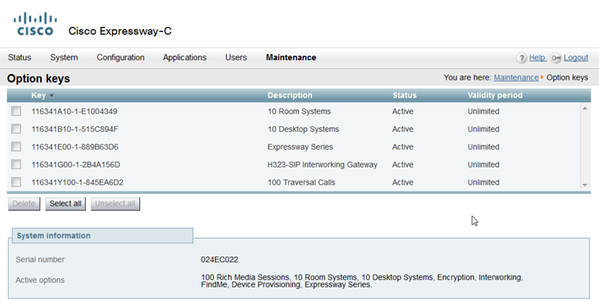
Verify
Navigate to Maintenance > Option keys page and notice how the option key has been added and is now visible in the Keys section, Active options of the System Information section and Current licenses section:

Troubleshoot
Note: These images are from a VCS Series, that is ok, they are the same for an Expressway Series device.
Add a key and you see an error, “Unable to add option key”:

- Confirm that you correctly copy the alpha-numeric chain that it is an option key value. Ensure there were no extra spaces or characters.
- Confirm that you apply the option key to the correct Expressway. The option keys are matched to the device serial number.
- Confirm you add the option key in the Add option key field and not the Release key field. The Expressway will accept the option key in the Release Key field and prompt for a restart
Note: When you add an option key to an Expressway, it takes effect immediately. A restart is NOT required in all but one case. The Expressway Series option key changes the Virtual Machine (VM) from a VCS Series to an Expressway Series. This option key DOES require a restart.

Observe after restart, a banner pops up with an error "Invalid release key":

Install the release key and option key in the correct fields and restart the Expressway again to correct this issue.
If you encounter errors after you confirm the procedures documented in the Troubleshoot section of this document, contact Cisco TAC.
