Configure and Troubleshoot SNMPv3 for CER
Available Languages
Download Options
Bias-Free Language
The documentation set for this product strives to use bias-free language. For the purposes of this documentation set, bias-free is defined as language that does not imply discrimination based on age, disability, gender, racial identity, ethnic identity, sexual orientation, socioeconomic status, and intersectionality. Exceptions may be present in the documentation due to language that is hardcoded in the user interfaces of the product software, language used based on RFP documentation, or language that is used by a referenced third-party product. Learn more about how Cisco is using Inclusive Language.
Contents
Introduction
This document describes how to configure and troubleshoot the Simple Network Management Protocol (SNMP) version 3 for Cisco Emergency Responder (CER).
Prerequisites
Requirements
Cisco recommends that you have knowledge of these topics:
- Cisco Unified Communications Manager (CUCM)
- Cisco Emergency responder
- SNMP protocol
Components Used
The information in this document is based on these software and hardware versions:
- CUCM: 11.5.1.14900-8
- CER: 11.5.4.50000-6
- Switch: WS-C3560CX-12PC-S
The information in this document was created from the devices in a specific lab environment. All the devices used in this document started with a cleared (default) configuration. If your network is live, make sure that you understand the potential impact of any command.
Background Information
Emergency Responder uses SNMP to obtain information about the ports on a switch. Once the information is obtained, CER admin user can assign the ports to Emergency Response Locations (ERL), and so that Emergency Responder can identify phones that are attached to the ports and update their ERL assignments.
SNMP V3 provides additional security features that cover message integrity, authentication, and encryption. In addition, SNMP V3 controls user access to specific areas of the MIB tree.
Emergency Responder only reads SNMP information, it does not write changes to the switch configuration, so you only have to configure the SNMP read community strings.
There are some conditions to track by switch ports in CER:
- CER fetches switch interfaces, ports and VLANs (just for CAM), Cisco Discovery Protocol (CDP) information.
- CER fetches registered phones from CUCM.
- CER looks at device name sent from CUCM and searches if MAC belongs to a switch port. If the MAC is found, CER updates its database with port location of a phone.
Configure
When you configure the SNMP strings for your switches, you must also configure the SNMP strings for your Unified Communications Manager servers. Emergency Responder must be able to make SNMP queries of all Unified CM servers where the phones are registered to in order to get the phone information.
CER offers the possibility to use patterns, for example 10.0.*.* or 10.1.*.* for those devices with IPs that begin with 10.0 or 10.1. If you want to include all the possible addresses, you can use the subnet *.*.*.*.
CER Configuration
In order to configure SNMPv3 for phone tracking in Cisco Emergency Responder follow these steps:
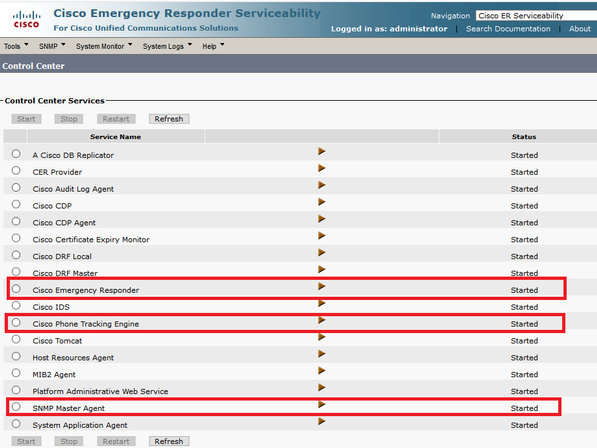
Step 1. As shown in the image, ensure that the SNMP Master Agent, the CER, and the Cisco Phone Tracking Engine services are started.
Step 2. In order to configure the SNMP settings used for switches and CUCM nodes, navigate to CER Admin > Phone tracking > SNMPv2/v3. You can configure the SNMP username, authentication, and privacy information as shown in the image.
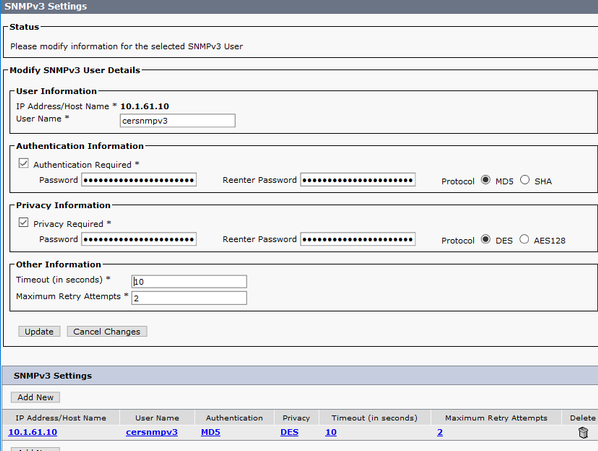
In this example, 10.1.61.10 is the IP of the switch and 10.1.61.158 is the IP of the Call Manager. The SNMPv3 configuration in CER is as shown in the image.

Note: You can specify *.*.*.* or other wildcards/ranges in the IP Address/Hostname in order to include more than one server, otherwise, you can configure specific IP Addresses.
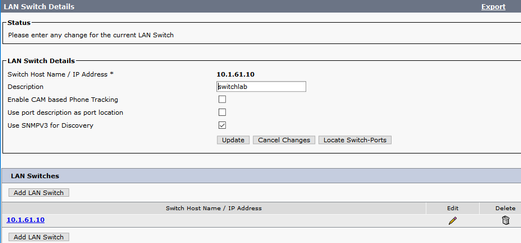
Step 3. In order to configure the switch IP on LAN switches, navigate to CER Admin > Phone tracking > LAN switch detail > Add LAN Switch as shown in the image.
Communications Manager Configuration
In CUCM, there are two levels of SNMP connectivity, the SNMP Master Agent and Cisco CallManager SNMP Service. You must enable both services in all those nodes with CallManager service activated. In order to configure your Cisco Unified Communications Manager server follow these steps.
Step 1. In order to check the status of the Cisco CallManager SNMP Service, navigate to Cisco Unified Serviceability > Tools > Feature services. Select the server and ensure that the status of the Cisco CallManager SNMP Service is activated as shown in the image.

Step 2. In order to check the status of the SNMP Master Agent, navigate to Cisco Unified Serviceability > Tools > Network services. Select the server and verify that the SNMP Master Agente service runs as shown in the image.

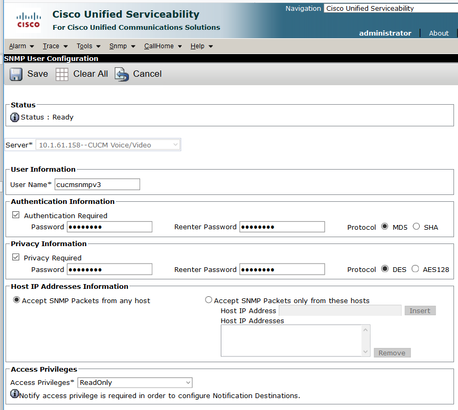
Step 3. In order to configure the SNMPv3 in CUCM, navigate to Cisco Unified Serviceability > SNMP > V3 > User. Select the server and configure the User Name, Authentication Information and Privacy Information as shown in the image.
Switch Configuration
In order to track phones by switchport, the SNMP configuration in the switch must match with the configuration in CER server. Use these commands to configure the switch.
snmp-server group <GroupName> v3 auth read <Name_of_View>
snmp-server user <User> <GroupName> v3 auth [sha/md5] <authentication_password> priv [DES/AES128] <privacy_password>
snmp-server view <Name_of_View> iso included
Example:
Switch(config)#snmp-server group Grouptest v3 auth read Viewtest
Switch(config)#snmp-server user cersnmpv3 Grouptest v3 auth md5 cisco123 priv des cisco123
Switch(config)#snmp-server view Viewtest iso included
In order to verify your configuration, use the show run | s snmp as shown in the example.
Switch#show run | s snmp
snmp-server group Grouptest v3 auth read Viewtest
snmp-server view Viewtest iso included
Verify
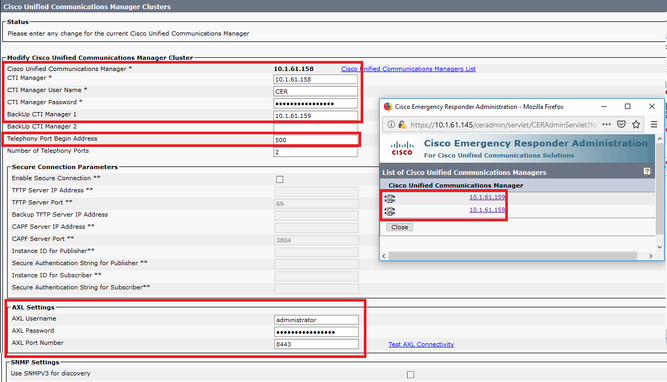
Each CUCM that runs Cisco CallManager service must also run SNMP services. If all is configured correctly, you must see all the CallManager nodes when you click on the Cisco Unified Communications Manager List hyperlink and the phones must be tracked by switchport.
Step 1. In order to verify the CUCM nodes list, navigate to CER Admin > Phone tracking > Cisco Unified Communications Manager. Click on the hyperlink as shown in the image.
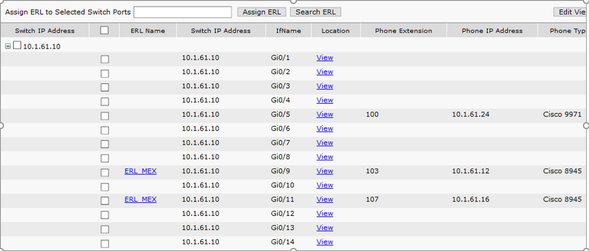
Step 2. In order to confirm that phones are tracked by switchport, navigate to CER Admin > ERL Membership > Switchport > Filter > and click on Find. The switch IP address and phones tracked must be listed as shown in the image.
Troubleshoot
SNMP Walk Version 3
In order to confirm that both CUCM and the switch respond to CER you can use the SNMP walk v3 command. The recommended Object Identifier (OID) is 1.3.6.1.2.1.1.2.0 as shown in the example.
Example of SNMP walk version 3 from CER to CUCM:
admin:utils snmp walk 3
Enter the user name:: cucmsnmpv3
Enter the authentication protocol [SHA]::
Enter the authentication protocol [SHA]:: MD5
Enter the authentication protocol pass phrase:: ********
Enter the privacy protocol [AES128]:: DES
Enter the privacy protocol pass phrase:: ********
Enter the ip address of the Server, use 127.0.0.1 for localhost.Note that you need to provide the IP address, not the hostname.:: 10.1.61.158
The Object ID (OID):: 1.3.6.1.2.1.1.2.0
Enter parameter as "file" to log the output to a file. [nofile]::
This command may temporarily impact CPU performance.
Continue (y/n)?y
SNMPv2-MIB::sysObjectID.0 = OID: SNMPv2-SMI::enterprises.9.1.1348
Example of SNMP walk version 3 from CER to the switch:
admin:utils snmp walk 3
Enter the user name:: cersnmpv3
Enter the authentication protocol [SHA]:: MD5
Enter the authentication protocol pass phrase:: ********
Enter the privacy protocol [AES128]:: DES
Enter the privacy protocol pass phrase:: ********
Enter the ip address of the Server, use 127.0.0.1 for localhost.Note that you need to provide the IP address, not the hostname.:: 10.1.61.10
The Object ID (OID):: 1.3.6.1.2.1.1.2.0
Enter parameter as "file" to log the output to a file. [nofile]::
This command may temporarily impact CPU performance.
Continue (y/n)?y
SNMPv2-MIB::sysObjectID.0 = OID: SNMPv2-SMI::enterprises.9.1.2134
Example of SNMP walk v3 with root access in CER:
snmpwalk -v3 -u <User> -l authPriv –A <auth_password> –a [MD5/SHA] -x [DES/AES128] -X <Priv_password> IP_Device <OID>
Where:
-u : is the snmp v3 user.
-l : is the authentication mode [noAuthNoPriv|authNoPriv|authPriv].
-A : is the Authentication password.
-a : is the authentication protocol [MD5|SHA].
-x : is the privacy protocol [DES/AES128].
-X : is the privacy protocol password.
Example of the output is as show in the image.

If you receive the following error "Error generating a key (Ku) from the supplied privacy pass phrase" try with the following syntax:
snmpwalk -v3 -l authPriv -u <User> –a [MD5/SHA] –A <auth_password> -x [DES/AES128] -X <Priv_password> IP_Device <OID>
Verify that the OID returned is one of the supported devices in the CER release notes of your version.
Some of the OIDs that CER sends to the switch are:
- 1.3.6.1.2.1.1.1.0 - sysDescr
- 1.3.6.1.2.1.1.2.0 - sysObjectID
- 1.3.6.1.2.1.1.5.0 - sysName
- 1.3.6.1.2.1.1.3.0 – sysUpTime
Some of the OIDs that CER sends to the CUCM are:
- 1.3.6.1.4.1.9.9.156.1.1.2.1.7 - ccmEntry/ ccmInetAddress
- 1.3.6.1.2.1.1.2.0 - sysObjectID
- 1.3.6.1.4.1.9.9.156.1.1.2.1.2 - ccmName
Packet Capture
It is very useful to get a packet capture in order to isolate issues with phone tracking, these are the steps to get a packet capture in CER.
Step 1. Start a packet capture via CLI with the command utils network capture eth0 file ExampleName size all count 10000, where ExampleName is the name for your packet capture.
Step 2. Replicate the issue (place the 911 call, SNMP walk, phone tracking update,etc).
Step 3. Stop the packet capture with Ctrl+C
Step 4. Confirm that the packet capture was saved in CER with the command file list activelog platform/cli/*
Step 5. Retrieve the packet capture with the command file get activelog platform/cli/ExampleName.cap (an SFTP server is required to export the file).
Enable the Logs in CER
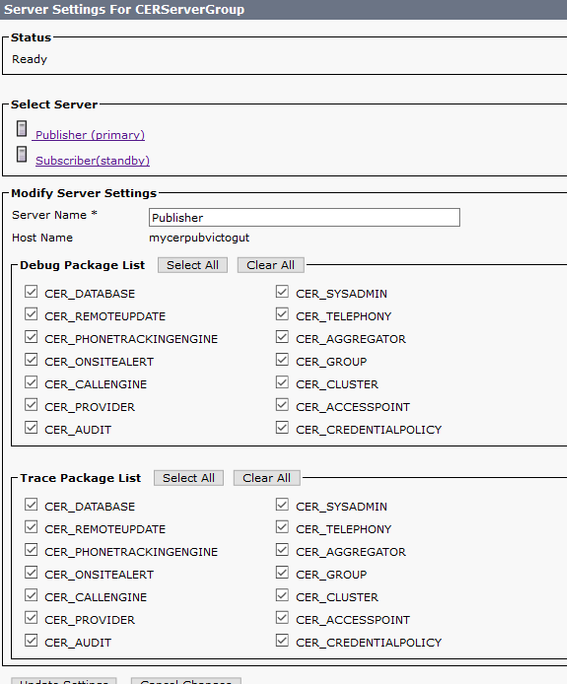
In order to enable the logs in Emergency Responder Server, navigate to CER Admin > System > Server Settings. Activate all the checkboxes, it does not generate any service impact on the server.
In order to troubleshoot a switch that is not shown in the switchports (CER > Admin > ERL membership > Switch Ports), these steps must be taken:
- Verify the configuration in Admin > Phone tracking > LAN Switch details.
- Verify the configuration in Admin > Phone tracking > SNMP v2 / v3.
- Verify the Enable CAM based Phone Tracking checkbox. If it is a non-Cisco switch, or CDP is disabled, check the Enable CAM based Phone Tracking checkbox.
- Verify the SNMP configuration on the switch.
- Collect phone tracking logs.
If switch ports show up but phones do not, these steps must be taken:
- SNMP configuration on CER and Communications Managers.
- Confirm the IP/Hostname under Cisco Unified Communications Manager.
- Confirm if phones not showed belong to an specific Communications Manager.
- Confirm both SNMP Services (SNMP Master Agent / CallManager SNMP Service) are started on all CallManager nodes in the cluster.
- Confirm CUCM reachability via SNMP walk.
- Collect phone tracking logs.
Example 1 of CER phone tracking logs:
305: Jun 30 12:05:17.385 EDT %CER-CER_PHONETRACKINGENGINE-7-DEBUG:SnmpSocketReader-47637:SnmpPrivacyParam encryptDESPrivParam Exception thrown while encrypting DES parameters :Cannot find any provider supporting DES/CBC/NoPadding
Possible reason: Wrong configuration on SNMPv3 Privacy Information.
Example 2 of CER phone tracking logs:
Snmp exception while reading ccmVersion on <IP address CCM Node>
Possible reason: Cisco CallManager SNMP Service is deactivated in one of the CUCM nodes.
Related Information
Contributed by Cisco Engineers
- Victor Gutierrez LunaCisco TAC
Contact Cisco
- Open a Support Case

- (Requires a Cisco Service Contract)
 Feedback