VG224 and VG350 Simultaneous Bulk Import of Device and Line Configuration Example
Available Languages
Contents
Introduction
This document describes how to bulk import both the device and line level configuration of the Voice Gateway (VG). VG 224 and VG350 configurations normally have many ports. The addition of the device and line level configuration for all the ports becomes a tedious process in huge deployments.
See the "Add Cisco VG224 gateways using BAT" procedure documented in the Cisco Unified Communications Manager Bulk Administration Guide for information on how to import multiple VGs. However, it does not provide a way to import the line level configuration for all the ports.
Prerequisites
Requirements
Cisco recommends that you have knowledge of the Bulk Administration Tool.
Components Used
The information in this document is based on Cisco Unified Communications Manager (CUCM) Release 10.5.2.
The information in this document was created from the devices in a specific lab environment. All of the devices used in this document started with a cleared (default) configuration. If your network is live, make sure that you understand the potential impact of any command.
Configure
If the VG is already added in CUCM and the requirement is only to update the device and line level configuration of the ports, then go to the section "Update the Device and Line Level Configuration of Ports of the Current VG".
If the requirement is to insert the VG and also to update the device and line level configuration on the ports, then begin with the section "Insert Gateway".
Insert Gateway
In order to insert the gateway, complete these steps:
- Choose Bulk Administration > Gateways > Gateway Template.
- Click Add New. The Add a New Gateway window displays.
- From the Gateway Type drop-down list, choose the appropriate VG and click Next. The next Add a New Gateway window displays.
- From the Protocol drop-down list, choose MGCP or SCCP. Click Next. The Gateway Configuration window displays.
- Enter values for all the fields and click Save.
- Choose the appropriate Slot and Sub Unit values as per the VG. Click Save.
- When the Status indicates that the update completed, the endpoint identifiers display as links to the right of the subunit drop-down lists.
- Click an endpoint identifier (for example, 1/0/0) in order to configure device protocol information. Click Save.
- Choose Bulk Administration > Upload/Download files and download the bat.xlt file.
- Open the bat.xlt file, enable editing, choose the appropriate VG, and populate the VG details.
- Click Export to BAT format and save the file in .csv format.
- Choose Bulk Administration > Upload/Download files > Add New and choose the file created in step 11.
- Choose The Target as Gateways and Transaction Type as Insert Gateways. Click Save.
- Choose Bulk Administration > Gateways > Insert Gateways. Choose the appropriate Gateway Type. Click Next.
- Choose the .csv file uploaded in Step 12 and choose the Gateway template created in Step 2.
- Choose either the Run Immediately or Run Later option as per your requirement. Click Submit.
Update the Device and Line Level Configuration of Ports of the Current VG
In order to update the configurations, complete these steps:
- Choose Bulk Administration > Import/Export > Export. Under Device Data, choose Gateway. Select a filename and run the job.
- Choose Bulk Administration > Upload/Download files. Choose the .tar file you created in step 1 and download the same.
- Extract the .tar file (use 7zip File Manager) and extract it to a folder. Open the .csv file.
- The port and theDN configurations are to be entered under the section Entity:ANALOG.

- All the columns need to be updated in this section. You can increment the PORT NUMBER column and update the other columns as per your configuration.
- In the DIRECTORY NUMBER 1 column, type the DN that you want to use for that port.
- Once the configuration changes are made in this worksheet, save the .csv file with the same name and in the same folder where you extracted the .tar file.
- Use 7zip File Manager and create a new .tar file of this folder.
- Choose Bulk Administration > Upload/Download files > Add New. Choose the .tar file, choose the target as Import/Export, choose the Transaction Type as Import Configuration, and click Save.
- Choose Bulk Administration > Import/Export > Import. Choose the .tar file uploaded in step 9. Click Next.
- Under Device Data, choose Gateway and toggle "Override the existing configuration" as required. Run the job.
Verify
Use this section to confirm that your configuration works properly.
- Choose Bulk Administration > Job Scheduler. Choose the appropriate Job Id and verify the Job Result Status.
- If the job failed, check the log file in order to identify the reason why the job failed.
Troubleshoot
This section provides information you can use to troubleshoot your configuration.
If the job fails with an error that the header is missing, then make sure that the updated .csv file is saved in the same folder where you exported the gateway configuration.
Make sure that the filename mentioned in the header file is same as that of the actual .csv file.
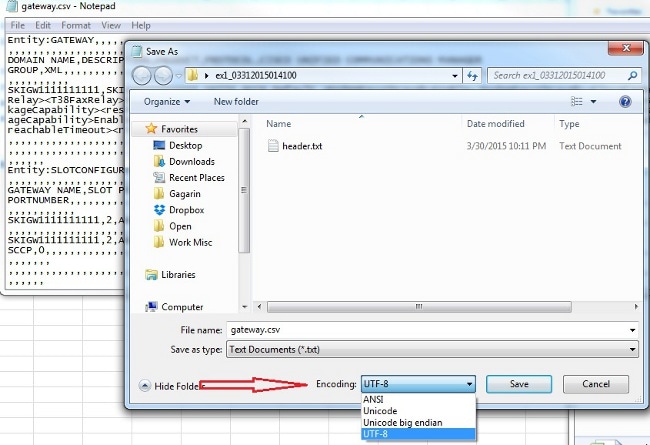
In Step 9 of the section "Update the Device and Line Level Configuration of Ports of the Current VG", if you do not see the option 'Gateway' then most likely the endpoint description has a special character. This is because Windows saves the .csv file in 'ANSI' format by default. When you save the .csv file, choose UTF-8 from the Encoding drop-down list as shown in this screenshot.

Revision History
| Revision | Publish Date | Comments |
|---|---|---|
1.0 |
07-Apr-2015 |
Initial Release |

 Feedback