Configure Smart Licensing Using Policy on the Nexus Platform
Available Languages
Download Options
Bias-Free Language
The documentation set for this product strives to use bias-free language. For the purposes of this documentation set, bias-free is defined as language that does not imply discrimination based on age, disability, gender, racial identity, ethnic identity, sexual orientation, socioeconomic status, and intersectionality. Exceptions may be present in the documentation due to language that is hardcoded in the user interfaces of the product software, language used based on RFP documentation, or language that is used by a referenced third-party product. Learn more about how Cisco is using Inclusive Language.
Introduction
This document describes how to configure Smart Licensing using Policy (SLP) on the Nexus 9K platform.
Prerequisites
Requirements
Cisco recommends that you have knowledge of these topics:
- Nexus NX-OS software
- Cisco NX-OS licensing options
- Domain Name System (DNS)
Components Used
The information in this document is based on Cisco Nexus 9000 with NXOS version 10.2(5).
The information in this document was created from the devices in a specific lab environment. All of the devices used in this document started with a cleared (default) configuration. If your network is live, ensure that you understand the potential impact of any command.
Configure
Smart Software Licensing (SL) provides a single, standardized licensing solution for all of your Cisco products. It is a cloud-based licensing end-to-end platform that consists of tools and processes to authorize the usage and reporting of your Cisco products. It is designed to run on a product instance and communicate with the Cisco Cloud License Service through the Smart Call Home transport medium to complete product registration and authorization.
Smart Licensing Using Policy (SLP) was introduced in Cisco NX-OS Release 10.2(1)F, and it remains the only supported licensing mode to this day.
Smart Licensing Using Policy is an enhanced version of Smart Software Licensing, with the overarching objective of providing a licensing solution that does not interrupt the operations of your network, but rather, one that enables a compliance relationship to account for the hardware and software licenses you purchase and use.
Smart Licensing Using Policy is honor-based. However, license use compliance does require software reporting.
Cisco Smart Software Manager (CSSM) is responsible for managing the accounts and license instances. CSSM runs 24/7 on the Cisco Site.
Methods
Main methods to connect Nexus switches to CSSM:
- Directly: You point directly to the Cisco site using the Internet connection.
- Via Cisco Smart Licensing Utility (CSLU): This is a software application you can run on your computer. Installation Guide.
- Via On-Prem license server: Dedicated server running operating system provided by Cisco. Installation Guide.
- Offline: You generate a report on the Nexus switch and upload the file to CSSM to generate an acknowledgment file, which then needs to be applied to the Nexus switch.

Note: It does not matter what method is used, the first report must still be done to CSSM within the next 90 days. Later, report frequency is required every 365 days, unless a license usage change occurs, which requires another report within the next 90 days.
Configurations
These configurations are implemented on Nexus 9K switch using management VRF for all communications, which is the default VRF for SLP.
Method 1: Directly Connected
- Both smart and call-home modes of transport are supported.
- Only management VRF is supported on call home mode of transport until NXOS 10.2(2)F, starting NXOS 10.2(3)F non-management VRF is supported as well.
- Before NXOS 10.3(2)F, only management VRF is supported on smart mode of transport. Starting from NXOS 10.3(2)F, non-management VRF is supported as well.
Step 1. Configure DNS client.
Nexus(config)# ip domain-lookup
Nexus(config)# vrf context management
Nexus(config-vrf)# ip name-server <dns server ip>
Step 2. Configure smart transport mode.
Nexus(config)# license smart transport smartStep 3. Indicate CSSM URL.
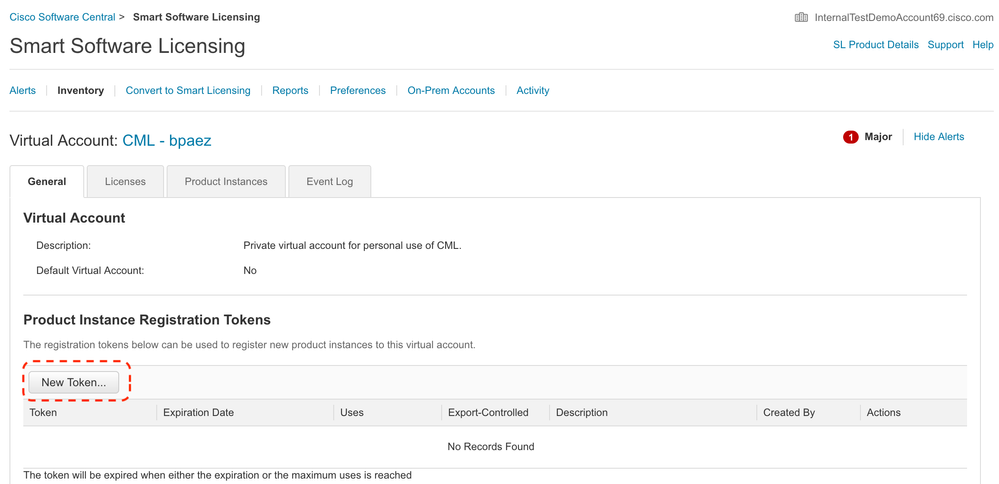
Nexus(config)# license smart url smart https://smartreceiver.cisco.com/licservice/licenseStep 4. Create the Trust Code (token) on the Cisco Site.
Log in to Cisco Software Central > Smart Software Licensing > Inventory > General.
Click New Token....
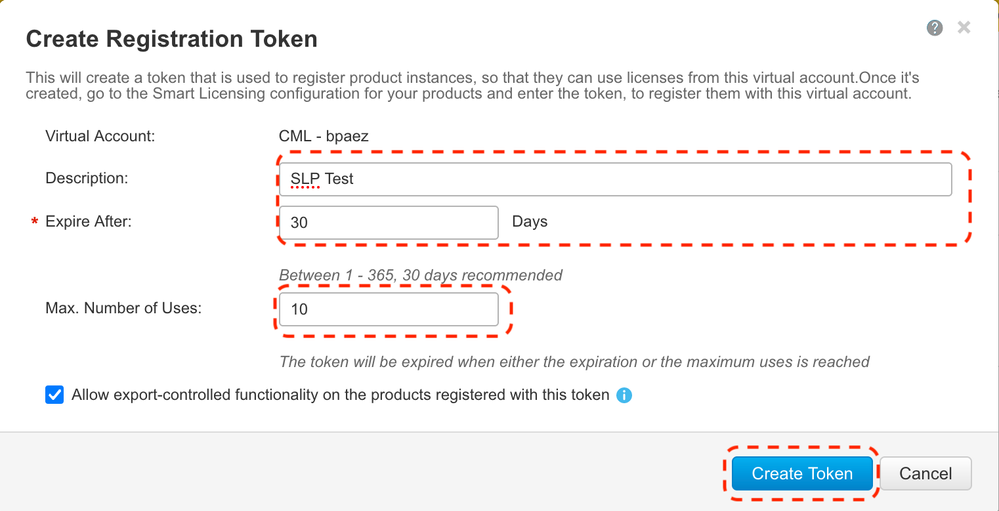
Step 4a. Fill in the required information and click Create Token.
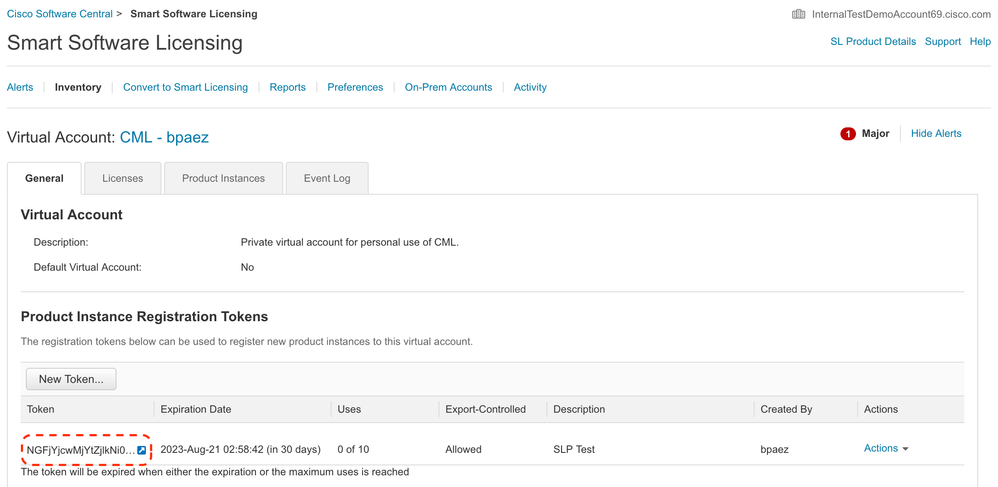
Step 4b. Click the newly created token.
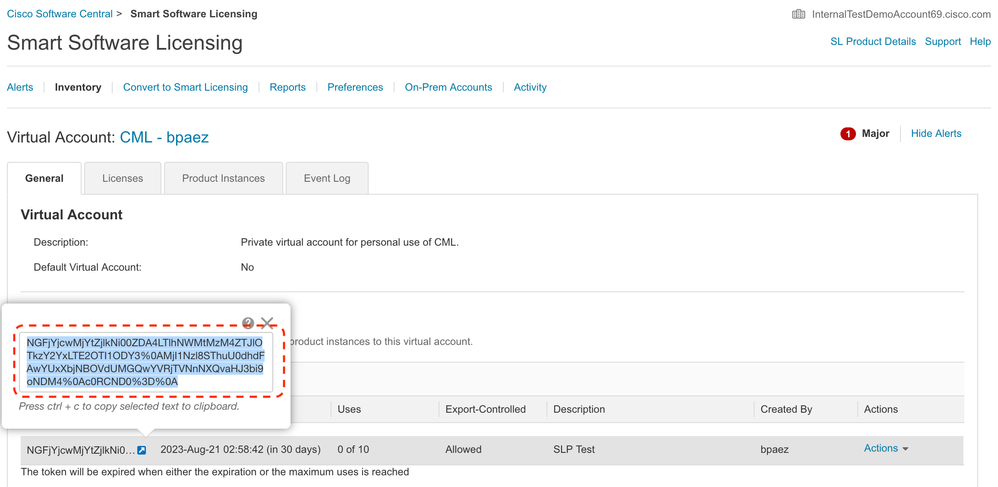
Step 4c. Press ctrl + c to copy the selected text to the clipboard.
Step 5. Install Trust Code in Nexus switch.
Nexus# license smart trust idtoken <token from step 4> all force
Initiated trust establishment with backend. run show license status, for trust establishment status
Step 6. Ensure Nexus is present on CSSM.
Log in to Cisco Software Central > Smart Software Licensing > Inventory > Product Instances.
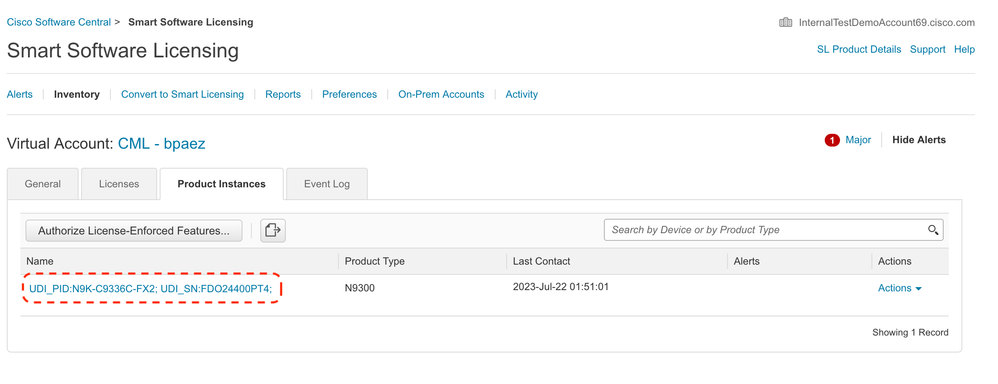
Step 7. Enable any feature that requires your desired license. For this example, a feature is enabled that requires an NX-OS LAN Enterprise Services license.

Note: NX-OS always asks for the leaf nodes in the license hierarchy.
NX-OS always asks for Feature-Based Licenses, instead of Tier-Based Licenses.
Nexus(config)# feature eigrpStep 8. Confirm you have the expected license (feature-based) in use.
Nexus# show license summary
License Usage:
License                    Entitlement tag                 Count   Status
-------------------------------------------------------------------------
LAN license for Nexus 9... (LAN_ENTERPRISE_SERVICES_PKG)    1       IN USE
Nexus# show license usage LAN_ENTERPRISE_SERVICES_PKG

Feature List:
eigrp
Step 9. Verify the expected license is consumed on the Cisco Site.
Log in to Cisco Software Central > Smart Software Licensing > Inventory > Licenses.
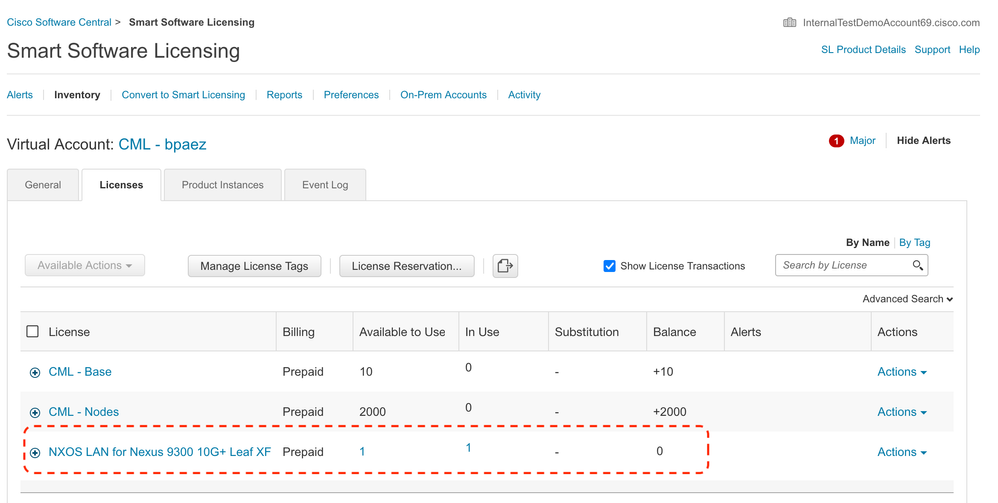
Log in to Cisco Software Central > Smart Software Licensing > Inventory > Licenses. Click the expected license from the list to see the details.

Step 10. Verify communication is successful with the Cisco site.
Nexus# show license status
Utility:
    Status: DISABLED

Smart Licensing using Policy:
    Status: ENABLED

Data Privacy:
    Sending Hostname: yes
    Callhome Hostname Privacy: DISABLED
        Smart Licensing Hostname Privacy: DISABLED
    Version Privacy: DISABLED

Transport:
    Type: Smart
    URL: https://smartreceiver.cisco.com/licservice/license
    Proxy:
        Not configured

Policy:
    Policy in use: Merged from multiple sources
    Reporting ACK required: Yes
    Unenforced/Non-Export:
        First report requirement (days): 90 (CISCO default)
        Ongoing reporting frequency (days): 365 (CISCO default)
        On change reporting (days): 90 (CISCO default)
    Enforced (Perpetual/Subscription):
        First report requirement (days): 0 (CISCO default)
        Ongoing reporting frequency (days): 0 (CISCO default)
        On change reporting (days): 0 (CISCO default)
    Export (Perpetual/Subscription):
        First report requirement (days): 0 (CISCO default)
        Ongoing reporting frequency (days): 0 (CISCO default)
        On change reporting (days): 0 (CISCO default)

Miscellaneous:
    Custom Id: <empty>

Usage reporting:
    Last ACK received: Jul 21 19:28:32 2023 UTC
    Next ACK deadline: Jul 20 19:28:32 2024 UTC
    Reporting push interval: 30 days
    Next ACK push check: <none>
    Next report push: Aug 20 19:23:33 2023 UTC
    Last report push: Jul 21 19:23:33 2023 UTC
    Last report file write: <none>

Trust Code installed: Jul 21 19:18:04 2023 UTC
    Active: PID: N9K-C9336C-FX2, SN: FDO24400PT4
        Jul 21 19:18:04 2023 UTC


Nexus#
Method 2: CSLU
Before NXOS 10.3(2)F, only management VRF is supported on CSLU mode of transport. Starting from NXOS 10.3(2)F, non-management VRF is supported as well.
Step 1. Configure DNS client.

Note: You can skip to step 3 if you are not using a Fully Qualified Domain Name (FQDN) on the host running CSLU.
Nexus(config)# ip domain-lookup
Nexus(config)# vrf context management
Nexus(config-vrf)# ip name-server <dns server ip>
Step 2. Add an entry for cslu-local on your DNS server.

Note: Nexus automatically discovers hostname cslu-local and cslu-local.<domain>
Step 3. Ensure cslu transport is configured. This is the default configuration.
Nexus(config)# license smart transport csluStep 4. Indicate CSLU transport URL.
Nexus(config)# license smart url cslu http://<ip address of the host running CSLU>:8182/cslu/v1/piStep 5. Enable any feature that requires your desired license. For this example, you enable a feature that requires NX-OS LAN Enterprise Services license.

Note: NX-OS always asks for the leaf nodes in the license hierarchy.
NX-OS always asks for Feature-Based Licenses, instead of Tier-Based Licenses.
Nexus(config)# feature isisStep 6. Confirm you have the expected license (feature-based) in use.
Nexus# show license summary
License Usage:
License                    Entitlement tag                 Count   Status
-------------------------------------------------------------------------
LAN license for Nexus 9... (LAN_ENTERPRISE_SERVICES_PKG)    1       IN USE
Nexus# show license usage LAN_ENTERPRISE_SERVICES_PKG

Feature List:
isis
Step 7. Send the license usage report (known as RUM report) to CSSM.
Nexus# license smart sync all
Initiated sync with backend.
Step 8. Click Refresh Product Instance List and verify product instance is present on CSLU, indicating Complete: Usage report uploaded to CSSM.
Open CSLU > Inventory > Product Instances.
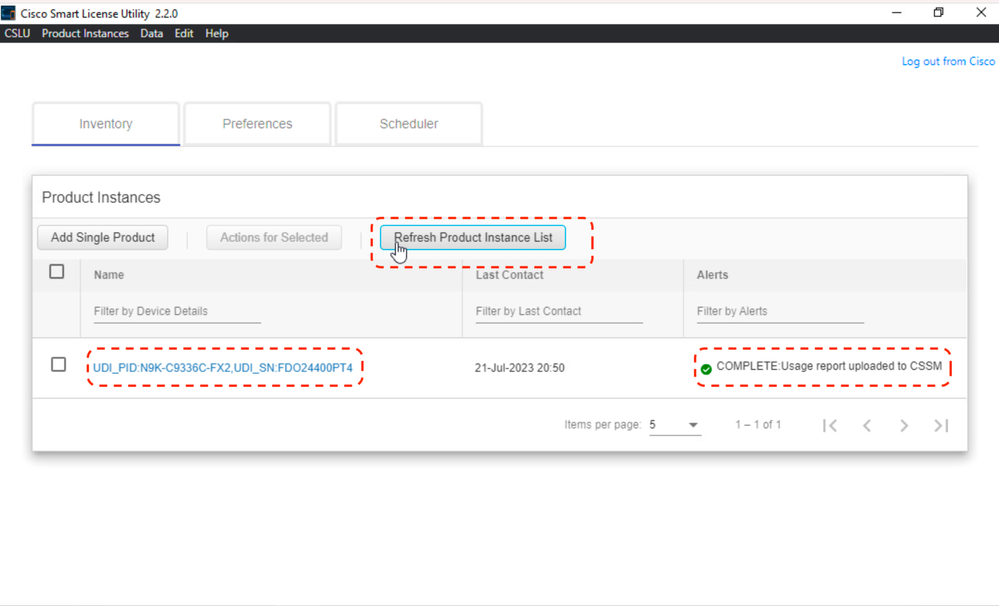
Step 9. Ensure Nexus is present on CSSM. This confirms communication works properly between CSLU and CSSM.
Log in to Cisco Software Central > Smart Software Licensing > Inventory > Product Instance.
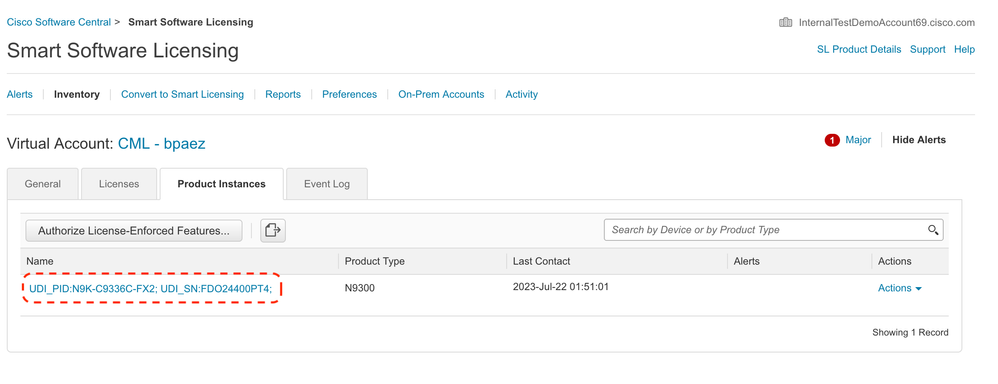
Step 10. Verify the expected license was consumed on CSSM On-Prem local server.
Log in to Cisco Software Central > Smart Software Licensing > Inventory > Licenses.
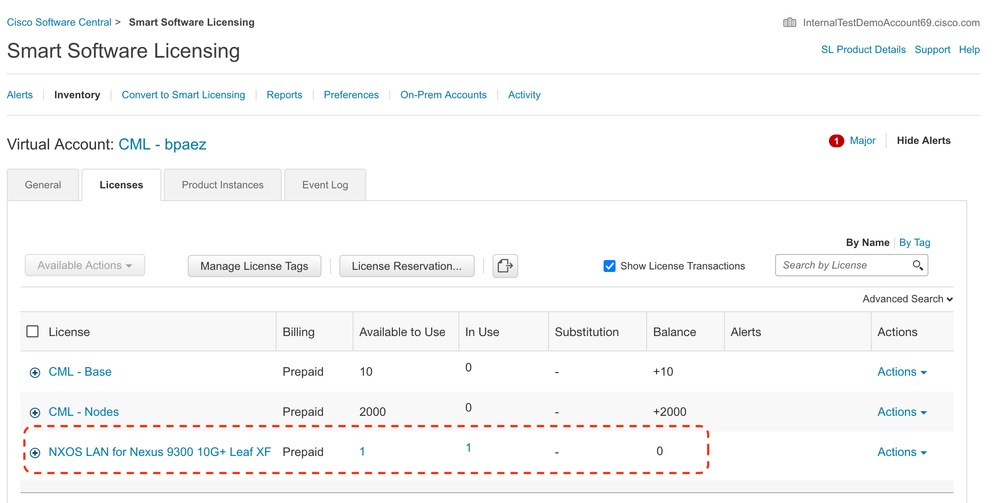
Log in to Cisco Software Central > Smart Software Licensing > Inventory > Licenses > Click on License > Product Instances.

Step 11. Verify communication is successful with the Cisco site.
Nexus# show license status
Utility:
    Status: DISABLED

Smart Licensing using Policy:
    Status: ENABLED

Data Privacy:
    Sending Hostname: yes
    Callhome Hostname Privacy: DISABLED
        Smart Licensing Hostname Privacy: DISABLED
    Version Privacy: DISABLED

Transport:
    Type: CSLU
    Cslu address: http://10.201.255.233:8182/cslu/v1/pi

Policy:
    Policy in use: Merged from multiple sources
    Reporting ACK required: Yes
    Unenforced/Non-Export:
        First report requirement (days): 90 (CISCO default)
        Ongoing reporting frequency (days): 365 (CISCO default)
        On change reporting (days): 90 (CISCO default)
    Enforced (Perpetual/Subscription):
        First report requirement (days): 0 (CISCO default)
        Ongoing reporting frequency (days): 0 (CISCO default)
        On change reporting (days): 0 (CISCO default)
    Export (Perpetual/Subscription):
        First report requirement (days): 0 (CISCO default)
        Ongoing reporting frequency (days): 0 (CISCO default)
        On change reporting (days): 0 (CISCO default)

Miscellaneous:
    Custom Id: <empty>

Usage reporting:
    Last ACK received: <none>
    Next ACK deadline: Oct 20 01:09:12 2023 UTC
    Reporting push interval: 30 days
    Next ACK push check: Jul 22 01:18:02 2023 UTC
    Next report push: Aug 21 01:13:03 2023 UTC
    Last report push: Jul 22 01:13:03 2023 UTC
    Last report file write: <none>

Trust Code installed: <none>
Note:
Expect to see Trust Code Installed as in the show license status using this method.
Expect to see Last ACK received as in the show license status the first time you sync up with CSSM On-Prem. This changes after the first Next report push is done.
Method 3: On-Prem License Server
- Only CSLU mode of transport is supported on On-Prem.
-
Before NXOS 10.3(2)F, only management VRF is supported on CSLU mode of transport. Starting from NXOS 10.3(2)F, non-management VRF is supported as well.
Step 1. Configure DNS client.
Nexus(config)# ip domain-lookup
Nexus(config)# vrf context management
Nexus(config-vrf)# ip name-server <dns server ip>
Step 2. Ensure CSLU transport is configured. This is the default configuration.
Nexus(config)# license smart transport csluStep 3. Identify the CSLU transport URL.
Log in to CSSM On-Prem > Smart Software Manager On-Prem > Select Local Virtual Account (top right corner). From the drop-down menu, choose Inventory > General, then click CSLU Transport URL to copy.
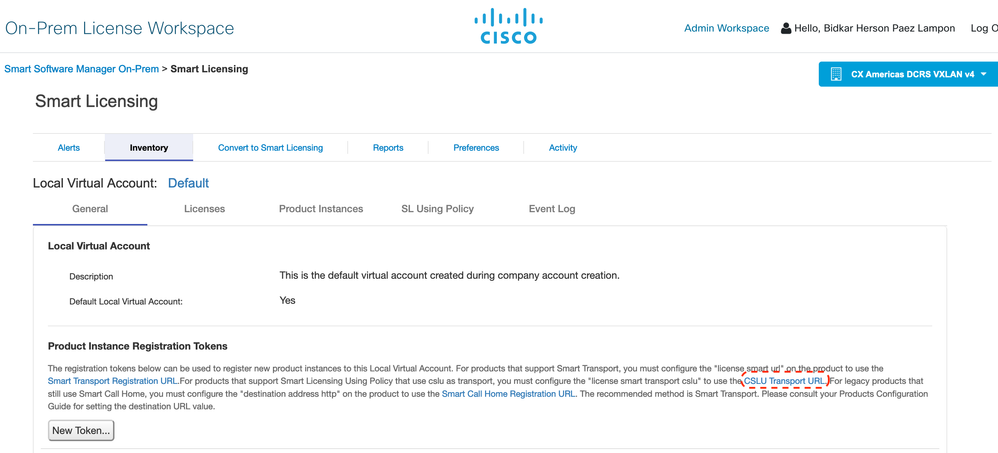
Step 4. Indicate CSLU transport URL.
Nexus(config)# license smart url cslu https://<on-prem hostname>/cslu/v1/pi/<virtual account>Step 5. Enable any feature that requires your desired license. For this example, a feature is enabled that requires an NX-OS LAN Enterprise Services license.

Note: NX-OS always asks for the leaf nodes in the license hierarchy.
NX-OS always asks for Feature-Based Licenses, instead of Tier-Based Licenses.
Nexus(config)# feature ospfStep 6. Confirm you have the expected license (feature-based) in use.
Nexus# show license summary
License Usage:
License                    Entitlement tag                 Count   Status
-------------------------------------------------------------------------
LAN license for Nexus 9... (LAN_ENTERPRISE_SERVICES_PKG)    1       IN USE
Nexus# show license usage LAN_ENTERPRISE_SERVICES_PKG

Feature List:
ospf
Step 7. Send RUM report to CSSM.
Nexus# license smart sync all
Initiated sync with backend.
Step 8. Ensure Nexus is present on CSSM On-Prem.
Log in to CSSM On-Prem > Smart Software Manager On-Prem > Select Local Virtual Account (top right corner). From the drop-down menu, choose Inventory > SL Using Policy.
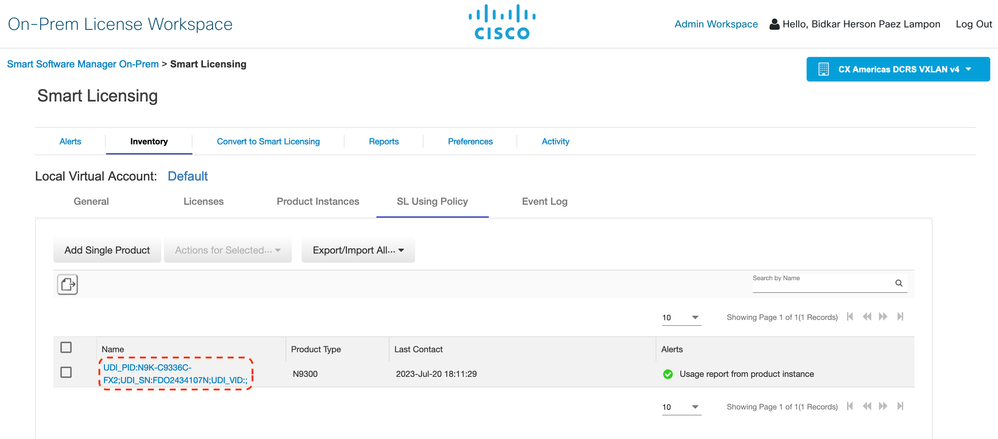
Step 9. Verify the expected license was consumed on CSSM On-Prem local server.
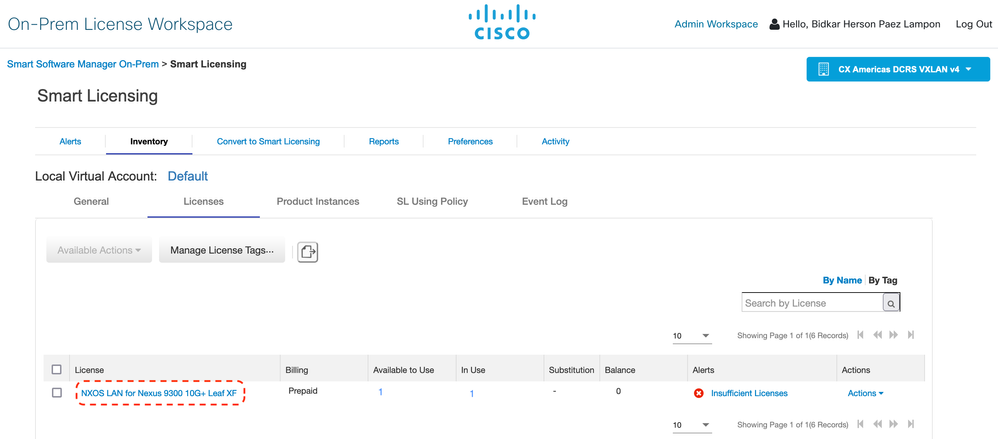
Log in to CSSM On-Prem > Smart Software Manager On-Prem > Select Local Virtual Account (top right corner) from the drop-down menu > Inventory > Licenses.
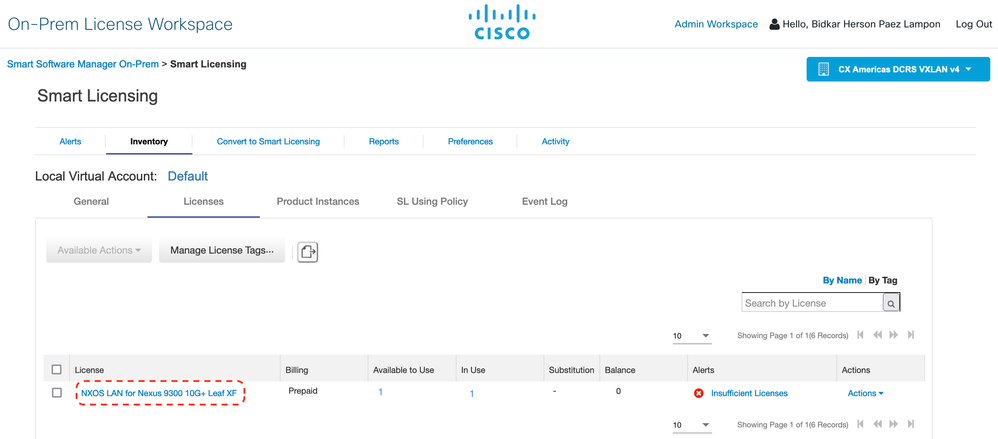
Log in to CSSM On-Prem > Smart Software Manager On-Prem > Select Local Virtual Account (top right corner). From the drop-down menu, choose Inventory > Licenses. Click the expected license from the list to see the details.


Note: Expect to see Trust Code Installed as <none> in in show license status using this method.
Expect to see Last ACK received as in show license status the first time you sync up with CSSM On-Prem. This changes after the first Next report push is done.
Method 4: Offline
Step 1. Disable smart transport mode.
Nexus(config)# license smart transport off Step 2. Enable any feature that requires your desired license. For this example, a feature is enabled that requires an NX-OS LAN Enterprise Services license.

Note: NX-OS always asks for the leaf nodes in the license hierarchy.
NX-OS always asks for Feature-Based Licenses, instead of Tier-Based Licenses.
RUM reports cannot be saved if no licensing features are active. The RUM reports capture the licensing transactions in the device for upload. On a greenfield device, there is nothing to report, so it is empty and not generated.
Nexus(config)# feature bgpStep 3. Confirm you have the expected license (feature-based) in use.
Nexus# show license summary
License Usage:
License                    Entitlement tag                 Count   Status
-------------------------------------------------------------------------
LAN license for Nexus 9... (LAN_ENTERPRISE_SERVICES_PKG)    1       IN USE
Nexus# show license usage LAN_ENTERPRISE_SERVICES_PKG
Feature List:
bgp
Step 4. Generate and save RUM report.
Nexus# license smart save usage all bootflash:all_rum.txt
Success: Saved in bootflash:/all_rum.txt.
Step 5. Copy the file from Step 4 to a device with an Internet connection.
Step 6. Upload RUM report (usage data) to CSSM.
Log in to Cisco Software Central > Smart Software Licensing > Reports > Usage Data Files.
Step 6a. Click Upload Usage Data.

Step 6b. Click Browse.
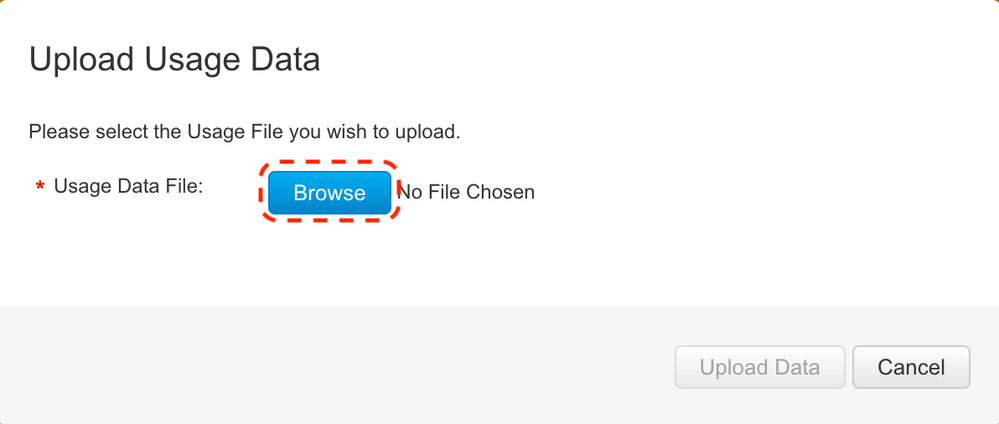
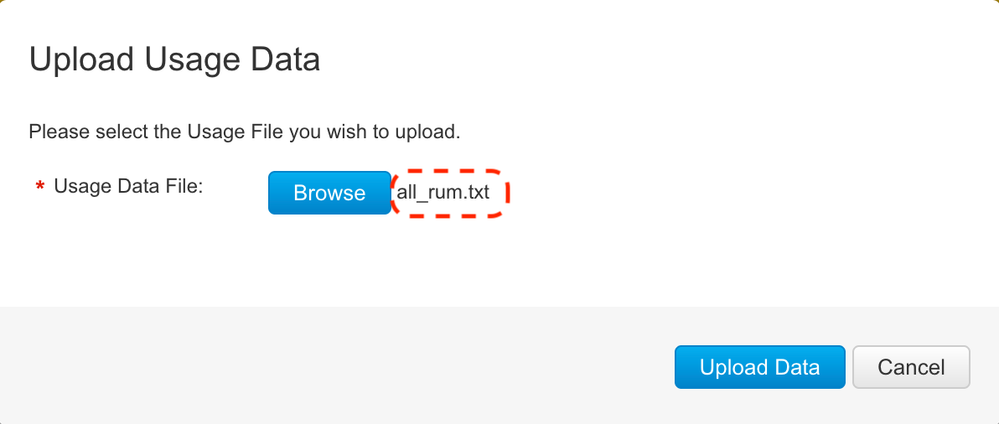
Step 6c. Select all_rum.txt on the pop-up window, then click Upload Data.
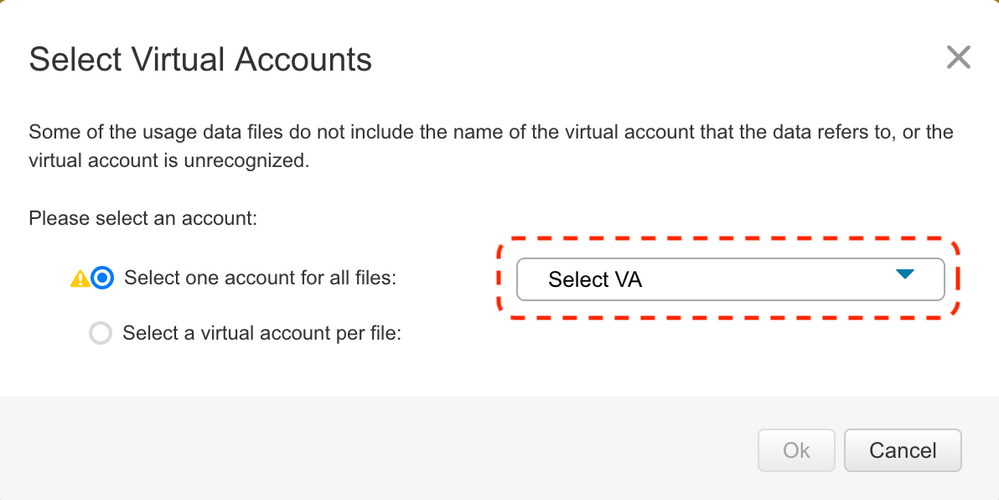
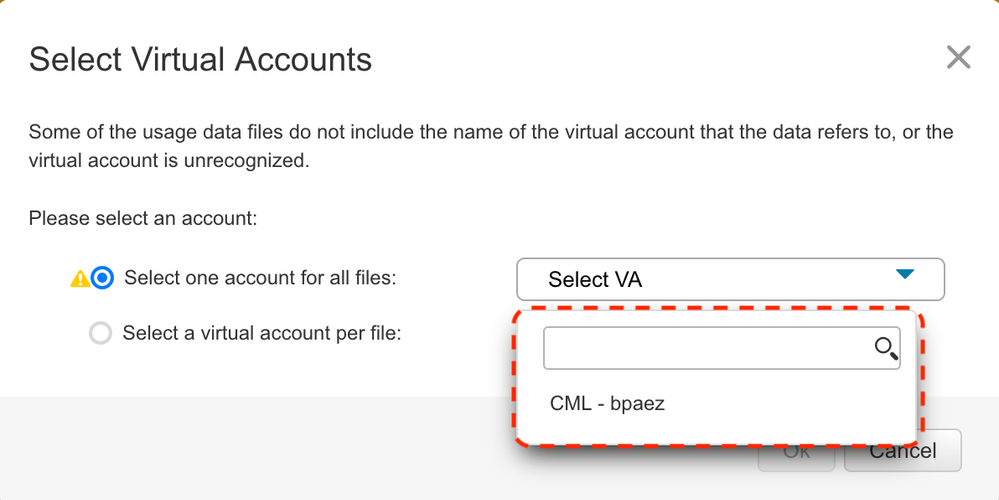
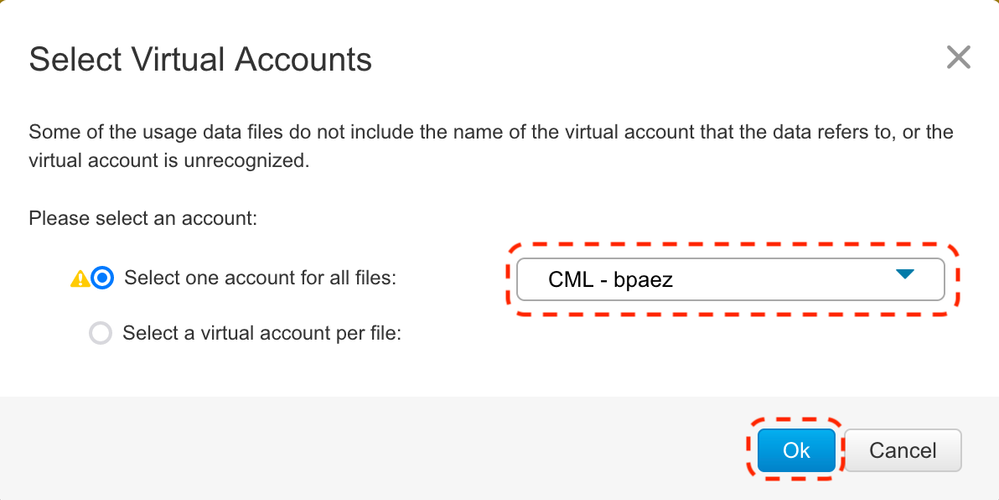
Step 6d. Select the Virtual Account that receives the uploaded file from the drop-down menu, then click Ok.
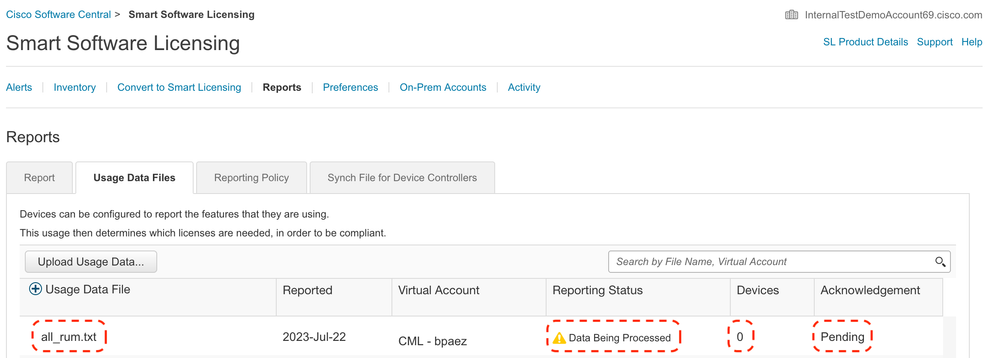
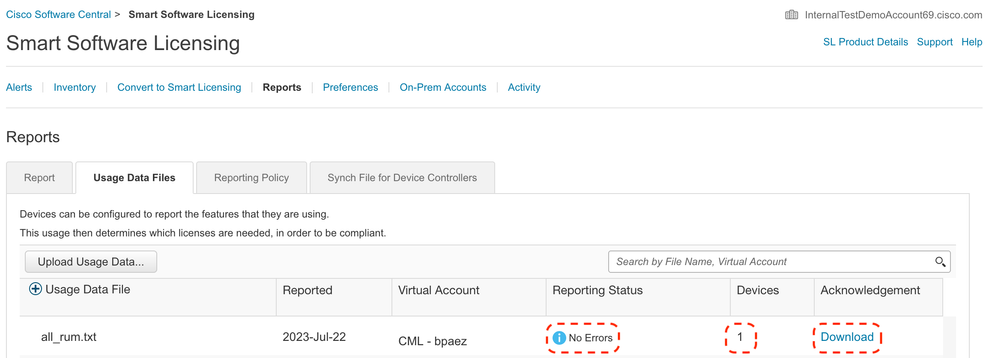
Step 7. Wait for Reporting Status to change to No errors, then click Download to get the ACK file.
Step 8. Ensure Nexus is present on CSSM.
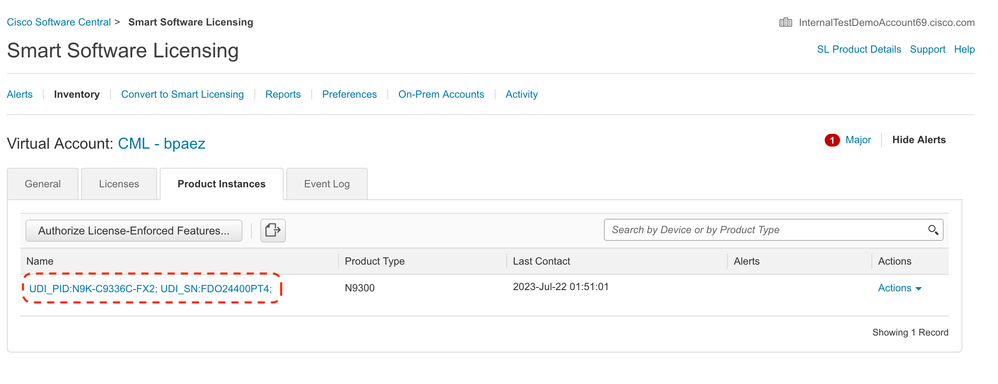
Step 9. Verify the expected license was consumed on the Cisco Site.
Log in to Cisco Software Central > Smart Software Licensing > Inventory > Licenses.
Log in to Cisco Software Central > Smart Software Licensing > Inventory > Licenses. Click the expected license from the list to see the details.

Step 10. Upload the ACK file from step 7 to the Nexus switch.
Step 11. Install ACK file in Nexus switch.
Nexus# license smart import bootflash:ACK_all_rum.txt
Done smart import.
Step 12. Verify ACK was installed successfully.

Note: It is expected to see Trust Code Installed as <none> in show license status output using this method.
Nexus# show license status
Utility:
    Status: DISABLED

Smart Licensing using Policy:
    Status: ENABLED

Data Privacy:
    Sending Hostname: yes
    Callhome Hostname Privacy: DISABLED
        Smart Licensing Hostname Privacy: DISABLED
    Version Privacy: DISABLED

Transport:
    Type: Off

Policy:
    Policy in use: Merged from multiple sources
    Reporting ACK required: Yes
    Unenforced/Non-Export:
        First report requirement (days): 90 (CISCO default)
        Ongoing reporting frequency (days): 365 (CISCO default)
        On change reporting (days): 90 (CISCO default)
    Enforced (Perpetual/Subscription):
        First report requirement (days): 0 (CISCO default)
        Ongoing reporting frequency (days): 0 (CISCO default)
        On change reporting (days): 0 (CISCO default)
    Export (Perpetual/Subscription):
        First report requirement (days): 0 (CISCO default)
        Ongoing reporting frequency (days): 0 (CISCO default)
        On change reporting (days): 0 (CISCO default)

Miscellaneous:
    Custom Id: <empty>

Usage reporting:
    Last ACK received: Jul 21 20:29:40 2023 UTC
    Next ACK deadline: Oct 19 20:29:40 2023 UTC
    Reporting push interval: 30 days
    Next ACK push check: <none>
    Next report push: Jul 21 20:02:40 2023 UTC
    Last report push: <none>
    Last report file write: <none>

Trust Code installed: <none>
Related Information
Revision History
| Revision | Publish Date | Comments |
|---|---|---|
2.0 |
19-Aug-2024 |
Updated Alt Text, and Formatting. |
1.0 |
26-Jul-2023 |
Initial Release |
Contributed by Cisco Engineers
- Bidkar Herson Paez LamponTechnical Consulting Engineer
Contact Cisco
- Open a Support Case

- (Requires a Cisco Service Contract)
 Feedback