Configuration of Wi-Fi Protected Setup (WPS) on WAP551 and WAP561 Access Points
Available Languages
Objective
Wi-Fi Protected Setup (WPS) is a protocol that enables the simple establishment of wireless networks without any compromise of network security. It relieves the network administrator from the process of configuring network names, keys, and other cryptographic configurations. WPS can be configured either with Push Button Configuration or a Personal Identification Number (PIN).
The objective of this document is to explain how to configure WPS Setup on WAP551 and WAP561 Access Points.
Applicable Devices | Firmware Version
- WAP551 | 1.0.4.2 (Download latest)
- WAP561 | 1.0.4.2 (Download latest)
WPS Setup
Step 1. Log in to the web configuration utility and choose Wireless > WPS Setup. The WPS Setup page opens:

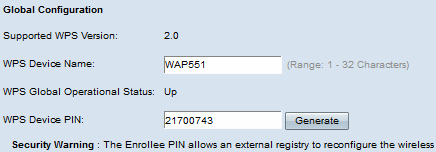
Global Configuration

The following information is available:
- Supported WPS Version - Displays the WPS protocol version that the WAP device supports.
Step 1. Enter the device name in the WPS Device Name field.
- WPS Global Operational Status - Displays whether the WPS protocol is enabled or disabled on the WAP device.
- WPS Device PIN - Displays the system-generated eight-digit WPS PIN for the WAP device. The device PIN is needed when you start WPS enrollment in the client device. Refer the article entitled, Configuration of Wi-Fi Protected Setup (WPS) Process on WAP551 and WAP561 Access Points for further details on the WPS enrollment process.
Step 2. (Optional) To generate a new PIN, click Generate.
Security Warning: The Enrollee PIN allows an external registry to reconfigure the wireless network so it must only be used by/given to trusted administrators. There is no expiration on this PIN.
Instance Configuration

Step 1. Choose an identifier for the instance from the WPS Instance ID drop-down list. The WPS Instance ID drop-down list allows you to choose the instance of WPS on which to enroll the device. However, the WAP only supports one instance of WPS.
Step 2. Check the Enable check box in the WPS Mode field to enable the default instance.
Step 3. Click the desired radio button from the WPS Radio field.
Step 4. Choose the virtual access point (VAP) associated with the WPS instance from the WPS VAP drop-down list. The WAP supports up to five VAP including the default VAP0.
Step 5. Check the Enable check box in the WPS Built-in Registrar field to enable the built-in registrar function. The router becomes the registrar and can easily add additional wireless clients into your network by automatically assigning the Wireless Network Name (SSID) and WPA/WPA2-PSK security of the routers to the client.
Step 6. Choose one of the following settings from the WPS Configuration State drop-down list.
- Unconfigured - Indicates that the VAP settings are configured by WPS, after which the state changes to Configured.
- Configured - Indicates that the VAP settings cannot be configured by the external registrar and retains the present configuration.
Step 7. Click Save to save the changes.
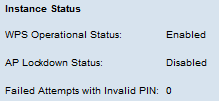
Instance Status

The following information is available:
- WPS Operational Status - Displays the status of the recent WPS transaction.
- AP Lockdown Status field - Displays whether the current instance is in lockdown state.
- Failed Attempts with Invalid PIN - Displays the number of times the authentication has failed due to an incorrect or invalid password.