Configuring Social Media Authentication on WAP571 and WAP571E Devices
Available Languages
Objective
Network users often connect to a wireless access point to receive faster internet speeds than their mobile device’s carrier service. A smooth login process and easy navigation can ensure a positive experience for these users. You can configure your WAP571 or WAP571E to have some easy options for user login while still keeping your network secure. Third party authentication through Google or Facebook is an available feature with this latest update. This article will guide you through configuration for 3rd party authentication on a WAP571 or WAP71E access point. When utilized, the user’s 3rd party account of the user acts as a type of ‘passport’, granting the user access to your wireless network. Whether you run a coffee shop or a real estate office, it will ensure visitors have easy access to your network and have a great visitor experience.
Devices / Software Version
- WAP571 – 1.0.2.6
- WAP571E – 1.0.2.6
Requirements
- Internet access to either Facebook or Google authentication servers
- Users must have an existing account and preference to use either Google or Facebook to gain access to network services
Introduction
In this multi-step guide you will complete short steps across multiple menu locations in the administration interface. Once you log into your device, the sections we’ll be using are all contained under the Captive Portal menu on the left hand side of the screen. In this guide, two optional features, including the ability to customize the appearance of the web portal and to view connected clients, are explained. To finish the guide, we’ll cover some basics about customizing the “face” of your network to these users, as well as preview the method to view authenticated users.
Global Configuration
Step 1. Click Captive Portal from the menu bar on the left hand side of the screen, the browser will take you to the Global Configuration by default.

Step 2. Click the Enable checkbox at the top of the menu.

Step 3. Configure Authentication Timeout, and Additional HTTP/S port. These options open additional ports in case your network requires them to access services. In our case we’ve left these options at their default values.
Step 4. Click the Save button.

Local Groups/Users
This section manages the settings applied to groups of users based on your input. In other words, it acts like a funnel for any user joining the network, directing them to the captive portal instance of our choice.
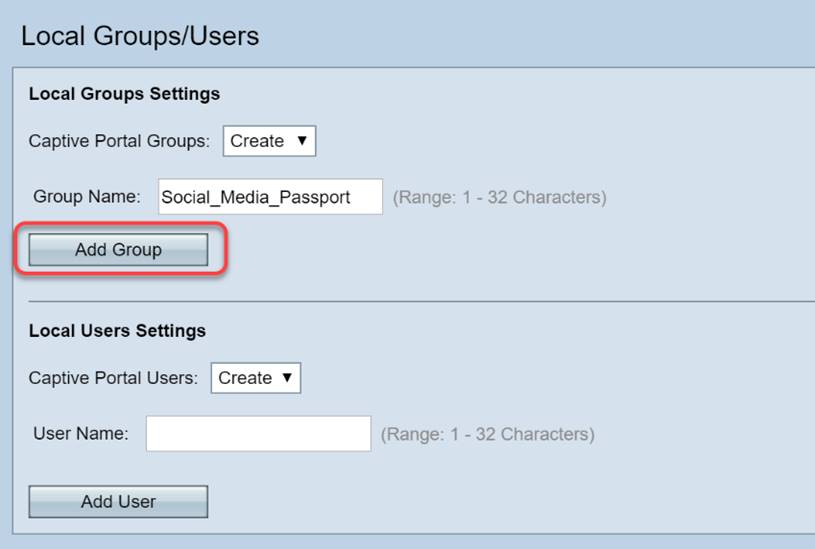
Step 1. From the Captive Portal menu click Local Groups Users.

Step 2. Ensure the Create option is displayed in the Captive Portal Groups dropdown box.

Step 3. Then name the User Group. In our case we’ve named the Local Group “Social_Media_Passport”.

Step 4. Click the Add Group button.
Instance Configuration
An instance can be thought of as unique system around a group of settings that are applied on an on-demand basis. So one set of users can be served one instance while another is served a different instance.
Step 1. From the Captive Portal menu click Instance Configuration.

Step 2. Ensure Create is listed in the Captive Portal Instances drop-down box.

Step 3. Name the instance, containing from 1 – 32 alphanumeric characters.
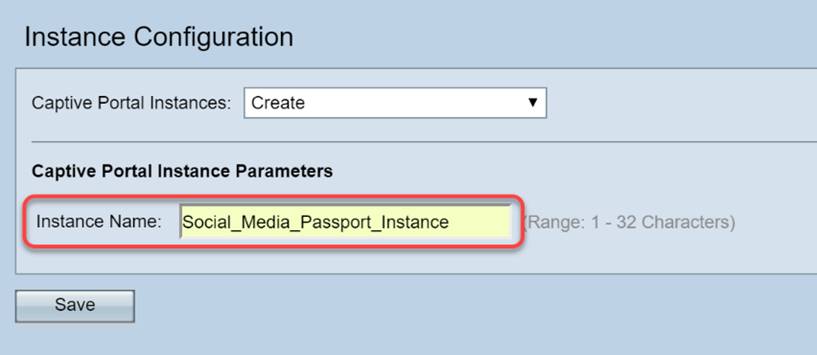
Step 4. Click the Save button.

The page will refresh and new options will become available as shown below.

Step 5. (Optional) Click the Protocol drop-down box and select HTTPS.

Step 6. Click the Verification drop-down box and select 3rd Party Credentials.

For more information on Authentication Method read the chart below.
| Authentication Method | Details |
|---|---|
|
Local Database |
Uses the onboard memory of the device to maintain a record of expected users and criteria for network participation. |
|
Radius Server |
Opposite of local, an authentication server using the protocol RADIUS and is remote from the device. |
|
Active Directory Service |
Similar to RADIUS, active directory services are remote from the device. |
|
3rd Party Credentials |
Uses social media account to verify identity and provide access to the network. |
Step 7. Select the 3rd party services you’d like to use by clicking their check boxes.

Step 8. Scroll down the page until you see User Group Name, then click the drop-down box and select the User Group created in the previous section of this guide.

Step 9. Now scroll to the bottom of this page and click the Save button.

Instance Association
Once the Instance is created, we’ll need to either associate it with a Virtual Access Point (VAP), or you can leave it at the default (VAP 0). A VAP is a synthetic instance duplicating the appearance of an additional access point for users to connect.
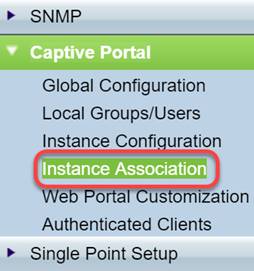
Step 1. From the Captive Portal menu click Instance Association.
Step 2. Select the radio you wish to associate an instance, the page will default to 5.

Step 3. Click the dropdown box and select the Instance you created in the last section.
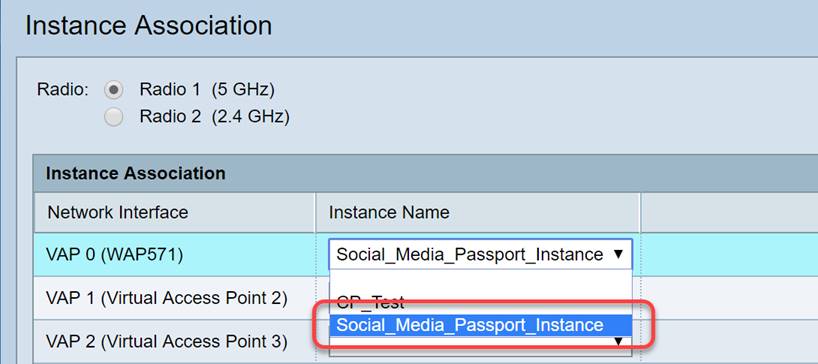
Note: Most users will need to set the Instance Name for both the 5GHz and 2.4GHz bands, repeat this step by clicking on the appropriate radio button highlighted in step 2.
Step 4. Click Save.

Web Portal Customization
This section allows you to customize the “face” of your new captive portal. You’re able to add and customize your organization’s logo and a user agreement to join the network.
Step 1. From the Captive Portal menu click Web Portal Customization.

Step 2. Within the Captive Portal Web Locale list, ensure Create is listed in the drop-down box.

Step 3. Enter a Web Locale Name, in our case we chose “Social_Media_Web_Locale”.

Step 4. Select the Captive Portal instance you created previously.

Step 5. Click Save.

Like the Instance Configuration Page, the page will refresh and now include additional points of customization for your Captive Portal. The options you may edit in this section are numerous and self-explanatory in many cases.
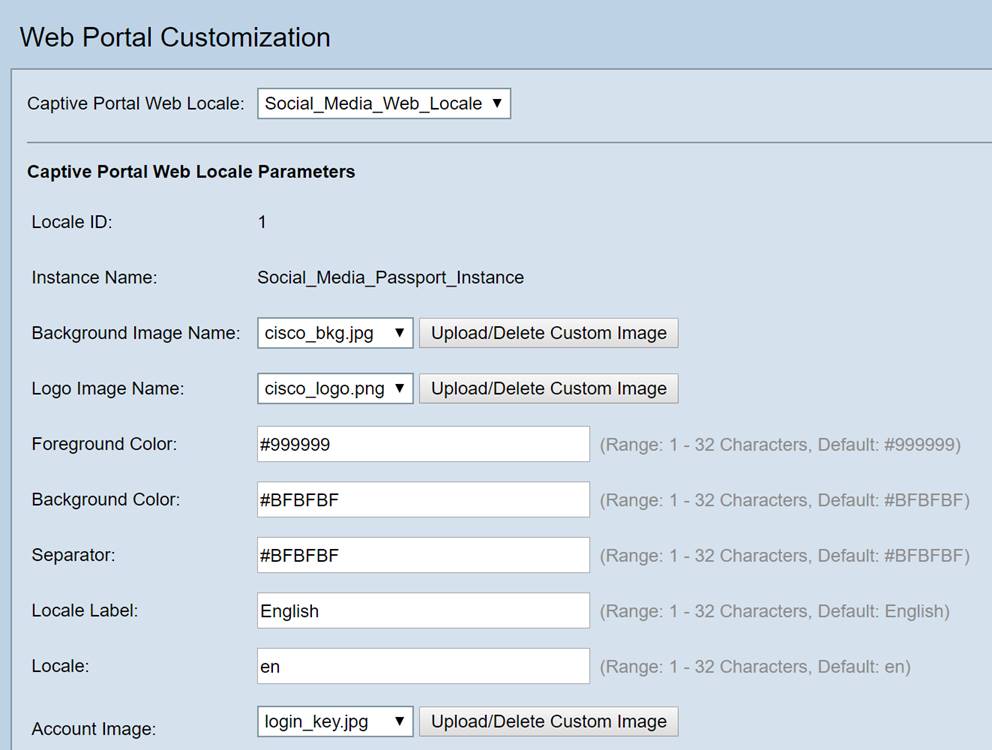
Note: Colors are represented in hexadecimal form, if you’re unfamiliar, see this article on web colors.
Personalization here plays a big role in presentation, below are some of the best practice options to customize:
- Background Image
- Logo Image – Best if the logo has a transparent background
- Foreground/Background Color
- Acceptance Use Policy
There are many options to tweak with this page, so take your time in modifying these settings.
Step 6. When satisfied with your edits, click the Save button.
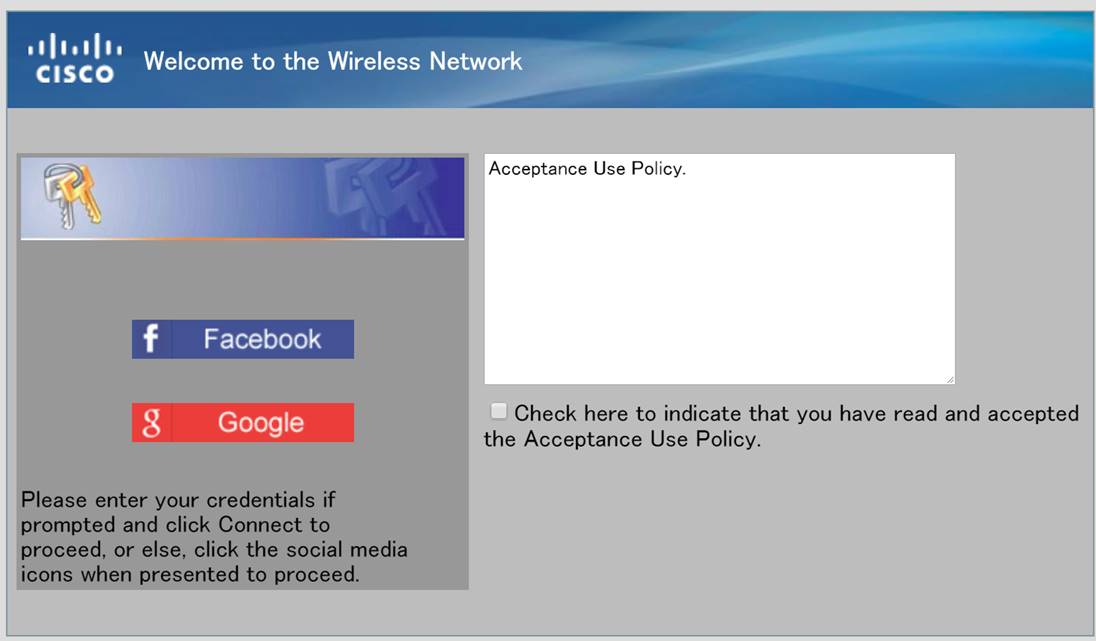
From here you can preview what the user would see by clicking the Preview button at the bottom of the Web Portal Customization page. Below is a preview of what users would see with Google and Facebook login options in place on a default template.
Authenticated Clients
When users have connected, or failed authentication while connecting to your WLAN, they will be itemized in this screen. To view guests connected to your WLAN perform the following steps.
Step 1. From the Captive Portal menu click Authenticated Clients.

Step 2. Review the information contained on this screen. The below screenshot does not contain any connected or rejected clients. Provided you have users authenticated via a 3rd party platform, you will see statistics on this page.

Conclusion
Nice job, you’re set to offer guests a frictionless on-ramp to your network. You’ve also had the option to customize it to present your brand to new users. We’re excited you’re using this feature and hope you keep building your network.There are even more cool features to help you get the most out of your hardware.