Traffic Shaping
Available Languages
Objective
The objective of this article is to describe the steps to configure traffic shaping in a CBW network.
If you are unfamiliar with terms in this document, check out Cisco Business: Glossary of New Terms.
Applicable Devices | Firmware Version
- 140AC (Data Sheet) | 10.0.1.0 (Download latest)
- 145AC (Data Sheet) | 10.0.1.0 (Download latest)
- 240AC (Data Sheet) | 10.0.1.0 (Download latest)
Introduction
Traffic shaping is a bandwidth control technique. It is used on computer networks and delays some or all datagrams. Traffic shaping is created to comply with a specified traffic profile. Traffic shaping maximizes or guarantees performance, boosts latency. It can also increase available bandwidth for certain kinds of packets. Application-based traffic shaping is the most common form of traffic shaping.
The goal of configuring traffic shaping is to buffer and queue excess packets above the committed rates. Traffic shaping is less likely to drop excess packets because excess packets are buffered. It buffers packets up to the length of the queue. Drops may occur if excess traffic is continuous at high rates. It typically avoids retransmissions due to dropped packets. One drawback of configuring traffic shaping is, it can introduce delay due to queuing, particularly deep queues.
Configuration
Beginner Help
This toggled section highlights tips for beginners.
Logging In
Log into the Web User Interface (UI) of the Primary AP. To do this, open a web browser and enter https://ciscobusiness.cisco.com You may receive a warning before proceeding. Enter your credentials.You can also access the Primary AP by entering https://[ipaddress] (of the Primary AP) into a web browser.
Tool Tips
If you have questions about a field in the user interface, check for a tool tip that looks like the
following: ![]()
Trouble locating the Expand Main Menu icon?
Navigate to the menu on the left-hand side of the screen, if you don’t see the menu button, click
this icon to open the side-bar menu.
Cisco Business App
These devices have companion apps that share some management features with the web user interface. Not all features in the Web user interface will be available in the App.
Frequently Asked Questions
If you still have unanswered questions, you can check our frequently asked questions document. FAQ
Steps for configuring traffic shaping in CBW network are:
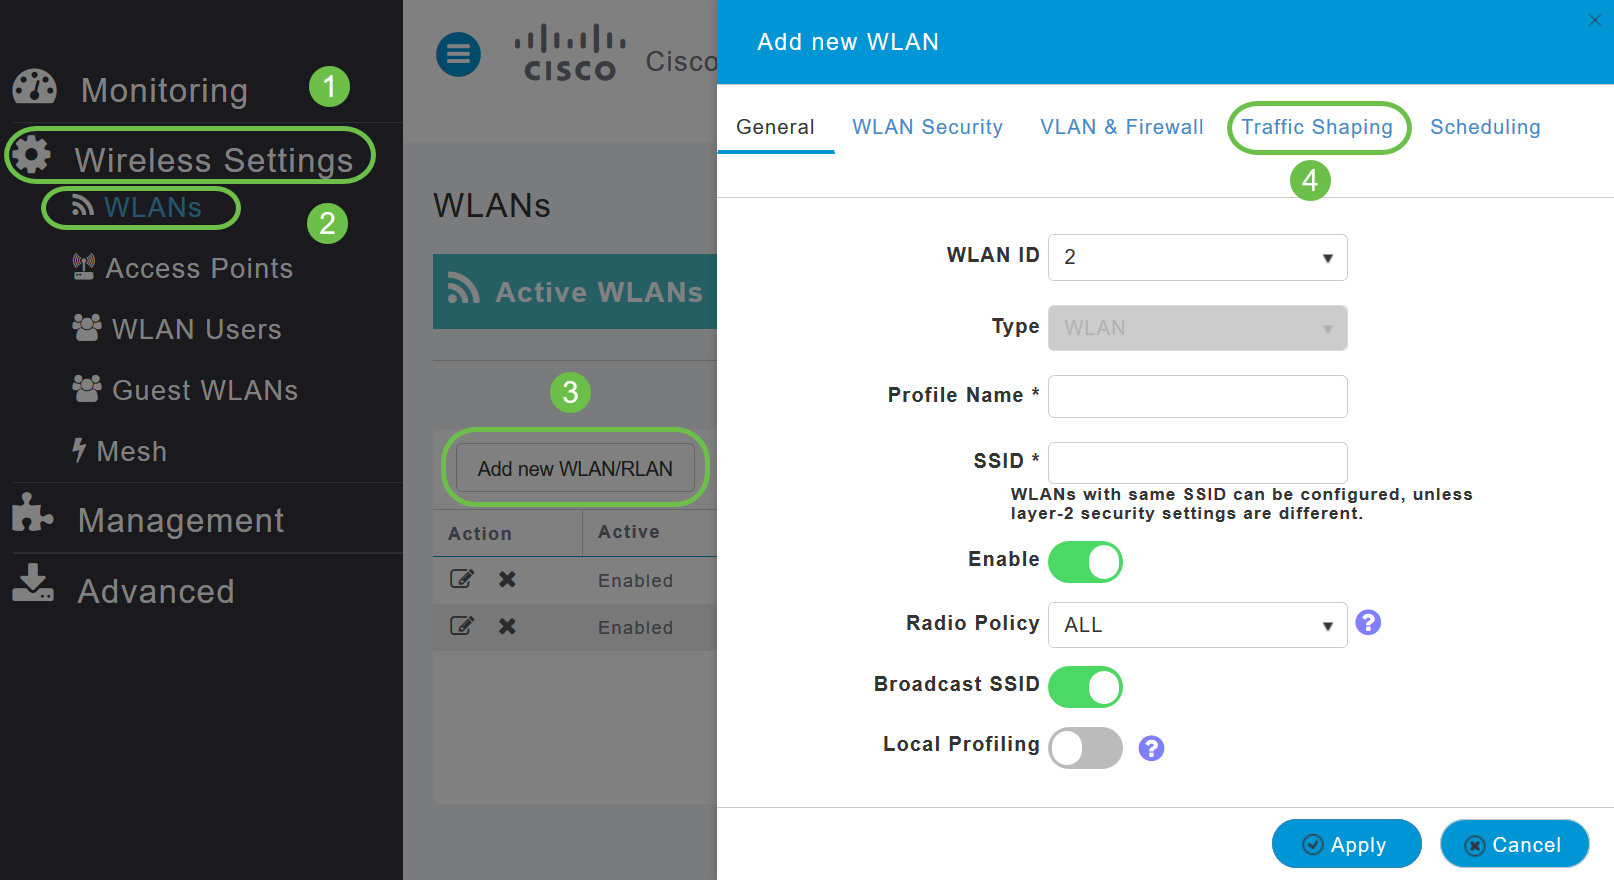
Step 1. Navigate to Wireless Settings > WLANs > Adding new WLAN/RLAN > Traffic Shaping.

Step 2. On the Traffic Shaping tab, configure the following parameters:
i) Quality of service (QoS) — QoS refers to the capability of a network to provide better service to selected network traffic. It prioritizes traffic over various technologies. The goal of QoS is to grant dedicated bandwidth, latency, controlled jitter and, and improved loss characteristics. Latency parameters are required by some real-time and interactive traffic.
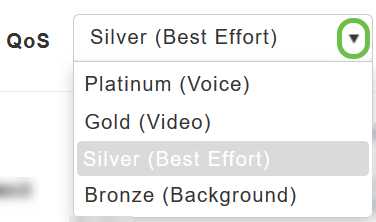
The CBW Primary AP supports the following four QoS levels. Under the QoS tab, from the QoS drop-down list, choose one of the following QoS levels:
-
Platinum (Voice) — Ensures a high quality of service for voice over wireless.
-
Gold (Video) — Supports high-quality video applications.
-
Silver (Best Effort) — Supports normal bandwidth for clients.
-
Bronze (Background) — Provides the lowest bandwidth for guest services.

Defaut setting is Silver (Best Effort).
ii) Choose the desired values (in Kbps) for the following:
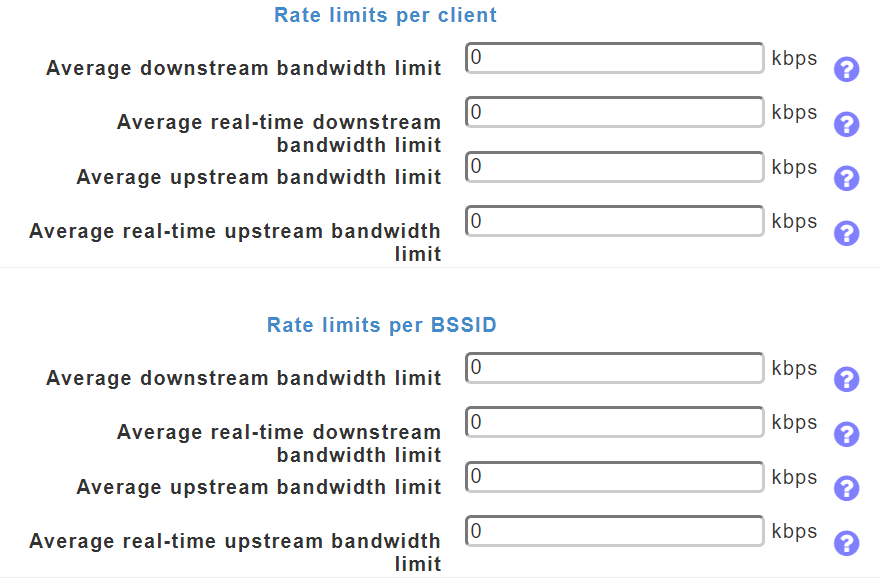
Specify the Rate limits per client and Rate limits per BSSID using the following criteria:
-
Average downstream bandwidth limit — Define the average data rate TCP traffic by entering the rate in Kbps in the Average Data Rate text boxes.
-
Average real-time downstream bandwidth limit — Define the average real-time rate for UDP traffic per user by entering the rate in Kbps in the Average Real-Time Rate text boxes.
-
Average upstream bandwidth limit — Define the average data rate TCP traffic by entering the rate in Kbps in the Average Data Rate text boxes.
-
Average real-time upstream bandwidth limit — Define the average real-time rate for UDP traffic per user by entering the rate in Kbps in the Average Real-Time Rate text boxes.

iii) Fastlane — Wireless application traffic in real-time environments often needs to be prioritized by its type. For example, due to real time application constraints, voiceover Wi-Fi traffic needs a higher priority than Safari web traffic.
Various standards exist to help network devices agree on how different types of traffic are marked to make sure they are prioritized. QoS Fastlane greatly simplifies this agreement process so that network congestion is minimized and time sensitive traffic (like voice or video) is delivered on time.
On enabling the Fastlane, the QoS is set to platinum such that voice traffic has higher priority than any other traffic.

iv) Application Visibility Control (AVC) - AVC classifies applications using the Network-Based Application Recognition (NBAR2) engine and provides application-level visibility in wireless networks. A list of recognized applications is available here. Application Visibility enables the Primary AP to detect and recognize more than 1000 applications and perform real-time analysis and monitor network congestion and network link usage. This feature contributes to the Applications By Usage statistic in the Monitoring > Network Summary.
To enable Application Visibility Control, choose Enabled from the Application Visibility drop-down list. Otherwise, choose Disabled which is the default option.

v) AVC Profile – It’s displays the Wireless LAN (WLAN) name.
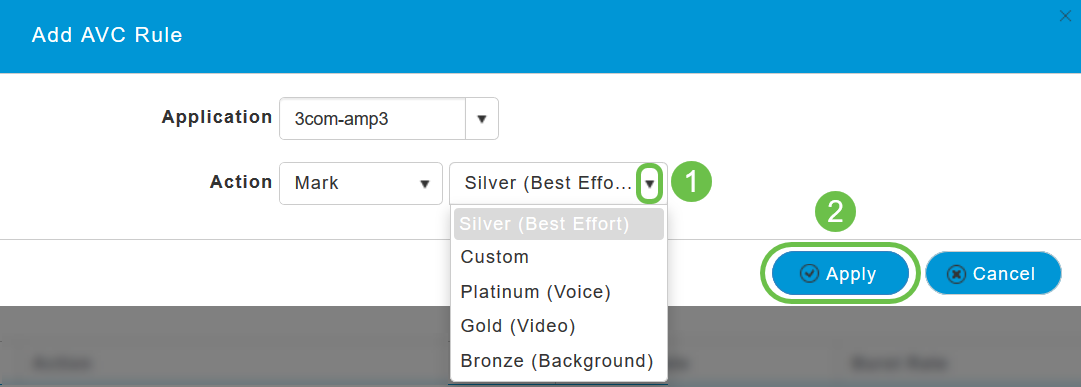
Click Add Rule to allow/deny specific applications when the clients get connected to the specific WLAN.

On the pop-up screen, select the Application from the list of applications that can be allowed/denied.

Choose the Action, choose Mark to allow the application, Drop to deny the application and Rate limit to limit the rate at which the application runs.

Now, select the QoS profile from the drop-down list, click Apply to save the configuration for AVC Rule.

Once you are sure that all the above-mentioned parameters are configured and the configuration parameters for the remaining tabs under Add new WLAN page are done then click Apply to save the configuration.

Conclusion
You have now completed the steps to configure traffic shaping in a Cisco Business Wireless network.
Check out other mesh wireless articles that might interest you:
Revision History
| Revision | Publish Date | Comments |
|---|---|---|
1.0 |
30-Apr-2020 |
Initial Release |
Contact Cisco
- Open a Support Case

- (Requires a Cisco Service Contract)
 Feedback