Frequently Asked Questions (FAQ) for a Cisco Business Wireless Network
Available Languages
Objective
The objective of this article is to answer some of the questions you might have on Cisco Business Wireless Networking. Topics covered include information on mesh networks, Primary APs, Mesh Extenders, compatibility, and management.
If you are unfamiliar with terms in this document, check out Cisco Business: Glossary of New Terms.
Applicable Devices | Firmware Version
- 140AC (Data Sheet) | 10.4.1.0 (Download latest)
- 141ACM (Data Sheet) | 10.4.1.0 (Download latest)
- 142ACM (Data Sheet) | 10.4.1.0 (Download latest)
- 143ACM (Data Sheet) | 10.4.1.0 (Download latest)
- 145AC (Data Sheet) | 10.4.1.0 (Download latest)
- 240AC (Data Sheet) | 10.4.1.0 (Download latest)
Table of Contents
The Basics
New Features
Beginner Help
This toggled section highlights tips for beginners.
Logging In
Log into the Web User Interface (UI) of the Primary AP. To do this, open a web browser and enter https://ciscobusiness.cisco. You may receive a warning before proceeding. Enter your credentials.You can also access the Primary AP by entering https://[ipaddress] (of the Primary AP) into a web browser.
Tool Tips
If you have questions about a field in the user interface, check for a tool tip that looks like the
following: ![]()
Trouble locating the Expand Main Menu icon?
Navigate to the menu on the left-hand side of the screen, if you don’t see the menu button, click
this icon to open the side-bar menu.
Cisco Business Wireless App
These devices have companion apps that share some management features with the web user interface. Not all features in the Web user interface will be available in the App.
What is the difference between previous Cisco Business Wireless products and these new models?
The new Cisco Business Wireless access points are 802.11 a/b/g/n/ac (Wave 2) based, with internal antennas. These access points support the latest 802.11ac Wave 2 standard for higher performance, greater access, and higher-density networks.
The new Cisco Business Wireless access points have the ability to be configured for a traditional wireless or a wireless Mesh Network. If you would like to learn about the basics of Mesh Networking, check out Cisco Business: Welcome to Wireless Mesh Networking.
Mesh Networking information
What is a wireless mesh network?
Mesh is a type of topology where the wireless access points connect to each other to relay information. These networks work dynamically to adjust the needs and maintain connectivity for all users.
The access points work together to create a strong and successful network. A wireless mesh infrastructure uses the same resources as a traditional wireless network. However, it is configured differently, using equipment that is mesh capable.
What are the benefits of using a wireless mesh network?
Mesh Wi-Fi networks have some advantages over traditional wireless networks. They don't create a separate network, so wherever you go in your house/office, WAPs are available for connection.
A mesh network is reliable and offers redundancy. When one node can no longer operate, the rest of the nodes can still communicate with each other, directly or through one or more intermediate nodes.
Mesh infrastructure carries data over large distances by splitting the distance into a series of short hops. Intermediate nodes not only boost the signal but cooperatively pass data from point A to point B by making forwarding decisions based on their knowledge of the network, i.e. perform routing by first deriving the topology of the network.
Mesh networks, by design, create multiple routes between its nodes. This means that if one network node fails, data moving across a network will have another path it can use. This also applies to wireless networks, as a wireless signal can take multiple routes to reach its destination.
What is the difference between a traditional wireless network and a mesh network?
A wireless mesh infrastructure uses the same resources as a typical wireless network. The difference lies mainly in its configuration, but that difference provides several noticeable benefits.
| Traditional Wireless Network | Mesh Wireless Network |
|---|---|
| Traditional wireless network access relies on plugging access points and routers into a wired network. | The Primary access point and the Primary Capable AP (if applicable) needs to be wired. Some of the subordinate APs do not need to be wired to the network. The nodes connect wirelessly to each other. This opens up space for other necessary wired connections. |
| Wireless range extenders, wireless bridging, and single-point setup are used in traditional networks. | None of these configurations are necessary. |
| Need to avoid cross-coverage of access points to avoid unnecessary installations. | Benefits from having multiple nodes for a device to use. Allows a device to have multiple points of access as movement occurs or if an AP should fail. |
Mesh Vocabulary
- Access Point (AP): A device in a network that is used to allow users to connect to the Network wirelessly. Specific labels may be added to this depending on its function: Primary, Remote, Root, Subordinate, etc.
- Wireless Mesh Network: A type of topology where the wireless access points connect to each other to relay information. These networks work dynamically to adjust the needs and maintain connectivity for all users.
- Primary AP: The Primary AP provides management and control of the wireless network and topology. It is the bridge to the rest of the external network, (usually the Internet) using an Internet Service Provider (ISP). The Primary AP directly links to the premise router which in turn routes traffic to the WAN ISP interface. The Primary AP is the orchestrator of all the nodes providing wireless services within the mesh network. It manages information from the nodes on the network, each client connection quality and neighbor information in order to make the best decision on the best route for optimized wireless services out to the mobile client.
- Primary: The current AP tasked with management of the WLAN.
- Preferred Primary: A setting in which a specific Primary-capable AP is listed as preferred. If the Primary AP fails, the Preferred Primary AP will take over. Once the Preferred AP is back up, it does not automatically switch back over. You do not have designate a Preferred Primary.
- Primary Capable AP: An AP that has a physical wired connection back to the network. This AP needs to be connected to Ethernet and can become the Primary AP if the Primary AP fails.
- Mesh Extender: A remote subordinate AP in the network that is not connected to the wired network.
- Subordinate AP: A general term that can be applied to any mesh AP that is not configured as a Primary.
- Parent AP: A parent AP is an AP that provides the best route back to the Primary AP.
- Child AP: A child AP is a mesh extender that selects the parent AP as its best route back to the Primary AP.
- Upstream AP: An upstream AP is a general term referring to the direction data flows through APs when going from the client to the server.
- Downstream AP: A downstream AP carries data from the Internet down to the client.
- Co-located APs: Mesh Extenders that are within broadcast range of the backhaul channel.
- Nodes: In this article, APs are referred to as nodes. In general, nodes describe any device that makes a connection or interaction within a network, or has the ability to send, receive, and store information, communicate with the internet, and has an IP address. In a mesh network, optimized radio parameters across all nodes assures maximum wireless coverage while reducing radio interference among nodes to provide superior data speeds and throughput.
- Backhaul: In a wireless mesh network, information in the Local Area Network (LAN) needs to get to a wired access point in order to reach the Internet. Backhaul is the process of getting that information back to the wired access point.
Login Tips
Perhaps you have tried to log into ciscobusiness.cisco, and are encountering problems. Check out these simple suggestions:
- If you just completed Day Zero configurations, close the app and then re-launch it.
- Make sure the correct Service Set Identifier (SSID) is selected. This is the name that you created for the wireless network.
- Disconnect any VPN for either the mobile app or on a laptop. You might even be connected to a VPN that your mobile service provider uses that you might not even know. For example, an Android (Pixel 3) phone with Google Fi as a service provider there is a built-in VPN that auto-connects without notification. This would need to be disabled to find the Primary AP.
- If you have an Android phone, you may be using a private Domain Name Server (DNS) and may need to disable this feature for connectivity. To check this, you can typically find this under Settings > Network and Internet > Advanced > Private DNS.
- Log into the Primary AP with https://<IP address of the Primary AP>. The Primary AP address is the assigned IP address you used in the initial set up procedure. If you opted out of assigning a manual address at that time, check your router for the DHCP IP address given to the Primary AP management page. The management address will be assigned on MAC address 00:00:5e:00:01:01.
- Once you do initial setup, be sure https:// is being used whether you are logging into ciscobusiness.cisco or by entering the IP address into your web browser. Depending on your settings, your browser may have auto-populated with http:// since that is what you used the very first time you logged in.
- To help with problems related to accessing the web UI or browser issues during the use of the AP, in the web browser (Firefox in this case) click on Open menu, go to Help > Troubleshooting Information and click on Refresh Firefox.
Primary APs and Primary Capable APs
What is the difference between Primary and Primary Capable APs?
The Primary AP is the bridge to the rest of the external network, which is usually the Internet using an Internet Service Provider (ISP). The Primary AP directly links to the primary router which in turn routes traffic to the WAN ISP interface.
The Primary AP is the orchestrator of all the nodes providing wireless services within the mesh network. It manages information from the nodes on the network, gathering client connection quality and neighbor information in order to make the best decision on the best route for optimized wireless services out to the mobile client.
You can set a Preferred Primary in your network if there is a specific AP you would want to set as the Primary, otherwise, one is assigned automatically. If the Preferred Primary fails for some reason, another wired AP/Primary Capable AP will automatically take over. The new Primary AP will run unless it fails. In that case, the Preferred Primary (if configured) or another wired AP that is Primary Capable will take over the Primary AP role.
In order for an AP to be a Primary or a Primary Capable AP, there must be a wired connection. Mesh extenders are not Primary capable.
What is the difference between the 140AC and 145AC Primary Capable APs?
- The 140AC and the 145AC has the same processor and same memory.
- The 140AC is ceiling mounted, while the 145AC is wall mounted.
- The 140AC has no extra Ethernet ports. The 145AC has three Ethernet ports to connect additional devices such as an IP phone or a security camera. One of the Ethernet ports can provide Power over Ethernet (PoE).
- The 145AC has one pass-through port (a cable extension) that gives network access to another device without having to use a switch. It is like having another wall jack.
- The 145AC has a port labeled in green as PSE-LAN1. This port can provide Power over Ethernet (PoE), but only if the 145AC itself is connected to an 802.3at port on the uplink. If the 145AC is only connected to an 802.3af uplink port, it will have enough power to run but not enough to provide PoE.
How does the 240AC Primary Capable AP compare the 100 Series APs?
The 240AC AP is a higher performing model. It has more radios, a faster processor, and more Random-Access Memory (RAM). The 240AC contains one Ethernet port that can be used to connect additional devices.
Why would I configure a Preferred Primary AP?
You don’t have to set a preferred AP, by default a Primary AP is automatically assigned, and if the Primary fails, another Primary capable AP automatically takes over. However, if one of the wired AP/Primary Capable AP is in a distant location or is not desirable for some reason, you might want to assign a preferred AP to a more desirable AP.
The PoE Ethernet Uplink Port on the Primary AP can ONLY be used to provide uplink to the LAN, and NOT to connect to any other Primary capable or mesh extender devices.
What if I want to add an additional 140AC, 145AC, or 240AC AP after my network is up and running?
Believe it or not, all you have to do is plug it in! As long as all the APs are on the the same VLAN/subnet you are set. The firmware on the new AP will be updated automatically and then it will join the network.
Mesh Extenders
What is the difference between the Cisco Business Mesh Extenders?
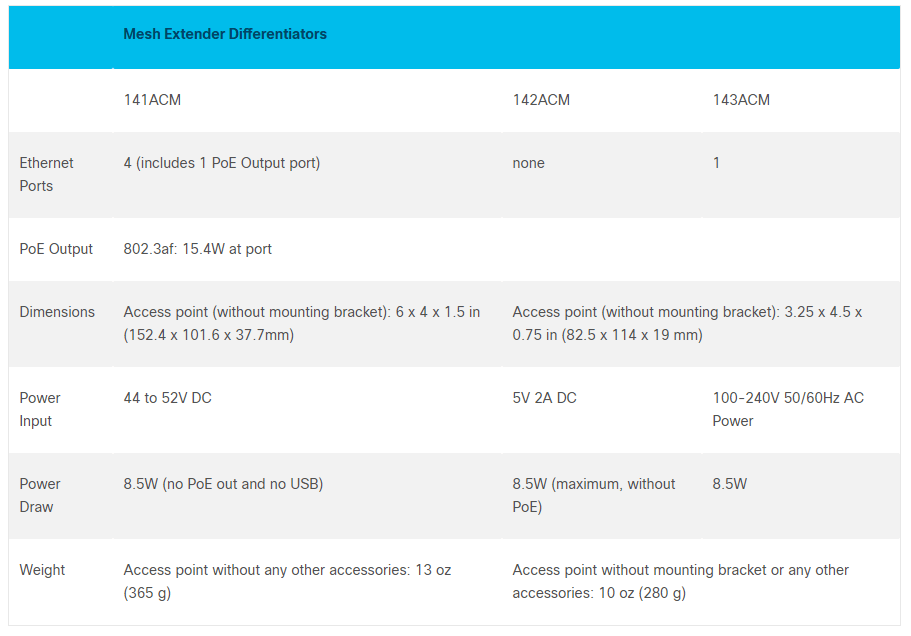
- The 141ACM can be placed on any flat surface and includes a cord to plug it in. It has four Ethernet ports; one can even power a phone or other device using its Power over Ethernet (PoE) port.
- The 142ACM can be plugged right into an AC outlet and contains no other wiring.
- The 143ACM can be mounted up to six feet from an outlet and includes one Ethernet port.
More details for the Mesh Extenders can be found in the following table:
How do I find the MAC address on a mesh extender?
A MAC address includes numbers and letters in pairs, separated by colons.
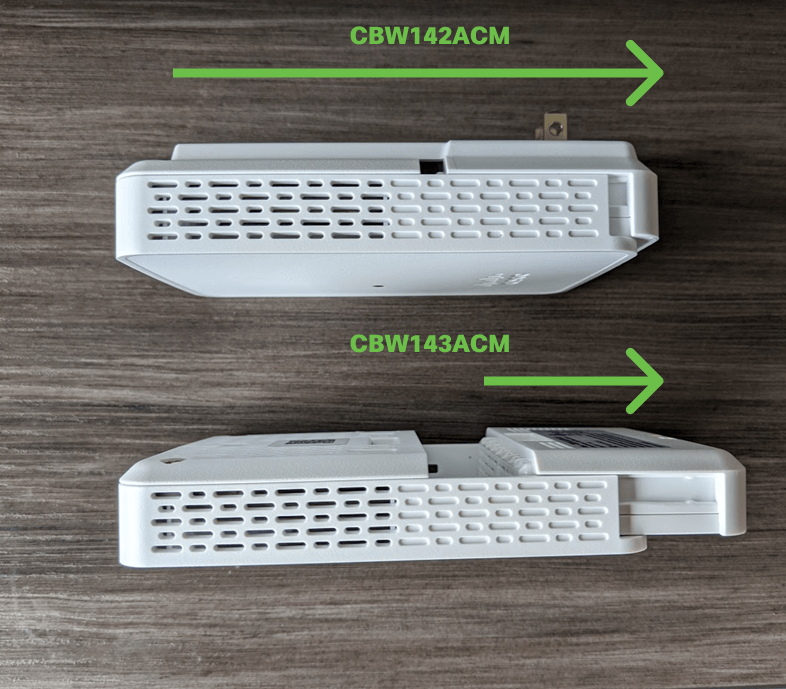
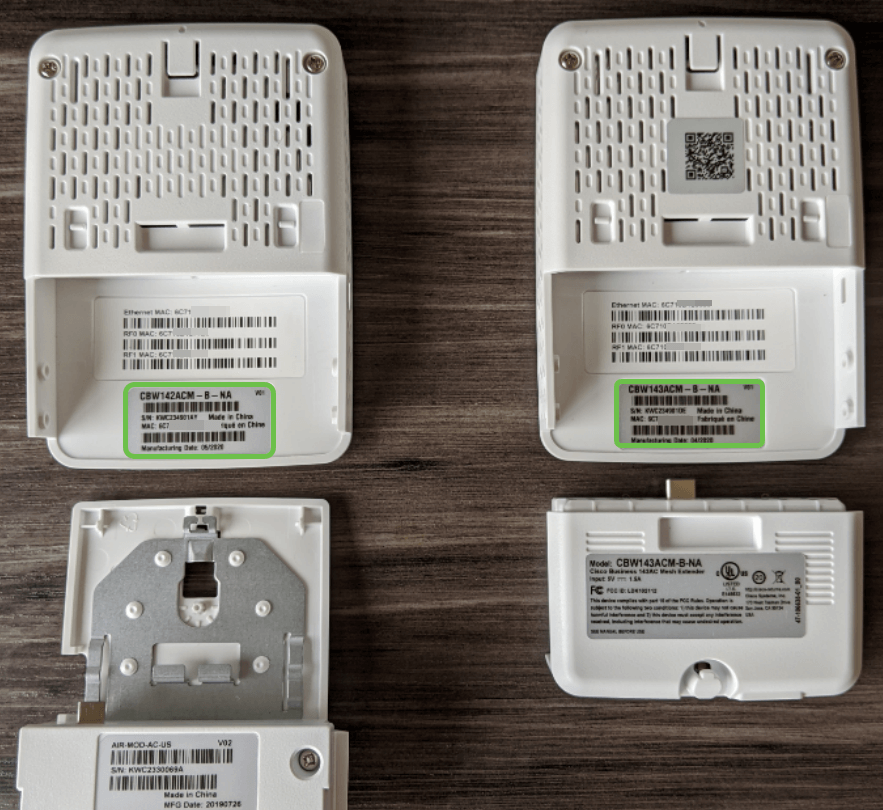
On most APs, including the 141ACM, the MAC address can be found on the outside of the actual AP. On the 142ACM and 143ACM you need to slide out the power apparatus to view the MAC address. To do this, apply light pressure on the AP where the arrows indicate. Slide and lift the power component out.
On the 142ACM and 143ACM, you will see the MAC address in the locations pointed out below.
How do I remove a Mesh Extender?
To remove a mesh extender from your current WLAN, under expert view, navigate to Wireless Settings > Access Points. Click on the edit icon of the AP you want to edit. Click the Mesh tab and simply change the Bridge Group Name for deployment in another LAN. Be sure to click Apply.
How do I add an additional 141ACM, 142ACM, or 143ACM mesh extender to an existing Cisco mesh network?
It's easy peasy if you already have a mesh extender on your network. All you need to do is add the new MAC address to the Allow list, using the the QR code with the mobile app (Overview > Add Mesh Extender) or Web UI (Wireless Settings > WLAN Users > Local MAC Addresses) and plug in the mesh extender within range of a CBW AP. The firmware on the new mesh extender will be updated automatically by pulling it from another mesh extender and then it will join the network.
How do I add a mesh extender to an existing mesh network if there is not a mesh extender already in the network?
Since the mesh extender you are adding doesn't have another mesh extender, you need to update the firmware. Updating via cisco.com should work, but if not you can download the update file to a PC and apply the ap1g5-capwap file using the HTTP update method. You can also use a TFTP or SFTP server. For step-by-step instructions, check out Update Software of a Cisco Business Wireless Access Point. This process may take a while or may not work on the first attempt, please be patient.
Compatibility FAQ
If I use Mobility Express, can I keep that on the same LAN as the Cisco Business Wireless LAN?
No, Mobility Express needs to be on a separate LAN or you need to migrate from Mobility Express to A2.
How would I best integrate mesh into my current Wireless Local Area Network (WLAN)?
To enjoy the full benefits that the new access points provide, it is best to use only the equipment listed in these tables for your wireless portion of a mesh network.
The following CBW Access Points have the ability to be a Primary AP or a Primary Capable AP:
| Primary AP / Primary Capable AP |
|---|
| Cisco Business 140AC Access Point |
| Cisco Business 145AC Access Point |
| Cisco Business 240AC Access Point |
These Access Points can be used for either a mesh or a traditional wireless network.
The following CBW Access Points have the ability to be a Mesh Extender:
| Mesh Extender |
|---|
| Cisco Business 141AC Mesh Extender |
| Cisco Business 142AC Mesh Extender |
| Cisco Business 143AC Mesh Extender |
These Access Points will only function in a mesh network.
Are CBW products compatible with Small Business (SMB) WAPs?
SMB WAPs, like the WAP125, WAP571, and WAP351 are not compatible, as these APs use different technology. They must be on their own subnetworks to work properly.
All About the Numbers
Recommendations for Spacing and Deployment
- Place Mesh Extenders in line-of-site of Primary-Capable APs.
- Downstream Mesh Extenders in line-of-site of parent Mesh Extender.
- Downstream Mesh Extenders require good/excellent on backhaul SSID signal strength from upstream Primary-Capable APs.
- Mesh Extenders should have a minimum Signal to Noise Ratio (SNR) value of 30.
- Avoid placing Mesh Extenders too close to other Mesh Extenders or other Primary-Capable APs.
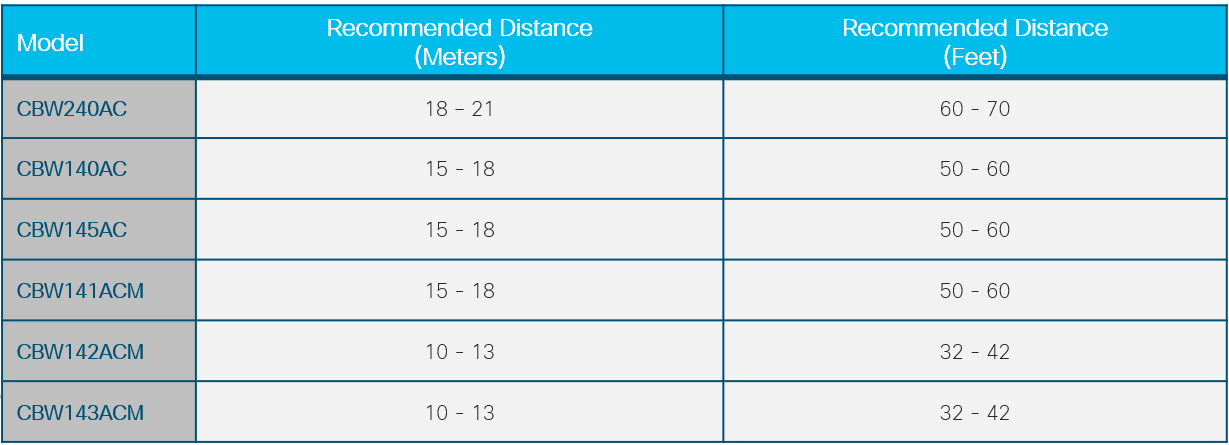
The following chart lists the expected coverage areas in an open space. If you deploy your network in an area that is not open, reduce these values by 20-30%.
What is the maximum number of APs that can be in the network?
There can be up to 50 depending on the configuration and environment.
What is the maximum number of mesh extenders in the network?
There can be up to 25 depending on the configuration and environment.
What is the maximum number of clients per AP?
There can be up to 200 depending on the configuration and environment.
What is the total number of clients that can be in the network?
There can be up to 1000 in a full network depending on the configuration and environment.
Approximately how much area can an AP cover?
Up to 2500 square feet, but this depends largely on the configuration and environment.
How much should the coverage overlap?
Coverage should overlap at least 10%-20%.
How many SSIDs can be configured?
You can create up to 16 different separate SSIDs for business and guest access.
Managing Your Devices FAQ
Basic Management
How do I manage the APs?
For management, you can use the Web User Interface (UI) or the Cisco Business Wireless application.
If I add an AP, how does it get configured?
The configuration can be cloned from the Primary AP. You must enter the MAC address of all Mesh Extenders that you want to use in the mesh network on the Primary AP. You can add a Mesh Extender through the Web UI or through the mobile app.
Navigating the Web Interface
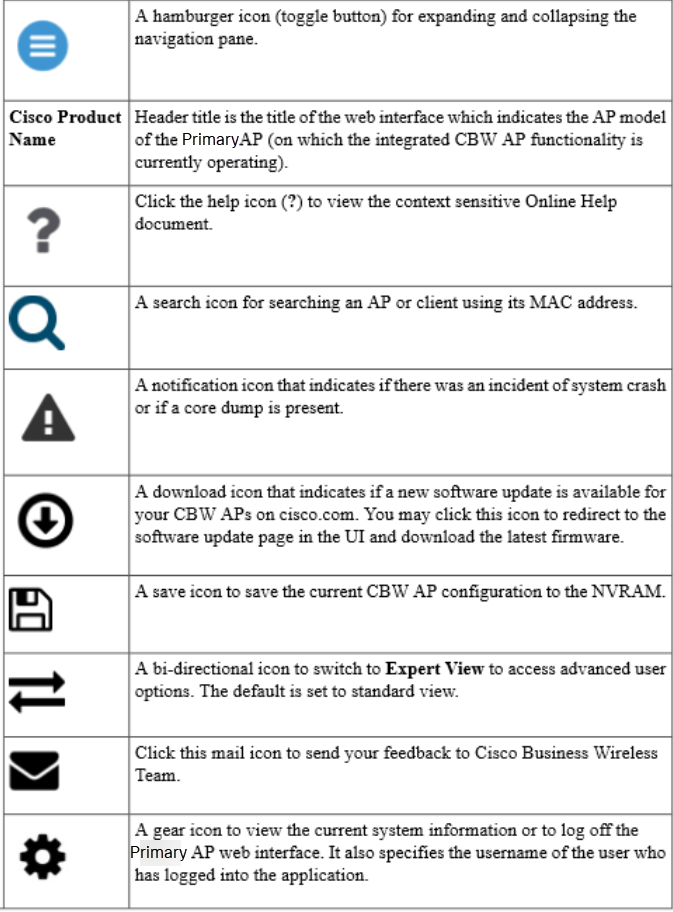
What do the header toolbar icons on the Web UI represent?
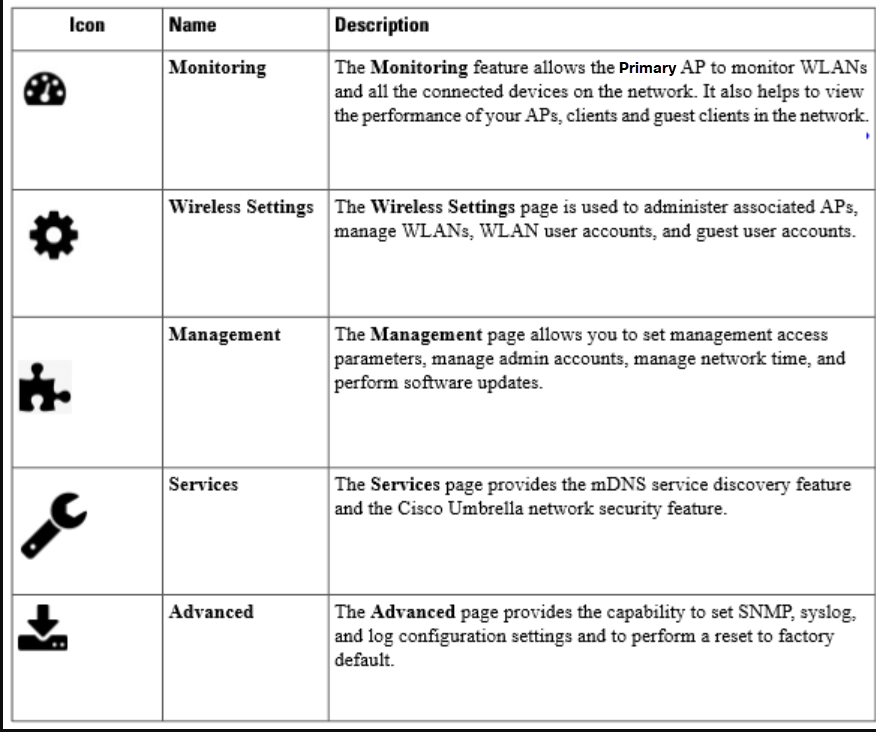
What do the navigation pane icons on the Web UI represent?
How do I access additional navigation pane features?
By default, the standard view is enabled. To have access to all the menu options, click on the arrow icon on the top-right menu of the Web UI. This enables Expert View. This needs to be enabled to set up various options including Umbrella, Interference, RF Optimization and more.

Conclusion
Now that you have all this knowledge, you must be pretty excited to get your network up and running. Want to learn more? Click on the article topics below.