Configure Normal Extension on SPA500S Attendant Console that is connected to SPA500 Series IP Phone
Available Languages
Objective
An attendant console is an expansion module that is connected with the IP Phone to increase the number of extensions that can be assigned to the IP Phone. With the SPA500S, 32 more extensions can be added. The extensions can be configured as a normal extension, a shared line, a monitor line, a watch, an overlay, an intercom, or a dialable intercom. Normal extension configuration on SPA500S is same as a normal extension configuration for an IP Phone.
The objective of this article is to explain how to configure a normal extension on the SPA500S Attendant Console with the use of the Cisco Configuration Assistant (CCA).
Note: The SPA500DS will not work with the UC500 series unified communication devices and will only work with UC320 unified communication device.
Applicable Devices
• UC500 Series Device
• SPA500S
• SPA500 Series IP Phone
Software Version
• v8.6.0 [ UC540 ]
• v3.2(1) [ Cisco Configuration Assistant ]
• spa50x-30x-7-4-9c [ SPA509G IP Phone ]
Configure SPA500S Attendant Console with CCA
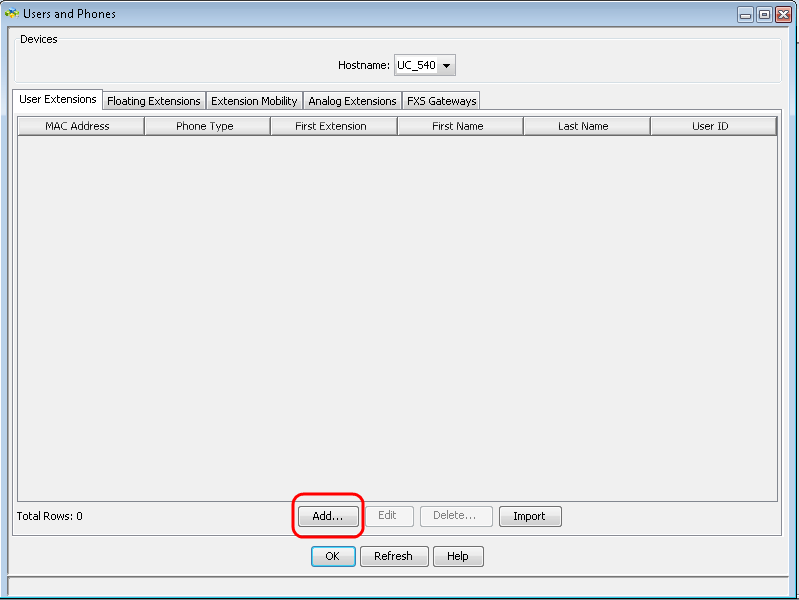
Step 1. Log in to the Cisco Configuration Assistant (CCA) of the UC500 Series device, and choose Configure > Telephony > Users/Extension > Users and Phones. The Users and Phones window opens.
Step 2. Click Add to add an IP Phone.

Note: To learn how to add SPA500S, refer to the article Add SPA500S Attendant Console that is Connected to SPA500 Series IP Phone.
Step 3. In the First Name field, enter the first name of the phone user.

Step 4. In the Last Name field, enter the last name of the phone user.
Step 5. In the User ID field, enter the user ID for this phone to be used when you log in to Cisco Unity Express User Options webpages
Step 6. In the Password field, enter the password for this phone.
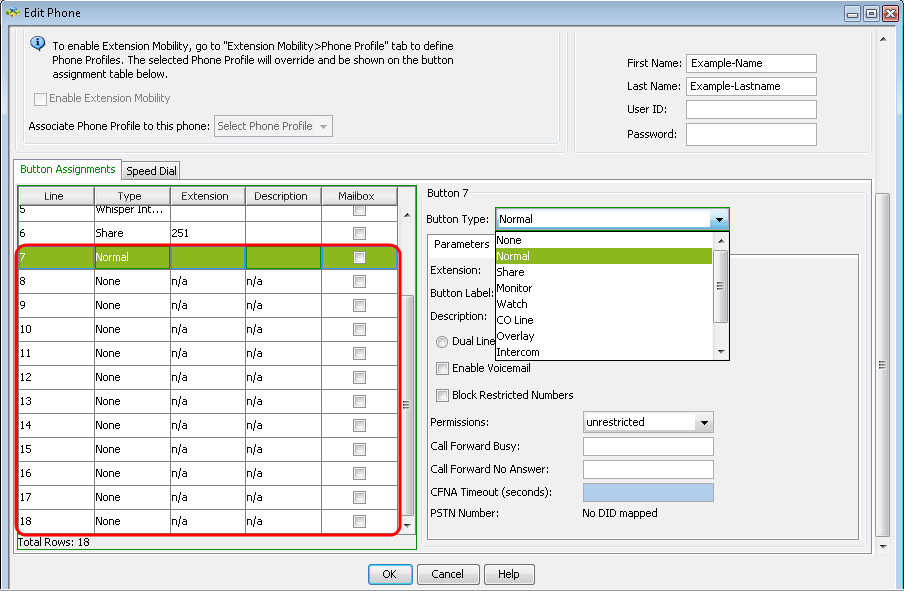
Step 7. In the Button Assignments area, you can assign numbers and extensions to the line buttons on the IP Phone. Click the line number that you would like to configure as a normal extension.

Step 8. Choose Normal from the Button Type drop-down list to configure a normal extension on SPA500S Attendant Console.
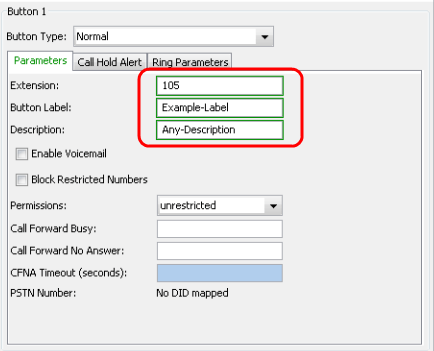
Step 9. Enter any 3 digit extension number in the Extension field.

Step 10. Enter the Button Label name in the Button Label field.
Step 11. Enter the description about the extension in the Description field.
Step 12. Click OK to save the configuration.
Revision History
| Revision | Publish Date | Comments |
|---|---|---|
1.0 |
11-Dec-2018 |
Initial Release |
 Feedback