Configure IPv4 Static Routes Settings on a Switch through the CLI
Available Languages
Objective
This article provides instructions on how to configure IPv4 static routes on the switch through the Command Line Interface (CLI).
Introduction
Static routing refers to the configuration of the path selection of routers. This type of mechanism takes place in the absence of communication between routers regarding the current topology of the network and thus, manually configuring routes to the routes table on the switch is recommended. Static routes help reduce the overhead on the switch CPU. This feature also allows you to deny access to certain networks.
When routing traffic, the next hop is decided on according to the longest prefix match (LPM) algorithm. A destination IPv4 address may match multiple routes in the IPv4 Static Route Table. The device uses the matched route with the highest subnet mask, that is, the longest prefix match. If more than one default gateway is defined with the same metric value, the lowest IPv4 address from among all the configured default gateways is used.
Note: For instructions on how to configure IPv4 static routes settings on the switch through the web-based utility, click here.
Applicable Devices
- Sx300 Series
- Sx350 Series
- SG350X Series
- Sx500 Series
Software Version
- 1.4.8.06 - Sx300, Sx500
- 2.3.0.130 - Sx350, SG350X
Configure IPv4 Static Routes
You cannot configure a static route through a directly‑connected IP subnet where the device gets its IP address from a DHCP server. To configure a static IPv4 interface on the switch, click here for instructions.
Step 1. Log in to the switch console. The default username and password is cisco/cisco. If you have configured a new username or password, enter the credentials instead.
To learn how to access an SMB switch CLI through SSH or Telnet, click here.

Note: The commands may vary depending on the exact model of your switch. In this example, the SG350X switch is accessed through Telnet.
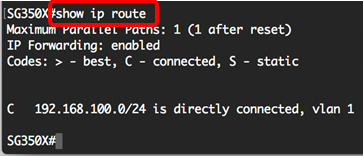
Step 2. To display the current routes on the switch, enter the following:
SG350X#show ip route
Note: In this example, a directly connected route to 192.168.100.0 network is displayed.
Step 3. From the Privileged EXEC mode of the switch, enter the Global Configuration mode by entering the following:
SG350X#configureStep 4. In the Global Configuration mode, enter the ip route command to establish static routes:
SG350X#ip route [prefix[mask | prefix-length][ip-address][metric value]]The options are:
- prefix - IP route prefix for the destination.
- mask - Prefix mask for the destination.
- prefix-length - Prefix mask for the destination. It specifies the number of bits that comprise the IP address prefix. The prefix length must be preceded by a forward slash (/). The range can be from 0 to 32.
- ip-address - IP address of the next hop that can be used to reach that network.
- metric value - Metric of the route. The default metric is 6 for the Next Hop on an In-Band interface and 2 for the Next Hop on Out-of-Band (OOB). The range can be from one to 255.

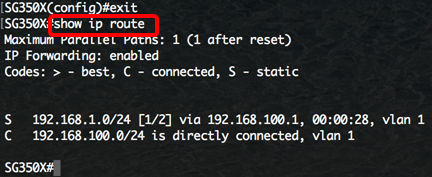
Note: In this example, a static route to 192.168.1.0 network is established through 192.168.100.0. The defined administrative distance is 2. The route goes to a router with IP address 192.168.100.1.
Step 5. (Optional) To remove all static routes to the given subnet, enter the following:
SG350X#no ip route [prefix[mask | prefix-length]Step 6. (Optional) To remove only one static route to the given subnet via the given next hop, enter the following:
SG350X#no ip route {prefix[mask | prefix-length][ip-address]}Step 7. Enter the exit command to go back to the Privileged EXEC mode:
SG350X#exit
Step 8. (Optional) To display the configured route, enter the following:
SG350X#show ip route
Step 9. (Optional) In the Privileged EXEC mode of the switch, save the configured settings to the startup configuration file, by entering the following:
SG350X#copy running-config startup-config
Step 10. (Optional) Press Y for Yes or N for No on your keyboard once the Overwrite file [startup-config]… prompt appears.

You have now configured IPv4 static routes on your switch through the CLI.
 Feedback