LAG Load Balancing on Cisco 350 and 550 Series Switches
Available Languages
- Objective
- Introduction
- Applicable Devices
- Software Version
- LAG Management
- Topology
- How LAG Load Balancing Works on Cisco 350 and 550 Series Switches
- Example of a Two Port LAG with IP/MAC Address Load Balancing
- Example of a Two Port LAG with only MAC Address Load Balancing
- Configure LAG Load Balance Algorithm on the Switch
- Conclusion
Objective
This article explains how Link Aggregation (LAG) load balancing works on Cisco 350 and 550 series switches and how to configure load balancing on your switch.
Introduction
Link Aggregation Control Protocol (LACP) is part of the IEEE specification (802.3az) that enables you to bundle several physical ports together to form a single logical channel called a LAG. LAGs increase bandwidth while maintaining redundancy between two devices.
Traffic forwarded to a LAG is load-balanced across the active member ports, thus achieving an effective bandwidth close to the aggregate bandwidth of all the active member ports of the LAG.
Traffic load balancing over the active member ports of a LAG is managed by a hash-based distribution function that distributes unicast and multicast traffic based on Layer 2 or Layer 3 packet header information.
The device supports two modes of load balancing:
- By Media Access Control (MAC) Addresses—Based on the destination and source MAC addresses of all packets.
- By Internet Protocol (IP) and MAC Addresses—Based on the destination and source IP addresses for IP packets, and destination and source MAC addresses for non-IP packets.
Applicable Devices
- SG350
- SF350
- SG350X
- SG350XG
- SF550X
- SG550X
- SX550X
- SG550XG
Software Version
- 2.5.0.83
LAG Management
In general, a LAG is treated by the system as a single logical port. In particular, the LAG has port attributes similar to a regular port, such as state and speed.
The 350 family of devices support up to 8 LAGs. The 550 family of devices support up to 32 LAGs. All devices support up to 8 ports in a LAG group.
Every LAG has the following characteristics:
- All ports in a LAG must be of the same media type, such as Ethernet cable connectivity.
- Ports in a LAG must not be assigned to another LAG.
- No more than 8 ports are assigned to a static LAG and no more than 16 ports can be candidates for a dynamic LAG.
- When a port is added to a LAG, the configuration of the LAG is applied to the port. When the port is removed from the LAG, its original configuration is reapplied.
- Protocols, such as Spanning Tree, consider all the ports in the LAG to be one port.
Topology

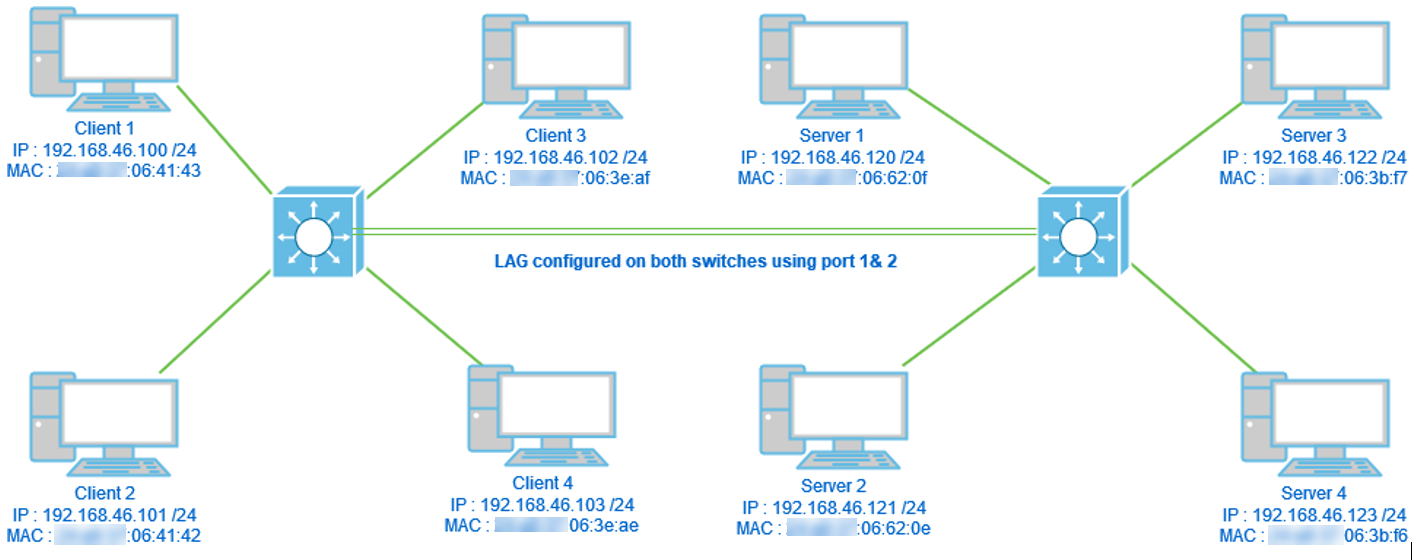
Two switches connected via LAG using 2 ports only and load balance algorithm MAC Address vs MAC/IP address. Additionally, 4 clients connected to one switch, 4 servers connected to the second switch.
How LAG Load Balancing Works on Cisco 350 and 550 Series Switches
Please note that Cisco 350 and 550 series switches use the Exclusive OR (XOR) method to choose the interface which is forwarding traffic. These switches provide load balance between LAG ports using XOR on MAC address (destination and source) or combination MAC/IP address (destinations and sources). This means that for specific packets with the same MAC and/or IP addresses, traffic will be sent via one specific port and not two or three at the same time. This implies that one client to server connection would not be able to exceed one port throughput no matter how many ports are in a LAG. It is purely based on header information on the packet. If those remain unchanged, there will not be any difference in the algorithm behavior.
We will compare algorithm mode MAC Address with MAC/IP address. Since we are using 2 ports for LAG we can have only two different results from XOR, either 0 or 1. That means we need to use only last bit of the address for XOR comparison so we could have 0 or 1. If XOR results are 0, the traffic will go via the 1st port of the LAG and if result will be 1 it will go via the 2nd port of the LAG.
- 0 > Port 1
- 1 > Port 2
If we use 3 or 4 ports, we could receive a minimum of 3-4 different results of XOR. We would need to use 2 bits for comparison, so we could have 4 different combinations.
- 00 > Port 1
- 01 > Port 2
- 10 > Port 3
- 11 > Port 4
If we use 5-8 ports, we could receive a minimum of 5-8 different results of XOR and we would need to use 3 bits for comparison so we could have 8 different combinations like 000, 001, 010, 011, 100, 101, 110 and 111. And the mechanism of choosing port would be similar as above but with more options.
- 000 > Port 1
- 001 > Port 2
- 010 > Port 3
- 011 > Port 4
- 100 > Port 5
- 101 > Port 6
- 110 > Port 7
- 111 > Port 8
Example of a Two Port LAG with IP/MAC Address Load Balancing
In this example, we focus on 2 ports for the LAG. Therefore, we only have to take the last bit of the binary form of the MAC and IP address into consideration for the XOR operation.
Listed below is a conversion of IP and MAC addresses to binary as well as XOR on those sources and destinations.
Sources:
| Name | IP address | Binary form of IP (last octet only) | MAC address (Last 6 digits only) | Binary form of MAC (last digit) | XOR output |
|---|---|---|---|---|---|
| Client 1 | 192.168.46.100 | 01100100 | :06:41:43 | 0100 0011 | 0 XOR 1 = 1 |
| Client 2 | 192.268.46.101 | 01100101 | :06:41:42 | 0100 0010 | 1 XOR 0 = 1 |
| Client 3 | 192.168.46.102 | 01100110 | :06:3e:af | 1010 1111 | 0 XOR 1 = 1 |
| Client 4 | 192.168.46.103 | 01100111 | :06:3e:ae | 1010 1110 | 1 XOR 0 = 1 |
Destinations:
| Name | IP address | Binary form of IP (last octet only) | MAC address (Last 6 digits only) | Binary form of MAC (last digit) | XOR output |
|---|---|---|---|---|---|
| Server 1 | 192.168.46.120 | 01111000 | :06:62:0f | 0000 1111 | 0 XOR 1 = 1 |
| Server 2 | 192.268.46.121 | 01111001 | :06:62:0e | 0000 1110 | 1 XOR 0 = 1 |
| Server 3 | 192.168.46.122 | 01111010 | :06:3b:f7 | 1111 0111 | 0 XOR 1 = 1 |
| Server 4 | 192.168.46.123 | 01111011 | :06:3b:f6 | 1111 0110 | 1 XOR 0 = 1 |
XOR done on all the destination and source MAC and IP addresses gives the same value 1. That would mean that all traffic would utilize only port 2 of the LAG. Port 1 would not be used for connections from any of the clients to any of the servers and it means that MAC/IP Address mode is not optimal.
Example of a Two Port LAG with only MAC Address Load Balancing
Now we will analyze the load balancing based only on the MAC address.
| Name | MAC address (Last 6 digits only) | Binary form of MAC (last digit) | Last digit of the binary output |
|---|---|---|---|
| Client 1 | :06:41:43 | 0100 0011 | 1 |
| Client 2 | :06:41:42 | 0100 0010 | 0 |
| Client 3 | :06:3e:af | 1010 1111 | 1 |
| Client 4 | :06:3e:ae | 1010 1110 | 0 |
| Name | MAC address (last 6 digits only) | Binary form of MAC (last digit) | Last digit of the binary output |
|---|---|---|---|
| Server 1 | :06:62:0f | 0000 1111 | 1 |
| Server 2 | :06:62:0e | 0000 1110 | 0 |
| Server 3 | :06:3b:f7 | 1111 0111 | 1 |
| Server 4 | :06:3b:f6 | 1111 0110 | 0 |
This time XOR done for each MAC address is different.
- If we take packet from client 1 to server 1, we would do 1 XOR 1 > 0 using port 1.
- If we take packet from client 1 to server 2, we would do 1 XOR 0 > 1 using port 2.
- If we take packet from client 2 to server 2, we would do 0 XOR 0 > 0 using port 1.
- If we take packet from client 2 to server 1, we would do 0 XOR 1 > 1 using port 2.
Now we would achieve optimal load balance and port utilization would be fairly equal.
Note: While using the IP/MAC Address algorithm, in some cases we may achieve the optimal output by changing the IP address only on the source or destination side as MAC address of the device will remain the same.
Configure LAG Load Balance Algorithm on the Switch
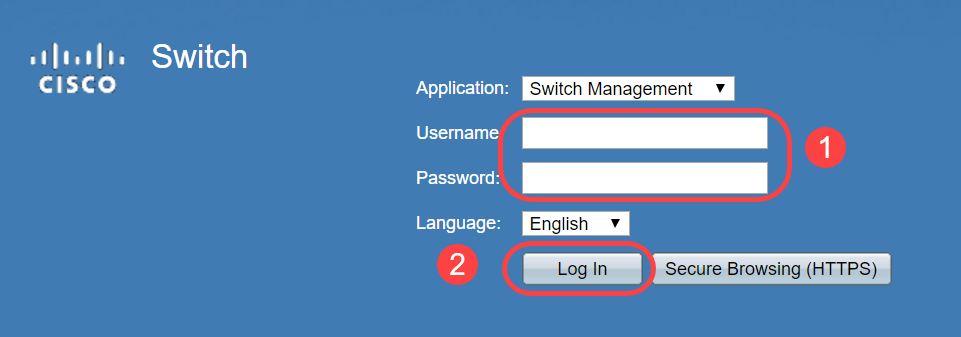
Step 1. Log in to the Cisco switch by entering the Username and Password. Click Log In. By default the username and password are cisco, but since you are working on an existing network, you should have your own username and password. Enter those credentials instead.
Note: By default, the Application window shows the Switch Management option selected, and should be left alone.

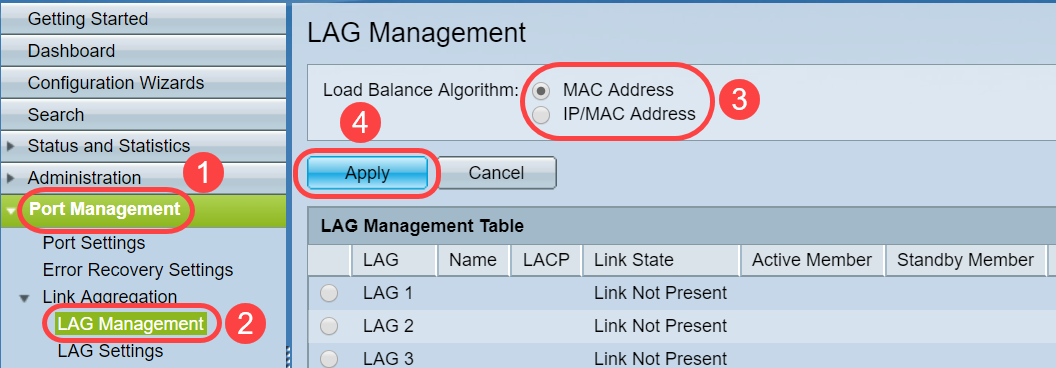
Step 2. Navigate to Port Management > LAG Management and select the Load Balance Algorithm option. You can select either MAC Address, or IP/MAC Address. Click Apply.
Note: By default, MAC Address is the option selected for Load Balance Algorithm.

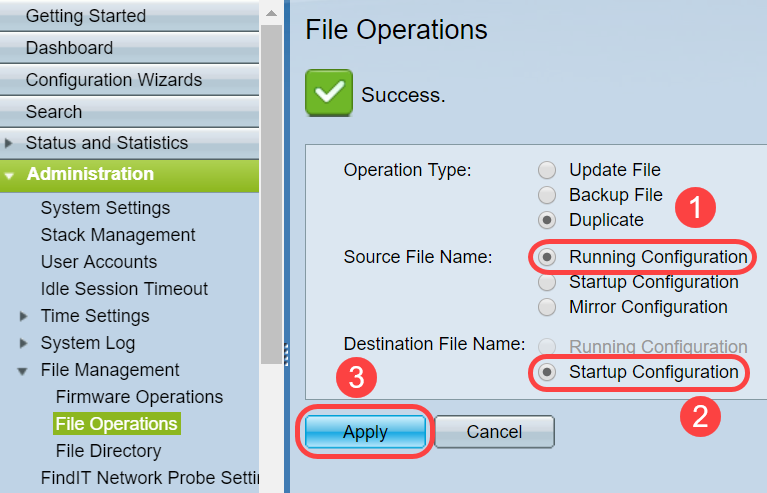
Step 3. Now you will be able to see the Success notification on the screen. Click File Operations to save the configuration on the switch to startup configuration.

Note: Alternatively, you can just click on the  icon to save the configuration.
Step 4. The File Operations page will open. Verify that the Source File Name is selected as Running Configuration and Destination File Name is selected as Startup Configuration. Click Apply to save the configuration.

Conclusion
You now have a better understanding of LAG load balancing and how to configure it on your 350 or 550 series switches. You have also learned that if you select the IP/MAC address load balance, in certain topologies, there is a chance that load balancing may not work effectively.
Check out these related articles:
Configuring Link Aggregation Groups on the SG350XG and SG550XG
Configuring LAG Settings on a Switch through the Command Line Interface (CLI)