Configure Subnet-Based Virtual Local Area Network (VLAN) Groups on a Switch
Available Languages
Objective
A Virtual Local Area Network (VLAN) allows you to logically segment a Local Area Network (LAN) into different broadcast domains. In scenarios where sensitive data may be broadcast on a network, VLANs can be created to enhance security by designating a broadcast to a specific VLAN. Only users that belong to a VLAN are able to access and manipulate the data on that VLAN. VLANs can also be used to enhance performance by reducing the need to send broadcasts and multicasts to unnecessary destinations.
Networking devices on which multiple protocols are running cannot be grouped to a common VLAN. Non-standard devices are used to pass traffic between different VLANs in order to include the devices participating in a specific protocol. For this reason, the user cannot take advantage of the many features of VLAN.
VLAN groups are used to load balance the traffic on a Layer 2 network. The packets are distributed with respect to different classifications and are assigned to VLANs. Many different classifications exist, and if more than one classification scheme is defined, the packets are assigned to the VLAN in this order:
- Tag — The VLAN number is recognized from the tag.
- MAC-Based VLAN — The VLAN is recognized from the source Media Access Control (MAC)-to-VLAN mapping of the ingress interface. To learn how to configure this feature, click here for instructions.
- Subnet-Based VLAN — The VLAN is recognized from the source IP Subnet-to-VLAN mapping of the ingress interface.
- Protocol-Based VLAN — The VLAN is recognized from the Ethernet type Protocol-to-VLAN mapping of the ingress interface. To learn how to configure this feature, click here for instructions.
- PVID — VLAN is recognized from the port default VLAN ID.
The subnet-based group VLAN classification enable packets to be classified according to their subnet. You can then define subnet-to-VLAN mapping per interface. You can also define several subnet-based VLAN groups, which each group containing different subnets. These groups can be assigned to specific ports or LAGs. Subnet-based VLAN groups cannot contain overlapping ranges of subnets on the same port.
This article provides instructions on how to configure subnet-based groups on a switch.
Applicable Devices
- Sx350 Series
- SG350X Series
- Sx550X Series
Software Version
- 2.2.5.68
Configure Subnet-Based VLAN Groups on the Switch
Add Subnet-Based VLAN Group
Step 1. Log in to the web-based utility and choose Advanced from the Display Mode drop-down list.

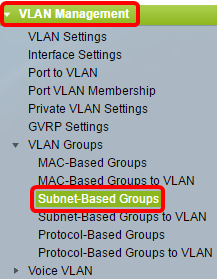
Step 2. Choose VLAN Management >VLAN Groups > Subnet-Based Groups.
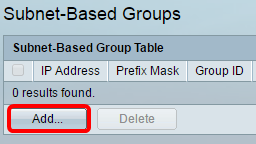
Step 3. In the Subnet-Based Group Table, click Add.
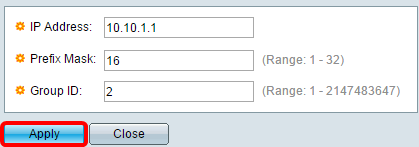
Step 4. Enter the IP address to be assigned to a VLAN group in the IP Address field. This is where the subgroup is based.

Note: In this example, 10.10.1.1 is used.
Step 5. Enter the prefix mask that defines the subnet in the Prefix Max field.

Note: In this example, 16 is used.
Step 6. In the Group ID field, enter an ID to identify the subnet-based VLAN group. It is used to identify the subnet-based VLAN group.

Note: In this example, 2 is used.
Step 7. Click Apply then click Close.
Step 8. (Optional) Click Save to save settings to the startup configuration file.
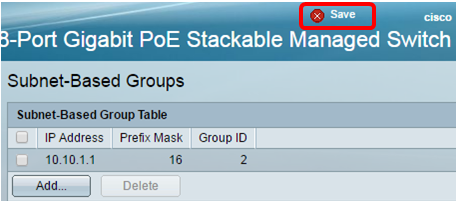
You should now have added a subnet-based VLAN group on your switch.
Delete Subnet-Based VLAN Group
Step 1. Choose VLAN Groups > Subnet-Based Groups.
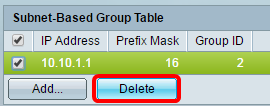
Step 2. In the Subnet-Based Group Table, check the box next to the subnet-based VLAN group you would like to delete.
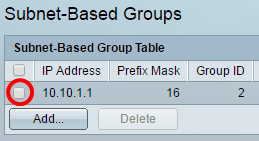
Step 3. Click the Delete button to delete the subnet-based VLAN group.
Step 4. (Optional) Click Save to save settings to the startup configuration file.

The subnet-based VLAN group should now have been deleted from your switch.
You should now have configured subnet-based VLAN groups on your switch. To learn how to map subnet-based groups to VLAN, click here for instructions.
 Feedback