Troubleshoot Adding a Cisco Business Switch to Stack
Available Languages
Objective
This article aims to show you some basic troubleshooting steps if you cannot add a new switch to an existing stack.
Applicable Devices | Software Version
- CBS350 (Data Sheet) (Administration Guide)
- CBS350-2X (Data Sheet) (Administration Guide)
- CBS350-4X (Data Sheet) (Administration Guide)
Introduction
Stacking is a network solution that connects two or more switches on top of one another and configuring them as one device. The switches in a stack function as a single switch with all its characteristics and functionality, at the same time, having additional ports to accommodate more devices. This procedure provides users the convenience to expand their network without the hassle of managing multiple switches.
A stack is composed of switches that has three roles:
- Active — This switch is the commander of the whole stack. It handles all the configuration and other functions of the whole stack. Each time you need to change or configure any of the settings, you must do it on this switch.
- Standby — This switch is like a standby switch in case the active switch goes offline. It automatically assumes the responsibility and becomes the active switch.
- Member — This switch serves as a member of the stack and operates as an additional unit within the stack.
If you are unfamiliar with these terms, check out the following glossary.
To learn how to configure stack settings on your switch, click here.
Stackable switches can be replaced, added, or removed from a stack as needed without affecting the overall performance of the stack. In this scenario, a stack already exists and the original active switch has been replaced. However, the new replacement switch is not working as expected when it was added to the stack. This can be due to the following reasons:
- Power — The new switch is powered on and the stacking cable is already attached to it and connected to the stack.
- Cable Issues — The cables attached to the switches are not properly connected.
- Different firmware version — The new switch does not have the same firmware version with the rest of the switches in the stack.
- Loaded configuration — The new switch already has configuration settings loaded in it.
- Port Statistics and Configuration — The port of the new switch was not properly configured.
Cannot Add a New Switch
The following are the possible reasons of issues encountered when replacing a switch in a stack and steps on how to resolve them.
Power
If the new switch is already powered on and a cable is already attached to it prior to connecting it to the stack, the entire stack will reboot. Make sure the new switch is powered off before connecting it to the stack.
Cable Issues
If there are one or more cables used in the stack that are either not working properly or not connected properly, the connectivity of the stack will be affected. Make sure to check all cables and their connection to each of the switches in the stack.
Different firmware version
All the switches in the stack should have the same firmware version. Make sure to check the firmware version of the new switch. Follow the steps below to check the firmware version of your switch:
Step 1
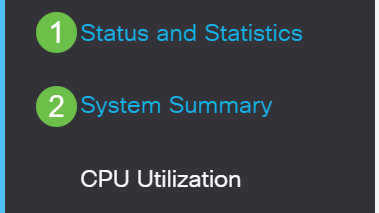
Log in to the switch web-based utility and choose Status and Statistics > System Summary.

Step 2
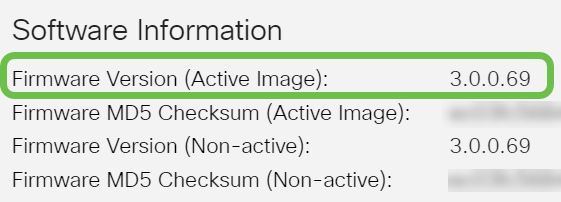
Under the Software Information area, look for the Firmware Version (Active Image). This will determine the version of the firmware the new switch is currently using.

Step 3
Repeat these steps on any of the active switches in the stack and check the firmware version they are using. If the new switch has a different version than the rest of the switches in the stack, you need to upgrade or downgrade it, whichever is needed. To learn how to upgrade the firmware of your switch, click here.
Loaded Configuration
If the new switch already contains configuration settings, it may cause issues the moment you add it to the stack. If you are not sure, it is recommended to reset the switch to set it back to factory default settings before adding it to the stack. To learn how to reset the switch, click here.
Port Statistics and Configuration
If the port on the new switch is not properly configured, it will not work with the stack. Make sure the switch is reset to its factory default settings in order to erase improper configuration so it can be recognized immediately by the stack.
You now should have added a new switch to your existing stack.
Looking for more articles on your CBS350 switch? Check out any of the links below for more information.
Revision History
| Revision | Publish Date | Comments |
|---|---|---|
1.0 |
27-Sep-2021 |
Initial Release |
Contact Cisco
- Open a Support Case

- (Requires a Cisco Service Contract)
 Feedback