Objective
A Virtual Local Area Network (VLAN) allows you to logically segment a Local Area Network (LAN) into different broadcast domains. In scenarios where sensitive data may be broadcast on a network, VLANs can be created to enhance security by designating a broadcast to a specific VLAN. Only users that belong to a VLAN are able to access and manipulate the data on that VLAN. VLANs can also be used to enhance performance by reducing the need to send broadcasts and multicasts to unnecessary destinations.
Networking devices on which multiple protocols are running cannot be grouped to a common VLAN. Non-standard devices are used to pass traffic between different VLANs in order to include the devices participating in a specific protocol. For this reason, the user cannot take advantage of the many features of VLAN.
VLAN groups are used to load balance the traffic on a Layer 2 network. The packets are distributed with respect to different classifications and are assigned to VLANs. Many different classifications exist, and if more than one classification scheme is defined, the packets are assigned to the VLAN in this order:
- Tag — The VLAN number is recognized from the tag.
- MAC-Based VLAN — The VLAN is recognized from the source Media Access Control (MAC)-to-VLAN mapping of the ingress interface. To learn how to configure this feature, click here for instructions.
- Subnet-Based VLAN — The VLAN is recognized from the source IP Subnet-to-VLAN mapping of the ingress interface.
- Protocol-Based VLAN — The VLAN is recognized from the Ethernet type Protocol-to-VLAN mapping of the ingress interface. To learn how to configure this feature, click here for instructions.
- PVID — VLAN is recognized from the port default VLAN ID.
The subnet-based group VLAN classification enable packets to be classified according to their subnet. You can then define subnet-to-VLAN mapping per interface. You can also define several subnet-based VLAN groups, which each group containing different subnets. These groups can be assigned to specific ports or LAGs. Subnet-based VLAN groups cannot contain overlapping ranges of subnets on the same port.
This article provides instructions on how to configure subnet-based groups on a Cisco Business 350 series switch.
Applicable Devices | Software Version
Configure Subnet-Based VLAN Groups on the Switch
Add Subnet-Based VLAN Group
Step 1
Log in to the web-based utility and choose Advanced from the Display Mode drop-down list.

Step 2
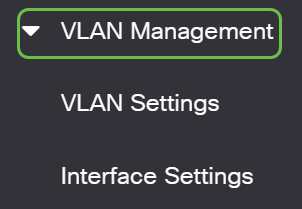
Click VLAN Management.
Step 3
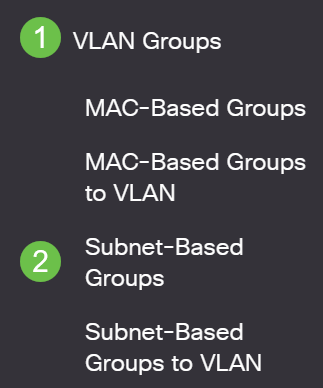
Click VLAN Groups > Subnet-Based Groups.
Step 4
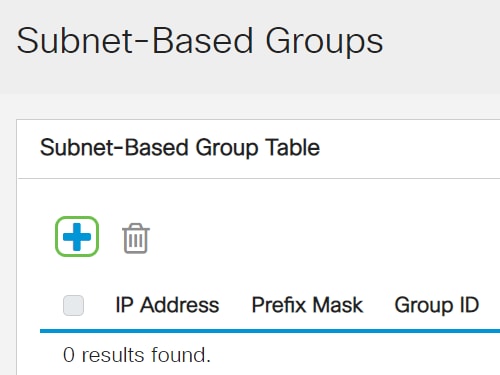
In the Subnet-Based Group Table, click the add icon.
Step 5
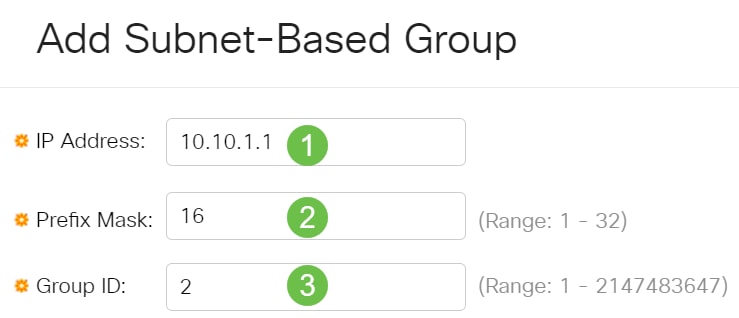
- Enter the IP address to be assigned to a VLAN group in the IP Address field. This is where the subgroup is based.
- Enter the prefix mask that defines the subnet in the Prefix Max field.
- In the Group ID field, enter an ID to identify the subnet-based VLAN group. It is used to identify the subnet-based VLAN group.
Step 6
Click Apply then click Close.

Step 7
Click Save to save settings to the startup configuration file.

You should now have added a subnet-based VLAN group on your switch.
Delete Subnet-Based VLAN Group
Step 1
Choose VLAN Groups > Subnet-Based Groups.

Step 2
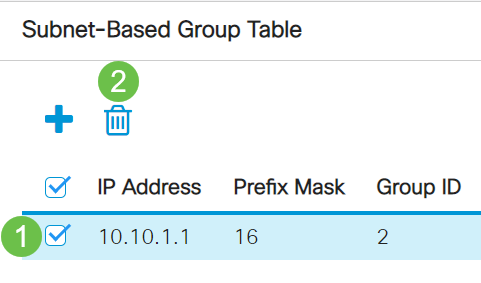
In the Subnet-Based Group Table, check the box next to the subnet-based VLAN group you would like to delete. Click the trash icon to delete the subnet-based VLAN group.
Step 3
Click the save icon to save settings to the startup configuration file.

The subnet-based VLAN group should now have been deleted from your switch.
You should now have configured subnet-based VLAN groups on your switch. To learn how to map subnet-based groups to VLAN, click here for instructions.
Looking for more information on VLANs for your Cisco Business Switches? Check out any of the following links for more information.
Article Skeleton w/ Content
Objective
The subnet-based group VLAN classification enables packets to be classified according to their subnet. You can then define subnet-to-VLAN mapping per interface. You can also define several subnet-based VLAN groups, which each group containing different subnets. These groups can be assigned to specific ports or LAGs. Subnet-based VLAN groups cannot contain overlapping ranges of subnets on the same port.
Forwarding of packets based on their IP subnet requires setting up groups of IP subnets and then mapping these groups to VLANs. This article provides instructions on how to configure subnet-based groups on a switch through the CLI.
Applicable Devices | Software Version
Introduction
A Virtual Local Area Network (VLAN) allows you to logically segment a Local Area Network (LAN) into different broadcast domains. In scenarios where sensitive data may be broadcast on a network, VLANs can be created to enhance security by designating a broadcast to a specific VLAN. Only users that belong to a VLAN are able to access and manipulate the data on that VLAN. VLANs can also be used to enhance performance by reducing the need to send broadcasts and multicasts to unnecessary destinations.
To learn how to configure the VLAN settings on your switch through the web-based utility, click here. For CLI-based instructions, click here.
Networking devices on which multiple protocols are running cannot be grouped to a common VLAN. Non-standard devices are used to pass traffic between different VLANs in order to include the devices participating in a specific protocol. For this reason, you cannot take advantage of the many features of VLAN.
VLAN groups are used to load balance the traffic on a Layer 2 network. The packets are distributed with respect to different classifications and are assigned to VLANs. Many different classifications exist, and if more than one classification scheme is defined, the packets are assigned to the VLAN in this order:
- Tag — The VLAN number is recognized from the tag.
- MAC-based VLAN — The VLAN is recognized from the source Media Access Control (MAC)-to-VLAN mapping of the ingress interface.
- Subnet-based VLAN — The VLAN is recognized from the source Subnet-to-VLAN mapping of the ingress interface.
- Protocol-based VLAN — The VLAN is recognized from the Ethernet type Protocol-to-VLAN mapping of the ingress interface.
- PVID — VLAN is recognized from the port default VLAN ID.
To configure Subnet-based VLAN groups on your switch, follow these guidelines:
1. Create the VLANs. To learn how to configure the VLAN settings on your switch through the web-based utility, click here. For CLI-based instructions, click here.
2. Configure interfaces to VLANs. For instructions on how to assign interfaces to VLANs through the web-based utility of your switch, click here. For CLI-based instructions, click here.
If the interface does not belong to the VLAN, the subnet-based groups to VLAN configuration setting will not take effect.
3. Configure subnet-based VLAN groups. For instructions on how to configure subnet-based VLAN Groups through the web-based utility of your switch, click here.
4. (Optional) You can also configure the following:
MAC-based VLAN Groups Overview — For instructions on how to configure subnet-based VLAN Groups through the web-based utility of your switch, click here. For CLI-based instructions, click here.
Protocol-based VLAN Groups Overview — For instructions on how to configure Protocol-based VLAN Groups through the web-based utility of your switch, click here. For CLI-based instructions, click here.
Configure Subnet-based VLAN Groups on the Switch through the CLI
Create Subnet-based VLAN Group
Step 1
Log in to the switch console. The default username and password is cisco/cisco. If you have configured a new username or password, enter the credentials instead.

The commands may vary depending on the exact model of your switch.
Step 2
From the Privileged EXEC mode of the switch, enter the Global Configuration mode by entering the following:
CBS350#configure
Step 3
In the Global Configuration mode, configure a subnet-based classification rule by entering the following:
CBS350(config)#vlan database
Step 4
To map an IP subnet to a group of IP subnets, enter the following:
CBS350(config)#map subnet [ip-address] [prefix-mask] subnets-group [group-id]
The options are:
- ip-address — Specifies the IP address of the subnet to be mapped to the VLAN group. This IP address cannot be assigned to any other VLAN group.
- prefix-mask — Specifies the prefix of the IP address. Only a section of the IP address is looked at (from left to right) and then placed in a group. The lower the length number, the fewer bits are looked at. This means you can assign a large number of IP addresses to a VLAN group at once.
- group-id — Specifies the group number to be created. Group ID can range from one up to 2147483647.

In this example, the subnet-based VLAN groups 10 and 20 are created. Group 10 filters the first 24 bits or three octets (192.168.100.x), while Group 20 filters the first 16 bits or two octets (192.168.x.x) of the IP address.
Step 5
To exit the Interface Configuration context, enter the following:
CBS350(config)#exit
You should now have configured the subnet-based VLAN groups on your switch through the CLI.
Map Subnet-based VLAN Group to VLAN
Step 1
In the Global Configuration mode, enter the Interface Configuration context by entering the following:
CBS350#[interface-id | range interface-range]
The options are:
- interface-id — Specifies an interface ID to be configured.
- range interface-range — Specifies a list of VLANs. Separate nonconsecutive VLANs with a comma and no spaces. Use a hyphen to designate a range of VLANs.

Step 2
In the Interface Configuration context, use the switchport mode command to configure the VLAN membership mode:
CBS350(config-if)#switchport mode general
- general — The interface can support all functions as defined in the IEEE 802.1q specification. The interface can be a tagged or untagged member of one or more VLANs.
Step 3 (Optional)
To return the port to the default VLAN, enter the following:
CBS350(config-if)#no switchport mode general
Step 4
To configure a subnet-based classification rule, enter the following:
CBS350(config-if)#switchport general map subnets-group [group] vlan [vlan-id]
The options are:
- group — Specifies the subnet-based group ID to filter the traffic through the port. The range is from one up to 2147483647.
- vlan-id — Specifies the VLAN ID to which the traffic from the VLAN group is forwarded. The range is from one to 4094.
In this example, the interface is assigned to subnet-based group 10 which is mapped to VLAN 30.

Step 5
To exit the Interface Configuration context, enter the following:
CBS350(config-if)#exit
Step 6 (Optional)
To remove the classification rule from the port or range of ports, enter the following:
CBS350(config-if)#no switchport general map subnets-groups group
Step 7 (Optional)
Repeat steps 1 to 6 to configure more general ports and assign to the corresponding subnet-based VLAN groups.
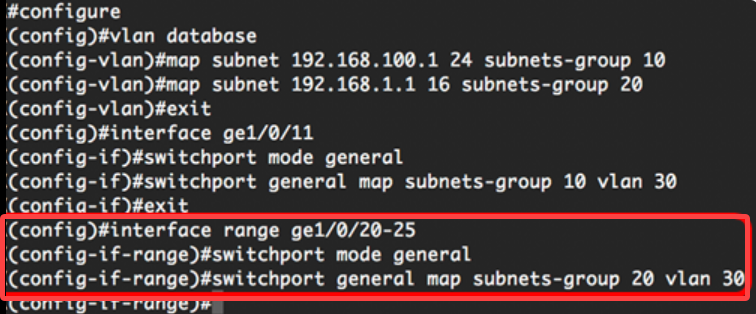
In this example, interfaces that range from ge1/0/20 to 25 are assigned to subnet-based group 20 and assigned to VLAN 30.
Step 8
Enter the end command to go back to the Privileged EXEC mode:
CBS350(config-if-range)#end
You should now have mapped subnet-based VLAN groups to the VLANs on your switch through the CLI.
Show Subnet-based VLAN Groups
Step 1
To display the subnet addresses that belong to the defined subnet-based classification rules, enter the following in the Privileged EXEC mode:
CBS350#show vlan subnets-groups

Step 2 (Optional)
To display the classification rules of a specific port on the VLAN, enter the following:
CBS350#show interfaces switchport [interface-id]
- interface-id — Specifies an interface ID.
Each port mode has its own private configuration. The show interfaces switchport command displays all these configurations, but only the port mode configuration that corresponds to the current port mode displayed in Administrative Mode area is active.
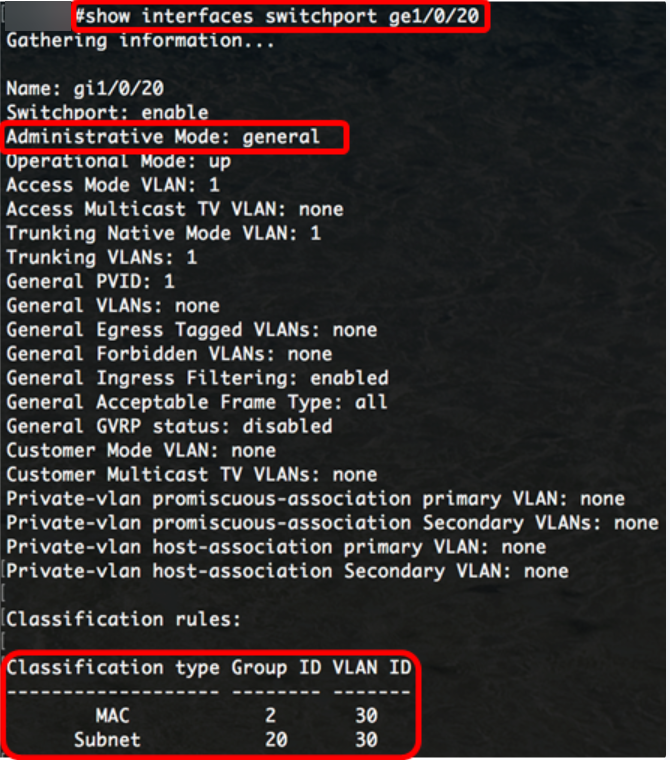
In this example, the administrative and operational statuses of interface ge1/0/20 are displayed. The Classification rules table shows that the interface has been mapped to a MAC-based VLAN Group 2 and Subnet-based VLAN Group 20, and traffic will be forwarded to VLAN 30.
Step 3 (Optional)
In the Privileged EXEC mode of the switch, save the configured settings to the startup configuration file, by entering the following:
CBS350#copy running-config startup-config
Step 4
Press Y for Yes or N for No on your keyboard once the Overwrite file [startup-config]… prompt appears.
You should now have displayed the subnet-based VLAN group and port configuration settings on your switch.
Important: To proceed with configuring the VLAN group settings on your switch, follow the guidelines above.
Looking for more information on VLANs for your Cisco Business Switches? Check out any of the following links for more information.


