LAN Setup on RV016, RV042, RV042G and RV082 VPN Routers
Available Languages
Objective
This document guides you through the setup of Local Area Network (LAN) parameters on RV016, RV042, RV042G and RV082 VPN Routers. LANs are extremely useful since they allow devices to communicate and share resources between each other. This article shows how to configure the router to properly assign itself an Internet Protocol (IP) address, both IPv4 and IPv6, so that it can be recognized by other devices on the network. It also guides you through the creation of subnets, or the creation of multiple networks within the main network of the router. This is useful when you want to logically separate devices in networks.
Applicable Devices
• RV016
• RV042
• RV042G
• RV082
Software Version
• v4.2.1.02
Network Setup
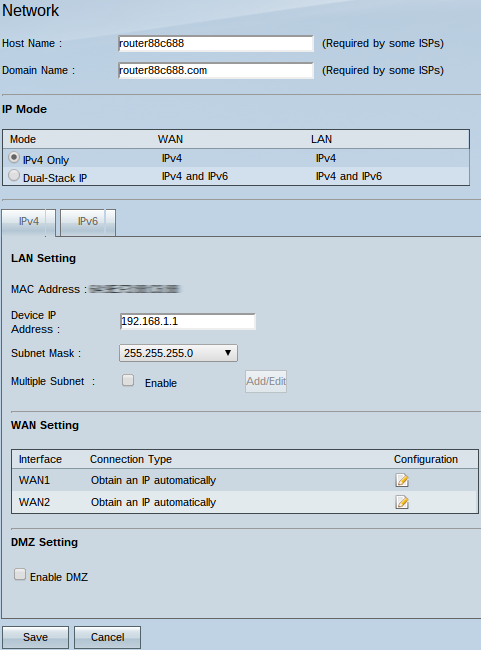
Step 1. Log in to the Router configuration utility and choose Setup > Network. The Network page opens:


Timesaver: Some Internet Service Providers (ISPs) require you to assign a host name and domain name to identify the router on the ISP network. If your ISP does not require these values, skip to Step 4.
Step 2. In the Host Name field enter a new host name. Host names are default or user specified names given to the router to be identifiable on the domain and network of the ISP.
Step 3. In the Domain Name field enter a new domain name. Domain names are default or user specified names given to a router to be identifiable on the ISP network. They link names to IP addresses.

Step 4. Click the IPv4 Only radio button to use only IPv4 addressing on the networks of the router or click the Dual-Stack IP radio button to use both IPv4 and IPv6 addressing on the networks of the router.
Note: Both IPv4 and IPv6 addresses for LAN, WAN, and DMZ settings can be configured only if the Dual-Stack IP radio button in the IP Mode table is clicked
Note: The default LAN settings can be sufficient for small businesses. If the need arises, the IPv4 and IPv6 addresses of the router can be changed.
Note: Multiple subnets can be created only if you click the IPv4 Only radio button in the IP Mode table.
IPv4 LAN Settings

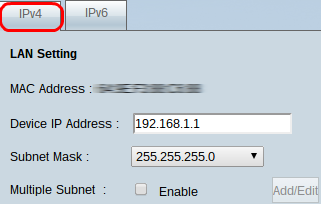
Step 1. To change IPv4 LAN Settings click the IPv4 tab.
Note: The MAC Address field name displays the Media Access Control (MAC) address of the router. It cannot be changed by the user.
Step 2. In the Device IP Address field, enter an IP address for the router. The device IP address is a default or user specified IP address of the router that logically identifies it in a network. The default IP address is 192.168.1.1. If you change the default IP address, the router will log you off and you may have to login again to the newly configured IP address.
Step 3. From the Subnet Mask drop-down list, choose a subnet mask for the router. The default or user specified subnet mask of the router defines which logical subdivision of the network its IP address is in.
Step 4. (Optional) To enable the subnetting features on the router check the Enable box in the Multiple Subnet field. Subnets are useful to logically separate devices that are in the same physical network. By default, the router will not be able to communicate with devices that belong to a different subnet than the router. However, you can enable multiple subnets to allow the router to communicate with devices on different subnets.
Timesaver: If you do not need to add or modify subnets, skip to Step 12.
Step 5. Click Add/Edit to create or modify the subnets. The Multiple Subnet Management window appears.

Step 6. Enter a LAN IP address to add a new subnet in the LAN IP Address field. This IP address is used to access the device from a different subnet.
Step 7. Enter the subnet mask for the new LAN IP in the Subnet Mask field. This identifies how large the subnet is.
Step 8. Click Add to list. The IP address and subnet mask that were entered appear on the list directly below.

Step 9. (Optional) To add a new item to the list click Add New and follow Steps 6 to 8.

Step 10. (Optional) To delete an item on the list, click the item on the list and click Delete.
Step 11. (Optional) To edit an item, click the item on the list and the LAN IP Address field and Subnet Mask field become editable. Modify the entries as required and click Update once finished.
Step 12. Click OK to save changes. The Multiple Subnet Management window closes.
Step 13. (Optional) To undo changes to the list, click Cancel.
Step 14. (Optional) To close the Multiple Subnet Management window without any settings being saved click Close.
Step 15. On the Network page, click Save at the bottom to save all the IPv4 configurations that have been made.
IPv6 LAN Settings
Note: The IPv6 LAN Settings are only available if Dual-Stack IP is enabled as described in Step 4 of the Network Setup section.

Step 1. To change IPv6 LAN Settings, click the IPv6 tab.
Step 2. Enter an IPv6 address in the IPv6 Address field to assign a new IPv6 address to the router. The default or user specified IPv6 address of the router logically identifies it on the IPv6 network.
Step 3. Enter a prefix length in the Prefix Length field to assign a new IPv6 prefix length to the router. The default or user specified prefix length of the IPv6 address of the router defines in which logical subdivision of the IPv6 network the device is currently.
Step 4. Click Save at the bottom of the page to save the IPv6 configurations that have been made.
Revision History
| Revision | Publish Date | Comments |
|---|---|---|
1.0 |
10-Dec-2018 |
Initial Release |
 Feedback