Set Up Dual WAN Connections on RV042, RV042G and RV082 VPN Routers
Available Languages
Objective
A Wide Area Network (WAN) is a network that consists of multiple LANs. The RV router supports a dual WAN feature that allows both WAN ports to be used simultaneously. The WAN connections can also be configured as a failover setup to ensure continuous internet connectivity. To further optimize the dual WAN feature, the RV router uses protocol binding. Protocol binding allows for specific traffic to be sent through a specific WAN port.
This article explains how to configure dual WAN on RV042, RV042G and RV082 VPN Routers.
Applicable Devices
• RV042
• RV042G
• RV082
Software Version
• v4.2.1.02
Setup Dual WAN
Step 1. Log in to the the Router Configuration Utility to choose System Management > Dual WAN. The Dual WAN page opens:
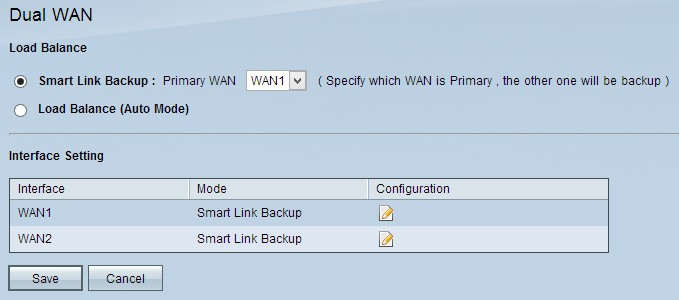
Load Balance
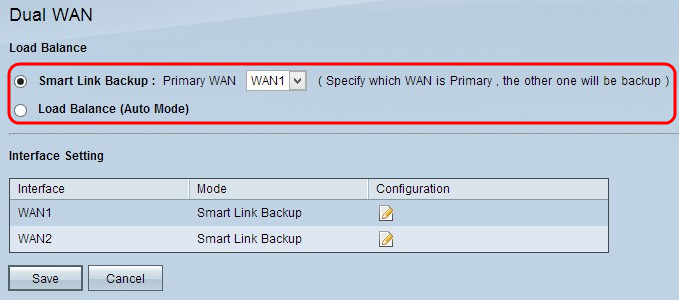
Step 1. Click the appropriate WAN modes to manage the WAN connection.
• Smart Link Backup — This option ensures continuous WAN connectivity on the RV router. If the primary WAN loses connection, the backup WAN takes over. Choose the desired WAN that is designated as the primary WAN from the Primary WAN drop-down list.
• Load Balance — Use both WAN connections simultaneously. This increases the available bandwidth for the RV router.
Step 2. Click Save to save the settings.
Edit the WAN
Note: If you want to know more about maximum bandwidth management refer to Rate Control Bandwidth Management on RV042, RV042G and RV016 VPN Routers for rate control type bandwidth and Priority Bandwidth Management on RV042 and RV042G for Priority type bandwidth.
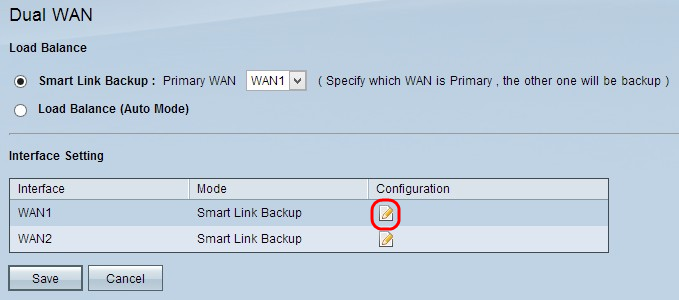
Step 1. Click the Configuration button to edit the appropriate WAN interface to edit the Dual WAN settings. The Dual WAN page opens:
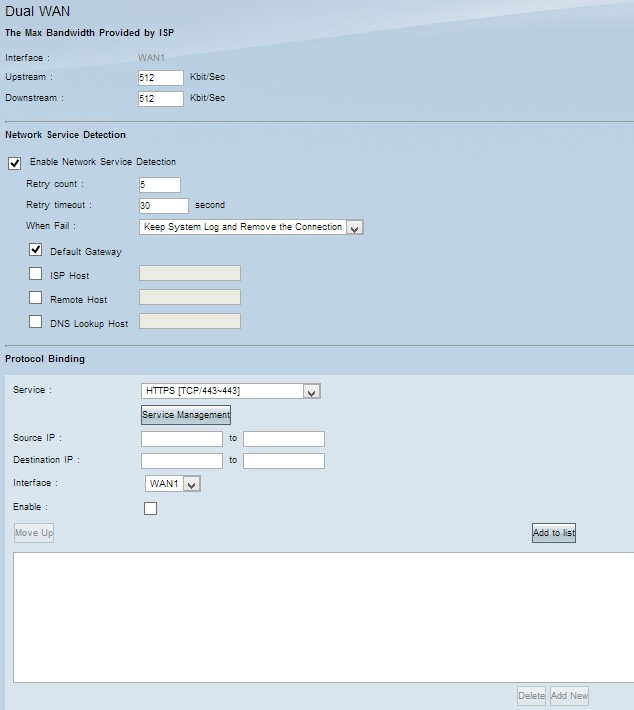
Refer to the following subsections for information about the above window.
• WAN Bandwidth — How to configure bandwidth for a specified WAN interface.
• Network Service Detection — How to perform a ping test to detect WAN connectivity.
• Manage Protocol Binding — How to configure a protocol binding for a specified WAN interface. Protocol bindings determine which WAN interface is used for certain traffic.
WAN Bandwidth

The Interface field displays the interface of the specified WAN.
Step 1. Enter the maximum upload bandwidth in kilobits per second in the Upstream field. Upstream bandwidth is the maximum bandwidth the network sends data to the Internet Service Provider (ISP). The default upstream bandwidth is 512 kbit/sec.
Step 2. Enter the maximum download bandwidth in kilobits per second in the Downstream field. Downstream bandwidth is the maximum bandwidth at which the Internet Service Provider (ISP) sends data to the network. The default downstream bandwidth is 512 kbit/sec.
Step 3. Click Save to save the settings.
Network Service Detection

Step 1. Check Enable Network Service Detection to allow the RV router to detect connectivity. This is performed through a ping test to a configured IP address.
Step 2. Enter the number of times the RV router tries to ping the configured IP address in the Retry Count field. The default value is 5.
Step 3. Enter the time in seconds the RV router waits between pings in the Retry Timeout field. The default time is 30 seconds.
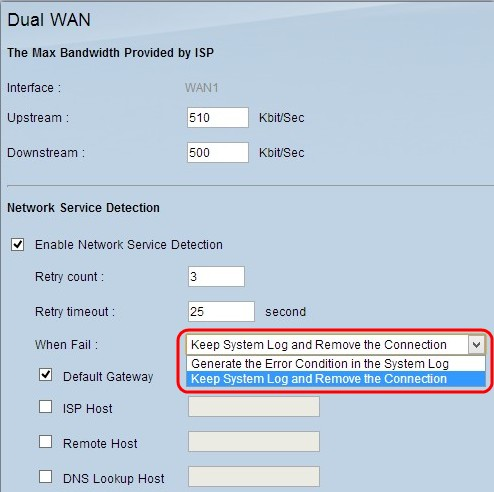
Step 4. From the When Fail drop-down list, choose an action to take place when a ping test fails.
• Keep System Log and Remove the Connection — A failover occurs and the backup WAN interface takes control. The primary WAN resumes control when the connection to the primary WAN is restored.
• Generate the Error Condition in the System Log — A failure is recorded in the system log and no failover takes place.

Step 5. Check the check box of the location that is to be pinged for the ping test.
• Default Gateway — The RV320 pings the configured default gateway.
• ISP Host — Enter the IP of the ISP host for the RV router to ping.
• Remote Host — Enter an IP of a remote host for the RV router to ping.
• DNS Lookup Host — Enter a host name or domain name for the router to ping.
Step 6. Click Save.
Manage Protocol Binding
Protocol Binding is a feature that is used to send specific traffic through a specific WAN interface. Any traffic that matches the type of traffic and is sent from the configured source IP addresses to the configured destination addresses, is sent through the configured WAN interface of the protocol binding rule. Protocol Binding is only available if the dual WAN mode is configured as load balance.
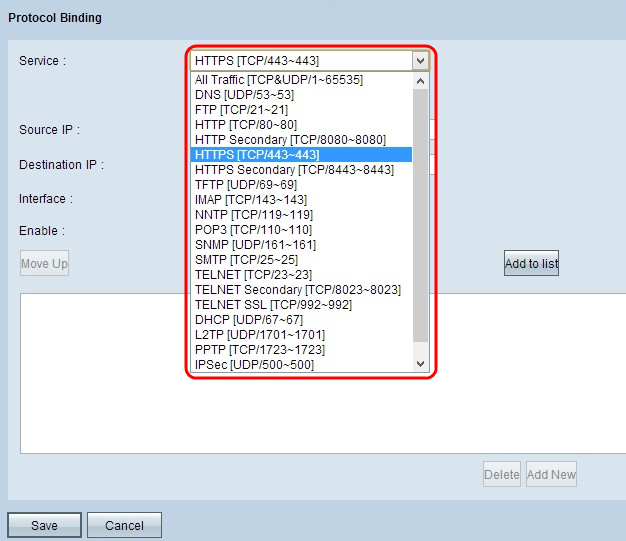
Step 1. From the Service drop-down list, choose the type of traffic that applies to the protocol binding.
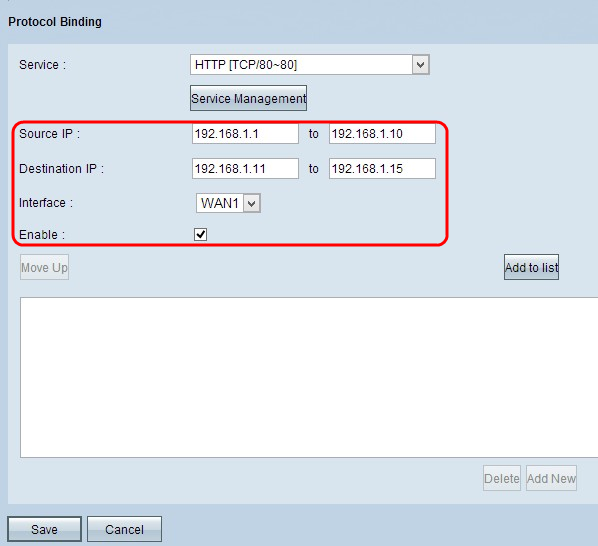
Step 2. Enter the source IP addresses that applies to the protocol binding in the Source IP field.
Step 3. Enter the destination IP address that applies to the protocol binding in the Destination IP field.
Step 4. From the Interface drop-down list, choose the interface that the traffic go through.
Step 5. Check the check box in the Enable field to enable the protocol binding.
Note: Click Service Management to add a service. To know more on how to add a service refer to Service Management section.
Step 6. Click Add to List to add in the table.
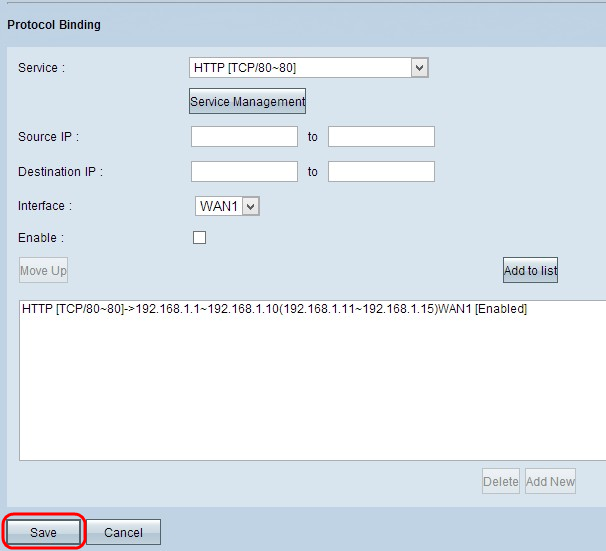
Step 7. Click Save. The protocol binding settings are configured.
Edit Protocol Binding

Step 1. Click the protocol binding which you want to edit from the table and change the necessary information. To know more on how to update, refer to Add the Protocol Binding section.
Step 2. Click Update to edit the protocol binding.
Step 3. Click Save. The protocol binding configuration is updated.
Delete Protocol Binding
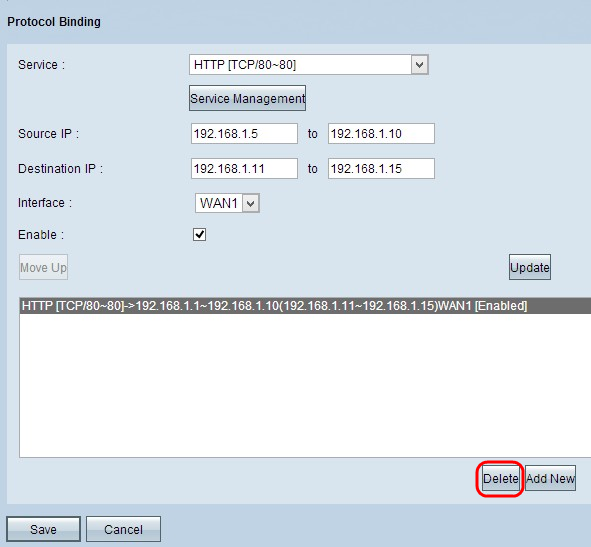
Step 1. Click the protocol binding which you want to delete from the table.
Step 2. Click Delete in the Protocol Binding Table.
Step 3. Click Save. The protocol binding configuration is deleted.
Service Management
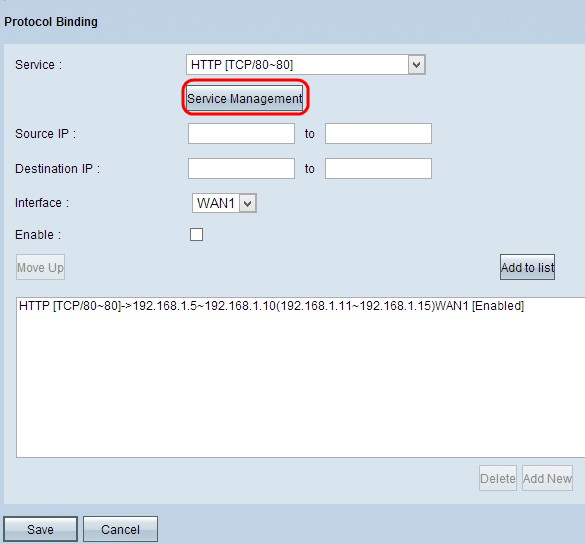
Step 1. Click Service Management. The Service Management window appears.
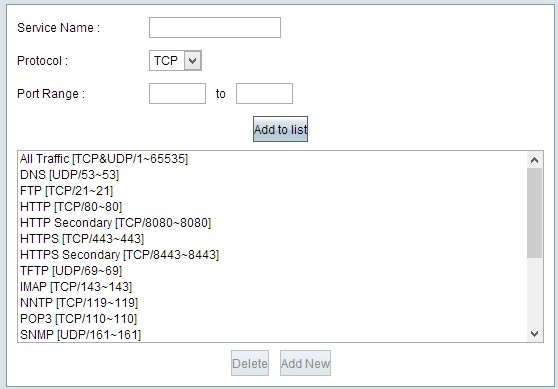

Step 2. Enter a name for the service in the Service Name field.
Step 3. From the protocol drop-down list, choose the protocol that the service uses.
• TCP — The service forwards Transmission Control Protocol (TCP) packets.
• UDP — The service forwards User Datagram Protocol (UDP) packets.
• IPv6 — The service forwards all IPv6 traffic.
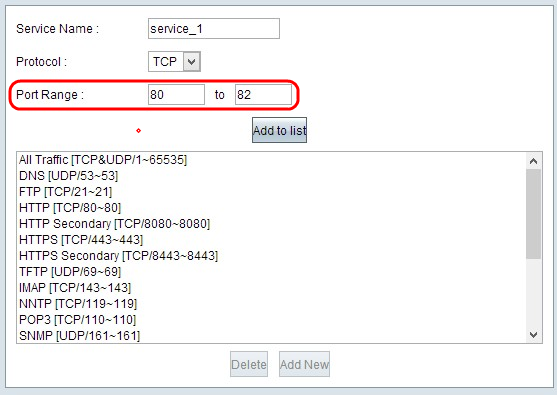
Step 4. If the protocol is either TCP or UDP, enter the range of ports that is reserved for the service in the Port Range field.
Step 5. Click Add to List. The service is saved to the Service Management Table.
Step 6. (Optional) Click the the service you want to edit, edit the necessary information, and click Save. To know more on how to edit, follow the previous steps.
Step 7. (Optional) Click the the service you want to delete and click Delete.
Revision History
| Revision | Publish Date | Comments |
|---|---|---|
1.0 |
10-Dec-2018 |
Initial Release |
 Feedback