IPv4 Static Routing Configuration on RV016, RV042, RV042G, and RV082 VPN Routers
Available Languages
Objective
Static Routing is a manually configured pathway a packet must travel on to reach a destination. If there is an absence of communication between routers regarding the current topology of the network, static routes can be configured to establish direct communication between the routers. Static Routes use less network resources than dynamic routing because it does not have to constantly calculate the next route to take. A static route creates a fixed path a packet must travel on between routers. This article explains how to configure static routing settings on the RV016, RV042, RV042G, and RV082 VPN Routers.
Applicable Devices
- RV016
- RV042
- RV042G
- RV082
Software Version
- v4.2.1.02
Static Routing Configuration
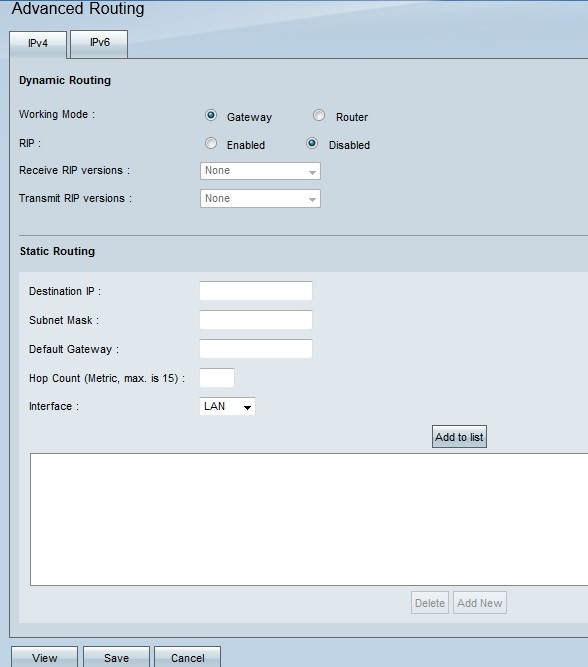
Step 1. Log in to the Router configuration utility and choose Setup > Advanced Routing . The Advanced Routing page opens:


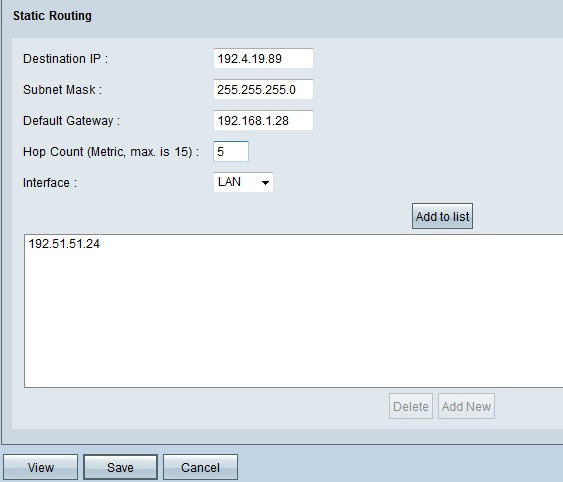
Step 2. Enter the destination address in the Destination IP field. The destination IP address is the address to which you want to assign a static route to.
Step 3. Enter the subnet mask of the destination address in the Subnet Mask field. The subnet mask specifies which portion of an IP address is the network address and which portion is the host address.
Step 4. Enter the IP address of the gateway in the Default Gateway field. The gateway allows for contact between the wired router and the specified network. A gateway is bridge between two different networks that allows communication with each other.
Step 5. Enter the number of hops in the Hop Count field. Every time a data packet passes through a node of network device, it has made one hop towards its destination. The hop count refers to the number of hops a data packet has made from its source to its destination.
Step 6. Choose the interface to use for this static route from the Interface drop-down list.
- WAN1, WAN2 - If router provides Internet connectivity for your network.
- LAN - If router gets Internet connectivity from a gateway router on your LAN.
Step 7. Click Add to List to add the configured static route to the list. You can enter up to 30.

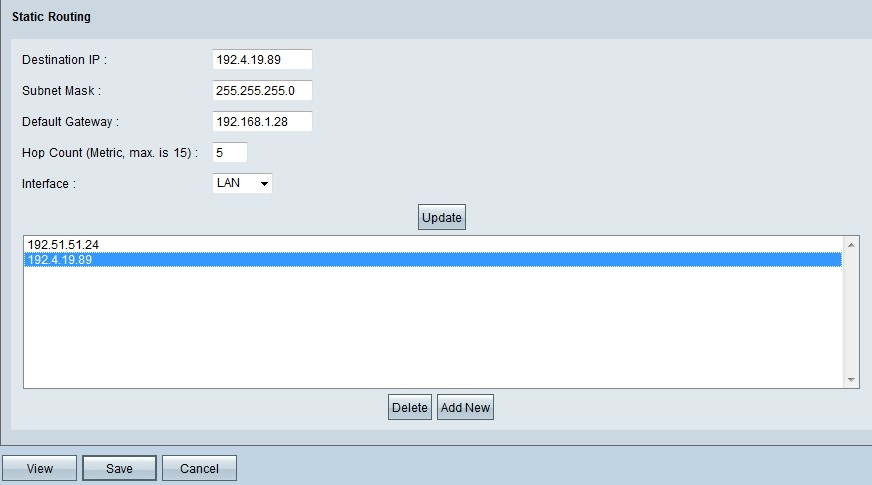
Step 8. (Optional) If you want to update the static route, then choose the route from the route list, update the desired fields, and click Update.
Step 9. (Optional) If you want to delete a static route from the static route list, choose the route from the list and click Delete.
Step 10. (Optional) To add another new static route to the list click Add New. If you want to add a new static route, follow Steps 2 through 6.
Step 11. Click Save to save your configuration.
You have now successfully configured static routing settings on the RV016, RV042, RV042G, and RV082 VPN routers.
Revision History
| Revision | Publish Date | Comments |
|---|---|---|
1.0 |
10-Dec-2018 |
Initial Release |
 Feedback