Configuration of Advanced IPv6 Routing on RV016, RV042, RV042G and RV082 VPN Routers
Available Languages
Objective
Advanced routing provides the flexibility to view the routing information as well as configuring static and dynamic routing. Static routing provides network routing through fixed paths which are configured manually. Static routes are the simplest, but require caution as they are configured manually. Dynamic routing provides network routing by software applications which learn the network destinations dynamically and advertise the information to the other routers.
This document explains how to set up advanced IPv6 routing in order to configure dynamic and static routing settings on RV016, RV042, RV042G and RV082 VPN Routers.
Applicable Devices
• RV016
• RV042
• RV042G
• RV082
Software Version
• v4.2.1.02
Enable IPv6 Routing
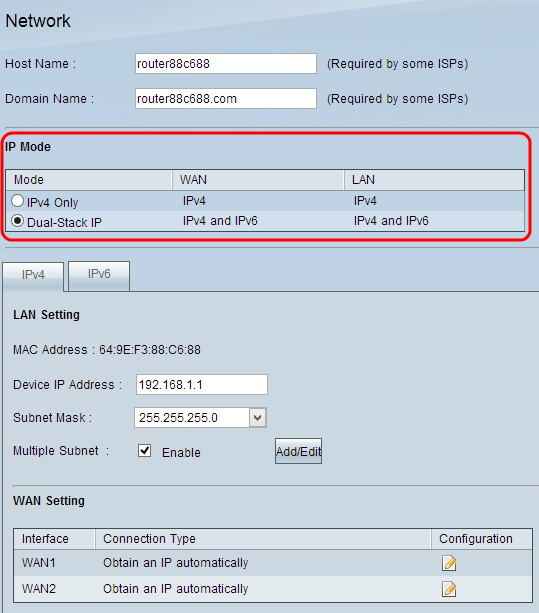
Step 1. Log in to web configuration utility and choose Setup > Network. The Network page opens:

Step 2. Click the Dual-Stack IP radio button in the IP Mode area to configure IPv6 routing.
Step 3. Scroll down and click Save to save the settings.
Configure Advanced IPv6 Routing
Step 1. Log in to Router Configuration Utility and choose Setup > Advanced Routing. The Advanced Routing page opens:

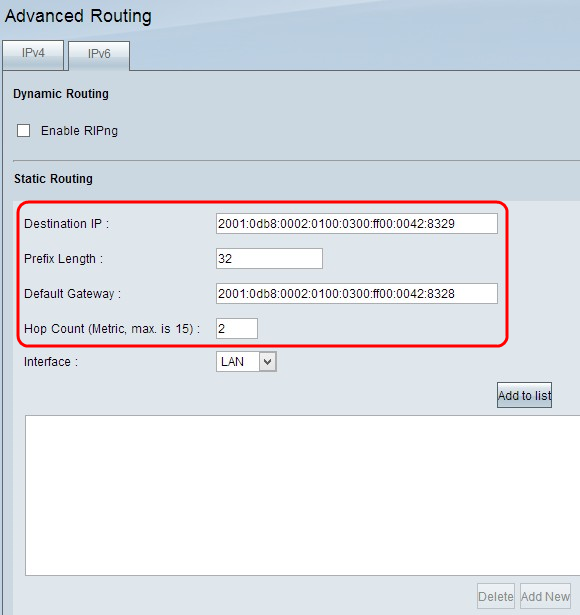
Step 2. Click the IPv6 tab. The IPv6 Advanced Routing page opens:

Configure Dynamic Advanced IPv6 Routing
Dynamic routing allows the router to calculate the best route between the source and destination automatically. It also allows the router to adjust the routing table automatically if any change occurs.

Step 1. Check the Enable RIPng check box if you want to enable Dynamic Routing on the device. Routing Information Protocol (RIP) is a dynamic routing protocol that allows the router to automatically broadcast its routing information with other routers to calculate the best path between the source and destination and to adjust the routing table if any change occurs.
Step 2. Scroll down and click Save to save the settings.
Configure Static Advanced IPv6 Routing
Static routing is a powerful and advanced feature that allows you to manually add the routing path in the routing table. Routers that use static routing cannot change their routing table automatically even if a change occurs without manual involvement. Static routes should be configured and maintained by the network administrator. It is usually used to configure stub network and default routes. You can add up to 30 static routes.

Step 1. Enter the destination IPv6 address of the remote LAN in the Destination IP Address field.
Step 2. Enter the Prefix length of the destination IP address in the Prefix field.
Step 3. Enter the router IP address for which the specific static route is configured in the Default Gateway field.
Step 4. Enter the number of routers or nodes that the traffic passes to reach the destination in the Hop Count field. The maximum hop count is 15.

Step 5. Choose the appropriate interface from the interface drop-down list for which the static route is configured.
• LAN — The static route configured router gets the Internet connection from a LAN connected gateway router.
• WAN 1 — The static route configured router connects with other networks through the Internet connection.
• WAN 2 — The static route configured router connects with other networks through the secure Internet connection.
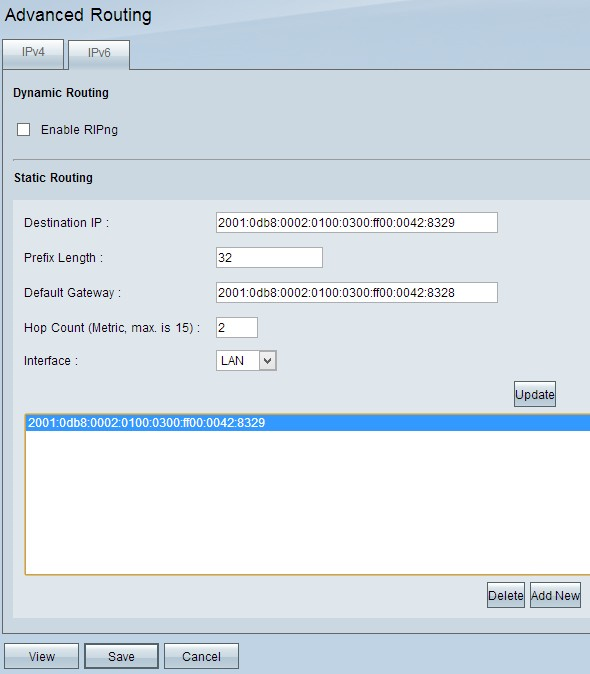
Step 6. Click Add to List. The new entry is added to the table.

Step 7.(Optional) To delete a static route from the list, click the respective static route and click Delete.
Step 8. (Optional) To edit the static route, click the respective static route to select it and then click Update to edit information.
Step 9. (Optional) To add a new entry, click Add New and follow the previous steps.
Step 10. Scroll down and click Save to save the settings.
Revision History
| Revision | Publish Date | Comments |
|---|---|---|
1.0 |
10-Dec-2018 |
Initial Release |
 Feedback