Configure an Internet Protocol (IP) Address Group on the RV34x Series Router
Available Languages
Objective
An Internet Protocol (IP) Address Group is a feature of the RV34x Series Router that allows an administrator to group IP addresses based on IP version. This supports other functions on the router such as Web Filtering and Application Control. By using this feature, this allows an administrator to further regulate access to resources on the Internet.
The objective of this document is to show you how to configure an IP Address Group on the RV34x Series Router.
Applicable Devices
- RV34x Series
Software Version
- 1.0.01.16
Add an IP Address Group
IPv4-based IP Address Group
Step 1. Log in to web-based utility of the router and choose System Configuration > IP Address Group.

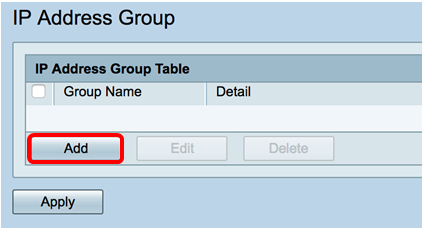
Step 2. In the IP Address Group Table, click Add to create an entry.

Step 3. In the Add/Edit IP Address Group window that appears, enter a name that will easily identify the group in the Group Name field. The field only accepts alphanumeric characters and underscores (_) for special characters.
Note: In this example, Stoneroses_grp1 is used.

Step 4. In the IP Address Group Table, click Add to create an entry.

Step 5. From the Protocol drop-down menu, choose an Internet Protocol. The options are:
- IPv4 — Internet Protocol version 4 (IPv4) is a 32-bit (4-byte) address. If you chose this, continue to Step 6.
- IPv6 — A successor to IPv4, consists of a 128-bit (8-byte) address. If you chose this, skip to the IPv6-based IP Address Group configuration area.

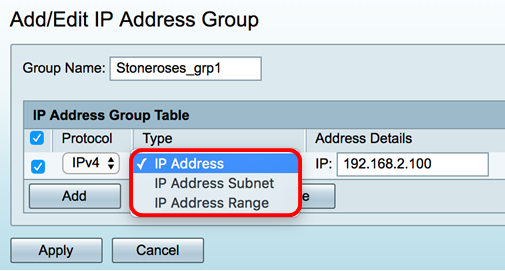
Step 6. Choose a type which the IPv4 will use to create a pool of IP addresses. The options are:
- IP Address — The IP address group uses a single IP address. If this is chosen, skip to Step 7.
- IP Address Subnet — A portion of a network that shares a particular subnet address. If this is chosen, skip to Step 8.
- IP Address Range — Enter a range of host IP addresses within the same subnetwork. If this is chosen, skip to Step 9.
Note: In this example, IP Address is used.

Step 7. If you chose IP Address, enter an IP address you want to assign to the group in the IP field.
Note: In this example, 192.168.2.100 is used.

Step 8. If you chose IP Address subnet, enter an IP address and subnet mask in their respective fields.
Note: In this example, 192.168.2.102 is used as the IP address and 255.255.255.0 for the subnet mask.

Step 9. If you chose IP Address Range in Step 6, enter a range of IP addresses in the respective Start and End fields.
Note: In this example, 192.168.1.124 is used as the Start IP address and 192.168.1.152 as the End address.

Step 10. Click Apply.

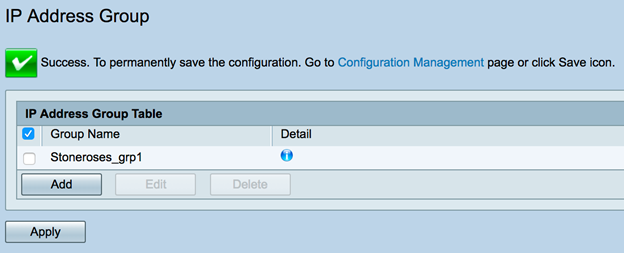
You will be redirected to the main IP Address Group page.
Step 11. Click Apply.

You should now have successfully configured an IPv4-based IP Address Group on the RV34x Series Router.

IPv6-based IP Address Group
Step 1. Choose a type which IPv6 will use to form an address group. The options are:
- IP Address — The IP address group uses a single IPv6 address. If this is chosen, skip to Step 2.
- IP Address Subnet — A portion of a network that shares a particular subnet address. If this is chosen, skip to Step 3.
- IP Address Range — Enter a range of host IPv6 addresses within the same subnetwork. If this is chosen, skip to Step 4.
Note: In this example, IP Address is chosen.

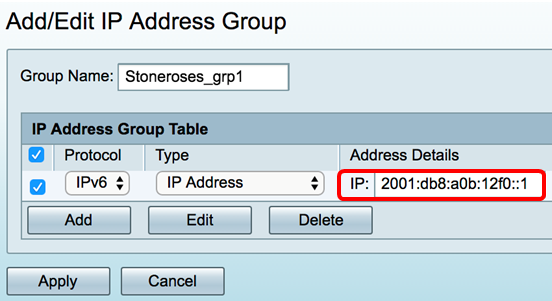
Step 2. If you chose IP Address, enter an IPv6 address you want to assign to the group in the IP field.
Note: In this example, 2001:db8:a0b:12f0::1 is used as the IP address.

Step 3. If you chose IP Address subnet, enter an IPv6 address and the prefix-length in their respective fields.
Note: In this example, the IPv6 address is 2001:db8:a0b:12f0::1 and the prefix-length is 96.

Step 4. If you chose IP Address Range in Step 1, enter a range of host IPv6 addresses in the respective Start and End fields.
Note: In this example, the Start address is 2001:db8:a0b:12f0::1 and the End address is 2001:db8:a0b:12f0::7.

Step 5. Click Apply.

You will be taken back to the main IP Address Group page.
Step 6. Click Apply.

You should now have successfully configured the IPv6-based IP Address Group on the RV34x Series Router.

 Feedback