Configure Group Policies on the RV34x Series Router
Available Languages
Objective
A group policy is a set of user-oriented attribute or value pairs for Internet Protocol Security (IPSec) connections that are stored either internally (locally) on the device or externally on a Remote Authentication Dial-In User Service (RADIUS) or Lightweight Directory Access Protocol (LDAP) server. A tunnel group uses a group policy that sets terms for Virtual Private Network (VPN) user connections after the tunnel is established.
Group policies let you apply whole sets of attributes to a user or a group of users, rather than having to specify each attribute individually for each user. You can also modify the group-policy attributes for a specific user.
The objective of this document is to show you how to configure Group Policies on the RV34x VPN Router Series.
Applicable Devices
- RV34x Series
Software Version
- 1.0.01.16
Configure Group Policies
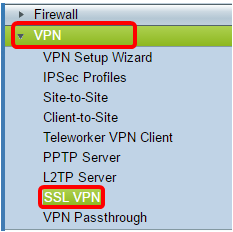
Step 1. Log in to the router web-based utility and choose VPN > SSL VPN.

Step 2. Under the SSL VPN area, click the Group Policies tab.

Step 3. Click the Add button under the SSL VPN Group Table to add a group policy.

Note: The SSL VPN Group table will show the list of group policies on the device. You can also edit the first group policy on the list, which is named SSLVPNDefaultPolicy. This is the default policy supplied by the device.
Step 4. Enter your preferred policy name in the Policy Name field.

Note: In this example, Group 1 Policy is used.
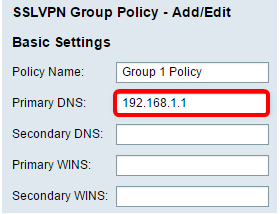
Step 5. Enter the IP address of the Primary DNS in the field provided. By default, this IP address is already supplied.

Note: In this example, 192.168.1.1 is used.
Step 6. (Optional) Enter the IP address of the Secondary DNS in the field provided. This will serve as a backup in case the primary DNS failed.

Note: In this example, 192.168.1.2 is used.
Step 7. (Optional) Enter the IP address of the primary WINS in the field provided.

Note: In this example, 192.168.1.1 is used.
Step 8. (Optional) Enter the IP address of the secondary WINS in the field provided.

Note: In this example, 192.168.1.2 is used.
Step 9. (Optional) Enter a description of the policy in the Description field.

Note: In this example, Group Policy with split tunnel is used.
Step 10. (Optional) Click on a radio button to choose the IE Proxy Policy to enable Microsoft Internet Explorer (MSIE) proxy settings to establish VPN tunnel. The options are:
- None — Allows the browser to use no proxy settings.
- Auto — Allows the browser to automatically detect the proxy settings.
- Bypass-local — Allows the browser to bypass the proxy settings that are configured on the remote user.
- Disabled — Disables the MSIE proxy settings.

Note: In this example, Disabled is chosen. This is the default setting.
Step 11. (Optional) In the Split Tunneling Settings area, check the Enable Split Tunneling check box to allow Internet destined traffic to be sent unencrypted directly to the Internet. Full Tunneling sends all traffic to the end device where it is then routed to destination resources, eliminating the corporate network from the path for web access.

Step 12. (Optional) Click on a radio button to choose whether to include or exclude traffic when applying the split tunneling.

Note: In this example, Include Traffic is chosen.
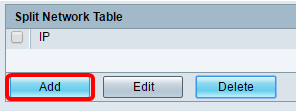
Step 13. In the Split Network Table, click the Add button to add split Network exception.

Step 14. Enter the IP address of the network in the field provided.

Note: In this example, 192.168.1.0 is used.
Step 15. In the Split DNS Table, click the Add button to add split DNS exception.

Step 16. Enter the Domain name in the field provided.

Note: In this example, Policy.com is used.
Step 17. Click Apply.

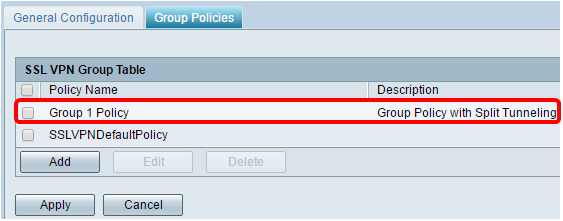
After the settings have been successfully saved, you will then be redirected to the SSL VPN Group Table showing the newly-added Group Policy.

You should now have successfully configured group policies on the RV34x Series Router.
If you would like to view the Easy Setup Guide for the RV340. click here.
If you would like to view the Administration Guide for the RV340. click here. The group policies information is located on page 93.
 Feedback