Configure Email Settings on the RV34x Series Router
Available Languages
Objective
A network administrator can be alerted of events on the network through email notifications. This improves the way the networks are monitored. The RV34x Series Router can be configured to generate real-time email notifications to inform you about selected network events such as changes in network settings, device status, and other updates on devices connected to the network.
This document aims to show you how to configure the email settings on the RV34x Series Router.
Applicable Devices
- RV34x Series
Software Version
- 1.0.00.33
Configure Email Settings
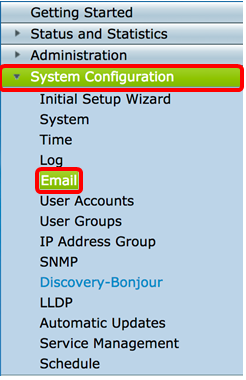
Step 1. Log in to the web-based utility and choose System Configuration > Email.
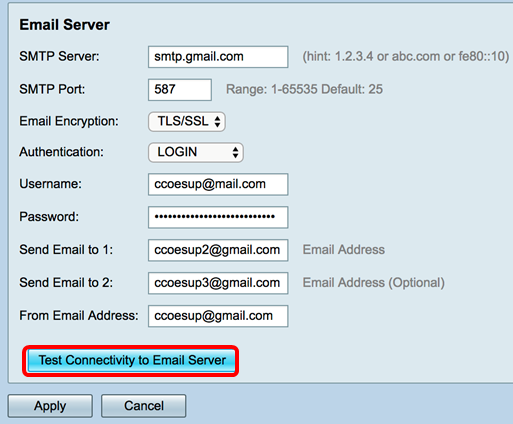
Step 2. In the SMTP Server field, enter the address of the SMTP server.
Note: For this example, smtp.gmail.com is used.

Step 3. Enter the port number of the mail server in the SMTP Port field. It is an outbound port number used to send emails. The valid port number range is from 0 to 65535 and the default value is 25.
Note: For this example, SMTP port number 587 is used since it is the SMTP port for gmail.

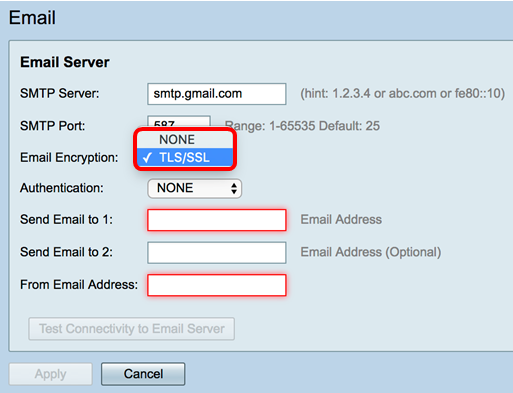
Step 4. From the Email Encryption drop-down list, select an encryption method to send messages to your email. It is important that the encryption method also matches the SMTP port.
The options are:
- NONE — No encryption will be used in the emails. This is the default.
- TLS/SSL — A combined option for Transport Layer Security (TLS) and Secure Sockets Layer (SSL). TLS is a cryptographic protocol that provides security and data integrity for communication over the Internet. This encryption uses SMTP Port 587. SSL is a standard security technology for creating an encrypted link between a web server and a browser. This encryption uses SMTP port 465. When this option is chosen, the port will match itself to either protocol.
Step 5. From the Authentication drop-down list, choose how you want to authenticate the access to your email.
The options are:
- NONE — No Username and Password authentication are required. If you choose this option, skip to Step 8.
- LOGIN — Username and Password are used for authentication.
- PLAINTEXT — Unencrypted but still requires Username and Password.
- MD5 — Message-Digest Algorithm 5 uses a 128-bit hash value for authentication that requires Username and Password.
Note: For this example, LOGIN is used.

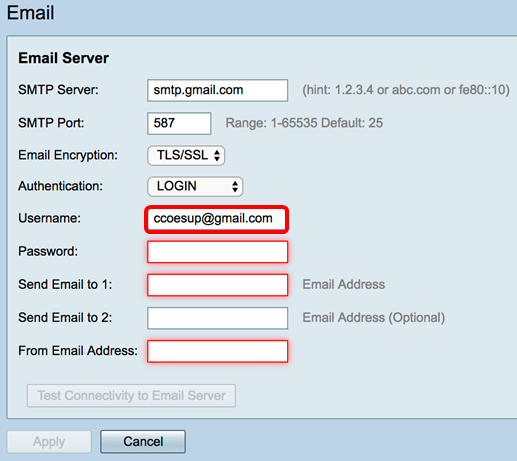
Step 6. If LOGIN, PLAINTEXT, or MD5 was chosen in Step 5, enter a Username in the Username field. This would be the sending email address.
Note: In this example, ccoesup@gmail.com is used.
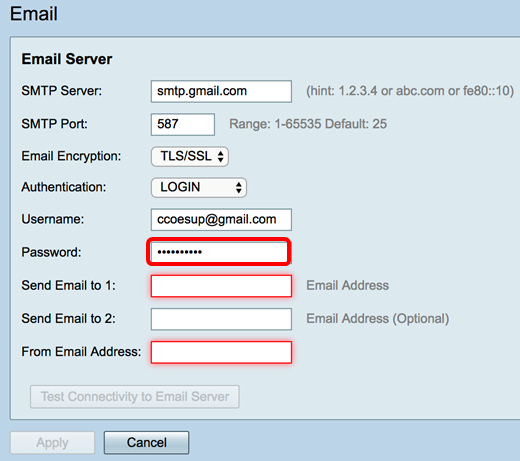
Step 7. Enter the corresponding password of your username in the Password field.
Note: It is highly recommended to use a separate email account instead of using your personal email to maintain privacy.
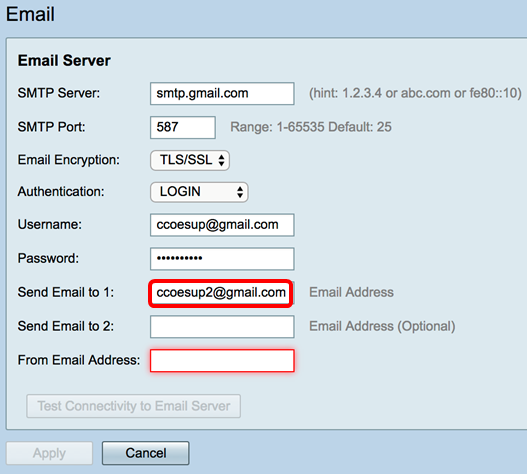
Step 8. Enter an email address in the Send Email to 1 field. The address is the recipient of the email syslogs. Email syslogs on the router has to be enabled to receive email notifications. To learn how to configure the log settings on the RV34x Router Series, click here.
Note: It is highly recommended to use a separate email account instead of using your personal email to maintain privacy. In this example, ccoesup2@gmail.com is used as an example.
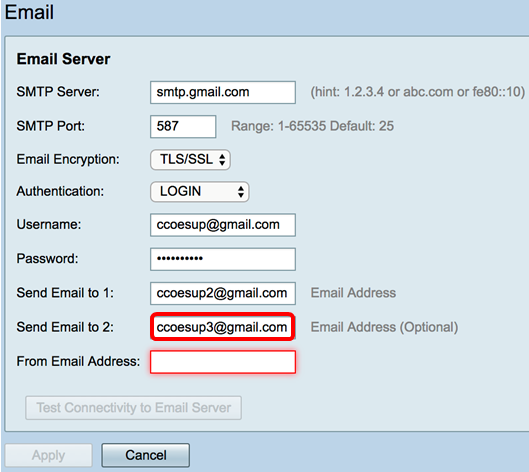
Step 9. (Optional) Enter a secondary email address in the Send Email to 2 field.
Note: For this example, ccoesup3@gmail.com is used.
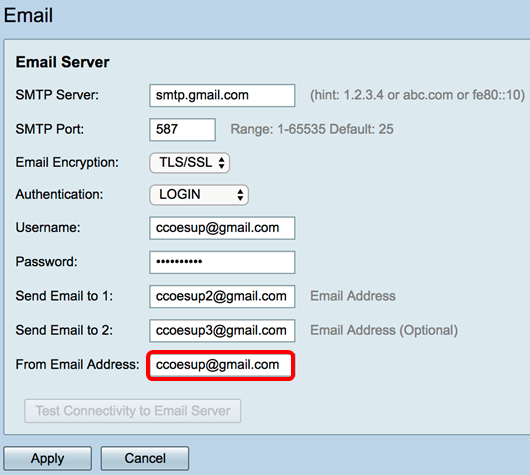
Step 10. In the From Email Address field enter the email address to send from which the entered Username and Password authentication are for.
Note: In this example, ccoesup@gmail.com is used.
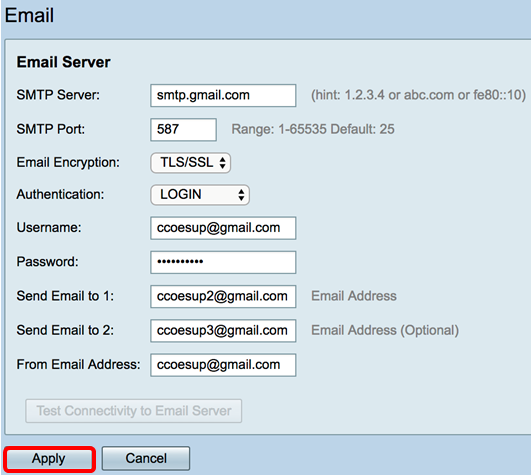
Step 11. Click Apply.
Step 12. To test the connectivity to the email server, click on the Test Connectivity to Email Server button.
Note: A green text will appear beside the Test Connectivity to Email Server button informing you that the test was a success.
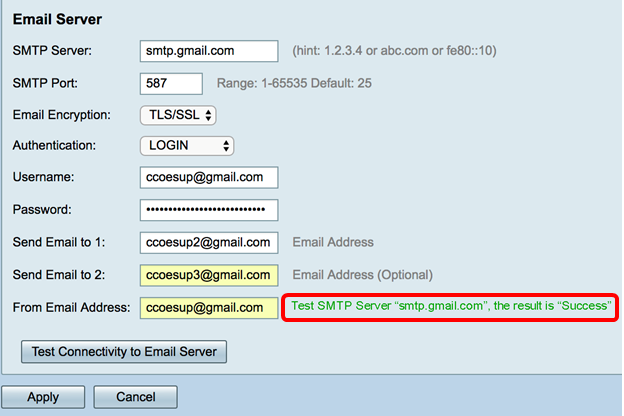
You should now have successfully configured the Email settings on the RV34x Series Router.
 Feedback